• Skip to primary navigation
  • Skip to main content
  • Skip to primary sidebar

Galaxy S10 Guides

a owners-help-owners community of Samsung Galaxy S10, S10+ and S10e

  • Home
    • About Galaxy S10 Guides
    • Contact Us
  • New Features
    • Top 10 new features in Android 10 update for Galaxy S10
    • Top 5 new features added in Galaxy S10 September Update
    • Top 10 new features of Galaxy S10
    • Top 10 disappointing or missing features of Galaxy S10
    • How to use the new fingerprint reader to unlock Galaxy S10, Note 10, S20, Note 20, S21, and S22?
    • How to use Galaxy S10 wireless PowerShare to charge other devices?
    • How to use Galaxy S10 home screen landscape mode for Home screen and lock screen?
    • Specifications of Samsung Galaxy S10, S10 Plus, S10e, and S10 5G
    • How to use Galaxy S10 camera night mode?
    • How to use Galaxy S10 night mode?
  • How-to Guides
    • Top 10 new features in Android 10 update for Galaxy S10
      • Top 5 new features added in Galaxy S10 September Update
    • How to charge Galaxy S10 battery?
      • How to use Galaxy S10 wireless PowerShare to charge other devices?
      • Galaxy S10 wireless charging guide
    • Galaxy S10 SIM card guide
      • How to use two SIM cards on Galaxy S10, S10+, S10e, S20, S20+, and S20 Ultra?
    • Meaning of Galaxy S10 status icons and notification icons
      • How to disable or customize the notification icons in the Galaxy S10 status bar?
      • How to enable and use Galaxy S10 developer options?
    • How to use Galaxy S10 Settings?
      • How to use Galaxy S10 quick setting buttons?
      • How to use Galaxy S10 screen zoom?
      • How to use Galaxy S10 edge screen?
      • How to use Galaxy S10 night mode?
      • How to move apps to the micro SD card to free phone storage on Galaxy S10 ?
    • How to take screenshots on Galaxy S10 without using any apps?
    • How to use and customize Galaxy S10 lock screen?
      • How to use Galaxy S10 home screen landscape mode for Home screen and lock screen?
      • How to Use Galaxy S10 Always On Display (AOD)?
    • Galaxy S10 layout (layout of Galaxy S10, S10 Plus, and S10e)
      • How to use Galaxy S10 touchscreen gestures on Galaxy S10, S10+, and S10e?
      • How to use the new fingerprint reader to unlock Galaxy S10, Note 10, S20, Note 20, S21, and S22?
      • How to power on, power off, and reboot Galaxy S10 even when the phone hangs?
    • Understand Galaxy S10 Home Screen
      • How to use Galaxy S10 navigation buttons and navigation gestures?
      • How to hide Bixby Home from Galaxy S10 Home Screen?
      • How to use Galaxy S10 virtual bezel to hide the front camera cutout without using any apps?
      • How to use Galaxy S10 home screen edit mode?
      • How to use Galaxy S10 Apps screen?
      • How to use app folders on Galaxy S10 Home screen and Apps screen?
    • Unbox Galaxy S10: understand Galaxy S10 box contents
      • How to use Samsung Smart Switch to migrate to Galaxy S10?
      • How to hide suggested apps on Galaxy S10? and how to stop Finder uploading your data to Samsung servers?
    • Galaxy S10 camera settings explained
      • How to set photo size on Galaxy S10, S10e, S10 5G, and S10+?
      • How to avoid mirrored photos with Galaxy S10 front camera?
      • How to use Galaxy S10 camera night mode?
  • Camera Guide
    • How to use Galaxy S10 Camera app?
    • Galaxy S10 camera settings explained
    • How to set photo size on Galaxy S10, S10e, S10 5G, and S10+?
    • How to use Galaxy S10 camera night mode?
    • How to avoid mirrored photos with Galaxy S10 front camera?
    • How to use 5 shooting methods for Galaxy S10 camera?
  • User Manual
  • Accessories Guide
    • How To Use Galaxy S10 LED View Cover (Galaxy S10 LED Wallet Cover)?
    • How to use Galaxy S10 LED cover (Galaxy S10 LED back cover)?
    • How to use Galaxy S10 clear view cover (S-View flip cover)?
    • Galaxy S10 wireless charging guide

Galaxy S10 layout

How to power on, power off, and reboot Galaxy S10 even when the phone hangs?

simon · 10 Comments

power on, power off, and reboot Galaxy S10 even when the phone hangsWhen Galaxy S10 hangs, you can hold the Power button AND the volume down button for more than 7 seconds to reboot the phone forcefully.

There are a few other combinations of keys (buttons) that you may need to know to power off, power on, reboot, reboot into recovery mode, or reboot into download mode on Galaxy S10, S10+, S10e, and S10 5G.

This Galaxy S10 how-to guide explains how to reboot Galaxy S10 when the phone hangs, and other key combinations for powering on, powering off and rebooting Galaxy S10 (including all 4 Galaxy S10 models).

How to reboot Galaxy S10 when the phone hangs?

Although it happens rarely, Galaxy S10 may hang (not responsive), just like other electronic devices or other Android phones.

If this happens to your Galaxy S10, you may also find the phone does not respond to the power button as well.

Up to Galaxy S5, Samsung used a removable battery in their phones and you can remove the battery to force a reboot.

But since Galaxy S6, Samsung has switched to non-removable batteries. And therefore, the battery removing method is not working for Galaxy S10.

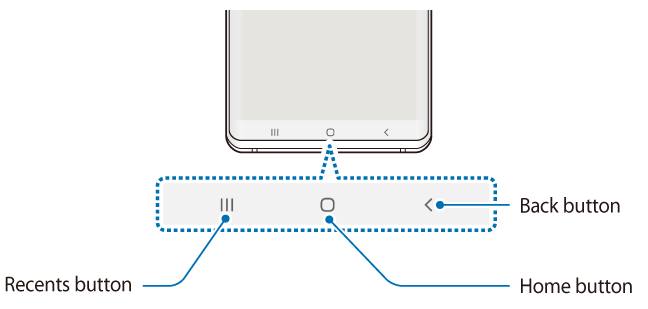
So, when Galaxy S10 hangs (even not responsive to the power button), you can hold the Power button and the volume down button (2 buttons), as shown below, for more than 7 seconds to reboot the phone forcefully. You may check the Galaxy S10 layout to locate the buttons.

reboot Galaxy S10 when the phone hangs

Technically, holding these two buttons is equivalent to removing (and putting back) the battery.

Using the power button and power button menu on Galaxy S10

Normally, you can press the power button on Galaxy S10 to:

  • Power on the phone (when the phone is off).
  • Wake up the screen (when the screen is off).
  • Turn off the screen and lock the phone. (when the screen is on)
  • Take photos in the camera app (if you enable it).
  • End a call (if you enable it).

If you quickly press the power button twice, you can launch the camera app. This is called Galaxy S10 camera quick launch.

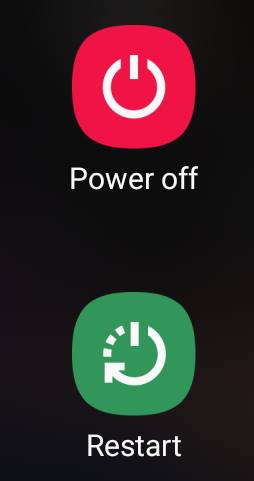
You can also call out the power button options (power button menu)  as shown below by long-press the power button for about 2 seconds.

In Galaxy S10 power button menu, there is no shortcut for the screenshot. This is different from the stock Android Pie. If you need to take screenshots, you may check this guide.

Please note, normally, you need to use the Power off button in the power button menu to power off Galaxy S10.

The Reboot button allows you to reboot Galaxy S10 gracefully. Reboot Galaxy S10 gracefully will not lose any data. But if you reboot Galaxy S10 forcefully, all unsaved data will be lost.

If you hold the power button for more than 5 seconds, Galaxy S10 will reboot.

How to reboot Galaxy S1o into recovery mode?

Occasionally, you need to reboot Galaxy S10 into the recovery mode, for example, to clear … Read the rest

Filed Under: S10 how-to guides Tagged With: Galaxy S10 camera quick launch, Galaxy S10 layout, Galaxy S10 lock screen, power button options, power key, Power off Galaxy S10, power on Galaxy S10, reboot Galaxy S10, reboot into Galaxy S10 download mode, reboot into Galaxy S10 recovery mode, take screenshots on Galaxy S10

How to avoid mirrored photos with Galaxy S10 front camera?

simon · 2 Comments

 avoid mirrored photos with Galaxy S10 front cameraBy default, Galaxy S10 camera app saves front camera photos as in the preview screen,  which is mirrored. Very often, you may want to avoid mirrored photos.

Although you can rotate the photo in any photo editors, you can easily change camera settings to avoid mirrored photos.

This Galaxy S10 camera guide explains why you get the mirrored photos, how to stop saving mirrored photos, and how to flip the mirrored photos as normal photos without using any third-party apps.

Why do you get the mirrored photos from Galaxy S10 front camera?

When you take selfies with Galaxy S10 front camera (see Galaxy S10 layout), the preview screen shows you a “mirrored” image for you to check.

Actually, all smartphone front cameras work in this way. This is consistent with what you do with makeups and clothes: you check them with a mirror.

But very often the mirrored photo is not what you want for a selfie photo. You often want to get a “normal”, not mirrored (flipped), photo, as what you get from the rear camera.

Unfortunately, most Android phone manufacturers by default save the mirrored photo for the front camera.

Of course, when saving, most Android phone manufacturers allow you to change the saving option in camera settings to avoid the mirrored photos.

Google Nexus and Pixel phones always avoid the mirrored photo when using the front camera. Actually, on Nexus and Pixel phones, there are no options for you to save a “mirrored” photo, although in the preview screen you get the mirrored image.

So, do not blame the Galaxy S10 front camera if you hate the mirrored selfies.

You should blame Samsung’s developers, who set the default as saving the mirrored photos.

Of course, you can change the Galaxy S10 camera settings to stop saving mirrored photos (read on).

For the mirrored photos saved on your phone, you can also easily flip them back to normal photos (read on).

How to avoid the mirrored (flipped) photos from Galaxy S10 front camera?

As mentioned, the mirrored photo issue is due to the default settings. You may follow these steps to stop saving the mirrored photos.

Step 1. Open the Camera app

You can open the camera app from the Galaxy S10 Home screen, or apps screen, or even the lock screen.

Step 2: Access camera settings

As shown in the screenshot below, tap the Settings icon (marked as 1) to access Galaxy S10 camera settings.

You can find a lot of options related to photo settings. For example, you can also change photo size settings for Galaxy S10 cameras.

Galaxy S10 camera app interfaceGalaxy S10 camera settings

Step 3. Change save options

In the camera settings, tap Save options as shown above.

Step 4. Disable save pictures as previewed

To avoid the mirrored photos, you can disable the Pictures as previewed in the save options.

As shown below, tap Picture as previewed to disable the mirrored photos.

Please note, in old Galaxy phones, the option may be named as “save … Read the rest

Filed Under: S10 camera guides Tagged With: Galaxy S10 camera, Galaxy S10 Camera app, Galaxy S10 camera settings, Galaxy S10 layout, Galaxy S10 photo size, Gallery app, mirrored photos

How to use Galaxy S10 clear view cover (S-View flip cover)?

simon · 4 Comments

Galaxy S10 clear view cover (aka Galaxy S10 S-View flip cover) is one of the flagship accessories from Samsung for S10, S10e,  S10+, and S10 5G.

The unique S-View features make the cover stand out, although some original S View features were removed or redesigned.

This Galaxy S10 accessories guide explains the changes, special features, pros and cons of the Galaxy S10 clear view cover. It also shows you how to customize and use the cover, and how to use the always-on display on the clear view cover.

The S View cover is available for all Galaxy S10 models (S10, S10+, S10e, and S10 5G). The only difference is the cutout and size of the case. In this guide, S10 refers to all of the four S1o models.

What’s new in the Galaxy S10 clear view cover (S-View flip cover)?

Samsung always releases some “official” accessories for its Galaxy phones.

Galaxy S10 clear view cover, aka Galaxy S10 S-View flip cover in some regions, is an evolution of the “S View” cover.

But compared to the Galaxy S9 clear view cover and Galaxy S8 clear view cover, there are some changes:

  • No kickstand. The kickstand in S-View serials covers for S8, S9, Note 8 and Note 9 was removed in S10.
  • Glossy back. The glossy plastic replaces the texture-rich back. It is a fingerprint magnet.
  • Some textures “inside” the front panel. The translucent front panel looks similar to that in S9. But if you stare at it at 90 degrees, you may notice there are some textures. Of course, the texture is inside, not outside of the panel.
  • Lighter and thinner. Because the kickstand was removed, the cover is lighter and thinner compared to that for S9.

On the software side, there are almost no changes.

What are the special features of the clear view cover (S-View flip cover)?

Galaxy S10 clear view cover shares similar S-View features as in S9 and S8:

  • Respond to calls, alarms, and events without flipping the cover.
  • Control music on the cover.
  • Read important information, including time, date, and battery level on the cover.
  • Auto lock and unlock.
  • Use faceWidgets on the cover.

Please note, there is no separate S-View window as in Galaxy S7 S-View cover.  Since S8, the full front panel is translucent.  The actual display is always on the phone screen.

How to apply and remove the Galaxy S10 S View cover?

When you apply the Galaxy S10 clear view cover to Galaxy S10, S10e, S10+, and S10 5G, you should fix the top part first. Then finish the bottom part.

When you want to remove the cover (to take out the phone), you should start from the bottom. Once the bottom part of Galaxy S10 is taken out of the cover, you can easily take the phone out.

Do NOT try to start from the top if you want to remove the cover. You may damage the cover … Read the rest

Filed Under: S10 how-to guides Tagged With: AOD, charge Galaxy S10 battery, Galaxy S10 always-on display (AOD), Galaxy S10 clear view cover, Galaxy S10 layout, Galaxy S10 LED back cover, Galaxy S10 LED View cover, Galaxy S10 LED wallet cover, Galaxy S10 lock screen, Galaxy S10 notification icons, Galaxy S10 settings, S View, smart lock, wireless charging, wireless PowerShare

How to use Galaxy S10 edge screen?

simon · Leave a Comment

Samsung Galaxy S10 edge screen allows you to access some features and apps quickly from the curved the display without navigating to the home screen or apps screen.

Since the inception of the curved-screen in Galaxy Note Edge, Samsung tried hard to develop some killing features for the curved screen.

This Galaxy S10 how-to guide explains everything you need to know about Galaxy S10 edge screen.: what is edge screen, how to access and use edge screen, edge lighting, edge panels, and Apps edge.

What is Galaxy S10 edge screen?

Samsung introduced the edge screen feature since Galaxy Note Edge (Note 4 Edge). But edge screen on Galaxy Note Edge is a separate display area to the right side of the main screen.

Since Galaxy S6 Edge, edge screen has been no longer a separate part. It refers to a part of the main screen linked to the curved edges of the display.

So, Galaxy S10 edge screen is not a separate screen. Instead, it is just part of the display close to the curved edges on both sides of Galaxy S10, S10+ and S10 5G as illustrated in Galaxy S10 layout.

Because Samsung started to reduce the curved part of the screen from Galaxy S8, many new Galaxy S8, S9, Note 8, Note 9 and S10 owners may even not realized the curved edges and the special features associated with them.

Galaxy S10 edge screen includes two fundamental features:

  1. Edge lighting. You can use edge lighting the light up the edges of the screen when notifications arrive.
  2. Edge panels. You can put frequently used apps and some special tools in the panels so that you can access them quickly.

If you disable both edge lighting and edge panels, Galaxy S10 edge screen will be disabled automatically. This is the only way to disable Galaxy S10 edge screen features.

Galaxy S10 edge screen works on all screens (except AOD)and apps when in portrait mode. You can use it on the home screen, lock screen, apps screen, and when using any apps.

When you use edge screen on the lock screen, some features will not work until the phone is unlocked. This is a security feature, not a bug.

If your home screen or lock screen is in landscape mode, or you are using an app in landscape mode, edge panel handle will disappear automatically. In other words, Galaxy S10 edge screen does NOT work in landscape mode.

How to access the edge screen?

You can access the Galaxy S10 edge screen by dragging the edge panel handle to the center of the screen, as shown below.

The edge panel handle appears on the right side by default. You can customize it so that it can appear on either left or right sides. You can also choose a color for it (read on).

The touchscreen gesture is dragging. But the swipe gesture works as well.

How to customize the Galaxy S10

… Read the rest

Filed Under: S10 how-to guides Tagged With: app folder, App pair, apps edge, edge lighting, edge panels, Galaxy S10 edge screen, Galaxy S10 home screen, Galaxy S10 home screen landscape mode, Galaxy S10 layout, Galaxy S10 Multi Window, Galaxy S10 settings, landscape mode, notifications, people edge, split-screen view, take screenshots on Galaxy S10, tasks edge, touchscreen gestures

How to use Galaxy S10 virtual bezel to hide the front camera cutout without using any apps?

simon · 3 Comments

You can hide the front camera cutout on Galaxy S10, S10+, S105G, and S10e with the Galaxy S10 virtual bezel without using any third-party apps.

Samsung pinched an elongated hole for the front cameras to avoid a notch on the screen. And they proudly announced this trick as infinity “O” display. But some owners do not like this design.

This Galaxy S10 how-to guide explains how to use Galaxy S10 virtual bezel to hide the front camera cutout on Galaxy S10, S10+, S105G, and S10e, and the implications of using Galaxy S10 virtual bezel.

Why some owners do not like the front camera cutout?

Nowadays, all smartphone manufacturers try hard to increase screen size without increasing the overall size of the phone.

So, the size of the bezels decreases over the years.  Samsung virtually eliminated the bezels on the sides with curved display since Galaxy S6.

On the bottom, Samsung removed the physical buttons and reduced the size of the bezel to the limit already.

So, on Galaxy S10, they tried to reduce the size of the bezel on the top further.

But there is a hard limit on the top: the front camera, notification LED, iris scanner, proximity, and light sensors all need spaces and cannot be hidden.

And Samsung made 2 stupid mistakes in reducing the size of the top bezel on Galaxy S10 (S10, S10+, S10 5G, and S10e):

  • The iris scanner was removed.
  • The notification LED was removed.

The hole punch for the front camera actually is not a bad idea, although some owners may prefer the notch design as in other Android phones or iPhones.

But what makes it wrong (or less ideal) is the location of the hole.  On all Galaxy S10 phones, the hole is punched on the right side.

First, the hole destroys the symmetry of the front side. The ugly asymmetric look will be magnified when you use an app with a white background.

Second, the curved screen is used on Galaxy S10, S10+, and S10 5G. The hole must keep a certain distance from the curved part. This results in a significantly-reduced area for the status bar.  So, Galaxy S10 has to offer the option for you to reduce the number of notification icons on the status bar or even hide/disable the notification icons on the status bar entirely.

Of course, some Galaxy S10 owners like the design.

Anyway, for those owners who cannot live with the look of the front camera cutout, it is easy to hide the front camera cutout without using any apps.

The truth is that Samsung already knew some owners would dislike the hole and therefore offered the Galaxy S10 virtual bezel to hide the front camera cutout.

The price you have to pay to hide the Galaxy S10 front camera cutout is slightly reduced screen size.

How to use Galaxy S10 virtual bezel to hide the front camera cutout?

If you want to hide the front cutout on Galaxy S10, you can … Read the rest

Filed Under: S10 how-to guides, S10 new features Tagged With: Galaxy S10 Camera app, Galaxy S10 home screen landscape mode, Galaxy S10 layout, Galaxy S10 lock screen landscape mode, Galaxy S10 notification icons, Galaxy S10 settings, Galaxy S10 status bar, Galaxy S10 virtual bezel, hide the front camera cutout, infinity O display, landscape mode, notification LED, status icons

How To Use Galaxy S10 LED View Cover (Galaxy S10 LED Wallet Cover)?

simon · 20 Comments

A definite guide for Galaxy S10 LED View Cover (LED Wallet Cover) on Galaxy S10, S10e, and S10+Galaxy S10 LED View Cover (aka Galaxy S10 LED Wallet Cover) stores cards in the interior pocket and shows LED notifications on the outside.

You can customize the LED notification icons on the front for individual contacts and apps.

This Galaxy S10 accessories guide explains the unique features of the Galaxy S10 LED View Cover, how to use the Galaxy S10 LED Wallet Cover, how to customize the LED notification icons for individual contacts and apps. A quick review of the Galaxy S10 LED View cover is also included.

Please note, due to differences in dimensions and cutout of Galaxy S10, S10e, and S10+ (see Galaxy S10 specifications), you need to get the Galaxy S10 LED View Cover for your Galaxy S10 model. In this guide, Galaxy S10 refers to S10, S10e, and S10+.

Also, in some regions, Galaxy S10 LED View Cover is named as Galaxy S10 LED Wallet cover.  Do not confuse with the Galaxy S10 LED back cover (LED cover) with the LED  View (or LED Wallet) cover.

Difference between Galaxy S10 LED cover (back cover) and Galaxy S10 LED View Cover (LED Wallet Cover)

For Galaxy S10, Samsung released two LED covers:

  • LED Cover (LED Back cover).
  • LED View Cover (LED Wallet cover)

Galaxy S10 LED cover is a back cover; while Galaxy S10 LED View cover is a flip cover.

Besides, the features of these two covers also differ in:

  • Unique features. Galaxy S10 LED cover has mood lighting,  camera timer, and emoticons for the rear cameras. Galaxy S10 LED Wallet cover does not have any of them.
  • Pocket (Wallet). Galaxy S10 LED View cover has a pocket (wallet) in the inside of the front part. Galaxy S10 LED cover does not have the front part and has no pockets.
  • Lock and wake up the phone. Galaxy S10 LED Wallet cover can lock the phone (when you close the case) or wake up the phone (when you open the case). Galaxy S10 LED cover does not have this feature.
  • Customize LED icons for contacts and apps. Galaxy S10 LED View cover allows you to customize the LED icons for individual contacts and apps. Galaxy S10 LED cover does not allow this. Besides, LED notification icons on the Galaxy S10 LED cover only works with pre-installed apps.

So, these two LED covers are substantially different. Galaxy S10 LED Wallet cover is the evolution of Samsung’s traditional LED cover (e.g., Galaxy S9 LED Wallet cover, or Galaxy S8 LED Wallet cover). While Galaxy S10 LED back cover is a new product.

What are the unique features of the LED View Cover (LED Wallet Cover)

Compared to other Galaxy S10 cases and covers, Galaxy S10 LED Wallet cover has the following prominent features:

  • LED notifications. You can get LED notifications on the LED View cover for incoming calls, app notifications, alarms, battery status, clock, and music controls. You can customize individual contacts or apps with unique LED
… Read the rest

Filed Under: S10 accessories guides Tagged With: charge Galaxy S10 battery, Galaxy S10 accessories, Galaxy S10 box contents, Galaxy S10 clear view cover, Galaxy S10 home screen, Galaxy S10 layout, Galaxy S10 LED cover, Galaxy S10 LED View cover, Galaxy S10 LED wallet cover, Galaxy S10 lock screen, LED icon editor, NFC, notification access, notifications, wireless charging

How to take screenshots on Galaxy S10 without using any apps?

simon · Leave a Comment

take screenshots on Galaxy S10 without using any appsYou can use at least 5 methods to take screenshots on Galaxy S10 without using any third-party apps.

Some screenshot-taking methods are unique to Galaxy S10 (and other Galaxy phones). Some are universal among all Android phones.

This Galaxy S10 how-to guide explains and shows the 5 different methods to take screenshots on Galaxy S10, S10e, S10+, and S10 5G.

What are the 5 ways to take screenshots on Galaxy S10?

On Galaxy S10 (all 4 Galaxy S10 variations), without using any third-party apps, you can use the following methods to take screenshots:

  1. Use hardware buttons (volume down + power button).
  2. Swipe your palm (palm swipe).
  3. Use the Assistant menu.
  4. Use Bixby Voice command.
  5. Use Google Assistant.

Please note, although these are different methods to take screenshots on Galaxy S10, the result is identical except Google Assistant (read on).

Method 1: Use hardware buttons (volume down + power button) to take screenshots

On all Android phones, you can take a screenshot by pressing the holding  Power button and Volume down button simultaneously.

This works on Galaxy S10 as well.

As illustrated below, you can simultaneously hold the power button and volume down button to take a screenshot on Galaxy S10. Please check Galaxy S10 layout for the location of physical buttons on S10 (S10e, S10+, and S10 5G).

Once the screenshot is taken, you will hear the click or shutter sound. If the smart capture feature is enabled in Galaxy S10 Settings — Advanced features, you will also see the toolbar on the bottom as well.

In old Samsung phones with a physical Home button, the physical home button was used with the power button to take screenshots. Because since Galaxy S8, Samsung has switched to on-screen (software) home button, you cannot use the Home button (with the Power button) to take screenshots on Galaxy S10.

The critical point of using physical buttons to take screenshots on the Galaxy S10 is to press the two buttons simultaneously.

As a human, we always press one button earlier than the other. It usually is OK to press the power button slightly earlier than pressing the volume down button. The power button accepts both single tap (press) and long tap gesture (for the power button options), and the long tap gesture will be triggered after you hold the button for about 2 seconds. So, as long as you hold the volume down button within 2 seconds (after holding the power button),  you should be able to get the screenshot.

If you press the volume down button first, you will get the volume settings immediately because the volume down button only accepts the single press gesture.

After pressing the two buttons,

  • If you get the power button option, it means you press the power button too early.
  • If you get volume settings, it means you press the volume button too early.
  • If the screen is turned off, it means, you release the power button too early.
… Read the rest

Filed Under: S10 how-to guides Tagged With: Assistant menu, Bixby button, Bixby voice, Galaxy S10 home screen, Galaxy S10 layout, Galaxy S10 settings, Google Assistant, Home button, palm swipe, power button options, screenshot, smart capture, take screenshots on Galaxy S10, touchscreen gestures

How to hide Bixby Home from Galaxy S10 Home Screen?

simon · Leave a Comment

hide Bixby home from Galaxy S10 Home ScreenIf you are not a fan of Bixby Home, or other Bixby features, you can hide the Bixby Home from Galaxy S10 Home screen easily.

On Galaxy S10, Samsung made it hard to disable Bixby Home and other Bixby features.  But you can hide the Bixby Home and remap the Bixby key so that the Bixby is less visible on Galaxy S10, S10e, S10+, and S10 5G.

This Galaxy S10 how-to guide explains what Bixby Home is, why some Galaxy S10 owners want to hide it, and how to hide Bixby Home from Galaxy S10 Home screen.

What is the Bixby Home?

Bixby Home is a component of Bixby, Samsung’s voice assistant.

By default, Bixby Home shows some relevant info (e.g., schedule, news,  and weather) for you. You can manage and customize the various cards in the Bixby Home.

On Galaxy S10 (S10, S10+, S10e, and S10 5G), a dedicated panel (the leftmost panel) in Galaxy S10 home screen is assigned for Bixby Home.

Although some owners may find the Bixby Home is useful, Google Now (Google Assistant) page usually is better (arguably) and gives more relevant info.

Besides, many owners do not like the idea of a dedicated Bixby Home or (Google page) on Galaxy S10.

Therefore, some Galaxy S10 owners want to hide Bixby Home from Galaxy S10 Home screen.

How to hide Bixby Home from Galaxy S10 Home Screen?

As shown in the screenshot below, the two lines on the leftmost of the home screen panel indicator tell you that the Bixby Home is currently shown on the Galaxy S10 Home screen.

After you hide Bixby Home from Galaxy S10 Home Screen, then the indicator should disappear.

On Galaxy S10 Home screen, you can use the pinch gesture as shown below to enter the edit mode of Galaxy S10 home screen.

You can also access the edit mode by tap and hold (long tap) any blank area on the Galaxy S10 home screen.

If you are using any apps, you can always return to the home screen by tapping the Home button (or swiping up from the middle line if you are using Galaxy S10 navigation gestures).

pinch to enter galaxy s10 home screen edit mode find the Bixby home icon from Galaxy S10 Home Screen

In the Galaxy S10 home screen edit mode, as shown above, you can tap the two-line indicator to navigate to the leftmost panel.

You can also just swipe right to navigate to the same panel.

Please note, the 2-line indicator will always be shown in the edit mode even after you hide the Bixby Home from Galaxy S10 Home screen.

This is not a bug. It allows you to unhide the Bixby Home in the future if you change your mind.

Once in the leftmost panel, you can find the switch for Bixby Home as shown below.

You can tap the switch to turn it off (if it is currently on) or turn it on (if it is currently off).

show Bixby home from Galaxy S10 Home Screen hide Bixby home from Galaxy S10 Home Screen

For example, as shown above, the Bixby Home is now hidden on … Read the rest

Filed Under: S10 how-to guides Tagged With: Bixby button, Bixby Home, Galaxy S10 home screen, Galaxy S10 Home screen edit mode, Galaxy S10 layout, Galaxy S10 navigation gestures, hide Bixby Home, pinch, touchscreen gestures

Understand Galaxy S10 Home Screen

simon · Leave a Comment

Understand Contents of Galaxy S10 Home ScreenYou need to understand the contents of the Galaxy S10 home screen to use the phone effectively.

There are usually up to 11 types of items on Galax S10 Home screen. And they are usually designed and arranged for different functions and purposes.

This Galaxy S10 how-to guide explains what Galaxy S10 Home screen is, the items on the home screen, and how to use the 11 types of items on the home screen.

What is Galaxy S10 Home screen?

In Galaxy S10 (S10, S10+, S10e, or S1o 5G), you will deal with 8 types of screens:

  • Lock screen.  The lock screen is the first screen you will encounter after starting or wake up the phone. You need to unlock to access private data and apps.
  • Home screen. By default, after you unlock Galaxy S10, you will be directed to Galaxy S10 Home screen.
  • Apps screen.  Traditionally, in Android phones, the apps screen is called app drawer, where you list all installed apps. Typically, only part of the installed apps is added to the home screen. Apps screen usually is considered as part of the Home screen,
  • Edge screen (for S10, S10+, and S10 5G only). As explained in Galaxy S10 layout, edge screen actually is a software feature, rather than a dedicated screen.  The edge screen requires a curved edge of the display. Therefore, it is not available in Galaxy S10e due to its flat screen.
  • Recents (Overview) screen. You can find the list of recently used apps in the Recents screen. You can launch these apps in the split-screen view or pop-up view (multiwindow mode) as explained in this guide.
  • Notification panel.  You can swipe down from the Galaxy S10 status bar to access the notification panel.
  • Quick settings panel.  You can use the quick setting buttons to turn on or off some features on Galaxy S10 without opening Galaxy S10 Settings.
  • Individual app screen.

Galaxy S10 Home screen is the center of the phone. There is no way to bypass the home screen.

Galaxy S10 is protected by Galaxy S10 lock screen to prevent unauthorized access to your apps and data.  Therefore, the Home screen is always behind the lock screen.

You can access the Home screen in different ways:

  • After unlocking Galaxy S10, you should get the Galaxy S10 Home screen directly.
  • When you are using any apps, you can tap the Home button (or swipe up from the centerline if you are using Galaxy S10 navigation gestures) in the navigation bar to access the Galaxy S10 Home screen directly.
  • When you are using any apps, you can keep tapping the Back button in the navigation bar to return to the Home screen eventually. Some apps may require you to tap the back button several times before you get the Home screen. A few apps may ask you to confirm to exit the app. Anyway, the behavior of the back button
… Read the rest

Filed Under: S10 how-to guides Tagged With: app folder, Galaxy S10 Apps screen, Galaxy S10 edge screen, Galaxy S10 home screen, Galaxy S10 Home screen edit mode, Galaxy S10 home screen landscape mode, Galaxy S10 layout, Galaxy S10 lock screen, Galaxy S10 lock screen landscape mode, Galaxy S10 notification icons, Galaxy S10 notification panel, Galaxy S10 quick setting buttons, Galaxy S10 settings, Galaxy S10 status bar, home screen panels, landscape mode, navigation button, navigation gestures, touchscreen gestures

How to disable or customize the notification icons in the Galaxy S10 status bar?

simon · Leave a Comment

disable or customize the notification icons in the Galaxy S10 status barYou can disable and customize notification icons in the Galaxy S10 status bar to save space for the status icons.

This Galaxy S10 how-to guide shows you how to limit the number of notifications icons in the Galaxy S10 status bar to 3, or to disable notification icons in the status bar.

This guide applies to all Galaxy S10 models: Galaxy S10, S10+, S10e, and S10 5G.

Why you may consider to customize or disable notification icons in the Galaxy S10 status bar?

Due to the cutout of front cameras in the screen (see Galaxy S10 layout), the icons in the Galaxy S10 status bar are not aligned to the right edge of the screen. Instead, the status icons are aligned to the left side of the camera cutout (the left side of the O of the infinity O display).

Besides, since Android Pie update for Galaxy S9, Samsung displays the current time on the left side of the status bar like other Android phones.

Therefore, the usable space for the notification icons in the Galaxy S10 status bar is significantly reduced.

For example, as shown below, the default status bar can be very crowded if you show many notification icons. The meaning of the Galaxy S10 status icons and notification icons are compiled on this page.

Therefore, Samsung allows you to customize the number of notification icons shown on the status bar.

You can even disable notification icons in the Galaxy S10 status bar.

How to disable or customize the notification icons in the Galaxy S10 status bar?

If you want to customize the number of Galaxy S10 notification icons in the status bar or to disable notification icons in Galaxy S10 status bar, you can do so in Galaxy S10 Settings.

In the Settings page, tap Notifications, as shown below, to manage Galaxy S10 notifications.

Galaxy S10 Settings turn off and customize the notification icons in the Galaxy S10 status bar

In the notification settings page, as shown in the screenshot above, tap Status bar.

Now, in the status bar, you can see all options for customizing notifications icons in the Galaxy S10 status bar.

As shown below, you can choose to show:

  • 3 recent notifications. If you have notifications from more than 3 apps, only the notifications icons from the last 3 apps will be shown.
  • All notifications.

The option of Shown battery percentage actually let you decide to show or hide the battery level on the right side of the status bar (among status icons, not notification icons).

As shown in the screenshot below, there is one notification icon. If you tap the switch for “Show notification icons” to turn it off it will hide the notification icon from the status bar.

turn off and customize the notification icons in the Galaxy S10 status bar turn off and customize the notification icons in the Galaxy S10 status bar

As shown in the screenshot above, you can find the notification icon disappears after you disable notification icons in the Galaxy S10 status bar.

Please note, disabling notification icons in the status bar does not affect the notification itself. The corresponding notifications are still in the notification panel. The … Read the rest

Filed Under: S10 how-to guides Tagged With: Android Pie, Galaxy S10 layout, Galaxy S10 notification icons, Galaxy S10 notification panel, Galaxy S10 settings, Galaxy S10 status bar, infinity O display, notifications

Galaxy S10 SIM card guide

simon · 9 Comments

You need to insert a SIM card to Galaxy S10 SIM card tray to use the mobile network (voice, SMS, and mobile data).

In the Galaxy S10 box, a SIM card is not included (although the SIM card tray ejection pin is included). You have to get one from the carrier. Of course, it is not free.

This Galaxy S10 how-to guide explains everything you need to know about Galaxy S10 SIM card: the size of the SIM card used in Galaxy S10, add or change the SIM card for Galaxy S10, check mobile network connections on Galaxy S10, use the SIM card tray for the single-SIM and dual SIM versions of Galaxy S10.

What is the SIM card size for Galaxy S10?

Galaxy S10 (all 4 models, Galaxy S10, S10e, S10+, and Galaxy S10 5G) requires a nano-SIM card, which is the smallest SIM card currently.

Most phone companies now offer 3-in-1 SIM cards as illustrated below. You can detach the smallest part and use it on Galaxy S10.

After detaching the nano-SIM card, do not throw away plastic parts, which can be used as a SIM card adapter for old devices that may require a micro or even mini-SIM card.

You can use the existing SIM card for Galaxy S10 if you migrated to Galaxy S10 from any of the following phones,

  • Samsung Galaxy S6, S7, S8, and S9 and all their variants (e.g., S9+, S8+, S7 edge, S6 edge, and S6 edge+).
  • Samsung Galaxy Note 5,  Note 7 FE, Note 8, and Note 9.
  • Any of Samsung Galaxy A series: Galaxy A3, A5, A7, A8, and A9.
  • Galaxy J3 2017 and later, Galaxy J5 2017 and later, Galaxy J7 and later.
  • iPhone 5, 6, 7, 8 and X (and all variants).
  • Moto X (all generations).
  • Moto Z (all generations)
  • Moto G5, G6, and G7.
  • Moto E4 and E5.
  • Pixel and Pixel XL (all generations).
  • LG G5, G6, G7 (all variants), V10, V20, V30 and V40.
  • Many other phones released after 2016.

If you are not sure whether you can use your existing SIM card on Galaxy S10, please post your phone model in the comments box below. We will try to check it for you.

Due to the size difference, you must use a nano-SIM on Galaxy S10. The SIM card tray was designed for this SIM card size only.

If your old SIM card is a micro SIM card,  and your carrier charges you for changing to the nano-SIM,  you may trim the old SIM card to a nano-SIM card. It is recommended to do it in the handphone shop. They usually use a specialized clipper,  which is more accurate and safer than your scissors.

If your old SIM card is a mini-SIM card, you need to check with the handphone shop. Some old mini-SIM cards have larger metal part than nano-SIM card. If this is the case, then you cannot trim it to a nano-SIM card. You have to change the … Read the rest

Filed Under: S10 how-to guides Tagged With: dual SIM, Galaxy S10 box, Galaxy S10 box contents, Galaxy S10 layout, Galaxy S10 SIM card tray, micro SD card, micro SIM, migrate to Galaxy S10, mini SIM, mobile data, mobile signal strength, nano SIM, SIM card, SIM card ejection pin, single SIM

How to use Galaxy S10 navigation buttons and navigation gestures?

simon · 6 Comments

You have to use either Galaxy S10 navigation buttons or navigation gestures to navigate through different pages and apps on Galaxy S10, S10+, S10e, and S10 5G.

If you just migrate to Galaxy S10 from a non-Samsung phone or a Samsung phone running Android Oreo or lower versions of Android, you may need to spend some time getting used to Galaxy S10 navigation gestures.

This Galaxy S10 how-to guide shows you how to use and customize the navigation buttons and navigation bar, and how to use the Galaxy S10 navigation gestures.

How to use Galaxy S10 navigation buttons?

By default, Galaxy S10 (including Galaxy S10, S10+, and S10e) uses a navigation bar with 3 navigation buttons: Back, Home. and Recents (overview) on the bottom part of the screen.

Please note Samsung moved to software navigation buttons since Galaxy S8. There are no hardware navigation buttons on Galaxy S10. The 3 hardware buttons (keys) on the Galaxy S10: Power button, Volume (up and down) button, and Bixby button as explained in Galaxy S10 layout.

By default, you will see the following Galaxy S10 navigation buttons in the navigation bar.

illustration of Galaxy S10 navigation buttons

Galaxy S10 navigation buttons (navigation bar)

If you migrated from non-Samsung phones, you may find the button order is different from other phones. In stock Android, the Back button is on the left of the Home button and Recents (Overview) button to the right. Of course, you can change the navigation button order on Galaxy S10 to match other Android phones (read on).

The functions of the 3 Galaxy S10 navigation buttons are similar to those in other Android phones.

Home button

Galaxy S10 Home button accepts three touchscreen gestures: tap, long tap, and swipe to the right side

You can tap the Home button to back to the Galaxy S10 home screen regardless of what you are doing, or what app you are using.

If you are on the Galaxy S10 home screen already, tapping the Home button will bring you to the “home” of the home screen panels.

Please note, unlike the home button on Galaxy S8, S9, Note 8, or Note 9, the Galaxy S10 home button is not pressure-sensitive. On the Galaxy S10 always-on display (AOD), you can tap anywhere to wake the screen if you enable the tap to wake feature.

If you tap and hold (long tap) the Home button, by default, Google Assistant will start.

If you swipe to the right side from the Home button, you will switch to the most recent app (read on in the Galaxy S10 navigation gestures section).

Back button

The behaviour of the Back button actually depends on the app you are using. In other words, the app developer can decide what happens when you tap the Back button when using the app.

For most apps, tapping the Back button brings you back to the previous screen of the app until you exit the app. Remember some apps don’t allow you … Read the rest

Filed Under: S10 how-to guides Tagged With: Android Pie, Back button, Galaxy S10 always-on display (AOD), Galaxy S10 home screen, Galaxy S10 layout, Galaxy S10 Multi Window, Galaxy S10 multiwindow, Galaxy S10 settings, Home button, navigation button, navigation gestures, NavStar, Recents button, Recents screen, touchscreen gestures

How to use Samsung Smart Switch to migrate to Galaxy S10?

simon · 2 Comments

You may migrate to Galaxy S10 easily with the Samsung  Smart Switch. Your photos, videos, music, messages, call logs, contacts, files, calendar events, alarms, and apps in the old phone can be transferred to Galaxy S10.

There are many solutions for you to migrate to Galaxy S10. But the simplest way is to use Smart Switch to transfer data between Galaxy S10 and the old phone.

This Galaxy S10 guide explains how to use Samsung Smart Switch to migrate to Galaxy S10.

What is the Samsung Smart Switch?

Samsung Smart Switch is the tool for you to migrate to Samsung devices from other mobile devices including:

  • Android
  • iOS
  • Windows
  • BlackBerry

In addition to Smart Switch Mobile, you can also download and install PC/Mac version of Smart Switch.

Smart Switch for PC is normally recommended for users who own one or more Samsung devices. It can back up almost all data on Samsung Galaxy phones to the PC and restore the backup to other Galaxy phones as well.

What can be migrated to Galaxy S10 using Smart Switch?

When using Samsung Smart Switch to migrate to Galaxy S10, the following data can be migrated (depending on OS on the old phone).

  • Contacts
  • Call log
  • Photos
  • Music
  • Videos
  • Calendar events
  • Alarms
  • SMS
  • Documents
  • Device settings (for Galaxy phones, most settings including home screen settings can be transferred)
  • Apps (Android phones only)

You can review and select items to be transferred before migrating data to Galaxy S10.

How to use Smart switch t0 connect Galaxy S10 to the old device?

When you migrate to Galaxy S10 using Smart Switch, you can choose one of the following 3 ways to connect Galaxy S10 to migrate data

USB connection

You need to use the old phone’s USB cable and the USB connector in the Galaxy S10 box.

This is the fastest, easiest, and most reliable way to migrate to Galaxy S10.

Wireless connection

You can also connect Galaxy S10 to the old Android phone using WiFi direct. The data on the old device can then be transferred to Galaxy S10 wirelessly.

For iOS devices, you only need to enable iCloud backup. On Galaxy S10, you can then transfer the iCloud backup to Galaxy S10 through the WiFi connection.

External storage

This connection is usually available for Galaxy phones or other Android phones that support back up to external storage (micro SD card, or USB flash drive).

To migrate data to Galaxy S10, you need to:

  • Back up the phone to the external storage
  • Remove the storage from the old phone
  • Connect the external storage to Galaxy S10
  • Start Smart Switch on Galaxy S10
  • Migrate all data in the back up to Galaxy S10

The 3 connection methods work similarly: you select what to transfer/migrate, start to transfer, restore to Galaxy S10.

How to use Smart Switch to migrate to Galaxy S10 with a USB cable?

You may follow these steps to migrate to Galaxy S10.

Step 1: Connect Galaxy S10 to the

… Read the rest

Filed Under: S10 how-to guides Tagged With: Android, Galaxy S10 box, Galaxy S10 layout, iOS, micro SD card, reboot Galaxy S10, Smart Switch, USB cable, USB connector, USB storage

How to use Galaxy S10 touchscreen gestures on Galaxy S10, S10+, and S10e?

simon · 3 Comments

use Galaxy S10 touchscreen gestures on Galaxy S10, S10+, and S10eUsing Galaxy S10 touchscreen gestures is not an option; it is a requirement if you want to use Galaxy S10, S10+, or S10e.

The good news is that Galaxy S10 touchscreen gestures are similar to those on other smartphones.

This Galaxy S10 how-to guide uses animation to demonstrate how to use seven Galaxy S10 touchscreen gestures. The examples (scenarios)  of using these Galaxy S10 touchscreen gestures are also provided.

The touchscreen gestures are identical on Galaxy S10, S10+, S10e, and S10 5G. So, in this guide, Galaxy S10 refers to all four models of Galaxy S10 phones.

What are the seven Galaxy S10 touchscreen gestures?

Unless you attach a keyboard/mouse to Galaxy S10 or use voice commands (e.g., Google Assistant or Bixby Voice), you have to use Galaxy S10 touchscreen gestures to control the screen and interact with the phone in apps.

Galaxy S10 touchscreen gestures refer to how your finger(s) moves on the screen.

The screen (see Galaxy S10 layout) in Galaxy S10 is a touchscreen. When your finger or a capacitive pen touches the screen, it can identify the motion.

The motion pattern can be designed and programmed as a gesture. The system and apps can then perform certain operations as a response to the gesture.

In Galaxy S10, as like in other Android phones, seven touchscreen gestures, tap, double tap, long tap (tap and hold), swipe, drag, pinch, and spread, are fully supported.

Galaxy S10 touchscreen gestures are used by:

  • The system. Galaxy S10 may use slightly different touchscreen gestures compared to other phones. For example, the navigation gesture is different from that in stock Android.
  • Individual apps. App developers can assign any functions to any gestures inside the app.

Please note S Pen is for Galaxy Note devices. Galaxy S10 screen will NOT respond to S Pen.

Very often, three of the Galaxy S10 touchscreen gestures were also programmed for some hardware buttons (keys).  In this case, we usually refer the gestures as press (instead of tap), double press and long press.

Please do not confuse the touchscreen gestures with Galaxy S10 navigation gestures.

Some Samsung cases/covers may also support some gestures. For example, both Galaxy S10 LED View cover (LED wallet) and the Galaxy S10 Clear view (S view) cover support swipe gesture to accept or reject a call.

List of  Galaxy S10 touchscreen gestures their usages

We will use animations to illustrate what are the 7 Galaxy S10 touchscreen gestures. The examples of using each gesture are followed.

Smartphone touchscreen gestures usually mimic the behaviours of a mouse on a PC.  When you use Samsung Dex with Galaxy S10, the mouse can replace these Galaxy S10 touchscreen gestures.

1. Tap gesture (press)

Tap (single tap) is one of the essential Galaxy S10 touchscreen gestures. You cannot survive without it.

The tap gesture, as shown in the animation below,  means you touch somewhere (e..g., a button in an app, an app icon in Galaxy S10 home screen) on the screen … Read the rest

Filed Under: S10 how-to guides Tagged With: app folder, double tap, drag, edge screen, Galaxy S10 always-on display (AOD), Galaxy S10 home screen, Galaxy S10 layout, Galaxy S10 lock screen, Galaxy S10 notification panel, infinity O display, long tap, mouse, pinch, Samsung DeX, spread, swipe, tap, touchscreen gestures

Unbox Galaxy S10: understand Galaxy S10 box contents

simon · 4 Comments

After unboxing Galaxy S10 (S10, S10+, or S10e), you need to understand the Galaxy S10 box contents: what are they? How to use them?

Understanding the items included in the Galaxy S10 box will surely help you use the phone (Galaxy S10, S10+, or S10e) properly and effectively.

This Galaxy S10 how-to guide shows you the package contents of the Galaxy S10 box and explains the usage of the 10 items of Galaxy S10 box contents.

The Galaxy S1o box contents are identical for Galaxy S10, S10+, and S10e, except the phone (and the dimensions of the box). In this page, we will use Galaxy S10 to refer to all these 3 Galaxy S10 phones.  You may refer to Galaxy S10 specifications to find the differences among these 3 Galaxy S10 phones.

What are the items of Galaxy S10 box contents?

In different regions, Galaxy S10 distributors may insert some additional promotional items.  But the “standard” box contents are standardized by Samsung.

In almost all regions, you can find these 10 common Galaxy S10 box contents as illustrated in the picture below.

  1. The Galaxy S10 box
  2. The phone (Galaxy S10, S10+, or S1oe)
  3. A transparent back cover
  4. A USB cable (USB-A to USB-C)
  5. AKG headset (with 3.5mm connector)
  6. Wall charger (travel adapter)
  7. USB connector
  8. SIM card tray ejection pin
  9. Quick start guide
  10. A leaflet of “How to transfer contents to Galaxy S10”

If you miss any items in the Galaxy S10 box, you may check with the seller.

How to use items of Galaxy S10 box contents?

Of course, each item in the Galaxy S10 box is for you to use and enjoy the phone.

#1. The Galaxy S10 box

The box should be sealed by Samsung or a local distributor.

The seal is to indicate this is an unopened package. If it is a pre-owned S10, it should be stated clearly in the box.

#2. The Phone (Galaxy S10, S10+, or S10e)

The phone is the main and the most expensive item in the Galaxy S10 box.

In most regions, for Galaxy S10, and S10+, a plastic screen protector has been pasted on the screen already.  It is not the normal protective film.

If you plan to use a screen protector on Galaxy S10, or S10+, you need to know that many tempered glass screen protectors do NOT work with the in-display fingerprint sensor (see this page), therefore Samsung applied this plastic screen protector for you before you can find a compatible screen protector. You may check this guide on how to use Galaxy S10 in-display fingerprint scanner to unlock Galaxy S10.

For Galaxy S10e, the fingerprint is mounted on the power button, and therefore all screen protector should work with the phone. This is the reason why Samsung does not give a screen protector for Galaxy S10e.

All new Galaxy S10 phones should have about 50-60% battery. You can charge the battery after finishing the setup, or charge the battery before using the phone.

#3.

… Read the rest

Filed Under: S10 how-to guides Tagged With: charge Galaxy S10 battery, Galaxy S10, Galaxy S10 accessories, Galaxy S10 box, Galaxy S10 box contents, Galaxy S10 cover, Galaxy S10 layout, Galaxy S10 package contents, Galaxy S10 screen protector, Galaxy S10 SIM card tray, Galaxy S10e, headphone, headphone jack, SIM card, USB cable, USB connector, wall charger, wireless charging

How to charge Galaxy S10 battery?

simon · 30 Comments

charge Galaxy S10 battery

You need to charge Galaxy S10 battery properly to maximize the battery life without sacrificing your usage.

There are many so-called expert recommendations and rules on how to charge Galaxy S10 battery. Some of them are outdated (e.g., you need to drain Galaxy S10 battery completely every a few weeks). Some are ridiculously wrong (e.g., you should not charge Galaxy S10 battery to full).

This Galaxy S10 how-to guide explains the proper way to charge Galaxy S10 battery with a wall charger (USB charging) or a wireless charger (wireless charging). Quick charge 2.0 and fast wireless charging 2.0 are also discussed.

How long should I charge Galaxy S10 battery the first time?

The old textbook may tell you that you should charge the new battery for at least 6-8 hours for the first time.

This is outdated. It does not apply to the Galaxy S10 battery.

When you charge Galaxy S10 battery the first time, you just need to charge it to “charged.” Then you can disconnect it from the charger (wall charger or wireless charger) and start to use it.

In fact, when Galaxy S10 leaves the factory, the battery was charged to about 60%. You can immediately use the phone when you get it. It is unnecessary to charge a new Galaxy S10 for 6 hours.

In some regions, Samsung does not offer a 1-to-1 exchange for hardware defects. You have to check the phone in the store.

Anyway, there are no special requirements when you charge the Galaxy S10 battery the first time.

Please note, there is no notification LED in Galaxy S10 (including S10, S10+, S10e, and S10 5G) as discussed in this page, you have to wake up the screen to check whether the battery is fully charged or not.

What are the two ways to charge the Galaxy S10 battery?

Galaxy S10 supports charging through the USB-C port and the wireless charging coil. You may refer to Galaxy S10 layout to check the location of the USB-C port and wireless charging coils.

So, you can charge Galaxy S10 battery in two ways:

  • Through a USB cable (USB charging). Normally, you will use a wall charger. But you can also charge Galaxy S10 battery with a power bank, PC, or another mobile device with USB-C port.
  • Wireless charging.

In Galaxy S10 box, a wall charger is included.

The wireless charging pad is not included in Galaxy S10 box. You may have to buy one.

What are fast charging and fast wireless charging for Galaxy S10, S10+, and s10e?

Galaxy S10, S10+, and 10e support quick charge 2.0 when charging through the USB-C port (USB charging). Of course, this requires a wall charger with quick charge support.

In the Galaxy S10 box, you can find the included 15W wall charger, which is a quick charge 2.0 compliant charger.

Samsung named the fast charge technology as adaptive fast charging. As mentioned in the top 10 disappointing and missing features of Galaxy … Read the rest

Filed Under: S10 how-to guides Tagged With: Android 12, charge Galaxy S10 battery, fast wireless charging 2.0, Galaxy S10 battery, Galaxy S10 layout, protect battery, quick charge, super-fast charging, USB cable, USB charging, USB-C, wall charger, wireless charging, wireless PowerShare

Primary Sidebar

RSS Samsung Galaxy S21 Guides

  • Top 12 new features in Android 12 update for Galaxy S21, S20 and S10
  • Android 12 update vs One UI 4.0 vs One UI 4.1: update Galaxy S21, S20 and S10 to Android 12
  • How to set and resize photo size on Samsung Galaxy S21, S20, S10, and S9 without using any third-party apps?
  • How to Customize Galaxy S21 Home Screen?
  • Master Galaxy S21 Lock Screen Settings
  • How to use widgets on Galaxy S21?
  • How to Use and Customize Galaxy S21 Side Key?
  • How to hide Galaxy S21 password and PIN when typing?
  • How to power on, power off, and reboot Galaxy S21,even when the phone hangs?
  • How to use Galaxy S21 quick settings panel?

RSS Galaxy S20 Guides

  • How to Use Enhanced Processing on Galaxy S20 with Android 11 update?
  • How to access, use, and customise widgets on Galaxy S20 lock screen and AOD screen with Android 11 update for Galaxy S20?
  • How to update Galaxy S20 to Android 11?
  • How to use Galaxy S20 lockdown mode?
  • Top 11 new features in Galaxy S20 Android 11 update
  • How to use Galaxy S20 recovery mode?
  • How to use 5 different shooting methods for Galaxy S20 camera?
  • How to use and customize power mode on Galaxy S20?
  • A Complete Guide Of Galaxy S20 Assistant Menu
  • How to manage location services on Galaxy S20 to protect your privacy?

RSS Galaxy S9 Guides

  • How to use Bixby quick commands on Galaxy S9, S9+, S8, S8+, Note 8, and Note 9 with the Android Pie update?
  • How to remap Bixby button on Galaxy S9 and S9+ after updating to Android Pie?
  • How to use the rotation toggle to change and lock screen orientation in Android Pie update for Galaxy S9 and S9 Plus?
  • How to lock Galaxy S9 home screen layout on Galaxy S9 and S9+ with Android Pie update?
  • How to use the lockdown mode on Galaxy S9 and S9+ with Android Pie update?

RSS Galaxy S8 Guides

  • How to use the new features in Android Pie update for Galaxy S8 and S8+?
  • How to use app shortcuts in Galaxy S8 Home screen in Android Oreo update for Galaxy S8 and S8+?
  • Use notification dots/notification number badge in Galaxy S8 Android Oreo update
  • How to Install Galaxy S8 Android Oreo Update for Galaxy S8 and S8+?

RSS Galaxy Note Tips & Tricks

  • Top 11 disappointments of Galaxy Note 20 and Galaxy Note 20 Ultra
  • How to use the Dynamic Lock screen on Galaxy Note 10?
  • Galaxy Note 10 LED View Cover Guide and Review
  • Install S Note app and Extension pack on Galaxy Note 10
  • How to Use Galaxy Note 10 Camera App?
  • Galaxy Note 10 SIM Card Guide
  • How to use Samsung DeX for PC with Galaxy Note 10 and Galaxy Note 10+?
  • How to use Galaxy Note 10 Clear View cover (S View cover)?
  • How to charge Galaxy Note 10 battery?

RSS All About Chromecast

  • Meaning of LED light on voice remote for Chromecast with Google TV
  • How to Chromecast Amazon Prime Video to your TV?
  • Chromecast Ultra vs Chromecast 2nd Gen
  • What are supported systems for Chromecast Audio companion device?
  • What are the 3 compatible audio cables for Chromecast Audio? and why it matters?

RSS Headphone Guide Pro

  • AirPods Pro 2 New features explained
  • What is Samsung Seamless Codec? 4 things you should know about this new codec
  • How to use widgets to check battery levels and control Galaxy Buds 2, Galaxy Buds Pro, Galaxy Buds Live, Galaxy Buds+, and Galaxy Buds?
  • AirPods 3 vs AirPods Pro: which one should you choose?
  • AirPods 3 vs AirPods 2: Top 8 improvements and new features of AirPods 3

© 2015–2023 · GadgetGuideOnline.com is an online community for Gadget Owners! · Hosted by PTRHosting · Powered by Genesis framework for WordPress

Samsung Galaxy S10 how-to guides, user manuals and tutorials for Samsung Galaxy S10, Galaxy S10+ (S10 Plus) and Galaxy S10e (S10 Lite) owners.

Disclaimer: Samsung, Galaxy, Galaxy S10, Galaxy S10+ (S10 Plus) and Galaxy S10e (S10 Lite)are trademarks of Samsung. Android is a trademark of Google. This website is NOT affiliated with Samsung or Google in any way. All the information provided on this website is provided on an "as is" and "as available" basis and you agree that you use such information entirely at your own risk.