• Skip to primary navigation
  • Skip to main content
  • Skip to primary sidebar

Galaxy S10 Guides

a owners-help-owners community of Samsung Galaxy S10, S10+ and S10e

  • Home
    • About Galaxy S10 Guides
    • Contact Us
  • New Features
    • Top 10 new features in Android 10 update for Galaxy S10
    • Top 5 new features added in Galaxy S10 September Update
    • Top 10 new features of Galaxy S10
    • Top 10 disappointing or missing features of Galaxy S10
    • How to use the new fingerprint reader to unlock Galaxy S10, Note 10, S20, Note 20, S21, and S22?
    • How to use Galaxy S10 wireless PowerShare to charge other devices?
    • How to use Galaxy S10 home screen landscape mode for Home screen and lock screen?
    • Specifications of Samsung Galaxy S10, S10 Plus, S10e, and S10 5G
    • How to use Galaxy S10 camera night mode?
    • How to use Galaxy S10 night mode?
  • How-to Guides
    • Top 10 new features in Android 10 update for Galaxy S10
      • Top 5 new features added in Galaxy S10 September Update
    • How to charge Galaxy S10 battery?
      • How to use Galaxy S10 wireless PowerShare to charge other devices?
      • Galaxy S10 wireless charging guide
    • Galaxy S10 SIM card guide
      • How to use two SIM cards on Galaxy S10, S10+, S10e, S20, S20+, and S20 Ultra?
    • Meaning of Galaxy S10 status icons and notification icons
      • How to disable or customize the notification icons in the Galaxy S10 status bar?
      • How to enable and use Galaxy S10 developer options?
    • How to use Galaxy S10 Settings?
      • How to use Galaxy S10 quick setting buttons?
      • How to use Galaxy S10 screen zoom?
      • How to use Galaxy S10 edge screen?
      • How to use Galaxy S10 night mode?
      • How to move apps to the micro SD card to free phone storage on Galaxy S10 ?
    • How to take screenshots on Galaxy S10 without using any apps?
    • How to use and customize Galaxy S10 lock screen?
      • How to use Galaxy S10 home screen landscape mode for Home screen and lock screen?
      • How to Use Galaxy S10 Always On Display (AOD)?
    • Galaxy S10 layout (layout of Galaxy S10, S10 Plus, and S10e)
      • How to use Galaxy S10 touchscreen gestures on Galaxy S10, S10+, and S10e?
      • How to use the new fingerprint reader to unlock Galaxy S10, Note 10, S20, Note 20, S21, and S22?
      • How to power on, power off, and reboot Galaxy S10 even when the phone hangs?
    • Understand Galaxy S10 Home Screen
      • How to use Galaxy S10 navigation buttons and navigation gestures?
      • How to hide Bixby Home from Galaxy S10 Home Screen?
      • How to use Galaxy S10 virtual bezel to hide the front camera cutout without using any apps?
      • How to use Galaxy S10 home screen edit mode?
      • How to use Galaxy S10 Apps screen?
      • How to use app folders on Galaxy S10 Home screen and Apps screen?
    • Unbox Galaxy S10: understand Galaxy S10 box contents
      • How to use Samsung Smart Switch to migrate to Galaxy S10?
      • How to hide suggested apps on Galaxy S10? and how to stop Finder uploading your data to Samsung servers?
    • Galaxy S10 camera settings explained
      • How to set photo size on Galaxy S10, S10e, S10 5G, and S10+?
      • How to avoid mirrored photos with Galaxy S10 front camera?
      • How to use Galaxy S10 camera night mode?
  • Camera Guide
    • How to use Galaxy S10 Camera app?
    • Galaxy S10 camera settings explained
    • How to set photo size on Galaxy S10, S10e, S10 5G, and S10+?
    • How to use Galaxy S10 camera night mode?
    • How to avoid mirrored photos with Galaxy S10 front camera?
    • How to use 5 shooting methods for Galaxy S10 camera?
  • User Manual
  • Accessories Guide
    • How To Use Galaxy S10 LED View Cover (Galaxy S10 LED Wallet Cover)?
    • How to use Galaxy S10 LED cover (Galaxy S10 LED back cover)?
    • How to use Galaxy S10 clear view cover (S-View flip cover)?
    • Galaxy S10 wireless charging guide

Galaxy S10 camera

How to use 5 shooting methods for Galaxy S10 camera?

simon · 2 Comments

use 5 shooting methods for Galaxy S10 cameraIn addition to the shutter button, you can also use other shooting methods for Galaxy S10 camera including the floating shutter button, volume key (button), voice, or show your palm to take photos.

These shooting methods work on all Galaxy S10 phones (S10, S10e, S10+, and S10 5G) when using the default Samsung camera app.

This Galaxy S10 camera guide explains how to enable and use all shooting methods on Galaxy S10.

How to take a photo (or record a video) with Galaxy S10 camera app?

As explained in this guide, in the Galaxy S10 camera app interface, you can:

  • Tap the shutter button to take a photo or record a video.
  • Hold the shutter button to take burst shots or create GIF. This feature is configurable in Galaxy S10 camera settings.

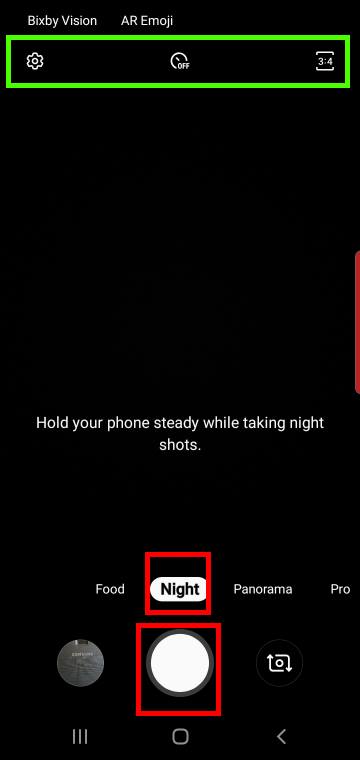
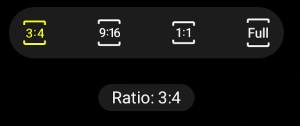
Of course, you can choose different camera modes including the new night mode for different scenarios.

What are the available shooting methods for Galaxy S10 camera?

In addition to the fixed shutter button, Galaxy S10 camera app also offers other shooting methods including:

  • Use the volume key.
  • Use your voice.
  • Use the floating shutter button.
  • Show your palm.

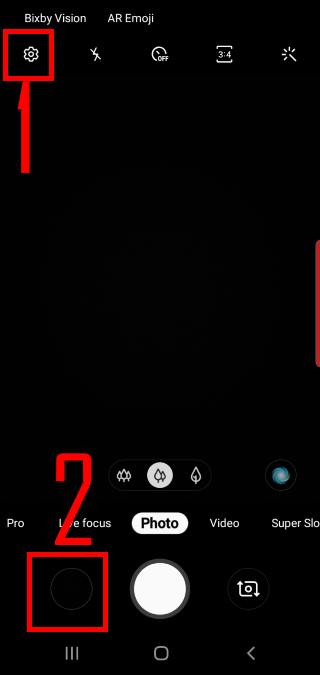
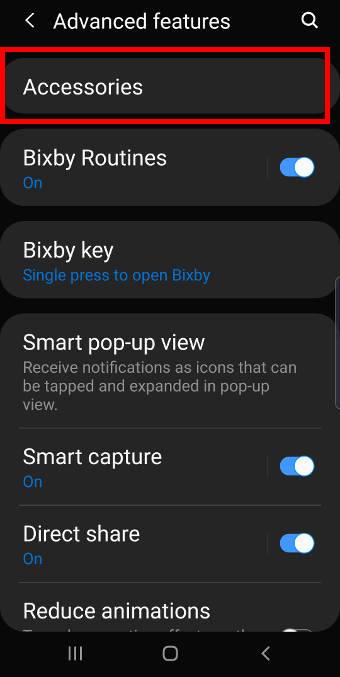
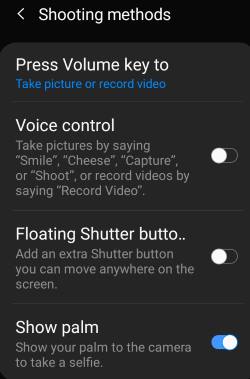
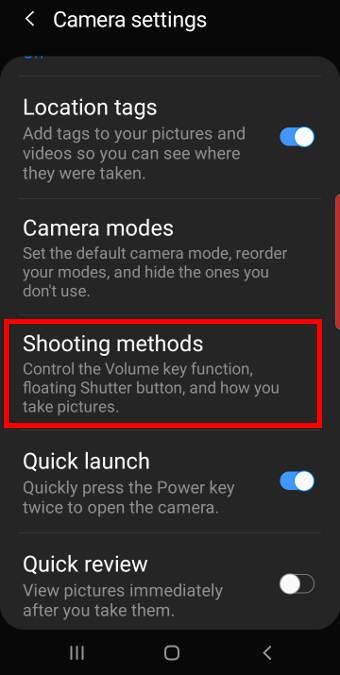
In Galaxy S10 camera settings, as shown in the screenshot below,  tap Shooting methods to enable/manage shooting methods for the camera app.

Galaxy S10 camera settings use different shooting methods for Galaxy S10 camera

As shown in the screenshot above, you can find the possible 4 additional shooting methods for Galaxy S10 camera.

Voice control, floating shutter button, and show palm are all disabled by default. You need to use the switch to enable the method individually.

Show palm method only works for the front camera (selfies). The other 3 shooting methods work for both the front and rear cameras.

How to use shooting methods for Galaxy S10 camera?

The fixed shutter button is always available in all scenarios.

The other 4 methods must be enabled before you can use them.

Use the power button to take photos on Galaxy S10

By default, in Galaxy S10 camera app, you can press the volume key to take photos.

But you can assign the volume key for other functions.

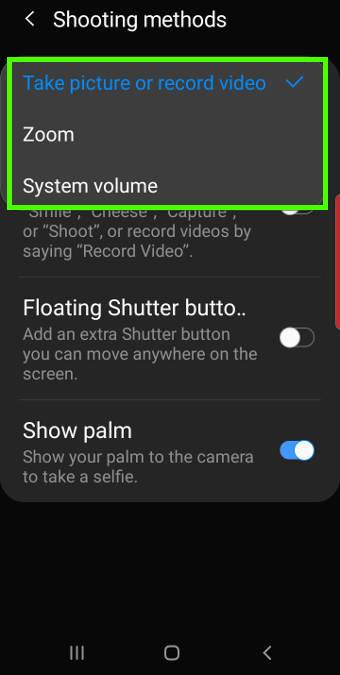
Tap Press volume key to (marked as 1) in the shooting methods page to get the options as shown below:

  • Take picture or record video (default).
  • Zoom.
  • System volume.

Please note, the camera app does not differ volume up or volume down when you use it to take photos (or record videos).

If you assign the volume key for zoom, then volume down and volume up will correspond to zoom out and zoom in respectively.

use different shooting methods for Galaxy S10 camera floating shutter button

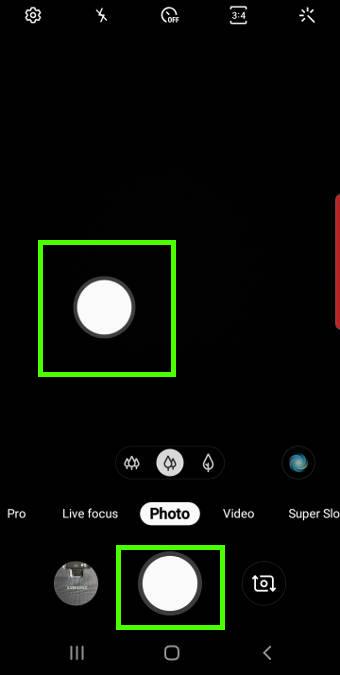
Use the floating shutter button to take photos on Galaxy S10

Once you enable floating shutter button (marked as 3)  in the shooting methods, you can then find an additional shutter button as shown above.

You can tap and hold the floating shutter button, then move it to any desired location.

The floating shutter button can be used exactly as the fixed shutter button. It is usually used for selfies, although … Read the rest

Filed Under: S10 camera guides, S10 how-to guides Tagged With: Bixby voice, floating shutter button, Galaxy S10 camera, Galaxy S10 Camera app, Galaxy S10 camera burst mode, Galaxy S10 camera settings, Galaxy S10 camera shutter button, Google Assistant, shooting methods for Galaxy S10, show palm, voice control, volume key

How to avoid mirrored photos with Galaxy S10 front camera?

simon · 2 Comments

 avoid mirrored photos with Galaxy S10 front cameraBy default, Galaxy S10 camera app saves front camera photos as in the preview screen,  which is mirrored. Very often, you may want to avoid mirrored photos.

Although you can rotate the photo in any photo editors, you can easily change camera settings to avoid mirrored photos.

This Galaxy S10 camera guide explains why you get the mirrored photos, how to stop saving mirrored photos, and how to flip the mirrored photos as normal photos without using any third-party apps.

Why do you get the mirrored photos from Galaxy S10 front camera?

When you take selfies with Galaxy S10 front camera (see Galaxy S10 layout), the preview screen shows you a “mirrored” image for you to check.

Actually, all smartphone front cameras work in this way. This is consistent with what you do with makeups and clothes: you check them with a mirror.

But very often the mirrored photo is not what you want for a selfie photo. You often want to get a “normal”, not mirrored (flipped), photo, as what you get from the rear camera.

Unfortunately, most Android phone manufacturers by default save the mirrored photo for the front camera.

Of course, when saving, most Android phone manufacturers allow you to change the saving option in camera settings to avoid the mirrored photos.

Google Nexus and Pixel phones always avoid the mirrored photo when using the front camera. Actually, on Nexus and Pixel phones, there are no options for you to save a “mirrored” photo, although in the preview screen you get the mirrored image.

So, do not blame the Galaxy S10 front camera if you hate the mirrored selfies.

You should blame Samsung’s developers, who set the default as saving the mirrored photos.

Of course, you can change the Galaxy S10 camera settings to stop saving mirrored photos (read on).

For the mirrored photos saved on your phone, you can also easily flip them back to normal photos (read on).

How to avoid the mirrored (flipped) photos from Galaxy S10 front camera?

As mentioned, the mirrored photo issue is due to the default settings. You may follow these steps to stop saving the mirrored photos.

Step 1. Open the Camera app

You can open the camera app from the Galaxy S10 Home screen, or apps screen, or even the lock screen.

Step 2: Access camera settings

As shown in the screenshot below, tap the Settings icon (marked as 1) to access Galaxy S10 camera settings.

You can find a lot of options related to photo settings. For example, you can also change photo size settings for Galaxy S10 cameras.

Galaxy S10 camera app interfaceGalaxy S10 camera settings

Step 3. Change save options

In the camera settings, tap Save options as shown above.

Step 4. Disable save pictures as previewed

To avoid the mirrored photos, you can disable the Pictures as previewed in the save options.

As shown below, tap Picture as previewed to disable the mirrored photos.

Please note, in old Galaxy phones, the option may be named as “save … Read the rest

Filed Under: S10 camera guides Tagged With: Galaxy S10 camera, Galaxy S10 Camera app, Galaxy S10 camera settings, Galaxy S10 layout, Galaxy S10 photo size, Gallery app, mirrored photos

How to use Galaxy S10 camera night mode?

simon · 4 Comments

use Galaxy S10 camera night modeSamsung added the Galaxy S10 camera night mode for the main camera in the April (2019) firmware update.  You can now use the dedicated camera night mode to take better photos in low-light conditions.

Update 1: Galaxy S10 camera night mode is now available for all camera lenses, including the selfie (front-facing) camera(s) following the Galaxy S10 September update.

This Galaxy S10 camera guide explains the details of the Galaxy S10 camera night mode, how to use the night mode, and differences between the night mode and the Auto (Photo) mode.

The camera night mode is available for all Galaxy S10 phones (S10, S10+, S10e, and S10 5G). In this guide,  Galaxy S10 refers to all these models.

Please do NOT confuse this camera mode with the dark theme (which is also called night mode).

What is Galaxy S10 camera night mode?

On Galaxy S10 (S10, S10e, S10+, and S10 5G), you may find there was no night mode for the camera when you got the phone.

Samsung removed the night mode from the camera app since Galaxy S6 as explained in this guide.

Although Samsung claimed the Auto mode (Photo mode) is good enough and you do NOT need a dedicated camera night mode, many owners do not agree. They want to get back the dedicated night mode.

On Galaxy S10, Samsung bragged about the Bright Night feature for the S10 rear camera and did not give users a dedicated mode for it.  It is supposed to help Galaxy S10 owners take nice photos in low-light conditions automatically. Apparently, the Photo mode often fails to deliver the promise.

So, in the Galaxy S10 firmware update released in April, Samsung finally added a dedicated night mode for the camera. For US versions of Galaxy S10 (all variants), the new camera mode was added with the June security update.

Yes, after 5 years (since Galaxy S5), Samsung finally realized the Auto mode (or the Photo mode) is not sufficient for taking photos in low-light conditions.

Now, on S10 (all variants), you can choose the night camera mode when you need to take photos when the light is not good.

Please note, the new Galaxy  S10 camera night mode is available only for the main rear camera (12MP).

Update: if your Galaxy S10 was updated to September (2019) security patch, then the nigh camera mode is available for all camera lenses as explained in this guide. You can even use the camera night mode when taking selfies with the front camera.

How to access and use the camera night mode?

You can access the camera night mode like other camera modes.

On the Galaxy S10 camera app interface, as shown in the screenshot below,  the default camera mode is Photo (aka Auto) mode (or the last used camera mode if you enable the option in Galaxy S10 camera settings).

You can swipe left as illustrated to access the new camera night mode.

As … Read the rest

Filed Under: S10 camera guides, S10 how-to guides Tagged With: Galaxy S10 Bright Night, Galaxy S10 camera, Galaxy S10 camera auto mode, Galaxy S10 camera burst mode, Galaxy S10 camera effects, Galaxy S10 camera flash, Galaxy S10 camera night mode, Galaxy S10 camera Pro mode, Galaxy S10 camera settings, Galaxy S10 camera shutter button, Galaxy S10 photo size, ultrawide camera

How to set photo size on Galaxy S10, S10e, S10 5G, and S10+?

simon · 11 Comments

Galaxy S10 camera aspect ratioYou can adjust the photo size on Galaxy S10, S10e, S10 5G, and S10+ to make sure the photo is good for the intended usages, e.g., to show on a TV screen, or to print on photopapers, or to use it for a design project.

Unfortunately, Samsung removed the option to explicitly set photo size on Galaxy S10, S10e, S10 5G, and S10+. You have to implicitly set photo size through the aspect ratio settings.

This Galaxy S10 camera guide explains the available photo sizes  and how to set photo size on Galaxy S10, S10e, S10 5G, and S10+

Why you may want to set or change photo size?

The requirement for a photo to be shared with others on the phone or to be printed on the photobook is surely different.

The size of a photo includes two factors:

  1. Aspect ratio.
  2. The number of pixels (resolution).

For the aspect ratio, the Galaxy S10 camera supports the following aspect ratios: 4:3, 16:9, 1:1, and 19:9 (full), as explained in Galaxy S10 camera settings.

The 4:3 aspect ratio is good for printing and for old monitors.  The native aspect ratio of the rear camera sensors on all Galaxy S10 phones is close to 4:3.

Therefore, among all aspect ratios, the 4:3 aspect ratio can have the maximum pixels.  You can imagine photos with all other aspect ratios are just cropped from the 4:3 one (as illustrated in the picture below).

The 16:9 aspect ratio is ideal for most TV screens and modern monitors.   Because of 4:3=16:12, a 16:9 photo crops the 4:3 photo in the height direction and maintains the width.

The 1:1 aspect ratio is mostly used by designers and some social networks. As 1:1=3:3, a 1:1 photo on Galaxy S10 crops the 4:3 photo in the width direction and maintains the height.

The 19:9 (aka full) ratio matches the Galaxy S10 phone screen. All 4 Galaxy S10 models have a screen with an aspect ratio of 19:9.  A 19:9 photo on Galaxy S10 also crops the 4:3 photo in the height direction and maintains the width, like the 16:9 one.

The cropping relationship between the 4 aspect ratios is illustrated in the following picture.

Please note, the above discussion is only for the rear cameras on Galaxy S10.

The front camera(s) on Galaxy S10 has a native aspect ratio close to (slightly smaller than) 3:2. This means for aspect ratios larger than 3: 2 (i.e.,  19:9 and 16:9), the photos are cropped in the height direction. The photos with an aspect ratio smaller than 3:2 (i.e., 4:3 and 1:1) are cropped in the width direction.

For some unknown reasons, Samsung removed the options to set up the number of pixels for the photos on the Galaxy S10. Once you set the aspect ratio, the size of the photo will be fixed at the maximum number of pixels.

How to set photo size on Galaxy S10, S10e, S10 5G, and S10+?

… Read the rest

Filed Under: S10 camera guides, S10 how-to guides Tagged With: Galaxy S10 camera, Galaxy S10 Camera app, Galaxy S10 camera settings, Galaxy S10 photo size, infinity O display, photo aspect ratio, photo resolution, ultrawide camera

Galaxy S10 camera settings explained

simon · 15 Comments

Galaxy S10 camera settings explainedTo use the camera effectively (to get the best possible photos) on Galaxy S10, you need to understand Galaxy S10 camera settings and know how to adjust the Galaxy S10 camera settings.

Some of the camera settings on Galaxy S10, S10+, S10e, and S10 5G are intuitive. But some are hidden under other settings/entries.

This Galaxy S10 camera guide explains the Galaxy S10 camera settings and shows you how to use them.

Because the camera app in Galaxy S10, S10e, S10+, and S10 5G are almost identical, this guide applies to all 4 Galaxy S10 models although only Galaxy S10 is normally referred to.

Why do you need to understand the Galaxy S10 camera settings?

Samsung revamped the camera app in Galaxy S10 as part of the brand new  One UI for Galaxy phones with Android Pie (Android 9.0).

So, if you just migrated to Galaxy S10 from other Android phones, or from Samsung Galaxy phones with Android Oreo or older versions, you are facing a very different camera app.

Compared to other Samsung Galaxy phones with Android Oreo (Android 8.0),  there are many changes in Galaxy S10 camera app as explained in this guide. Some changes are reasonable and make things better. But a few changes may be undesirable.

To fully utilize the features packed in the Galaxy S10 cameras so that you can get the best possible photos, you need to adjust some Galaxy S10 camera settings depending on the situation.

For example, you should enable shape correction for the ultrawide camera to reduce the distortion.  But the option is not enabled by default in the camera app.

How to access Galaxy S10 camera settings?

In the Galaxy S10 camera app, you can tap the Settings icon, as shown in the screenshot below, to open Galaxy S10 camera settings.

For the meaning of other buttons in the Galaxy S10 camera app interface and how to use gestures in the camera app, you may check this guide.

Galaxy S10 camera settings explained

After tapping the camera settings icon in Galaxy S10 camera app, you will get the following Galaxy S10 camera settings.

Please note, if you are in a camera mode other then the Auto mode, or the front camera is active, some entries in the camera settings will be greyed out. These grayed out entries are NOT relevant to your current camera mode or camera.

Samsung divided Galaxy S10 camera settings into 4 categories:

  • Intelligent features. These features, scene optimizer, shot suggestions, and flaw detection,  intend to make your camera smart and therefore help you get the best possible photos automatically if enabled.
  • Pictures. This section includes settings for photos including motion photos, the action for holding the shutter button and photo save options.
  • Videos. The settings in this section are about videos including rear video size, front video size, advanced recording options, and video stabilization.
  • Useful features. Everything else is included in the section of useful features. They include HDR,
… Read the rest

Filed Under: S10 camera guides, S10 how-to guides Tagged With: Galaxy S10 burst mode, Galaxy S10 camera, Galaxy S10 Camera app, Galaxy S10 camera flaw detection, Galaxy S10 camera modes, Galaxy S10 camera Pro mode, Galaxy S10 camera quick launch, Galaxy S10 camera quick review, Galaxy S10 camera settings, Galaxy S10 camera shutter button, Galaxy S10 mirrored photo, Galaxy S10 motion photos, Galaxy S10 picture size, Galaxy S10 tracking autofocus, galaxy S10 video size, Galaxy S1o camera shooting methods, scene optimizer, shot suggestions, ultrawide camera

How to use Galaxy S10 Camera app?

simon · 10 Comments

Galaxy S10 Camera appMastering Galaxy S10 Camera app is essential for taking the best photos with cameras on Galaxy S10, S10e, S10+, and S10 5G.

Samsung significantly changed the Camera app in One UI with Android Pie. So, even for seasoned Samsung Galaxy phone users, there are some new features of the Galaxy S10 Camera app, and of course, there are many removed features.

This Galaxy S10 camera guide explains the new features of the Galaxy S10 Camera app, the components of the camera app interface (UI), and how to use gestures in Galaxy S10 camera app.

Please note, in Android 10 update for Galaxy S10, S10+, and S10e, the Camera app was updated as well. You may check this guide for a few new features in the camera app.

New features of Galaxy S10 Camera app?

Compared to the Camera app in Galaxy S9 (prior to Android Pie update) and older Galaxy phones, Galaxy S10 Camera app has some new or changed features including:

  • There is no dedicated video recording button. Video recording is a camera mode. So, you cannot use the Pro mode to record videos anymore.
  • The shutter button does not have the zoom function. You cannot drag the shutter button to zoom.  You can use the pinch/spread gesture or rear camera selection buttons to zoom in/out.
  • Camera modes are located on the bottom (above the shutter button) in the portrait orientation, and the orientation does not change when you hold the phone in landscape orientation.
  • AR Emoji is not listed as a camera mode. It has a dedicated button in Galaxy S10 camera app interface.
  • The Bixby Vision and AR Emoji buttons are located on the top of the screen.
  • Galaxy S10 Camera setting button is located on the top (below the Bixby vision and AR Emoji).
  • The Auto camera mode is renamed as Photo mode.
  • New scene optimizer button was added on the preview window.
  • For supported camera modes, you can now change the aspect ratio of the photo (and photo size) without navigating to Galaxy S10 camera settings.
  • You cannot adjust the resolution of the photo directly. You can only adjust the aspect ratio of the photo. Each aspect ratio has a fixed resolution. You may refer to this guide on how to set photo size on Galaxy S10.
  • New Galaxy S10 camera night mode.

Please note, only the official Samsung Camera app can fully utilize the advanced features of Galaxy S10 camera sensors. Third-party camera apps can use the basic features of the sensors.

Components of the Galaxy S10 camera app

Once you launch the camera, by default, you can find the following 14 items in the camera app interface as shown in the screenshot below.

  1. Bixby Vision.
  2. AR Emoji.
  3. Galaxy S10 camera settings button.
  4. Flash.
  5. Timer.
  6. Photo aspect ratio/size settings.
  7. Galaxy S10 camera effects (filters).
  8. Camera lens selection.
  9. Scene optimizer.
  10. Galaxy S10 camera models.
  11. Shortcut to Gallery app.
  12. Shutter button.
  13. Front/rear cameras switch.
  14. Preview screen.
… Read the rest

Filed Under: S10 camera guides, S10 how-to guides Tagged With: AR Emoji, Bixby Vision, camera guides, camera timer, Galaxy S10 camera, Galaxy S10 Camera app, Galaxy S10 camera auto mode, Galaxy S10 camera effects, Galaxy S10 camera filters, Galaxy S10 camera flash, Galaxy S10 camera night mode, Galaxy S10 camera Pro mode, Galaxy S10 camera quick launch, Galaxy S10 camera settings, Galaxy S10 camera shutter button, Galaxy S10 camera stickers, Galaxy S10 LED cover, Galaxy S10 mirrored photo, Galaxy S10 photo size, Galaxy S10 status bar, Photo mode, scene optimizer, touchscreen gestures, ultrawide camera

How to use Galaxy S10 LED cover (Galaxy S10 LED back cover)?

simon · 6 Comments

Samsung introduced a new back cover for Galaxy S10, S10+ and S10e: Galaxy S10 LED cover (LED back cover).

The LED cover is a back cover with some unique LED features including mood lighting, LED emoticons, Picture cue, and camera timer. The old LED wallet cover is now renamed as Galaxy S10 LED View cover in most regions.

This Galaxy S10 accessories guide explains how to set up and use Galaxy S10 LED cover (LED back cover) on Galaxy S10, S10+, and S10e, the unique features of this cover and a review of this LED cover.

Unique features of Galaxy S10 LED cover (LED back cover)?

Galaxy S10 LED cover is a new type of official accessories. It is a back cover with some unique LED features.

Compared to other back covers, the LED back cover has the following special features:

  • Mood lighting.  When Galaxy S10 is facing downwards, a light show is presented with the LEDs.  You can only enable or disable the show, not customize the show.
  • LED notification icons. You will get notification icons on the back when a notification comes. But the LED notification icon only works with some Samsung apps, and you cannot customize the LED icons. Please note, in Galaxy S10 LED View cover, you can customize the LED notification icons.
  • Camera timer. If the timer for the rear camera is turned on, the countdown will be shown on both the screen and the cover.
  • Emoticons for the rear cameras. When you open the camera app, and the rear cameras are active, a LED icon you chose will be shown on the back cover.

Unlike the fabric-like material used in Galaxy S10 LED view cover, the exterior of the Galaxy S10 LED back cover is glossy plastic. Therefore it is a fingerprint magnet.

The LED cover provides moderate protection for the glass back of the phone. The raised edges on the top and bottom (over the screen) offers marginal protection for the screen,  The two side edges of the Galaxy S10 LED back cover for Galaxy S10, and S10+ are lower than the screen due to the curved screen in these two models.

Please note, Galaxy Friends, which is available for Galaxy S20 LED back cover,  are not available for Galaxy S10 LED back cover.

How to set up and customize the LED cover (LED back cover)?

Once you snap the LED back cover on to the phone, you will get a notification asking you to set up the cover if you use it the first time.

Actually, Galaxy S10 will automatically add:

  • The LED cover app in the Apps screen, as shown below.
  • An entry in Settings — Advanced features —Accessories — LED cover.

These two items are identical: both are shortcuts for the Galaxy S10 LED cover settings.

For example, in Galaxy S10 Settings, you can tap Advanced features as shown below.

S10 settings S10 accessories settings

In the Advanced Features page, tap Accessories… Read the rest

Filed Under: S10 accessories guides, S10 how-to guides, S10 new features Tagged With: camera timer, charge Galaxy S10 battery, Galaxy S10 accessories, Galaxy S10 back cover, Galaxy S10 battery, Galaxy S10 camera, Galaxy S10 case, Galaxy S10 cover, Galaxy S10 LED back cover, Galaxy S10 LED cover, Galaxy S10 LED View cover, Galaxy S10 LED wallet cover, Galaxy S10 notification panel, Galaxy S10 settings, mood lighting, NFC, notification LED, notification LED icon, picture cue, wireless charging, wireless PowerShare

Galaxy S10 layout (layout of Galaxy S10, S10 Plus, and S10e)

simon · 6 Comments

Galaxy S10 layout (layout of Galaxy S10, S10 Plus, and S10e)You need to understand the Galaxy S10 layout to properly use your Galaxy S10, S10+, or S10e.

The 4 models of Galaxy S10: S10, S10+ (S10 Plus), S10e, and S10 5G, share similar, but not identical design. The layout of these 4 Galaxy S10 phones is slightly different.

Because S10 5G has not been released yet, this Galaxy S10 guide will explain the layout of Galaxy S10, S10+, and S10e.

Why do you need to know about Galaxy S10 layout?

Galaxy S10 is not a revolutionary product. So, you can find some similarity between the Galaxy S10 layout and Galaxy S9 layout.

But the difference is also obvious.

Exploring the Galaxy S10 layout allows you to:

  • Locate the buttons: Power button, Bixby button, and volume buttons.
  • Locate the ports including multifunction (USB Type C) port and headphone jack.
  • Locate the SIM card tray.
  • Locate the antennas.
  • Locate the cameras and sensors.
  • Locate the wireless charging coil.
  • Locate the speaker and microphones.
  • Locate the fingerprint sensor.

Anyway, you should spend a few mins on understanding the Galaxy S10 layout. It will pay off immediately when you avoid some mistakes (e.g., piercing the microphone on the top with the SIM card ejection pin) or learn to use some special features or tricks.

The major differences among Galaxy S10 layout, Galaxy S10+ layout, and Galaxy S10e layout

The differences in specifications of Galaxy S10, S10+, and S10e are reflected in the device layout.

Here is the list of major differences among Galaxy S10 layout, Galaxy S10+ layout, and Galaxy S10e layout:

  • Size.  Galaxy S10+ is the largest and Galaxy S10e is the smallest. Galaxy S10 lies in between.
  • The front camera and the hole.   Galaxy S10+ has two front-facing cameras. The hole in the infinity O display is elongated and larger than that in the other two siblings.  Galaxy S10 and S10e only have one front-facing camera. If you want, you can use Galaxy S10 virtual bezel to hide the front camera cutout as explained in this guide.
  • Rear cameras. Both Galaxy s10 and S10+ have 3 rear cameras. Galaxy S10e only gets one.
  • Fingerprint scanner. Both Galaxy S10 and S10+ have an in-display fingerprint ultrasonic scanner. The fingerprint scanner in Galaxy S10e is mounted on the power button.

The relative locations of the buttons, sensors, antennas, ports, speaker and microphones, SIM card tray are almost identical.

The layout of Galaxy s10+ (Galaxy S10+ layout)

The front view of Samsung Galaxy S10+ layout is shown below.

In the front, you can find:

  • Touch screen in Galaxy S10+ layout

The touch screen occupies about 90% of the front side of Galaxy S10+.

You can use various Galaxy S10 touchscreen gestures to interact with the phone.

By default, in the bottom part of the screen, Galaxy S10 navigation bar with 3 navigation buttons can be found. Of course, you can also use navigation gestures, instead of navigation buttons.

On the top of the screen, you … Read the rest

Filed Under: S10 how-to guides, S10 new features Tagged With: Bixby, Bixby button, Bixby routine, Bixby voice, camera guides, edge screen, fast wireless charging 2.0, fingerprint scanner, Galaxy S10, Galaxy S10 5G, Galaxy S10 camera, Galaxy S10 home screen landscape mode, Galaxy S10 lock screen landscape mode, Galaxy S10e, GPS, headphone jack, heart rate sensor, layout, light sensor, MST, NFC, proximity sensor, S10+, SIM card, touch screen gestures, ultrasonic fingerprint scanner, USB-C, wireless PowerShare

Specifications of Samsung Galaxy S10, S10 Plus, S10e, and S10 5G

simon · 3 Comments

pecifications of Samsung Galaxy S10, S10 Plus and S10eAlthough software plays a more and more important role in today’s smartphones,  many potential Galaxy S10 buyers are still eager to know what are the specifications of Samsung Galaxy S10.

Based on early leaks and rumors, specifications of Samsung Galaxy S10 are almost certain in most aspects.

This post summarizes the key specifications of Samsung Galaxy S10, S10 Plus, S10e, and S10 5G.

How many models of Galaxy S10 will be?

Almost certain, tThere will be 3 are 4 Galaxy S10 models with slightly different specifications:

  • Galaxy S10.
  • Galaxy S10+ (Plus).
  • Galaxy S10e.
  • Galaxy S10 5G (in selected markets only).

Galaxy S10 is targeting mainstream users. S10+ (S1o Plus) is targeting hardware enthusiasts, who want to get everything available. Galaxy S10e is targeting buyers who want a smaller phone.  All these 3 Galaxy S10 models will be available globally on March 8, 2019.

Galaxy S10 5G is the only 5G capable phone in the market now. It will be available in Q2 2019. Because the 5G network is only available in very limited regions and carriers, Galaxy S10 5G will be available in selected regions.

The specifications of Galaxy S10, S10+, S10e, and S10 5G  are slightly different.

Of course, Galaxy S10+ will be the most expensive one among the three (the pricing of S10 5G is still not available now). S10e will be the cheapest.

Key features in specifications of Samsung Galaxy S10, S10 Plus, and S10e

Samsung Galaxy 10 is the 1oth generation of Galaxy S series phones.  Samsung needs to use this historical device to showcase its leadership in the oversaturated smartphone market.

In addition to the annual upgrade of CPU, there are some interesting and major changes in Galaxy S10 specifications.

The infinity display will be pushed to the limit: the top bezel is not enough for the camera lens and a hole in the display has to be punched.  So, Samsung just named it infinity O display. You may hide the hole (cutout) using a black bar (Galaxy S10 virtual bezel) if you do not like the hole. But this will reduce the usable screen area.

So, instead of a notch, you will see the punched area for the front cameras as shown below.

Key features in specifications of Samsung Galaxy S10, S10 Plus, and S10e

The fingerprint scanner will now be embedded under the screen in Galaxy S10, S10+, and S10 5G. And it uses ultrasonic 3D scanning technique.  There is no button or cutout for the fingerprint scanner.  Please check this guide on how to use Galaxy S1o in-display ultrasonic fingerprint reader.

On Galaxy S10e, the fingerprint scanner will be embedded in the power button on the right side of the phone.

Wireless charging has been a standard feature since Galaxy S6. Now, Samsung will add the wireless PowerShare (reverse wireless charging) into Galaxy S10.  You can use your phone as a wireless charger to charge other devices as explained in this guide.

Galaxy S10, S10+, S10e, and S10 5G will be powered by Android Pie with the … Read the rest

Filed Under: S10 new features Tagged With: Android Pie, Galaxy S10, Galaxy S10 5G, Galaxy S10 camera, Galaxy S10e, infinity O display, One UI, specifications, ultrasonic fingerprint scanner, wireless power sharing, wireless PowerShare

Primary Sidebar

RSS Samsung Galaxy S21 Guides

  • Top 12 new features in Android 12 update for Galaxy S21, S20 and S10
  • Android 12 update vs One UI 4.0 vs One UI 4.1: update Galaxy S21, S20 and S10 to Android 12
  • How to set and resize photo size on Samsung Galaxy S21, S20, S10, and S9 without using any third-party apps?
  • How to Customize Galaxy S21 Home Screen?
  • Master Galaxy S21 Lock Screen Settings
  • How to use widgets on Galaxy S21?
  • How to Use and Customize Galaxy S21 Side Key?
  • How to hide Galaxy S21 password and PIN when typing?
  • How to power on, power off, and reboot Galaxy S21,even when the phone hangs?
  • How to use Galaxy S21 quick settings panel?

RSS Galaxy S20 Guides

  • How to Use Enhanced Processing on Galaxy S20 with Android 11 update?
  • How to access, use, and customise widgets on Galaxy S20 lock screen and AOD screen with Android 11 update for Galaxy S20?
  • How to update Galaxy S20 to Android 11?
  • How to use Galaxy S20 lockdown mode?
  • Top 11 new features in Galaxy S20 Android 11 update
  • How to use Galaxy S20 recovery mode?
  • How to use 5 different shooting methods for Galaxy S20 camera?
  • How to use and customize power mode on Galaxy S20?
  • A Complete Guide Of Galaxy S20 Assistant Menu
  • How to manage location services on Galaxy S20 to protect your privacy?

RSS Galaxy S9 Guides

  • How to use the rotation toggle to change and lock screen orientation in Android Pie update for Galaxy S9 and S9 Plus?
  • How to use the new Recents screen in Android Pie update for Galaxy S9 and S9 Plus?
  • How to use the lift to wake feature on Galaxy S9 and S9+ with Android Pie update?
  • Top 9 new features of Android Pie update for Galaxy S9 and S9+
  • How to use Samsung DeX Station for Galaxy S9, S9+, S8, S8+, Note 8 and Note 9?

RSS Galaxy S8 Guides

  • How to use the new features in Android Pie update for Galaxy S8 and S8+?
  • How to use app shortcuts in Galaxy S8 Home screen in Android Oreo update for Galaxy S8 and S8+?
  • Use notification dots/notification number badge in Galaxy S8 Android Oreo update
  • How to Install Galaxy S8 Android Oreo Update for Galaxy S8 and S8+?

RSS Galaxy Note Tips & Tricks

  • Top 11 disappointments of Galaxy Note 20 and Galaxy Note 20 Ultra
  • How to use the Dynamic Lock screen on Galaxy Note 10?
  • Galaxy Note 10 LED View Cover Guide and Review
  • Install S Note app and Extension pack on Galaxy Note 10
  • How to Use Galaxy Note 10 Camera App?
  • Galaxy Note 10 SIM Card Guide
  • How to use Samsung DeX for PC with Galaxy Note 10 and Galaxy Note 10+?
  • How to use Galaxy Note 10 Clear View cover (S View cover)?
  • How to charge Galaxy Note 10 battery?

RSS All About Chromecast

  • Meaning of LED light on voice remote for Chromecast with Google TV
  • Master the Voice Remote for Chromecast with Google TV
  • How to use Chromecast to stream music to dumb speakers (as Chromecast Audio does)?
  • How to factory data reset Chromecast Audio?
  • What are supported systems for Chromecast Audio companion device?

RSS Headphone Guide Pro

  • AirPods Pro 2 New features explained
  • What is Samsung Seamless Codec? 4 things you should know about this new codec
  • How to use widgets to check battery levels and control Galaxy Buds 2, Galaxy Buds Pro, Galaxy Buds Live, Galaxy Buds+, and Galaxy Buds?
  • AirPods 3 vs AirPods Pro: which one should you choose?
  • AirPods 3 vs AirPods 2: Top 8 improvements and new features of AirPods 3

© 2015–2023 · GadgetGuideOnline.com is an online community for Gadget Owners! · Hosted by PTRHosting · Powered by Genesis framework for WordPress

Samsung Galaxy S10 how-to guides, user manuals and tutorials for Samsung Galaxy S10, Galaxy S10+ (S10 Plus) and Galaxy S10e (S10 Lite) owners.

Disclaimer: Samsung, Galaxy, Galaxy S10, Galaxy S10+ (S10 Plus) and Galaxy S10e (S10 Lite)are trademarks of Samsung. Android is a trademark of Google. This website is NOT affiliated with Samsung or Google in any way. All the information provided on this website is provided on an "as is" and "as available" basis and you agree that you use such information entirely at your own risk.