 To use the camera effectively (to get the best possible photos) on Galaxy S10, you need to understand Galaxy S10 camera settings and know how to adjust the Galaxy S10 camera settings.
Some of the camera settings on Galaxy S10, S10+, S10e, and S10 5G are intuitive. But some are hidden under other settings/entries.
This Galaxy S10 camera guide explains the Galaxy S10 camera settings and shows you how to use them.
Because the camera app in Galaxy S10, S10e, S10+, and S10 5G are almost identical, this guide applies to all 4 Galaxy S10 models although only Galaxy S10 is normally referred to.
Why do you need to understand the Galaxy S10 camera settings?
Samsung revamped the camera app in Galaxy S10 as part of the brand new One UI for Galaxy phones with Android Pie (Android 9.0).
So, if you just migrated to Galaxy S10 from other Android phones, or from Samsung Galaxy phones with Android Oreo or older versions, you are facing a very different camera app.
Compared to other Samsung Galaxy phones with Android Oreo (Android 8.0), there are many changes in Galaxy S10 camera app as explained in this guide. Some changes are reasonable and make things better. But a few changes may be undesirable.
To fully utilize the features packed in the Galaxy S10 cameras so that you can get the best possible photos, you need to adjust some Galaxy S10 camera settings depending on the situation.
For example, you should enable shape correction for the ultrawide camera to reduce the distortion. But the option is not enabled by default in the camera app.
How to access Galaxy S10 camera settings?
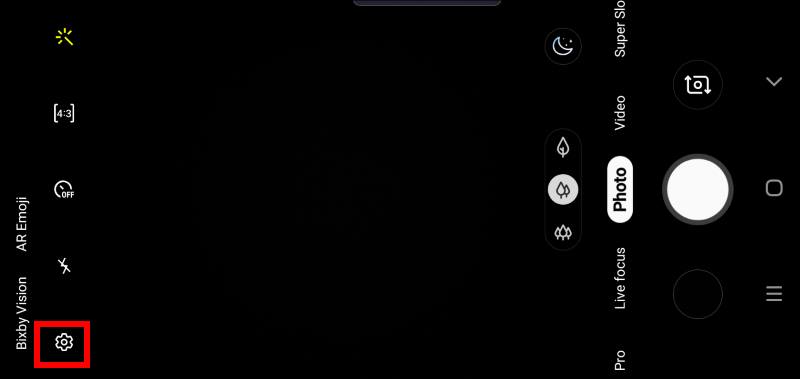
In the Galaxy S10 camera app, you can tap the Settings icon, as shown in the screenshot below, to open Galaxy S10 camera settings.
For the meaning of other buttons in the Galaxy S10 camera app interface and how to use gestures in the camera app, you may check this guide.
Galaxy S10 camera settings explained
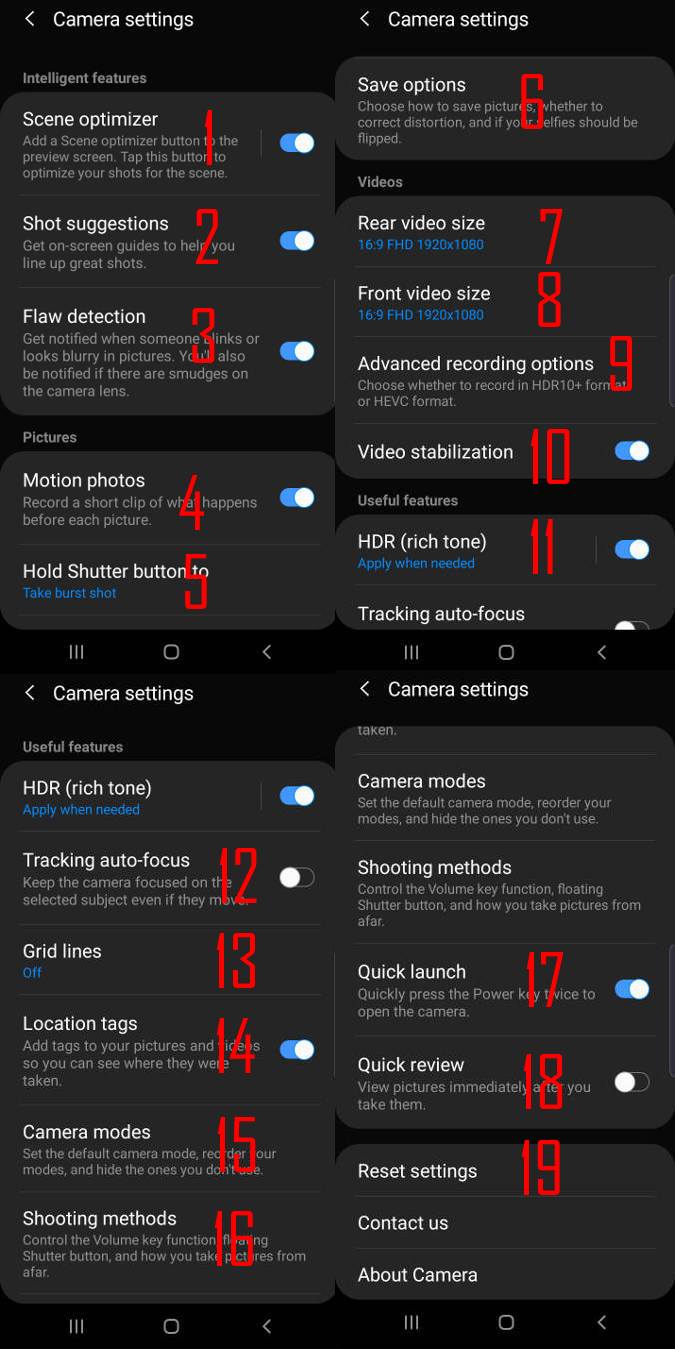
After tapping the camera settings icon in Galaxy S10 camera app, you will get the following Galaxy S10 camera settings.
Please note, if you are in a camera mode other then the Auto mode, or the front camera is active, some entries in the camera settings will be greyed out. These grayed out entries are NOT relevant to your current camera mode or camera.
Samsung divided Galaxy S10 camera settings into 4 categories:
- Intelligent features. These features, scene optimizer, shot suggestions, and flaw detection, intend to make your camera smart and therefore help you get the best possible photos automatically if enabled.
- Pictures. This section includes settings for photos including motion photos, the action for holding the shutter button and photo save options.
- Videos. The settings in this section are about videos including rear video size, front video size, advanced recording options, and video stabilization.
- Useful features. Everything else is included in the section of useful features. They include HDR, tracking autofocus, grid lines, location tags, camera modes including the night mode, shooting methods, quick launch, quick review, and reset camera settings.
We will explain these settings one by one.
1. Scene optimizer
Scene optimizer helps you choose the most appropriate color and tone settings for Galaxy S10 camera based on the scene or objects recognized.
By default, the scene optimizer is disabled. You can enable or disable it here by tapping the switch.
There is also a scene optimizer button in the Galaxy S10 camera preview screen. You can tap it to enable or disable it as shown on this page. If the button is black-and-white, it means the scene optimizer is disabled.
Once scene optimizer is enabled, it will work automatically when scene or objects are recognized.
The scene optimizer only works in the Photo mode.
2. Shot suggestions
The shot suggestions help you to focus on the correct object or location based on the intelligence of the Galaxy S10 camera.
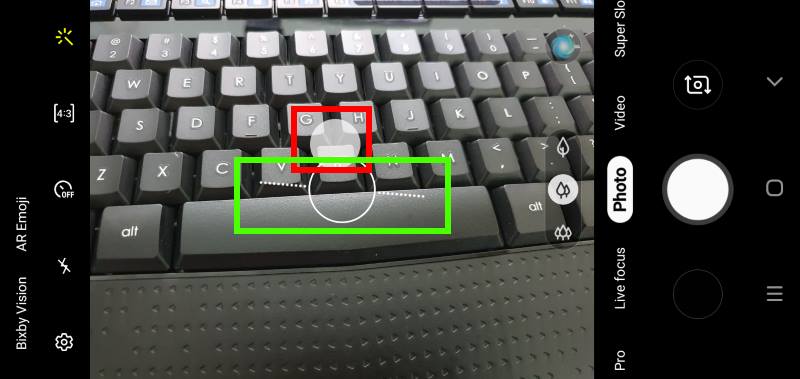
Once enabled, for example, as shown below, the Galaxy S10 camera will identify the best focus area. The identified area to be focused on is marked as a filled circle (in the red rectangle area in the screenshot below), and the current focus is marked as a circle line (in the green rectangle in the screenshot below).
Once you move your camera and these two circles overlap, the circle will become yellow (it suggests you take the photo).
3. Flaw detection
Galaxy S10 flaw detection, once enabled, will alert you:
- If someone moved.
- If someone blinked.
- If the photo may be blurry.
- If the camera is dirty.
By default, flaw detection is enabled on Galaxy S10 camera settings.
4. Motion photos
You can record a short video (a few seconds leading up to when the shutter button is released) if motion photos feature is enabled.
The video is saved with the photo. Only the Gallery app can play the video.
When you check a photo with motion photos enabled in the Gallery app, you will see a button for View motion photo. Tap the button to play the video.
When playing the video, you can tap anywhere to pause the video, and then you can see the options to save the motion photo as a video or share it as a video. You can also save any frame as a photo as well.
Please check this guide (coming soon) on how to use motion photos on Galaxy S10.
Update: in the Android 10 update for Galaxy S10, the Hold shutter button option was replaced by Swipe Shutter button to edge to. If you want to use the Galaxy S10 burst mode (to take burst shot photos) or to create GIF animations, you may check this guide on using the new gesture.
As you already know, you can tap the shutter button to take a photo or start/stop video recording.
By default, if you hold the shutter button (without releasing your finger from the button), Galaxy S10 camera will take photos in burst mode until you release your finger from the shutter button.
Galaxy S10 allows you to change this behaviour because some Galaxy S10 owners may not want to use the Galaxy S10 burst mode at all.
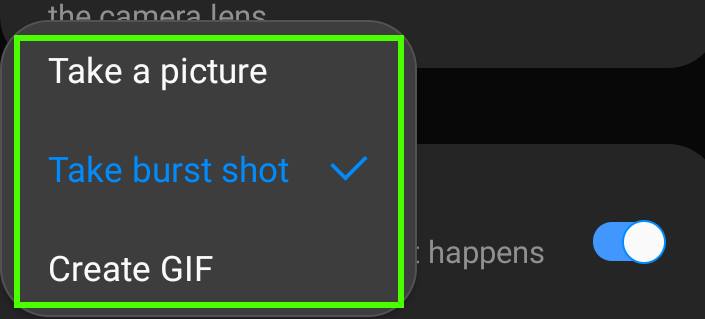
As shown below, you can choose the actions when you hold the shutter button as:
- Take a picture. Essentially, it is identical to the single tap gesture.
- Take the burst shot. You are using the Galaxy S10 burst mode. All photos taken in the burst mode will be always saved in the phone storage even you set the storage as the SD card.
- Create GIF. Galaxy S10 camera will take a series of photos and saved them as one GIF animation file. Please note, the resolution of the GIF animation is 480*640 (VGA) only. You do not have the option to change the resolution for the GIF.
6. Save options in Galaxy S10 camera settings
Don't overlook save options in Galaxy S10 camera settings. Some very useful camera settings are hidden here.
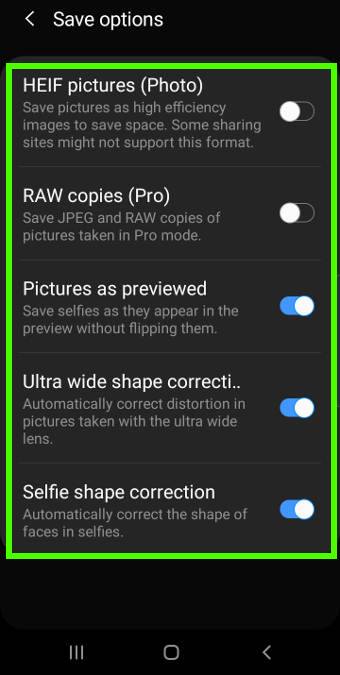
As shown in the screenshot below, under the save options, you can:
- Choose to save photos in HEIF (High-Efficiency Image File Format). If enabled, you can save about 20-30% storage without sacrificing the picture quality. The downside is that some sites or devices may not support this format. When sharing such photos through the Gallery app, you can choose to convert them to normal JPEG files.
- Enable RAW file saving in the Pro mode. When using the Galaxy S10 Pro mode, you can choose to save the RAW file (which can be edited with most professional photo editing/processing apps), together with the normal JPEG file.
- Choose to save selfies as previewed or mirrored. By default, the selfies (with front cameras) are saved as mirrored images. You can choose not to flip it so that the photo is identical to what you see in the preview screen. You may refer to this guide on how to stop saving mirrored photos.
- Enable or disable ultra-wide shape correction. When using the ultra-wide lens on Galaxy S10, the photo is always distorted, especially near the edges. By default, Galaxy S1o does not do any corrections. You should enable ultra-wide shape correction so that the distortion is minimized. I am not sure why Samsung chooses to disable this option by default.
- Enable or disable selfie shape correction.
7. Rear video size
You can adjust the video size for the rear camera.
Galaxy S10 rear cameras support 3 videos aspect ratios:
- 16:9 (default). In 16:9, you can choose UHD (3840*2160), UHD@60 fps, FHD (1920*1080), FHD@60 fps, or HD (1280*720).
- Full (19:9). In 19:9, the video resolution is fixed at 2280*1080.
- 1:1. In 1:1, the video resolution is fixed at 1440*1440
Please note, in the Galaxy S10 camera app interface, once in the video mode, you can only choose one of the three the aspect ratios. If you choose the 16:9 aspect ratio, the resolution and frame rate settings here will be used automatically.
On Galaxy S10, S10+, S10e, and S10 5G, Samsung removed the resolution settings for photos. For photos, you can only set the aspect ratio (4:3, 16:9, 1:1, and 19:9). The size (resolution) of the photo will be maxed out at that aspect ratio as explained in this guide.
8. Front video size
The front video size settings are similar to those for the rear video size except that the front camera does not support 60 fps recording.
9. Advanced recording options
Under the advanced recording options in Galaxy S10 camera settings, you can enable:
- HEVC (High-efficiency video coding). It will save you some storage space for the videos if it is enabled. Similar to HEIF, the downside is that some devices and platforms may not support HEVC videos.
- HDR 10+. The contrast and color in each scene/frame will be optimized if this option is enabled. But you need a TV or a device that supports HDR 10+ videos.
When sharing HEVC or HDR10+ videos through the Gallery app, you can choose to convert them to normal videos. There is an entry for this in the Gallery app.
10. Video stabilization
Video stabilization on Galaxy S10 mainly compensates the motion of the phone. If your video is shaky and blurry due to the motion of the objects, you may try to disable this option (a bit counter-intuitive) and turn on/off tracking auto-focus.
11. HDR
If you turn on HDR, you can then choose to:
- Apply when needed (default). Galaxy S10 camera app will decide whether the HDR is needed for the given shot.
- Always apply.
12. Tracking autofocus
If enabled, the Galaxy S10 camera can “follow” the motion of the selected object and keep it focused.
13. Grid lines
If enabled, you can choose to show:
- 3*3 rectangles marked by lines in the preview screen. This can help you compose a better photo (e.g., keeping the main object in the centre rectangle).
- A square. I have no idea who may need this. It was removed in Android 10 update for Galaxy S10.
You can choose to add location tags to the photos and videos so that you can know where the photo is taken after many years.
When sharing photos or videos, some apps (e.g., Google Photos) by default, will remove these tags automatically.
Of course, if you do not want to keep such info, you can disable this option.
15. Camera modes in Galaxy S10 camera settings
You can enable (show) or disable (hide) some camera modes in the camera app interface. You can also sort them as you like.
Under camera mode settings, you can also enable keep using the last mode. If enabled, next time, when you start the camera app, the last used camera mode will be selected automatically
In the April firmware update, a new Galaxy S10 camera night mode was added as explained in this guide.
16. Shooting methods
In addition to using the shutter button, you can also take photos using the volume key, your voice, a floating shutter button, or showing your palm (for selfies).
Please refer to this guide on various shooting methods on Galaxy S10.
17. Quick launch
You can quickly press the power key twice to launch the camera app at any time even when the screen is locked.
This is usually referred to as Galaxy S10 camera quick launch. You can disable it if you do not need this feature.
18. Quick review in Galaxy S10 camera settings
If enabled, after taking the photo, the picture will be shown on the screen for a few seconds for you to review it.
By default, the quick review is disabled in Galaxy S10 camera settings.
19. Reset Galaxy S10 camera settings
If you mess up the camera settings, you can reset the settings to the default.
This will only reset the camera settings. It does NOT affect any of your files or other settings.
Do you understand Galaxy S10 camera settings now? Do you have any questions on Galaxy S10 camera settings on Galaxy S10, S10+, S10e, and S10 5G?
If you have any questions or encounter any problems with Galaxy S10 camera settings on Galaxy S10, S10e, S10+, and S10 5G, please let us know in the comment box below.
The community will help you find the answer.
If you have questions on new features of Samsung Galaxy S10, please check Galaxy S10 new features guides page.
For using Galaxy S10, please check Galaxy S10 how-to guides page.
You can find the detailed guides of using Galaxy S1o camera in Galaxy S10 camera guides page.
To find and use accessories for Galaxy S10, please check Galaxy S10 accessories guides page.
To read and download the official Samsung Galaxy S10 user guides (in PDF format) in your local language, please check Galaxy S10 user guides page.
Also, do not forget to subscribe to our newsletter to get the latest update on Galaxy S10.
[newsletter]
Brand new S10. Open camera, go to settings, scroll down and there is no camera settings option.
Tap the gear icon inside the camer app. What do you get?
-- Our Facebook page || Galaxy S6 Guides || Galaxy S7 Guides || Android Guides || Galaxy S8 Guides || Galaxy S9 Guides || Google Home Guides || Headphone Guides || Galaxy Note Guides || Fire tablet guide || Moto G Guides || Chromecast Guides || Moto E Guides || Galaxy S10 Guides || Galaxy S20 Guides || Samsung Galaxy S21 Guides || Samsung Galaxy S22 Guides || Samsung Galaxy S23 Guides
I have a new Samsung Galaxy S10 Plus Smartphone and under Camera Settings there is no Camera Mode yet all the Manuals show a Camera Mode setting where you can enable/disable various functions. Was Camera Mode removed on the new Smartphones?
Samsung updated the Camera app during Android 10 update. Now the camera app is almost identical to that in Galaxy S20. So, you may check this guide for the new camera interface, and this guide for the updated camera settings. We are still trying to find time to update this post.
Yes, the camera modes were removed from the Camera settings. You can manage all camera modes by tapping the More button (right to Video, by default). You can also add other camera modes to the interface as explained in this guide.
-- Our Facebook page || Galaxy S6 Guides || Galaxy S7 Guides || Android Guides || Galaxy S8 Guides || Galaxy S9 Guides || Google Home Guides || Headphone Guides || Galaxy Note Guides || Fire tablet guide || Moto G Guides || Chromecast Guides || Moto E Guides || Galaxy S10 Guides || Galaxy S20 Guides || Samsung Galaxy S21 Guides || Samsung Galaxy S22 Guides || Samsung Galaxy S23 Guides
grid lines seem to have updated to just be 3×3 lines, is there any way to change the setting to have the option of the square grid?
No, the square grid line option was removed in the android 10 update.
-- Our Facebook page || Galaxy S6 Guides || Galaxy S7 Guides || Android Guides || Galaxy S8 Guides || Galaxy S9 Guides || Google Home Guides || Headphone Guides || Galaxy Note Guides || Fire tablet guide || Moto G Guides || Chromecast Guides || Moto E Guides || Galaxy S10 Guides || Galaxy S20 Guides || Samsung Galaxy S21 Guides || Samsung Galaxy S22 Guides || Samsung Galaxy S23 Guides
On my Galaxy S10+ I have set the camera to save all the images to the Micro SD card but the Raw images are not not going to the SD Card only the Jpeg’s, is there a setting so all Images go to the SD Card.
No, when saving RAW files, the JPG and DNG files are always saved in the internal storage. You cannot save raw file to SD card directly. One reason is the large file size of the raw file (dng) (which is typically 5-15 times larger than the JPG file). When writing large files in a short period of time, the phone needs to make sure the media writing to is fast enough.
Of course, you can manually copy or move any of these files to the SD card later.
-- Our Facebook page || Galaxy S6 Guides || Galaxy S7 Guides || Android Guides || Galaxy S8 Guides || Galaxy S9 Guides || Google Home Guides || Headphone Guides || Galaxy Note Guides || Fire tablet guide || Moto G Guides || Chromecast Guides || Moto E Guides || Galaxy S10 Guides || Galaxy S20 Guides || Samsung Galaxy S21 Guides || Samsung Galaxy S22 Guides || Samsung Galaxy S23 Guides
Is there a way to change the six digit Image numbers on the Samsung Galaxy S10 + from 20200905-171506 to something more meaningful, for example 000001 next Image 000002 and so on, the date is not needed because it is backed into the image. At the moment the six digital (171506) number does not follow in numerical order, the next image taken after 171506 is not 171507 it can be something totally different like 171583. This happens with all the six digit numbers. Is there a way of changing the Image numbering setting?
The last 6 digits are hour (in 24-hour format), minute and second. This makes each file name unique without remembering the “last” number.
For burst shot photos, 3 additional numbers are appended with an underscore.
Anyway, Samsung camera app does not allow you to change the file name format.
-- Our Facebook page || Galaxy S6 Guides || Galaxy S7 Guides || Android Guides || Galaxy S8 Guides || Galaxy S9 Guides || Google Home Guides || Headphone Guides || Galaxy Note Guides || Fire tablet guide || Moto G Guides || Chromecast Guides || Moto E Guides || Galaxy S10 Guides || Galaxy S20 Guides || Samsung Galaxy S21 Guides || Samsung Galaxy S22 Guides || Samsung Galaxy S23 Guides
You directs for s10 take a burst shot all link to s20. My s10 has updated to slide bottom to edge to take burstshot. But it doesn’t slide. Please how to take it ? Do you have instructions that apply to an s10? Thanks
What did you get exactly after using the gesture?
The burst shot mode works identically on Galaxy S10 (with Android 10) and S20.
To take burst shot photos, you need to put your finger on the shutter button, without releasing your finger from the screen, slightly move your finger downwards (do not release your finger from the screen). You should release your finger only if you want to stop taking more photos. So, the gesture is more like “dragging” (but the shutter button does not move of course).
Please note, if you put your finger on the shutter button too long (more than 2 seconds) without moving, the system will recognize it as a “holding” gesture, and therefore records a short video.
-- Our Facebook page || Galaxy S6 Guides || Galaxy S7 Guides || Android Guides || Galaxy S8 Guides || Galaxy S9 Guides || Google Home Guides || Headphone Guides || Galaxy Note Guides || Fire tablet guide || Moto G Guides || Chromecast Guides || Moto E Guides || Galaxy S10 Guides || Galaxy S20 Guides || Samsung Galaxy S21 Guides || Samsung Galaxy S22 Guides || Samsung Galaxy S23 Guides
I now have version 11.0.02.64 on an S10+ but I am missing options for video. My only choices are “ADVANCED RECORDING OPTIONS” and “VIDEO STABILIZATION”. Video stabilization is greyed out as I am using the rear camera. But under advanced I only have two options, HIGH EFFICENCY VIDEOS and HDR10+ VIDEOS. All my other options arent there. Any thoughts?
Hmm looks like I can get the options only if I select PRO VIDEO mode under MORE and then can change all the different options.
What options are you looking for?
-- Our Facebook page || Galaxy S6 Guides || Galaxy S7 Guides || Android Guides || Galaxy S8 Guides || Galaxy S9 Guides || Google Home Guides || Headphone Guides || Galaxy Note Guides || Fire tablet guide || Moto G Guides || Chromecast Guides || Moto E Guides || Galaxy S10 Guides || Galaxy S20 Guides || Samsung Galaxy S21 Guides || Samsung Galaxy S22 Guides || Samsung Galaxy S23 Guides