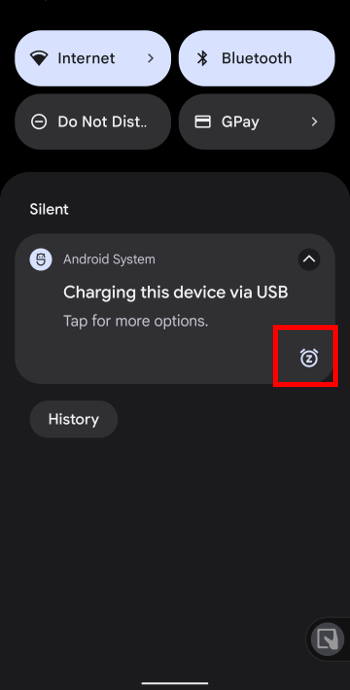
Android Guides

  • Android 101
    • Dual SIM Android phones: Dual standby vs dual active
    • How to make two SIM cards always available in dual SIM dual standby Android phones?
    • How to auto rotate home screen in Android phones (use home screen in landscape mode)
    • Understanding Android battery usage
    • How to check version of Android in your phone or tablet?
  • Lollipop
    • How to enable Flash Player on Android Lollipop?
    • How to use quick settings in Android Lollipop?
    • How to use screen pinning in Android Lollipop?
    • How to use Android Lollipop’s notification and interruption?
    • How to use smart lock in Android Lollipop?
    • What’s battery saver in Android Lollipop?
    • How to use Android Lollipop guest user mode and multiple users?
    • Top 5 new features in Android Lollipop 5.1
    • How to bypass device protection in Android Lollipop 5.1 when you do a factory data reset?
  • Marshmallow
    • Top 12 new features in Android Marshmallow 6.0 for users
    • How to use system UI tuner in Android Marshmallow?
    • How to get Android Marshmallow 6.0 update for your device?
    • How to use micro SD card in Android Marshmallow?
    • How to use micro SD card as internal storage in Android Marshmallow?
    • How to use micro SD card as portable storage in Android Marshmallow?
    • USB options in Android Marshmallow
    • How to use Now on tap in Android Marshmallow?
    • How to manage app permissions in Android Marshmallow?
    • How to use Android Marshmallow text selection?
    • How to use redo and undo features in Android Marshmallow?
    • How to silence Android Marshmallow phones?
    • How to use Do Not Disturb (DnD) in Android Marshmallow?
    • How to manage app notifications in Android Marshmallow?
    • How to use Android Marshmallow RAM manager?
    • How to use application manager in Android Marshmallow?
    • How to manage, use and reset default apps in Android Marshmallow?
    • How to use Android Marshmallow battery optimization?
  • Nougat
    • Android Nougat 7.0 New Features
    • New features in Android Nougat 7.1
    • How to use split-screen mode (multi window) in Android Nougat 7.0/7.1?
    • How to use Android Nougat quick settings bar?
    • How to change display size in Android Nougat?
    • How to use data saver in Android Nougat?
    • Use Android Nougat call blocking to block unwanted calls and SMS without using any apps
    • How to customize quick settings panel in Android Nougat?
    • How to get Android Nougat update for my device? and when?
    • How to use new features of Android Nougat notification panel: bundled notifications, directly reply and notification control?
    • How to set up Android Nougat lock screen wallpaper?
  • Oreo
    • Top 10 New Features of Android Oreo 8.0
    • What’s new in Android Oreo 8.1: Android Oreo 8.1 vs Android Oreo 8.0
    • How to use picture-in-picture (PIP) mode in Android Oreo 8.0 and 8.1?
    • How to use notification dots (notification badges) in Android Oreo?
    • How to use notification snooze in Android Oreo?
    • How to use and manage notification channels in Android Oreo?
    • How to use smart text selection in Android Oreo?
    • How to play Android Oreo Easter egg game?
  • Pie
    • Top 20 new features of Android Pie (Android 9)
    • How to use the Android Pie navigation gestures?
    • How to use the screenshot shortcut to take a screenshot on Android Pie?

How to use the screenshot shortcut to take a screenshot on Android Pie?

by simon Leave a Comment

How to use the screenshot shortcut to take a screenshot on Android Pie?Android Pie (Android 9) added a new screenshot shortcut so that it is very easy to take screenshots in smartphones with Android Pie.

This Android Pie guide explains where to find the screenshot shortcut in Android Pie and how to use it to take a screenshot in Android Pie.

Why you may need the screenshot shortcut?

In all Android phones, the default method of taking a screenshot is pressing and holding the power button and volume down button simultaneously.

Using this button combination to take screenshots works on all Android phones and tablets. regardless of the version of Android.  Even on Amazon Fire tablets, you can take a screenshot with the power button and volume down button although Amazon tried very hard to de-Google in the Fire OS (which is based on Android).

The method is simple and easy if you “master” it.

The tricky part is that you need to press and hold the two buttons “simultaneously“. It means

  • If you hold the power button too early, you get the power menu (power button options).
  • If you hold the volume down button too early, you get the volume settings.

For many users who take screenshots only occasionally,  it is hard to control the timing.

So, a shortcut for taking screenshots is one of the most popular features in some Android phones.

Now, Google finally introduced the screenshot shortcut to take a screenshot on Android Pie.

Both new users and experienced users will find it very useful. Even your grandma can easily take a screenshot with the screenshot shortcut.

Where is the screenshot shortcut in Android Pie?

After hearing about this new Android Pie feature, Some Android Pie users tried to find the screenshot shortcut in the quick settings.

Of course, they cannot find it.

The screenshot shortcut is in power menu (aka power button options).

You can hold the power button for about 2 seconds to get the power menu /power button options as shown below.

Where is the screenshot shortcut in Android Pie

By default, the shortcut to screenshot is enabled in the power button options. Stock Android does not offer a standard method to hide/unhide it.

However, some Android manufactures may customize this feature and let you enable or disable the button.

How to use the screenshot shortcut to take a screenshot on Android Pie?

To take a screenshot, you just need to call out the power button options, then tap Screenshot as shown above to take a screenshot for the screen (without the power button options).… Read the rest

Filed Under: Android Oreo Guides Tagged With: Android Pie, Fire OS, power button, power menu, quick settings, screenshot, screenshot shortcut, shortcut, volume down button

How to use the Android Pie navigation gestures?

by simon Leave a Comment

Android Piese the Android Pie navigation gestures (Android 9) introduced a set of new navigation gestures to replace the navigation buttons. Of course, there are many new features in Android Pie as explained in this guide.

If you just switched to Android from iPhone, you will get used to these Android Pie navigation gestures very quickly. But if you prefer the three navigation buttons, you need some time to adjust.

This Android Pie guide explains how to enable Android Pie navigation gestures, how to disable them,  how to use them, and answer some questions you may have on Android Pie gestures.

Background of Android Pie navigation gestures

In Android OS, the navigation buttons had been an essential part. Since Android Ice Cream Sandwich (ICS, Android 4.0), on-screen navigation buttons (software based navigation button) has been introduced to replace the hardware capacitive buttons.

Although Google wanted to kill the hardware buttons in Android (FYI, all Google released phones including Nexus and Pixel phones only use on-screen navigation buttons), Android manufacturers, especially Samsung, are slow to move in this direction. For example, Samsung only started to remove the hardware buttons in Galaxy S8 and S8+ in 2017.

For new smartphone users and old people, the navigation buttons (hardware or on-screen) are very useful and intuitive.

But for experienced users and younger generations, gestures can be more productive.

In Android 9, Google decided to add navigation gestures to partially replace the on-screen navigation buttons.

Of course, the Android Pie navigation gesture is not a complete replacement to the old navigation buttons because:

  • Android Pie navigation gestures still need the home button. Back button will also appear automatically whenever necessary.
  • Android manufacturers can always customize the gestures, or even disable them and use the old 3 navigation buttons.

In the future Android releases (e.g., Android Q), very likely, Google will strengthen and navigation gestures.  In fact, in Pixel 3 and Pixel 3 XL, the old navigation buttons were disabled, and owners have to use the Android Pie navigation gestures.

What are the Android Pie navigation gestures?

Android Pie navigation gestures are all based on the home button. Here is the list of supported gestures:

  • Swipe upwards from the home button to see recent apps. This is equivalent to tapping the Recent/overview button in the old 3-button system.
  • Swipe right from the home button to switch to the previous app.  In the old 3-button system, you need to get this in two steps: tap the Recent/Overview button, then tap the icon in the overview screen.
… Read the rest

Filed Under: Android Pie Guides Tagged With: Android 9, Android One, Android Pie, Home button, Moto X4, multiwindow, navigation button, navigation gesture, Nexus phone, Pixel phone, settings, swipe, touchscreen gestures

Top 20 new features of Android Pie (Android 9)

by simon Leave a Comment

new features of Android Pie (Android 9)You will enjoy many new features of Android Pie (Android 9) once your phone is updated to Android Pie, or you get a new phone shipped with Android Pie.

Although Android manufacturers may customize or cripple some of the new features of Android Pie (9) in their devices, you will still enjoy a similar Android Pie experiences.

This Android Pie guide explains the top 20 new features of Android Pie (Android 9) most users will enjoy.

What is Android Pie (Android 9)?

Android Pie, aka Android P or Android 9, is the 9th major update of Android OS. It was officially released to the public on August 6, 2018.

As the successor of Android Oreo, many new features of Android Pie are expected in both of the user interface (UI) and the underhood.

Since the release of Android Icecream Sandwich (Android 4.0) in 2011, Google has released one major update of Android each year: Android Jelly Bean (Android 4.1)  in 2012, Android KitKat (Android 4.4) in 2013, Android Lollipop (Android 5)  in 2014, Android Marshmallow (Android 6) in 2015, Android Nougat (Android 7)  in 2016 and Android Oreo (Android 8) in 2017.

On the release date, only Pixel, Pixel XL, Pixel 2 and Pixel 2 XL received the Android Pie (Android 9) update.  Pixel 3 and Pixel 3 XL are the first phones shipped with Android Pie.

Most Android vendors started to roll out Android Pie update for their flagship phones from October 2018.

Why do you care about the new features of Android Pie (Android 9)

For most end-users, user interface (UI) is one of the most important features.

Android Pie will not disappoint you.  There are tons of UI improvements.  Of course, unless you are using a Google Pixel phone or an Android One phone, the manufacturers may tweak these new UI features a bit.

This page highlights the top 20 new features of Android Pie that most Android users will be happy to enjoy.

For app developers, there are also many new features of Android Pie. For example, Android Pie now supports the Wi-Fi Round-Trip-Time (RTT). So you can take advantage of indoor positioning in your apps.

Anyway, updating your phone to Android Pie will rejuvenate your Oreo phone, which may look boring and work slower day-by-day.

#1 of the top 20 new features of Android Pie: new navigational gestures

Navigation buttons  (Home, Back and Recents/Overview) have been a standard feature in Android for a long time.… Read the rest

Filed Under: Android Pie Guides Tagged With: accessibility menu, adaptive battery, adaptive brightness, Android 9, Android Oreo, Android Pie, app actions, app timer, auto-rotate button, battery saver, battery usage, dark mode, device theme, digital wellbeing, doze mode, Home button, lockdown mode, multi-camera, multitasking, multiwindow, navigation gesture, new features, notification, overview selection, screenshot, Slices, smart lock, smart replies, split-screen view, text magnifier, volume control, Wind Down

How to use smart text selection in Android Oreo?

Smart text selection suggests you the most relevant app to use the highlighted text directly.

by editorl Leave a Comment

In Android Ore0 8.0 and 8.1, smart text selection was introduced by adding a dynamic (smart) option (based on text highlighted) to the text selection menu.

So, you can get one additional option (in addition to the normal text selection in previous versions of Android) to use the highlighted text directly without going through the copy and paste procedure.

This Android Oreo guide explains to you what smart text selection is, and how to use this feature with examples.

What is smart text selection?

Prior to Android Oreo, selection, copy, and paste are all independent of other operations.

For example, after you finish the text selection, Android simply put the contents in the clipboard and close the pop-out window. Later, you can paste the text in supported apps.

Smart text selection in Android Oreo gives you a suggested shortcut to specific apps, in addition to all other text selection options.

The suggested app shortcut is based on the contents highlighted.

For example, if you highlight a number, Android Oreo may think it is probably a phone number and therefore the phone app is suggested.

If you highlight an email address, smart text selection will think you may want to email this person, and therefore GMail app is suggested.

When you highlight an address, then Google Maps app will be suggested.

In Android Oreo, smart text selection can only suggest apps that can directly operate on the highlighted text.

How to use smart text selection?

Smart text selection is always enabled in Android Oreo.

There are no user-accessible settings for it. This means you even cannot disable it even if you do not like it.

Smart text selection in Android Oreo may suggest various apps such as Google Maps, GMail, Chrome and Phone.

Here are some examples of smart text selection for these apps.

Smart text selection for Google Maps

Android Oreo can detect addresses from highlighted phrases and suggest Google Maps as the following app to use the selected text.

When an address is highlighted, as shown below, Google Maps is placed before the cut/copy options in the copy/paste menu.

You have the option to use cut/copy/paste and other options normally as in text selection in Android Marshmallow/Nougat.

How to use smart text selection

If you tap Google Maps as shown above, your phone will bring you directly to Google Maps and display the address highlighted, as shown below.

In this case, the highlighted text (the address) will NOT be saved in the clipboard.… Read the rest

Filed Under: Android Oreo Guides Tagged With: Android Oreo, Android Oreo 8.0, Android Oreo 8.1, Smart text selection

How to play Android Oreo Easter egg game?

by editorl 13 Comments

Since Android Gingerbread, Google always hides an Easter egg in each major version of Android.

In Android Lollipop and Marshmallow, the Easter egg is the flappy bird-like game: dodging lollipops or flying bugdroid (to dodge Marshmallows).

The Easter egg in Android Nougat is even more interesting. The cat-catching game (Android Neko) is somewhat addictive for some users.

Android Oreo is not an exception. It also comes with an Easter egg.

What is Android Oreo Easter Egg?

Android Oreo’s Easter Egg features an octopus (because it is Android O).

It is a simple game: you can watch the octopus moving in the sea. Of course, you can drag it to move faster and change its path.

How to access the Android Oreo Easter egg game?

Google did not change the way to access Easter egg in Android Oreo.

If you are new to Android Easter egg, you may follow these steps to access the Android Oreo Easter egg game.

Step 1: Access phone settings

You can access phone settings via quick settings panel or settings app in the Home screen or Apps screen.

For example, as shown below, you can tap the settings icon (gear) in quick settings panel to access phone settings.

Oreo easter game

Step 2: Access Android version

In settings, scroll all the way down until you find system (or about phone in some Android phones).

Then as shown below, tap on System.

Oreo easter game Oreo easter game

In System page, tap on About phone.

Oreo easter game

In About phone page, you can find the Android version.

For example, as shown below, this Pixel XL is running Android 8.1.0.

Please note, some Android vendors may arrange the Android version in other locations.

Oreo easter game

Step 3: unhide Android Oreo Easter egg

You can unhide the Android Oreo Easter egg by tapping rapidly on Android version for more than 5 times.

An Android Oreo icon should appear as shown below.


Oreo easter game

Step 4: Play Android Oreo Easter egg game

Tap on the Android Oreo icon rapidly a few times and hold it to launch the game.

There are also a few other ways to launch the game as well.

The Android Oreo Easter egg- an octopus,  would appear.

You can drag the octopus by its head around the screen to move it.

Oreo easter game

To exit the game, simply press the back icon on the navigation bar.

Oreo easter game

Do you know how to unhide Android Oreo Easter egg? Do you know how to play the Android Oreo Easter egg game?

… Read the rest

Filed Under: Android Oreo Guides Tagged With: Android Easter egg, Android Oreo, Android version, quick settings

How to use and manage notification channels in Android Oreo?

by editorl 2 Comments

Notification channels (notification categories) in Android Oreo give you granular control of notifications.

You can manage individual channels of notifications from all apps to meet your needs.  You can use notification categories (channels) together with notification dots and notification snooze to get total control of notifications in your Android Oreo phones.

This Android Oreo guide explains what notification channels are, 3 ways to access notification categories and how to manage notification channels in Android Oreo phones.

What are notification channels?

When an app pushes notifications, you may want to only allow a certain type of notifications, for example, important notifications related to certain activities, to appear in the notification panel.

Prior to Android Oreo 8.0, you can enable or disable notifications for individual apps.  You can also silence notification for individual apps.

But you cannot selectively disable or enable some notifications of an app.

In Android Ore0, developers can group notifications of their apps into different notification channels (aka notification categories). You, as a user, can disable or enable individual notification channel (notification category) based on your preferences. For example, you can allow notifications from a specific notification channel to bypass do not disturb.

In a nutshell, notification channels offer granular control of notifications of individual apps. You can manage the notifications of each channel as well as of individual app.

Notification channels are enabled by individual app developers for their apps.  Apps developed for older versions of Android (API level less than 27) will not have notification channels even if your phone was updated to Android Oreo.

How to access notification channels in Android Oreo?

There are at least 3 ways to access the notification channels for individual apps:

  • via Quick Settings panel;
  • Settings app;
  • in the notifications panel.

Accessing notification channel through the Quick Settings panel or settings app

Step 1: Access the Settings menu

You can tap the settings app icon in the Home screen or Apps screen to enter phone settings.

Alternatively, you can open the quick settings panel by pulling the status bar downwards (swiping down from the status bar).

Then in the quick settings panel, tap the settings icon as shown below to access phone settings.

How to access notification channel?

Step 2: Check apps and their notification channels (notification categories)

In the Settings page, tap Apps & notifications as shown below.

How to access notification channel?

In apps and notifications page, tap on notifications then tap on app notifications.

How to access notification channel? How to access notification channel?

To see various notification channels for each app,  tap on the app.… Read the rest

Filed Under: Android Oreo Guides Tagged With: Android Oreo, Android Oreo 8.0, Android Oreo 8.1, Notification Channel, Notification Dots, notification panel, Notification Snooze, quick settings

How to use notification snooze in Android Oreo?

You can snooze important notifications without dismissing them to avoid a cluttered notification panel.

by editorl 5 Comments

Notification snooze allows you to temporally snooze a notification and act on it later on. This is similar to snooze an alarm.

When a notification is snoozed, it is not dismissed so that it will remind you again after the snoozing period (which you can customize) expires.

This Android Oreo guide shows you how to use notification snooze in Android Oreo 8.0 and Android Oreo 8.1 to snooze notifications and adjust snoozing duration.

What is notification snooze?

Once in a while, you may want to snooze a notification, instead of dismissing it, when you cannot handle it at that moment.

If you simply dismiss the notification, you very likely will forget it and you may miss some important events.

Notification snooze is a new feature introduced in Android Oreo 8.0. It allows you to snooze notifications to avoid notifications from cluttering in the notification panel.

At the same time, notification snooze will help you to keep the important ones.

How to use notification snooze in Android Oreo?

Notification snooze settings are integrated into the notification panel and notification channels in Android Oreo.

You can use snooze notifications directly in the notification panel.

You can also manage settings for notification snooze in the notification shade.

Please note, you cannot use notification snooze in notification dots. This means you cannot snooze notifications through notification dots menu in home screen or apps screen.

Access notification snooze icon

Notification snooze is associated with individual notifications or notification channels.

When a new notification arrives, you can then snooze it.

To access the notification snooze icon, partially slide the notification to either the right or left until a clock icon appears as shown below.

The clock icon would be accompanied by a settings (gear) icon which leads to the notifications channels and other settings.

How to access and use notification snooze in Android Oreo How to access and use notification snooze in Android Oreo

Choose duration of snooze time or cancel snooze

When you tap the clock icon, as shown above, the default snooze menu will be shown.

Tap Snoozed for 1 hour (except 1 hour area) to snooze the notification immediately for 1 hour.

Tap Undo as shown below to cancel the operation (i.e., not to snooze the notification).

How to access and use notification snooze in Android Oreo

As shown above, the default duration for notification snooze is 1 hour.

You can tap 1 hour to change the snooze duration to 3 other options: 15 mins, 30 mins or 2 hours as shown below

How to access and use notification snooze in Android Oreo

As mentioned above, you can cancel the snooze by tapping ‘undo’ in notification snooze menu. … Read the rest

Filed Under: Android Oreo Guides Tagged With: Android Oreo, Android Oreo 8.0, Android Oreo 8.1, Notification Channel, Notification Dots, notification panel, Notification Snooze

How to use notification dots (notification badges) in Android Oreo?

by editorl 47 Comments

ow to use notification dots (notification badges) in Android Oreo?Notification dots (aka notification badges), a new feature in Android Oreo 8.0 (and 8.1) quickly alerts you to unattended notifications from supported apps so that you will not miss any important notifications.

In addition to notifications in the notification panel, you can now find notification dots, which represents unread notifications near corresponding app icons, in the home screen and apps screen.

This Android Oreo guide shows you how to use notification dots in Android Oreo 8.0 and Android Oreo 8.1

What are notification dots?

When a new notification arrives, it will be automatically shown in the notification panel.

If you clear all notifications in the notification panel, you can then only find the notification/message after you open the app.

Therefore, sometimes, you may miss some important notifications, when you accidentally clear all attended notifications and forget to open the app later.

This problem was addressed in Android Oreo 8.0 with the introduction of notification dots.

If you are a Samsung Galaxy phone users, you probably have used the number badge already. But number badge is Samsung’s proprietary implementation. Only apps that implemented some Samsung libraries will have this number badge feature.

Notification dots in Android Oreo works with all apps. Even the app was developed (targeted) for old versions of Android, Android Oreo is able to show notification dots (notification badges).

You can also customize notification dots in Android Oreo.

For example, you can enable or disable notification dots for individual apps (read on). Notification dots also work with notification channel introduced in Android Oreo.

App developers can further customize notifications to be shown in notification dots.

How to use notification dots in Android Oreo?

Notification badges only appear when you receive notifications in an app.

For example, if you receive a new SMS message, a notification dot would appear at the top right of the messages app icon as shown below.

If it is an app folder, the notification dots indicate the presence of notification badges for one or more of the apps inside the folder. You need open the folder to find out the app having unattended notifications.

How to use notification dots in Android Oreo

To see the notification, press and hold the (long press) app icon.

A pop-up (pop-out) window will appear. App developers can customize this pop-up window.

So the look of this pop-out window may vary from app to app.

For example, for Android Messages app,  the pop-up window looks like below when you have unread messages.… Read the rest

Filed Under: Android Oreo Guides Tagged With: Android Oreo, Android Oreo 8.0, Android Oreo 8.1, Notification Channel, Notification Dots, Notification Snooze

How to use picture-in-picture (PIP) mode in Android Oreo 8.0 and 8.1?

by editorl 2 Comments

 use picture-in-picture (PIP) mode in Android Oreo 8.0 and 8.1Picture-in-picture (PIP) mode allows you to run two apps simultaneously with one app floating over the other app.

This Android Oreo feature is an addition to the split-screen view mode of multiwindow introduced in Android Nougat. PIP mode is similar to pop-up view mode in some Samsung Galaxy phones.

In this Android Oreo guide, you will learn how to use picture-in-picture (PIP) mode in Android Oreo 8.0 and 8.1. We will show you two examples of using picture-in-picture (PIP) mode in Android Oreo: VLC player and Google Duo.

If you are using a Samsung phones, you should check this guide.

What is picture-in-picture (PIP) mode?

PIP is a multi-window mode which is mainly used for video playback. You can use any app with a video playing (or Google Maps navigation) window floating over it.

As picture-in-picture (PIP) mode is a new feature for Android devices requiring the latest Android API (level 27), the number of supported apps is still very limited.

Currently, PIP mode can be used for apps such as Youtube (only if you have Youtube Red), VLC for Android, Google Duo, voice navigation in Google Maps, video calls in Whatsapp and a few others.

This list will expand when more app developers enable PIP support in their apps.

How to grant permission for picture-in-picture (PIP) mode in Android Oreo?

In order for apps to use picture-in-picture (PIP) mode, you have to grant them the permission first.

Apps that can float over other apps in PIP mode need a special permission. By default, this permission is granted when you install the apps.

This is required only for the floating apps. Apps under the floating app don’t need any special permission.

You may follow these steps to grant app permission for picture-in-picture (PIP) mode so that these apps can float over other apps.

Step 1: Enter the Settings page

You can enter the Settings menu through the Settings app in home screen or apps screen.

Another way to access the Settings menu is through the Quick Settings panel by swiping down from the status bar or top of the screen as shown below.

use picture-in-picture (PIP) mode in Android Oreo

Step 2: Enter Apps and Notifications settings

Tap on Apps & notifications in Settings page as shown below.

use picture-in-picture (PIP) mode in Android Oreo

Step 3: Access Advanced settings

Once in apps and notification page, scroll down until you see advanced as shown below.

How to grant permission for picture-in-picture (PIP) mode in Android Oreo? How to grant permission for picture-in-picture (PIP) mode in Android Oreo?

Step 4: Grant permission for picture-in-picture mode

Tap on Advanced and then select Special App Access.… Read the rest

Filed Under: Android Oreo Guides Tagged With: Android Oreo, Android Oreo 8.0, Android Oreo 8.1, app permission, Google Duo, picture-in-picture mode, PIP, VLC player

What’s new in Android Oreo 8.1: Android Oreo 8.1 vs Android Oreo 8.0

New features and enhancements introduced in Android Oreo 8.1

by editorl 4 Comments

Android Oreo 8.1 vs Android Oreo 8.0There are two versions of Android Oreo: Android Oreo 8.1 vs Android Oreo 8.0.

Google released Android Ore0 8.1 in December 5, 2017,  in less than 4 months after the release of Android Oreo (8.0).

There are a couple of new features and enhancements (as well as bug fixes) in Android Oreo 8.1, compared to Android Oreo 8.0.

This Android Oreo guide will show you the new features in Android Oreo 8.1. For new features in Android Oreo 8.0, please check this post.

Android Ore0 8.1 new features: #1. Neural Networks API

With Android Oreo 8.1 update, Android API level climbs to 27 with considerable changes for developers, especially in machine learning.

Neural network processing, which provided a much faster computation than with general-use CPU alone, is one of the most prominent features in Android Ore0 8.1.

Neural Networks API provides a base layer of functionality for higher-level machine learning frameworks. It can be called by machine learning libraries, frameworks, or relevant tools so that developers can train their models off-device and deploy them on Android devices.

With Android Neural Networks API, apps can run computationally intensive operations on mobile phones and to support on-device inferencing including classifying images, predicting user’s behaviour and selecting appropriate responses to search query.

Because inferencing is on-device, all your data are kept on the phone. So, it is unnecessary to worry about the privacy issues.

Android Ore0 8.1 new features: #2. Android Oreo (Go edition)

Android Go is a smaller and lightweight version of Android targeted for more entry-level smartphones.  It will complement Android One, which targets for middle range devices with pure Android experiences.

Android Oreo (Go edition) is the first release of Android Go. Some Android Go devices will be available in the market in 2018.

Compared to stock Android, Android Go is optimized for smartphones with lower specs:

  • Memory optimizations: memory usage is improved to ensure that apps can still run efficiently on devices with 1GB or less RAM.
  • Optimised Google Apps:  Google apps are redesigned for lighter updates and optimised to ensure they use less memory, storage space and mobile data. This allows them to create more space and at the same time improving the phone’s performance.
  • Google Play: All apps will still be available on devices running on Android Go.  But Google Play in Android Go would highlight apps that are specifically optimised for Android Go.

We will review some Android Go phones once they are available.… Read the rest

Filed Under: Android Oreo Guides Tagged With: Android Go, Android Oreo, Android Oreo 8.0, Android Oreo 8.1, Bluetooth, easter egg, navigation bar, Neural Networks API, power menu, quick settings, visual core

  • 1
  • 2
  • Next Page »

Follow Us

  • View gadgetguideonline’s profile on Facebook
  • View MadeBySimonMa’s profile on YouTube
  • View +SimonMaSg’s profile on Google+

RSS Galaxy S9 Guides

  • How to use the updated camera app in Android Pie update for Galaxy S9 and S9 Plus?
  • How to use the rotation toggle to change and lock screen orientation in Android Pie update for Galaxy S9 and S9 Plus?
  • How to lock Galaxy S9 home screen layout on Galaxy S9 and S9+ with Android Pie update?
  • How to use the floating keyboard on Galaxy S9 and S9+ with Android Pie update?
  • How to use the new Recents screen in Android Pie update for Galaxy S9 and S9 Plus?
  • How to use the lift to wake feature on Galaxy S9 and S9+ with Android Pie update?
  • How to update Galaxy S9 or S9 Plus to Android Pie (Android 9)?
  • How to use the night mode on Galaxy S9 and S9+ with Android Pie update?
  • How to use the lockdown mode on Galaxy S9 and S9+ with Android Pie update?
  • How to use the new navigation gestures in Android Pie update for Galaxy S9 and S9+?

RSS Galaxy S7 Guides

  • How to use Galaxy S7 blue light filter in Galaxy S7 and Galaxy S7 edge Android Nougat update?
  • How to use Galaxy S7 multi window new features in Android Nougat udpate for Galaxy S7 and Galaxy S7 edge?
  • How to clear number badge in Galaxy S7 and S7 edge with Android Nougat update?
  • How to customize Galaxy S7 quick setting buttons after Android Nougat update?
  • How to show brightness control above notification panel in Android Nougat update for Galaxy S7 and Galaxy S7 edge?
  • New Galaxy S7 status icons in Galaxy S7 and Galaxy S7 edge Nougat update

RSS Galaxy S8 Guides

  • How to use app shortcuts in Galaxy S8 Home screen in Android Oreo update for Galaxy S8 and S8+?
  • Use notification dots/notification number badge in Galaxy S8 Android Oreo update
  • How to Install Galaxy S8 Android Oreo Update for Galaxy S8 and S8+?
  • New status icons in Android Oreo update for Galaxy S8 and S8+
  • Galaxy S8 Android Oreo update guides
  • Top 10 new features of Android Oreo update for Galaxy S8 and S8+
  • How to use Galaxy S8 secure folder in Galaxy S8 and S8+?
  • How to set screen resolution in Galaxy S8 and S8+?
  • How to move apps to SD card in Galaxy S8 and S8+?
  • Use micro SD card in Galaxy S8 and Galaxy S8+

RSS Galaxy Note Tips & Tricks

  • How to change Galaxy Note 9 S Pen nib?
  • How to use S Pen remote control on Galaxy Note 9?
  • How to use Galaxy Note 9 S Pen?
  • Official Samsung Galaxy Note 9 user manual

RSS Google Home Guides

  • How to connect Google Home to a Bluetooth speaker?
  • How to adjust the equalizer (EQ) of Google Home, Google Home Mini and Google Home Max?
  • Meaning of Google Home Mini LED lights and Google Home Max LED lights
  • How to use touch control for Google Home Mini?
  • How to adjust alarm volume and timer volume in Google Home, Google Home Mini and Google Home Max?
  • Google Home Mini Guides

RSS Moto G Phone Guide

  • Official Moto G6 user manuals, Moto G6 Play user manuals and Moto G6 Plus user manuals
  • What are the differences: Moto G6 vs Moto G6 Plus vs Moto G6 Play (Moto G 2018)?
  • Moto G5 vs Moto G5 plus: the major differences between Moto G5 and Moto G5 plus

RSS Samsung Galaxy S5 Guide

  • Samsung Galaxy S5 Android Lollipop Update Guide
  • Samsung Galaxy S5 Android Lollipop User Guide (PDF)
  • How to enter Galaxy S5 recovery mode?

RSS Moto X Owners Community

  • Official Moto X4 User manual (User guide for Moto X 4th Gen , Moto X 2017)
  • What’s new in Android Marshmallow update for Moto X (Moto X 2014, Moto X Style and Moto X Pure edition)?
  • Top 5 new features in Moto X 2015 (Moto X Style, Moto X Pure edition and Moto X Play) vs Moto X 2014

RSS Moto E Guide

  • Moto E4 vs Moto E4 Plus: major differences between Moto E4 and Moto E4 Plus
  • Moto E 2nd Gen (Moto E 4G): the best value-for-money smartphone in 2015

RSS Galaxy S4 Guides

  • Samsung Galaxy S4 Lollipop User Manual (PDF)
  • Galaxy S4 Android Lollipop update guide

RSS Galaxy S6 Guide

  • Android Nougat Update Guide for Galaxy S6, Galaxy S6 edge and Galaxy S6 edge+
  • Official user manual for Galaxy S6 edge and Galaxy S6 edge+ with Android Nougat update
  • Official Galaxy S6 user manual with Android Nougat update
  • how to use widgets in Galaxy S6 and Galaxy S6 edge?

RSS Drive In Singapore

  • How to convert a foreign driving license to a Singapore driving license?
  • How to get a Touch ‘n Go card as a Singapore driver?
  • What is covered in the car warranty in Singapore? What is not?
  • What is the Singapore Road Speed Limit?
  • How to register, collect and use Malaysia Vehicle Entry Permit (VEP)?
  • Why are cars in Singapore are so expensive?
  • Drive to Malaysia
  • Car Maintenance and Servicing in Singapore
  • Driving in Singapore
  • Own a car in Singapore

RSS All About Chromecast

  • What’s new in Chromecast 2018 (3rd gen of Chromecast)?
  • How to use VLC media player on PC to stream music and video to Chromecast and Chromecast Audio?
  • How to use VLC for Android to stream local media to Chromecast?
  • How to use Chromecast Ultra to stream 4K contents?
  • How to disable Google Home and Chromecast casting notification?
  • About AllAboutChromecast.com
  • Chromecast Ultra vs Chromecast 2nd Gen
  • Chromecast Preview Program: Everything you need to know
  • How to launch Videostream (and other Chrome apps as well)?
  • How to play games on Chromecast from mobile devices (Android and iOS)?

RSS Headphone Guides

  • What is active noise cancelling (ANC)? How active noise cancelling headphone works?
  • AirPods Guide
  • Sports headphone guides
  • Noise cancelling headphone guides
  • Bluetooth Headphone Guides
  • Headphone 101
  • What are the differences among in-ear, on-ear and over-ear headphones?
  • Headphone Guides: how to choose and use headphones

Copyright © 2019 · GadgetGuideOnline.com is a online community for Gadget Owners! · Hosted by PTRHosting
Android Guide, Android tips, tricks and hacks. Everything you need know about Android. These guides will teach you how to use your Android devices and Android gadgets.
Disclaimer: Android is a trademark of Google. This website is NOT affiliated with Google in any way. All the information provided on this website is provided on an "as is" and "as available" basis and you agree that you use such information entirely at your own risk.

We use cookies to give you the best online experience. By using our website you agree to our use of cookies in accordance with our cookie policy.OKRead more