• Skip to primary navigation
  • Skip to main content
  • Skip to primary sidebar
  • Skip to footer

Android Guides

  • Android 101
    • Dual SIM Android phones: Dual standby vs dual active
    • How to make two SIM cards always available in dual SIM dual standby Android phones?
    • How to auto rotate home screen in Android phones (use home screen in landscape mode)
    • Understanding Android battery usage
    • How to check version of Android in your phone or tablet?
  • Lollipop
    • How to enable Flash Player on Android Lollipop?
    • How to use quick settings in Android Lollipop?
    • How to use screen pinning in Android Lollipop?
    • How to use Android Lollipop’s notification and interruption?
    • How to use smart lock in Android Lollipop?
    • What’s battery saver in Android Lollipop?
    • How to use Android Lollipop guest user mode and multiple users?
    • Top 5 new features in Android Lollipop 5.1
    • How to bypass device protection in Android Lollipop 5.1 when you do a factory data reset?
  • Marshmallow
    • Top 12 new features in Android Marshmallow 6.0 for users
    • How to use system UI tuner in Android Marshmallow?
    • How to get Android Marshmallow 6.0 update for your device?
    • How to use micro SD card in Android Marshmallow?
    • How to use micro SD card as internal storage in Android Marshmallow?
    • How to use micro SD card as portable storage in Android Marshmallow?
    • USB options in Android Marshmallow
    • How to use Now on tap in Android Marshmallow?
    • How to manage app permissions in Android Marshmallow?
    • How to use Android Marshmallow text selection?
    • How to use redo and undo features in Android Marshmallow?
    • How to silence Android Marshmallow phones?
    • How to use Do Not Disturb (DnD) in Android Marshmallow?
    • How to manage app notifications in Android Marshmallow?
    • How to use Android Marshmallow RAM manager?
    • How to use application manager in Android Marshmallow?
    • How to manage, use and reset default apps in Android Marshmallow?
    • How to use Android Marshmallow battery optimization?
  • Nougat
    • Android Nougat 7.0 New Features
    • New features in Android Nougat 7.1
    • How to use split-screen mode (multi window) in Android Nougat 7.0/7.1?
    • How to use Android Nougat quick settings bar?
    • How to change display size in Android Nougat?
    • How to use data saver in Android Nougat?
    • Use Android Nougat call blocking to block unwanted calls and SMS without using any apps
    • How to customize quick settings panel in Android Nougat?
    • How to get Android Nougat update for my device? and when?
    • How to use new features of Android Nougat notification panel: bundled notifications, directly reply and notification control?
    • How to set up Android Nougat lock screen wallpaper?
  • Oreo
    • Top 10 New Features of Android Oreo 8.0
    • What’s new in Android Oreo 8.1: Android Oreo 8.1 vs Android Oreo 8.0
    • How to use picture-in-picture (PIP) mode in Android Oreo 8.0 and 8.1?
    • How to use notification dots (notification badges) in Android Oreo?
    • How to use notification snooze in Android Oreo?
    • How to use and manage notification channels in Android Oreo?
    • How to use smart text selection in Android Oreo?
    • How to play Android Oreo Easter egg game?
  • Pie
    • Top 20 new features of Android Pie (Android 9)
    • How to use the Android Pie navigation gestures?
    • How to use the screenshot shortcut to take a screenshot on Android Pie?
    • How to use overview selection in Android Pie?
  • 10
    • Top 10 new features of Android 10
    • How to use Android 10 dark mode (dark theme)?
    • How to use the Android 10 Emergency button?
    • How to Use Location Access Control in Android 10?
    • How to use navigation gestures in Android 10?
    • How to share Wi-Fi using QR codes in Android 10?
  • 11
    • Top 11 new features of Android 11
    • How To Use Live Caption in Android 10 and Android 11
    • How to play Android 11 Easter Egg game (Android Neko Cat game)?
    • How to use dark theme scheduling in Android 11?
    • How to use native screen recorder in Android 11?
    • How to use notification history and notification logs in Android 11?
  • 12
    • Top 12 new features of Android 12 you should know
    • How to quickly snooze notifications in Android 12?
    • Extra Dim in Android 12: The Definite Guide
    • How to update to Android 12?
  • 13
    • Top 10 New Features of Android 13

quick setting panel

Extra Dim in Android 12: The Definite Guide

How does Extra Dim in Android 12 work? How to customize and use Extra Dim?

Last updated on: May 23, 2022, first published on: May 22, 2022 Leave a Comment

Extra Dim in Android 12: The Definite GuideExtra Dim is a less-known yet very useful new feature in Android 12.

It is not included in our top 12 new features in Android 12 because Extra Dim is a “niche” feature for very specific scenarios (if you often use the phone in a dark environment), not because it is not important.

Extra Dim is often misunderstood by even many professionals. Therefore, many users are confused the Extra Dim with the brightness control.

This Android 12 guide explains what the Extra Dim in Android 12 is, how it works, how to use it in Android 12, and corrects some common misunderstandings about Extra Dim in Android 12.

What is Extra Dim in Android 12?

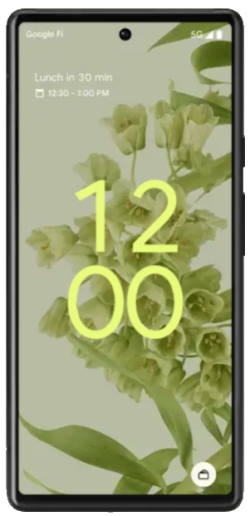
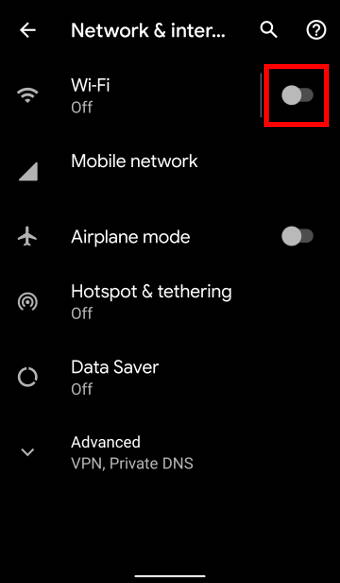
Sometimes, you may feel the phone screen is too bright in a dark environment (e.g., in a theatre). However, the brightness level is already set to the minimum level or auto-brightness (adaptive brightness) is already on.

Basically, you are stuck on that uncomfortable brightness level.

Extra Dim, which was introduced in Android 12,  is designed to solve this issue for you. It can further reduce up to 50% of the brightness of the screen for you.

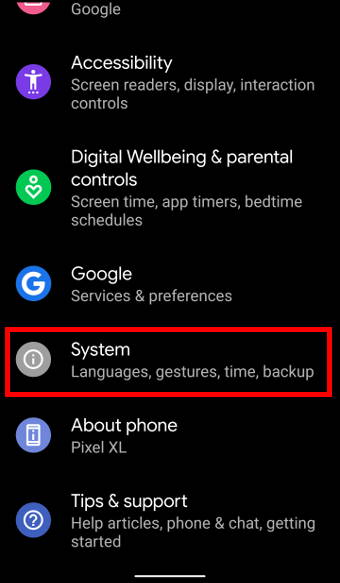
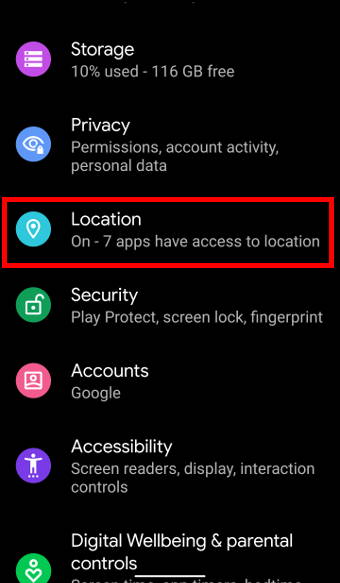
In Android 12, Google implemented Extra Dim as an accessibility feature to further reduce the “brightness” of the screen below the minimum level specified by the hardware vendor.

This may sound ridiculous. How can the brightness be lower than the minimum level specified by the hardware vendor?

So, here is the catch. When Extra Dim is activated,  the colour range will be reduced.

In other words, you get a dimmer screen at the price of the accuracy of the colours. Read on.

As this is a built-in accessibility feature in Android 12, none of the Android vendors has changed this feature.

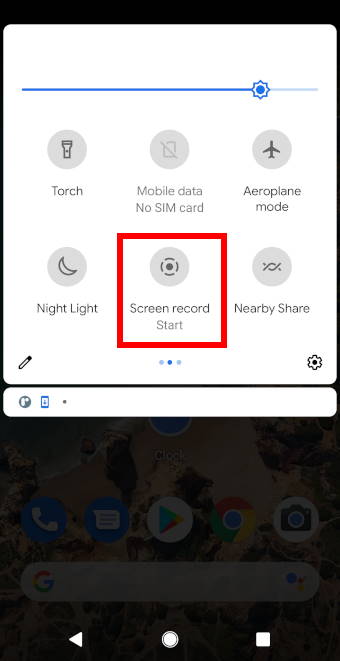
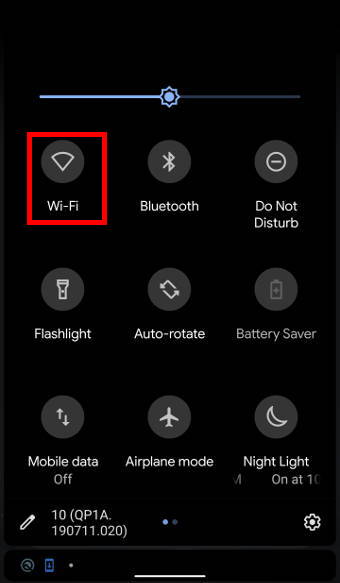
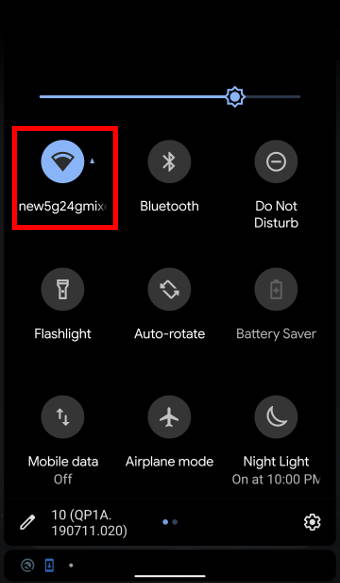
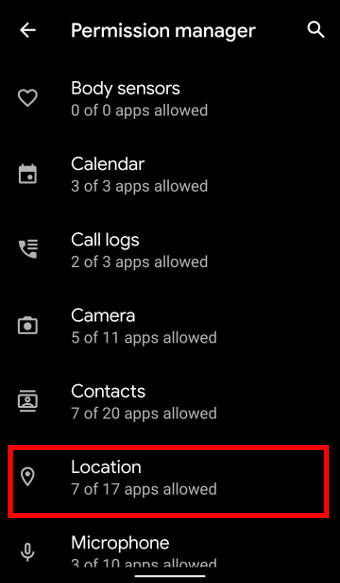
In addition to the entry in the accessibility settings,  a quick setting button for Extra Dim can be found in most Android 12 phones (e.g., in Galaxy S22).

How does Extra Dim in Android 12 work?

To understand how Extra Dim works, we need to know a bit (just a bit) about the colour and brightness.

Each colour on the screen has a value. For example, if the screen can only display 256 colours (8bit; most smartphone screens actually can display 16,777,216 colours or 24bit), the black colour will have a value of 0, and the white 255. The colour range is then 0-255.… Read the rest

Filed Under: Android 12 Guides Tagged With: accessibility menu, adaptive brightness, Android 11, Android 12, Android 12 new features, battery usage, extra dim, Galaxy S22, One UI, Pixel phone, quick setting panel, quick settings, Samsung, settings, shortcut

Top 12 new features of Android 12 you should know

Last updated on: May 22, 2022, first published on: January 16, 2022 Leave a Comment

Top 12 new features of Android 12 Android 12, as the successor of Android 11,  was publicly released on October 4, 2021, with many new features and improvements, as expected.

This guide summarizes the top 12 new features of Android 12 that most users will like (or need) to know. A concise explanation of each of these new features is provided to help users, especially those upgraded from Android 11, quickly start to use these new features.

Detailed step-by-step guides for some of these new features of Android 12 will be covered in other posts separately (and listed on the Android 12 Guides page).

Please note, a few big Android vendors (e.g., Samsung)  may implement a few of these features differently in their Android 12 releases. So, if your phone is not running the stock (or near-stock) Android 12, you may find the settings are in different locations or have different options.

If you have questions about getting the Android 12 update for your device, you may check this guide.

Here is our list of the top 12 new features of Android 12.

1. Redesigned UI: one of the most eye-catching new features of Android 12

After you update to Android 12, you will very likely be surprised by the huge digital clock on the lock screen.

This is just an example of dramatic changes in the redesigned UI (user interface).

Based on Google, the redesigned UI in Android 12 lets users feel more comfortable. For example, you will see more space in the notification panel. The quick settings panel is no longer just icons: the name and current status (if applicable) are also shown.

The redesigned UI in Android 12 actually changed the entire user interface, from shapes, light and motion, to customizable system colours.

It is also a lot easier to customize the Android 12 UI.

2. Camera and microphone access indicator: the most practical new features of Android 12

Android 12 now lets you know whenever the camera or microphone is accessed by an app. So, this is an addition to the location access control introduced in Android 10 to protect your privacy.

In the status bar, you will see the camera and microphone icons when they are being accessed.

And if you don’t want any apps to access your microphone or camera, you can completely disable camera and microphone access globally in the quick settings panel in Android 12. By default, these two quick setting buttons are hidden.… Read the rest

Filed Under: Android 12 Guides Tagged With: AI, Android 10, Android 12, Android 9, Android Lollipop, Android Marshmallow, Android Nougat, Android Oreo, Android Pie, AppSearch, camera access, extra dim, game dashboard, game mode, live caption, lock screen, microphone access, navigation gesture, Notification Snooze, one-hand mode, privacy, privacy control, privacy dashboard, Private Compute Core, quick setting panel, quick settings, screen recorder, screenshot, Scrolling screenshots, touchscreen gestures, WiFi sharing

How to use native screen recorder in Android 11?

You can record whatever on the phone screen and share it as a video.

Last updated on: December 21, 2020, first published on: December 21, 2020 Leave a Comment

Android 11 screen recorderAndroid 11 has finally included a native screen recorder.

Although some Android phones such as the Samsung Galaxy s10 already have a native screen recorder, it was only available to Samsung phones. With the Android 11 native screen recorder, Android devices are now able to take screen recordings without the use of third-party apps.

Read on to learn more about this feature, how to use it and some questions you may have about it.

What is native screen record in Android 11?

As seen by its name, this feature allows users to take a recording of their device screens without using an application.

Although there are many third-party apps which offer decent screen recorders for Android, the new native screen recorder in Android 11 reduces the hassle for users when they want to take a screen recording.

Since it is a native screen recorder, the recordings can be saved and directly backed-up to the Google Photos app. This allows users to be able to view and edit their recordings through the Google Photos app on different devices.

However, do note that as the screen recorder takes a video of what is displayed on the screen when it’s turned on, sensitive information such as passwords and usernames will be captured in the recording. These can be edited out or censored after the recording is saved using video editing apps or through the Google Photos app.

Anyway, now you are not limited by the static screenshots when you want to share the screen. You can share it as a live video with sounds.

How to use native screen record in Android 11?

To allow for easy access to the Android 11 screen recorder, users are able to access and use the feature through the quick settings menu. The following steps will show you how to use native screen record in Android 11.

Step 1: Access the quick setting menu

To access the quick settings menu, pull down twice from the top of the screen (or status bar if not in the immersive mode).

Scroll through the quick settings menu until you see the screen record icon. Tap on it to begin recording.

If you cannot find the button, you can tap the Pencil icon to add it.

Android 11 quick settings

Step 2: Begin recording

After tapping on the screen record icon, a pop-up for screen recorder settings will appear where you can adjust the settings for the screen recorder.… Read the rest

Filed Under: Android 11 Guides Tagged With: Android 11, Android 11 new features, frame rate, Google Photos, native screen recorder, notification panel, quick setting panel, quick settings, refresh rate, resolution, screen recorder, screenshot

How to share Wi-Fi using QR codes in Android 10?

You can generate a QR code for your WiFi and share it with friends

Last updated on: December 13, 2019, first published on: December 14, 2019 Leave a Comment

hare Wi-Fi using QR codes in Android 10In Android 10, Wi-Fi sharing via QR code (Quick Response code) is a new feature which allows users to share Wi-Fi networks with friends by generating a QR code instead of announcing the Wi-Fi password.

This is helpful if you prefer keeping the password of your Wi-Fi network secret when sharing the network with others.

This Android 10 guide shows you the detailed steps of sharing Wi-Fi through  QR code. Some frequently encountered questions on sharing Wi-Fi using QR code were also answered.

How to share Wi-Fi using a QR code in Android 10?

There are at least 2 ways to share Wi-Fi using a QR code in Android 10:

  • Through the Settings app.
  • Through the Quick settings panel.

Through Settings

Step 1: Open Settings

To access Settings, as shown below, tap on the Settings icon in the Apps screen (App drawer), or Home screen.

Of course, you can also tap the gear icon in the quick settings panel.

Accessing Settings through application

Step 2: Access Network and internet page

In the Settings page, tap on Network & internet, as seen below.

Android 10 Settings

Step 3: Turn on Wi-Fi

If the Wi-Fi is not enabled, you need to switch on the Wi-Fi by tapping on the switch, as shown below.

You could skip this step if WiFi was enabled already.

Android 10 Network settings

Step 4: Access the network details

In the network settings page, tap on Wi-Fi.

Then, tap on the name (SSID) of the Wi-Fi that you want to share.

Android 10 Network settings Android 10 Wi-Fi settings

Step 5: Generate a QR code

In the network details page, tap on the Share icon, as shown below.

Before the QR code is created, you will need to verify your identity by inputting the password for the phone.

Once the QR code is created, others can scan it to connect to the Wi-Fi network.

Android 10 Network details QR code example Share WiFi through QR code in Android 10

For example, as shown above, a QR code was generated and ready for share.

Through Quick Settings panel

You can also access the same sharing page from the quick settings panel.

Swipe down twice from the top of the screen to open the Quick settings panel.

In the quick settings panel, tap on the Wi-Fi icon to switch on the Wi-Fi, if it is not enabled, as shown below.

share Wi-Fi using QR codes in Android 10  through Android 10 Quick Settingsshare Wi-Fi using QR codes in Android 10 through Android 10 Quick settings

Once WiFi is connected, you can then press and hold the Wi-Fi icon, as shown above.

Then, tap on the name of the Wi-Fi, as shown below.

Android 10 Wi-Fi settings

Now, you can access the same network details page, and use the Share button to generate QR code as discussed earlier.… Read the rest

Filed Under: Android 10 Guides Tagged With: Android 10, Android 10 new features, camera app, QR code, quick setting panel, settings, WiFi sharing

How to use navigation gestures in Android 10?

A definite guide for Android 10 navigation gestures

Last updated on: March 7, 2020, first published on: December 13, 2019 Leave a Comment

How to use navigation gestures in Android 10?Android 10 brings a new (and improved) set of navigation gestures for you to use the phone more effectively and intuitively.

In addition to using the traditional 3 navigation buttons, and the 2-button navigation gestures as in Android Pie, you can now use gestures only without using any buttons in Android 10.

This Android 10 guide explains the new features of the Android 10 navigation gestures, how to enable them and how to use them.

What’s new in Android 10 navigation gestures?

Previously in Android Pie (Android 9), navigation buttons (3 or 2) are found at the bottom of the screen. Now in Android 10, navigation gestures can fully replace the navigation buttons.

This means that if navigation gestures are enabled, the Home, Back, and Recents (Overview) buttons located at the bottom of the screen, seen below, will be gone.

Android 10 Home screen

How to enable navigation gesture in Android 10?

If you upgraded the phone to Android 10, very likely, the original navigation buttons will likely be used by default.

In this case, you need to follow the following steps to enable the Android 10 navigation gestures.

Step 1: Open Settings

To access Settings, as shown below, tap on the Settings icon in the Apps screen (App drawer), or Home screen, or through the quick settings panel.

Accessing Settings through application Android 10 Quick Settings Panel

Step 2: Access System settings

In Settings, scroll down and tap on System, as shown below.

Android 10 Settings

Step 3: Access Gestures settings

In the System settings page, tap on Gestures, as seen below.

Android 10 System settings page

Step 4: Access System navigation page

In the System settings page, tap on System navigation, as shown below.

Android 10 Gesture settings

Step 5: Enable Gesture navigation

In the System navigation page, there will be the option to change the phone’s system navigation. Tap on Gesture navigation to enable it.

Android 10 System Navigation page

Additionally, you can change the sensitivity of the back gesture by tapping on the settings icon as seen below.

This adjusts how sensitive the phone will respond to gestures along the screen edge and hence prevent any accidental gestures along the screen edge.

Android 10 Gesture navigation Android 10 navigation gesture

How to use Navigation Gestures in Android 10?

Here are the 10 operations you need to master when switching to the new navigation gestures.

1. Returning to Home Screen (Home Screen) — Swipe upwards

To exit from an application and return to the Home screen, swipe up from the bottom of the screen, as shown below.

This has the same function as tapping the Home button in the previous version of Android (0r if you switch back to navigation buttons).… Read the rest

Filed Under: Android 10 Guides Tagged With: Android 10, Android 10 new features, Android 9, Android Pie, app drawer, Home button, Home screen, navigation bar, navigation button, navigation gesture, quick setting panel, quick settings

How to Use Location Access Control in Android 10?

You can easily control your privacy through Android 10 location access control

Last updated on: December 8, 2019, first published on: December 8, 2019 Leave a Comment

Use Location Access Control in Android 10Location access control is a new Android 10 feature that protects your privacy.

This Android 10 guide explains how the location access control in Android 10 protects your data, how to enter location access settings from location settings of from permission manager, and how to use location control on Android 10.

What does location access control in Android 10 do?

The location access control in Android 10 is an extension of the privacy controls in Android 10.

Previously in Android Pie (Android 9), app location access can only be changed from the application setting.  Users have to change the location access permission of each application one by one.

In Android 10, the Location Access control allows users to check, assign, and revoke location access for all apps in one centralised location.

This makes it easier for users to customise which apps can have access to the phone location.

Additionally, with the Android 10 location access control, it ensures external apps cannot easily view information about the phone’s location, and therefore enhances the privacy of the users.

How to enter the location access control page?

Firstly, you need to access Settings, as shown below, by tapping on the Settings icon in the Apps screen (App drawer), or Home screen.

Alternatively, you can access settings through the quick settings panel.

Accessing Settings through application Android 10 Quick Settings Panel

There are 2 ways to go to the location access settings page from the Settings page:

  • From the Location settings page
  • Through the Permission Manager

Method 1: Location settings page

In Settings, scroll down and tap on Location, as seen below, to access the location settings page.

Android 10 Settings

In the Location settings page, tap on App permissions, as shown below.

This will bring you to the location permissions page.

Android 10 Location settings Android 10 Location Access page

As shown above, in the location access control page, you can manage the location access (read on).

Method 2:  through Permission manager

In Settings, tap on Apps & notification.

Android 10 Settings

In the Apps & notification settings page, tap on Advanced to expand the list, as shown below.

Android 10 Apps manager Android 10 Apps manager

As shown above, tap on the Permission Manager to access permission managers of Android 10.

In Permission Manager page, tap on Location, as shown below.

This will bring you to the same location access control page.

Android 10 Permission manager Android 10 Location Access page

How to use location access control?

The location access age allows users to see which apps can view the phone’s location as well as apps that may require permission to use the phone location.… Read the rest

Filed Under: Android 10 Guides Tagged With: Android 10, Android 10 new features, Android 9, Android Pie, app permission, location access, location access control, privacy, privacy control, quick setting panel, quick settings, settings

How to use Android 10 dark mode (dark theme)?

You can use the system-wide dark theme on Android 10 to save battery and protect your eyes

Last updated on: December 17, 2020, first published on: December 3, 2019 Leave a Comment

Android 10 dark modeAndroid 10 dark mode can be regarded as one of the best Android 10 new features.

The dark mode is not an unfamiliar feature for Android phones. It was introduced previously in Android Pie (Android 9).

This Android 10 guide explains the new features of the dark mode, shows you how to enable and use the dark theme in three different ways, and answers some questions you may have on this feature.

In addition, now in Android 11, scheduling has been added to Android Dark theme. With this new feature, devices can automatically switch between dark and light mode according to its settings, reducing the hassle for users to manually switch between the 2 modes. Check out this page to learn more about what’s new in Android 11 Dark theme.

What is new in Android 10 dark mode?

Similar to the dark theme in Android Pie (Android 9), dark mode in Android 10 brings about the following benefits:

  • Improves visibility for users with low vision or are sensitive to bright lights.
  • Less eyestrain when using phones in low light environments.
  • Longer battery life as there is decreased power usage.

However, in Android Pie (Android 9),  the dark mode was not applied system-wide.

For example, in Android Pie (Android 9), the Settings menu remains white even if dark mode is enabled.

Now in Android 10, it can be applied to both the Android system UI as well as supported applications. This means that once dark mode is enabled, the entire Android system UI, as well as supported applications, will automatically switch to the dark theme according to the application’s settings.

How to enable and use Android 10 dark mode?

There are 3 ways to enable dark mode in Android 10:

Method 1:  through Settings

The first method to enable dark mode in Android 10 phones is through the Settings menu.

Step 1: Open Settings

To access Settings, as shown below,  tap on the Settings icon in the Apps screen (App drawer), or Home screen,  or through the quick settings panel.

Accessing Settings through apps screen Android 10 Quick Settings Panel

Step 2: Access Display settings

In Settings, scroll and tap on Display, as shown below.

Display Settings panel

Step 3: Enable the dark mode

In the Display Settings page,  you can find the option for the dark theme.

Tapping on it will turn on dark mode for the phone as well as all supported applications.

If the phone is already in the dark mode, tapping it will turn off dark mode.… Read the rest

Filed Under: Android 10 Guides Tagged With: Android 10, Android Pie, battery saver, dark mode, dark theme, quick setting panel, quick settings, settings

Primary Sidebar

Search the site

Follow Us

  • View gadgetguideonline’s profile on Facebook
  • View MadeBySimonMa’s profile on YouTube
  • View +SimonMaSg’s profile on Google+

RSS Samsung Galaxy S21 Guides

  • Top 12 new features in Android 12 update for Galaxy S21, S20 and S10
  • Android 12 update vs One UI 4.0 vs One UI 4.1: update Galaxy S21, S20 and S10 to Android 12
  • How to set and resize photo size on Samsung Galaxy S21, S20, S10, and S9 without using any third-party apps?
  • How to Customize Galaxy S21 Home Screen?
  • Master Galaxy S21 Lock Screen Settings
  • How to use widgets on Galaxy S21?
  • How to Use and Customize Galaxy S21 Side Key?
  • How to hide Galaxy S21 password and PIN when typing?
  • How to power on, power off, and reboot Galaxy S21,even when the phone hangs?
  • How to use Galaxy S21 quick settings panel?

RSS Galaxy S20 Guides

  • How to Use Enhanced Processing on Galaxy S20 with Android 11 update?
  • How to access, use, and customise widgets on Galaxy S20 lock screen and AOD screen with Android 11 update for Galaxy S20?
  • How to update Galaxy S20 to Android 11?
  • How to use Galaxy S20 lockdown mode?
  • Top 11 new features in Galaxy S20 Android 11 update
  • How to use Galaxy S20 recovery mode?
  • How to use 5 different shooting methods for Galaxy S20 camera?
  • How to use and customize power mode on Galaxy S20?
  • A Complete Guide Of Galaxy S20 Assistant Menu
  • How to manage location services on Galaxy S20 to protect your privacy?

RSS Galaxy S10 Guides

  • Top 10 new features in Android 10 update for Galaxy S10
  • Top 5 new features added in Galaxy S10 September Update
  • How to move apps to the micro SD card to free phone storage on Galaxy S10 ?
  • Galaxy S10 wireless charging guide
  • How to use app folders on Galaxy S10 Home screen and Apps screen?
  • How to enable and use Galaxy S10 developer options?
  • How to hide suggested apps on Galaxy S10? and how to stop Finder uploading your data to Samsung servers?

RSS Galaxy S9 Guides

  • How to remap Bixby button on Galaxy S9 and S9+ after updating to Android Pie?
  • How to use the new navigation gestures in Android Pie update for Galaxy S9 and S9+?
  • Top 9 new features of Android Pie update for Galaxy S9 and S9+
  • Galaxy S9 Android Pie update guides
  • How to use a USB flash drive on Galaxy S9 and S9+?
  • How to use Galaxy S9 camera Pro Mode on Galaxy S9 and S9+?
  • How to back up Galaxy S9 and S9+?
  • How to use micro SD card on Galaxy S9 and S9+?
  • How to use Do Not Disturb on Galaxy S9 and S9+?
  • How to use quick setting buttons on Galaxy S9 and S9+?

RSS Galaxy S8 Guides

  • How to use the new features in Android Pie update for Galaxy S8 and S8+?
  • How to use app shortcuts in Galaxy S8 Home screen in Android Oreo update for Galaxy S8 and S8+?
  • Use notification dots/notification number badge in Galaxy S8 Android Oreo update
  • How to Install Galaxy S8 Android Oreo Update for Galaxy S8 and S8+?

RSS Galaxy S7 Guides

  • How to change screen resolution of Galaxy S7 and S7 after Android Nougat update?
  • Use Galaxy S7 camera app with Android Nougat update in S7 and S7 edge
  • How to find out the app pushing pop up ads in Galaxy S7 and S7 edge?
  • How to use Galaxy S7 S View cover (for S7 and S7 edge)?

RSS Galaxy Note Guides

  • Top 11 disappointments of Galaxy Note 20 and Galaxy Note 20 Ultra
  • How to use the Dynamic Lock screen on Galaxy Note 10?
  • Galaxy Note 10 LED View Cover Guide and Review
  • Install S Note app and Extension pack on Galaxy Note 10
  • How to Use Galaxy Note 10 Camera App?
  • Galaxy Note 10 SIM Card Guide
  • How to use Samsung DeX for PC with Galaxy Note 10 and Galaxy Note 10+?
  • How to use Galaxy Note 10 Clear View cover (S View cover)?
  • How to charge Galaxy Note 10 battery?
  • How to use and remap Galaxy Note 10 Side key?

RSS Google Home Guides

  • How to Use Quick Gestures on Nest Hub 2nd Gen and Nest Hub Max?
  • How to Factory Data Reset Nest Audio?
  • Nest Audio Layout
  • Nest Audio vs Google Home: new features and improvements
  • How to connect Google Home to a Bluetooth speaker?
  • Meaning of Google Home Mini LED lights and Google Home Max LED lights

RSS Moto G Guides

  • Moto G8 vs Moto G8 Power vs Moto G8 Power Lite vs Moto G Power vs Moto G Stylus vs Moto G Pro vs Moto G fast: What are the differences?
  • Moto G8 User Manual for Moto G8 Plus and Moto G8 Play
  • Moto G8 Plus vs Moto G8 Play: Differences and common features

RSS Samsung Galaxy S5 Guide

  • How to use volume button to take photos in Galaxy S5?
  • How to customize Galaxy S5 camera shortcuts menu?
  • How to access and use Galaxy S5 notification panel?

RSS Moto X Owners Community

  • Official Moto X4 User manual (User guide for Moto X 4th Gen , Moto X 2017)
  • What’s new in Android Marshmallow update for Moto X (Moto X 2015, Moto X 2014, Moto X Style and Moto X Pure edition)?
  • Top 5 new features in Moto X 2015 (Moto X Style, Moto X Pure edition and Moto X Play) vs Moto X 2014

RSS Moto E Guides

  • How to use Moto E6 camera?
  • How to use SIM cards on Moto E6, E6 Plus, E6 Play, and E6s 2020?
  • How to remove Moto E6 back cover (including Moto E6, Moto E6 Plus, Moto E6 Play)?
  • Official user manual for Moto E6, Moto E6 Plus, Moto E6 Play, and Moto E6s

RSS Galaxy S4 Guides

  • Samsung Galaxy S4 User Manual and Handbook in Italian (Italiano)
  • Voice Recorder

RSS Galaxy S6 Guide

  • Galaxy S6 auto factory reset in Android Marshmallow update
  • Top 10 new features in Android Marshmallow update for Galaxy S6, Galaxy S6 edge and S6 edge+
  • FAQs on Android Marshmallow update for Galaxy S6
  • Galaxy S6 Android Marshmallow update guide

RSS Kindle Fire For Kid

  • How to Use Dark Theme on Fire Tablets with Fire OS 8?
  • How to use Quick Settings on Fire tablets?
  • How to take a screenshot on a Fire tablet without using any apps like a pro?
  • Fire Tablet Buying Guide
  • How-to Guides for Fire tablet

Footer

RSS Drive In Singapore

  • Top 5 rules of driving in Singapore safely and legally during COVID-19 Circuit Breaker period
  • Understand COE Price by 10 Simple Questions
  • How to convert a foreign driving license to a Singapore driving license?
  • How to get a Touch ‘n Go card as a Singapore driver?
  • What is covered in the car warranty in Singapore? What is not?
  • What is the Singapore Road Speed Limit?
  • How to register, collect and use Malaysia Vehicle Entry Permit (VEP)?
  • Why are cars in Singapore are so expensive?
  • Drive to Malaysia
  • Car Maintenance and Servicing in Singapore

RSS All About Chromecast

  • Master the Voice Remote for Chromecast with Google TV
  • Site Search
  • How to factory data reset Chromecast Audio?
  • Chromecast vs Chromecast Audio: which one is for you?
  • Chromecast Audio Guides
  • How to use the new Chromecast app?
  • What’s new in the new Chromecast (Chromecast 2015)
  • How to use Chromecast to share desktop screen (and audio) to TV?
  • How to change Chromecast WiFi network?
  • Privacy

RSS Headphone Guides

  • AirPods Pro 2 New features explained
  • What is Samsung Seamless Codec? 4 things you should know about this new codec
  • How to use widgets to check battery levels and control Galaxy Buds 2, Galaxy Buds Pro, Galaxy Buds Live, Galaxy Buds+, and Galaxy Buds?
  • AirPods 3 vs AirPods Pro: which one should you choose?
  • AirPods 3 vs AirPods 2: Top 8 improvements and new features of AirPods 3
  • How to Use and Adjust Force Sensor on AirPods Pro like a Pro?
  • Galaxy Buds 2 vs Galaxy Buds Pro: the Top 8 Pros and Cons
  • 4 ways to check Galaxy Buds Live battery level
  • How to manage Galaxy Buds Live in Galaxy Wearable App?
  • How to use touch control on Galaxy Buds Live?

© 2015–2023 · GadgetGuideOnline.com is a online community for Gadget Owners! · Hosted by PTRHosting
Android Guide, Android tips, tricks and hacks. Everything you need know about Android. These guides will teach you how to use your Android phones and other Android gadgets.
Powered by Genesis framework for WordPress
Disclaimer: Android is a trademark of Google. This website is NOT affiliated with Google in any way. All the information provided on this website is provided on an "as is" and "as available" basis and you agree that you use such information entirely at your own risk.

Add Android Guides to your Homescreen!

Add