• Skip to primary navigation
  • Skip to main content
  • Skip to primary sidebar
  • Skip to footer

Android Guides

  • Android 101
    • Dual SIM Android phones: Dual standby vs dual active
    • How to make two SIM cards always available in dual SIM dual standby Android phones?
    • How to auto rotate home screen in Android phones (use home screen in landscape mode)
    • Understanding Android battery usage
    • How to check version of Android in your phone or tablet?
  • Lollipop
    • How to enable Flash Player on Android Lollipop?
    • How to use quick settings in Android Lollipop?
    • How to use screen pinning in Android Lollipop?
    • How to use Android Lollipop’s notification and interruption?
    • How to use smart lock in Android Lollipop?
    • What’s battery saver in Android Lollipop?
    • How to use Android Lollipop guest user mode and multiple users?
    • Top 5 new features in Android Lollipop 5.1
    • How to bypass device protection in Android Lollipop 5.1 when you do a factory data reset?
  • Marshmallow
    • Top 12 new features in Android Marshmallow 6.0 for users
    • How to use system UI tuner in Android Marshmallow?
    • How to get Android Marshmallow 6.0 update for your device?
    • How to use micro SD card in Android Marshmallow?
    • How to use micro SD card as internal storage in Android Marshmallow?
    • How to use micro SD card as portable storage in Android Marshmallow?
    • USB options in Android Marshmallow
    • How to use Now on tap in Android Marshmallow?
    • How to manage app permissions in Android Marshmallow?
    • How to use Android Marshmallow text selection?
    • How to use redo and undo features in Android Marshmallow?
    • How to silence Android Marshmallow phones?
    • How to use Do Not Disturb (DnD) in Android Marshmallow?
    • How to manage app notifications in Android Marshmallow?
    • How to use Android Marshmallow RAM manager?
    • How to use application manager in Android Marshmallow?
    • How to manage, use and reset default apps in Android Marshmallow?
    • How to use Android Marshmallow battery optimization?
  • Nougat
    • Android Nougat 7.0 New Features
    • New features in Android Nougat 7.1
    • How to use split-screen mode (multi window) in Android Nougat 7.0/7.1?
    • How to use Android Nougat quick settings bar?
    • How to change display size in Android Nougat?
    • How to use data saver in Android Nougat?
    • Use Android Nougat call blocking to block unwanted calls and SMS without using any apps
    • How to customize quick settings panel in Android Nougat?
    • How to get Android Nougat update for my device? and when?
    • How to use new features of Android Nougat notification panel: bundled notifications, directly reply and notification control?
    • How to set up Android Nougat lock screen wallpaper?
  • Oreo
    • Top 10 New Features of Android Oreo 8.0
    • What’s new in Android Oreo 8.1: Android Oreo 8.1 vs Android Oreo 8.0
    • How to use picture-in-picture (PIP) mode in Android Oreo 8.0 and 8.1?
    • How to use notification dots (notification badges) in Android Oreo?
    • How to use notification snooze in Android Oreo?
    • How to use and manage notification channels in Android Oreo?
    • How to use smart text selection in Android Oreo?
    • How to play Android Oreo Easter egg game?
  • Pie
    • Top 20 new features of Android Pie (Android 9)
    • How to use the Android Pie navigation gestures?
    • How to use the screenshot shortcut to take a screenshot on Android Pie?
    • How to use overview selection in Android Pie?
  • 10
    • Top 10 new features of Android 10
    • How to use Android 10 dark mode (dark theme)?
    • How to use the Android 10 Emergency button?
    • How to Use Location Access Control in Android 10?
    • How to use navigation gestures in Android 10?
    • How to share Wi-Fi using QR codes in Android 10?
  • 11
    • Top 11 new features of Android 11
    • How To Use Live Caption in Android 10 and Android 11
    • How to play Android 11 Easter Egg game (Android Neko Cat game)?
    • How to use dark theme scheduling in Android 11?
    • How to use native screen recorder in Android 11?
    • How to use notification history and notification logs in Android 11?

quick settings

How to use native screen recorder in Android 11?

You can record whatever on the phone screen and share it as a video.

by editorl Leave a Comment

Android 11 screen recorderAndroid 11 has finally included a native screen recorder.

Although some Android phones such as the Samsung Galaxy s10 already have a native screen recorder, it was only available to Samsung phones. With the Android 11 native screen recorder, Android devices are now able to take screen recordings without the use of third-party apps.

Read on to learn more about this feature, how to use it and some questions you may have about it.

What is native screen record in Android 11?

As seen by its name, this feature allows users to take a recording of their device screens without using an application.

Although there are many third-party apps which offer decent screen recorders for Android, the new native screen recorder in Android 11 reduces the hassle for users when they want to take a screen recording.

Since it is a native screen recorder, the recordings can be saved and directly backed-up to the Google Photos app. This allows users to be able to view and edit their recordings through the Google Photos app on different devices.

However, do note that as the screen recorder takes a video of what is displayed on the screen when it’s turned on, sensitive information such as passwords and usernames will be captured in the recording. These can be edited out or censored after the recording is saved using video editing apps or through the Google Photos app.

Anyway, now you are not limited by the static screenshots when you want to share the screen. You can share it as a live video with sounds.

How to use native screen record in Android 11?

To allow for easy access to the Android 11 screen recorder, users are able to access and use the feature through the quick settings menu. The following steps will show you how to use native screen record in Android 11.

Step 1: Access the quick setting menu

To access the quick settings menu, pull down twice from the top of the screen (or status bar if not in the immersive mode).

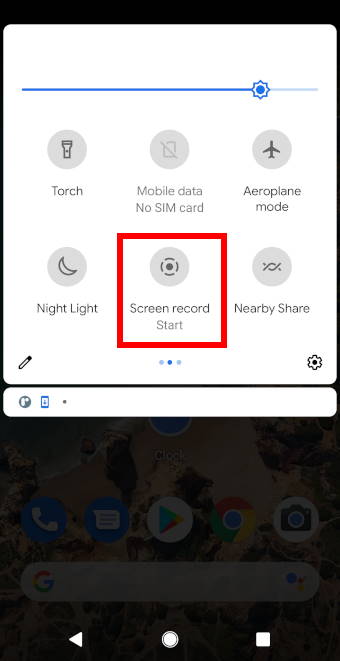
Scroll through the quick settings menu until you see the screen record icon. Tap on it to begin recording.

If you cannot find the button, you can tap the Pencil icon to add it.

Android 11 quick settings

Step 2: Begin recording

After tapping on the screen record icon, a pop-up for screen recorder settings will appear where you can adjust the settings for the screen recorder.… Read the rest

Filed Under: Android 11 Guides Tagged With: Android 11, Android 11 new features, frame rate, Google Photos, native screen recorder, notification panel, quick setting panel, quick settings, refresh rate, resolution, screen recorder, screenshot

How to use dark theme scheduling in Android 11?

by editorl Leave a Comment

Android 11 Dark themeDark theme has been a well-received feature in Android phones since it was first introduced Android Pie (Android 9) and improved greatly in Android 10. In Android 11, new features have been added to optimize and improve the user experience of Android dark theme.

This guide explains the new features in the Android 11 dark theme, how to use it, how to customize it, and how to schedule so that dark theme is turned on and turned off automatically.

What’s new in Android 11 dark theme?

In Android 10, Dark theme was introduced to be applied system-wide on both the Android system UI and apps running on the device.

Now in Android 11, scheduling has been added to Dark theme.

With scheduling, the phone will automatically switch to dark theme mode according to the user’s schedule settings. This reduces the hassle for users to switch between light mode and dark mode on their phones during the day.

There are 3 types of schedules users can apply to their phones Dark theme and will be explained later on in the post:

  1. None.
  2. Turns on at a custom time.
  3. Turns on from sunset to sunrise.

How to access Android 11 Dark theme settings?

There are 2 ways to access the settings for the Android 11 Dark theme:

  1. Through Settings
  2. Through the quick settings panel

Method 1: Through Settings

The first way to access the settings for Dark theme is through Settings.

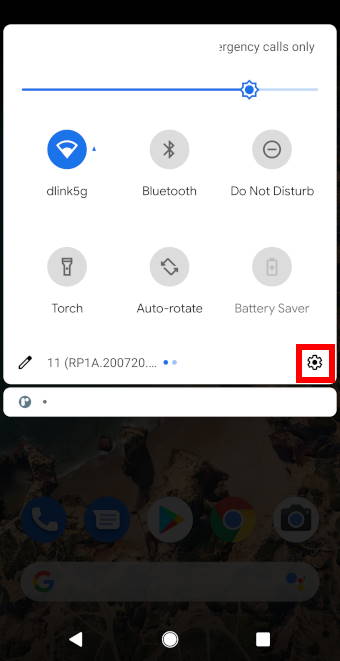
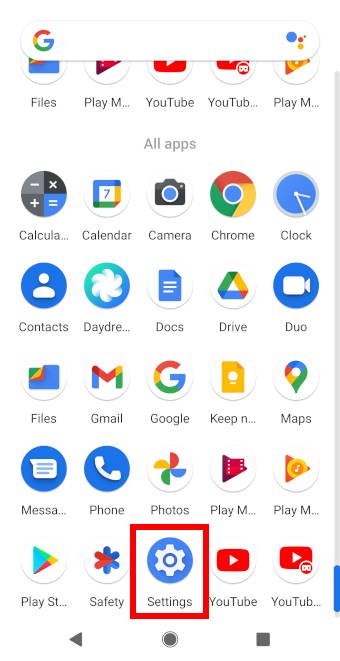
Access Settings either through the quick settings menu or by tapping on the Settings icon in the apps menu.

Quick Settings Panel Android Apps menu

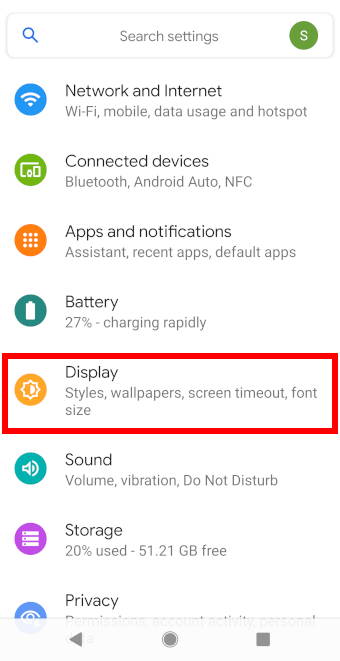
In Setting, tap on Display to enter the display settings.

Android 11 Settings

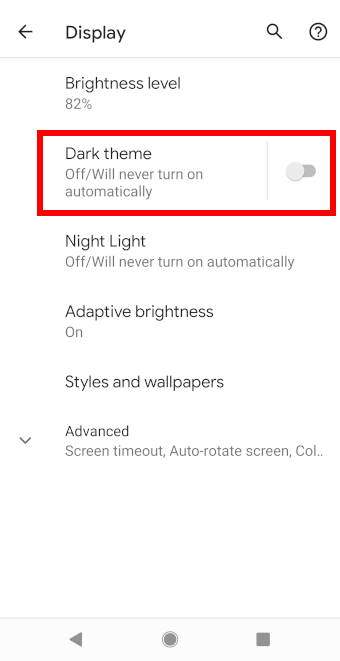
In the Display settings, tap on the Dark theme to enter the settings for it.

Do not tap on the switch as it only turns on/off Dark theme on the device.

Android 11 Display Settings

Method 2: Through the quick Settings menu

Another way to access the settings for the dark theme in Android 11 is through the quick settings panel.

To access the quick menu panel, pull down the status bar twice.

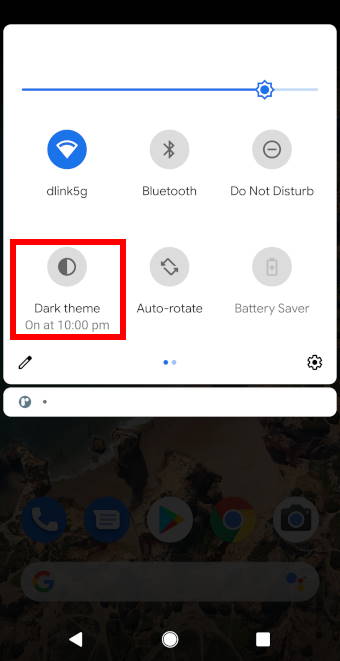
Once in the quick settings panel, hold down on the icon named dark theme as shown below.

Quick Settings Panel

By default, the icon is not found in the quick settings menu; you can add the icon to the quick settings by tapping on the edit icon and dragging the needed icon to the quick settings panel.

How to use dark theme scheduling in Android 11?

… Read the rest

Filed Under: Android 11 Guides Tagged With: Android 10, Android 11, Android 11 new features, Android Pie, dark mode, dark theme, quick settings, settings

How to play Android 11 Easter Egg game (Android Neko Cat game)?

by editorl Leave a Comment

Android 11 Easter Egg game: Neko catAndroid 11 has returned with an Android Easter Egg game. For each major version of Android from Android Gingerbread, an Easter Egg has always been included as a mini-game in the Android System with Android 10 being an exception.

In previous Android systems, such as In Android Lollipop and Marshmallow, the Easter egg game is usually an entirely new game. However, the Android 11 Easter Egg has brought back the beloved Android Neko game that was initially introduced in Android Nougat.

This guide will explain what the Android 11 Easter Egg game is, how to access it and how to play the game (Android Neko Cat game).

What is the Android 11 Easter Egg game?

For Android 11, its Easter Egg is called the Android Neko game. The game works in a similar way as it does in Android Nougat, with the main objective of the game being having users collect cats by providing them with food, water and toys.

Unlike the previous Easter Egg games, the Android 11 Easter Egg is not played in the Quick Settings but rather in the Device Controls under Power menu.

How to access the Android 11 Easter Egg?

Like the previous Easter Egg games, the Android 11 Easter Egg game need to be enabled through the phone Settings.

The following steps will show how you can enable (and disable) the Android 11 Easter Egg game via Settings.

Step 1: Access Settings

Enter Settings either through the quick settings panel or by tapping on the Settings icon in the apps menu, as shown in the two following screenshots.

Quick Settings Panel Android Apps menu

Step 2: Access Android Version

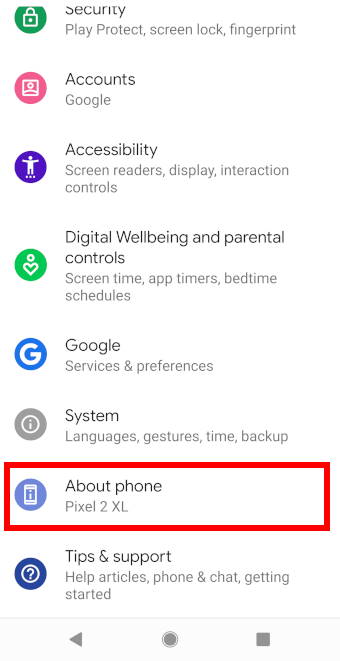
In Settings, scroll to the bottom of the Settings menu and tap on About phone as shown below.

Android 11 Settings

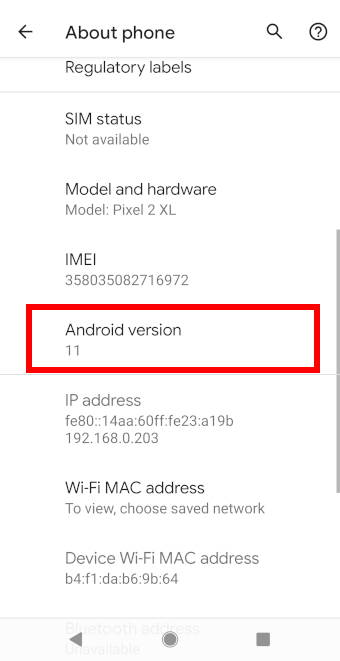
In the About phone page, scroll down until you see Android version and tap on it.

Make sure that it says 11 under Android version, if not you will be unable to access the Android 11 Easter Egg game. (Please refer to this guide on how to update your android version)

Android 11 About phone

Step 3: Access the Easter egg

After tapping on Android version you’ll be brought to a page which allows users to view the information about the Android system.

Tap on Android version 11 rapidly to access the Android 11 easter egg. A green dial should appear as shown below.

Now, you are ready to enable and play the Easter Egg game.… Read the rest
Filed Under: Android 11 Guides Tagged With: Android 11, Android Easter egg, Android Nougat, Android version, easter egg, Neko Cat game, power button, power menu, quick settings, settings

How To Use Live Caption in Android 10 and Android 11

by editorl Leave a Comment

Android Live Caption

Android 10 introduced the Live Caption feature, initially for selected Pixel phones, to automatically caption any audio being played.  Later, most Android vendors implemented it in Android 10 phones (e.g., Samsung Galaxy S20 and Galaxy Note 20).  Google further improved this feature in Android 11.

This Android 11 guide explains what Live Caption is, when you need to use it, how to use it, and how to customise it in Android 11 and Android 10 phones.

What is Live Caption?

Live Caption is a new feature that has been added to phones with Android 10 and up.

When the feature is enabled, the phone automatically detects audio being played and captions them on the phone in real-time. You can use the Live Caption even if the phones audio is being muted.

Live Caption generates real-time caption according to the audio that’s being played. The feature is supported by most Andriod apps but may be unavailable for some media and calling apps.

When to use Live Caption?

Live Caption in Android 10 and Android 11 can be used to caption the audio from the following such as:

  • Audio messages
  • Phone calls
  • Videos
  • Podcasts
  • Recordings

Anyway, you can use this feature to caption most audios on Android 10 and Android 11.

How to turn on Live captions?

By default, Live Caption is not enabled in most Android phones.  You can turn on (and turn off)  it at any time. The captions will only show when speech is detected.

Live Captions in Android 10 and Android 11 can be turned on through 2 ways:

  1. Using Android Settings;
  2. Using the volume button.

Through Settings

You may follow the following steps to turn on Live Caption (or turn off) on your phone via Settings.

Step 1: Open Settings

Enter Settings either through the quick settings panel or by tapping on the Settings icon in the apps menu, as shown in the two screenshots below.

Quick Settings Panel Android Apps menu

Step 2: Open sound panel

In the Settings page, tap on Sound as shown.

Settings

Step 3: Tap on Live Caption

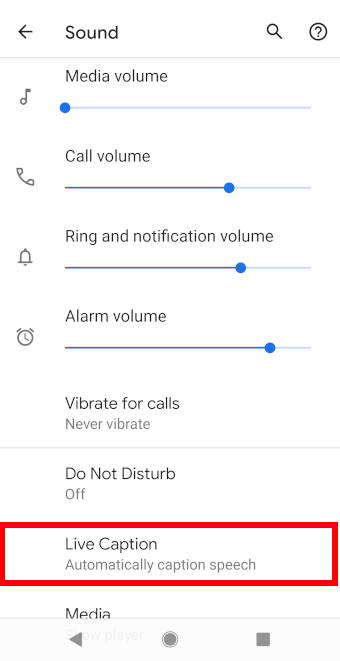
In the Sound settings, scroll down to the Live Caption tab and tap on it to enter Live Caption page.

Sound setting page

Step 4: Enable Live Caption

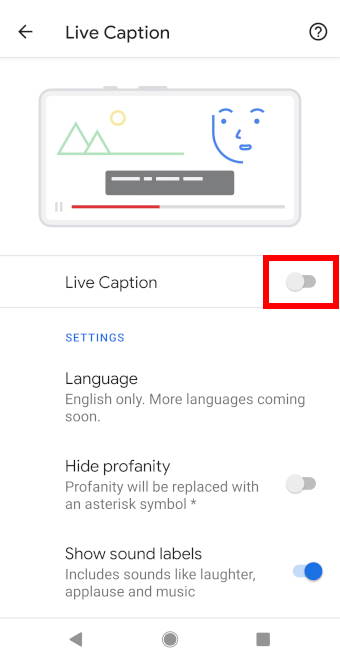
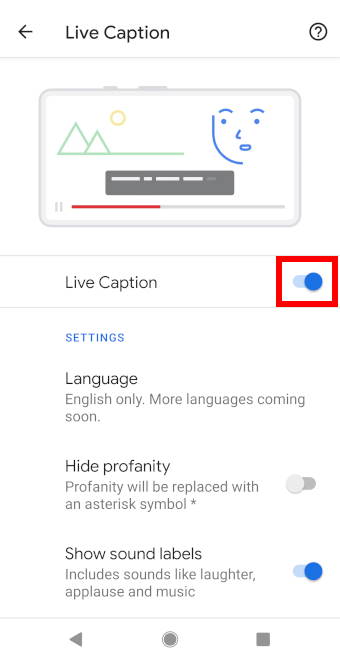
In the Live Caption page, you can turn on/off this feature and change the captions’ settings.

Tap on the switch as shown below to turn Live Caption on.

Tap again to turn it off.

Live caption settings Live caption settings

In this page, you can also access the Live Caption settings, as shown above.… Read the rest
Filed Under: Android 10 Guides, Android 11 Guides Tagged With: Android 10, Android 10 new features, Android 11, Android 11 new features, hide profanity, live caption, Live Caption in volume control, quick settings, screenshot, settings, volume control, volume down button

How to use navigation gestures in Android 10?

A definite guide for Android 10 navigation gestures

by editorl Leave a Comment

How to use navigation gestures in Android 10?Android 10 brings a new (and improved) set of navigation gestures for you to use the phone more effectively and intuitively.

In addition to using the traditional 3 navigation buttons, and the 2-button navigation gestures as in Android Pie, you can now use gestures only without using any buttons in Android 10.

This Android 10 guide explains the new features of the Android 10 navigation gestures, how to enable them and how to use them.

What’s new in Android 10 navigation gestures?

Previously in Android Pie (Android 9), navigation buttons (3 or 2) are found at the bottom of the screen. Now in Android 10, navigation gestures can fully replace the navigation buttons.

This means that if navigation gestures are enabled, the Home, Back, and Recents (Overview) buttons located at the bottom of the screen, seen below, will be gone.

Android 10 Home screen

How to enable navigation gesture in Android 10?

If you upgraded the phone to Android 10, very likely, the original navigation buttons will likely be used by default.

In this case, you need to follow the following steps to enable the Android 10 navigation gestures.

Step 1: Open Settings

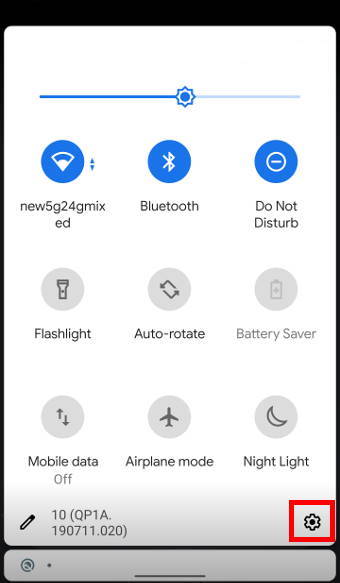
To access Settings, as shown below, tap on the Settings icon in the Apps screen (App drawer), or Home screen, or through the quick settings panel.

Accessing Settings through application Android 10 Quick Settings Panel

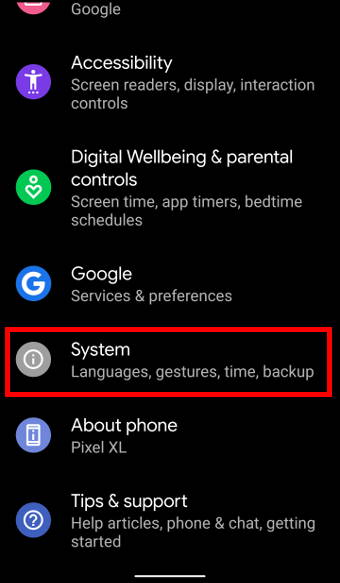
Step 2: Access System settings

In Settings, scroll down and tap on System, as shown below.

Android 10 Settings

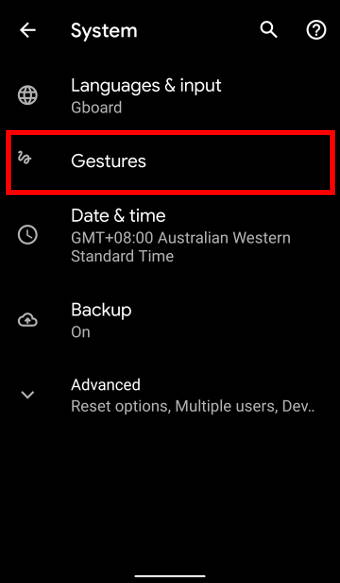
Step 3: Access Gestures settings

In the System settings page, tap on Gestures, as seen below.

Android 10 System settings page

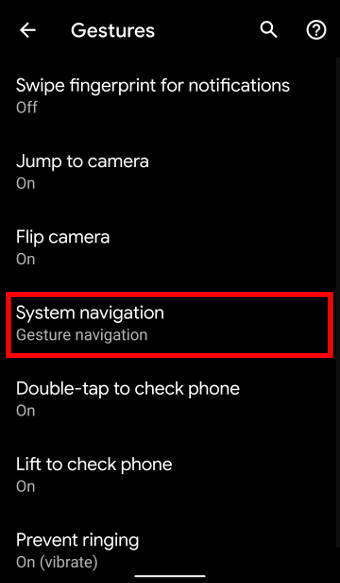
Step 4: Access System navigation page

In the System settings page, tap on System navigation, as shown below.

Android 10 Gesture settings

Step 5: Enable Gesture navigation

In the System navigation page, there will be the option to change the phone’s system navigation. Tap on Gesture navigation to enable it.

Android 10 System Navigation page

Additionally, you can change the sensitivity of the back gesture by tapping on the settings icon as seen below.

This adjusts how sensitive the phone will respond to gestures along the screen edge and hence prevent any accidental gestures along the screen edge.

Android 10 Gesture navigation Android 10 navigation gesture

How to use Navigation Gestures in Android 10?

Here are the 10 operations you need to master when switching to the new navigation gestures.

1. Returning to Home Screen (Home Screen) — Swipe upwards

To exit from an application and return to the Home screen, swipe up from the bottom of the screen, as shown below.

This has the same function as tapping the Home button in the previous version of Android (0r if you switch back to navigation buttons).… Read the rest
Filed Under: Android 10 Guides Tagged With: Android 10, Android 10 new features, Android 9, Android Pie, app drawer, Home button, Home screen, navigation bar, navigation button, navigation gesture, quick setting panel, quick settings

How to Use Location Access Control in Android 10?

You can easily control your privacy through Android 10 location access control

by editorl Leave a Comment

Use Location Access Control in Android 10Location access control is a new Android 10 feature that protects your privacy.

This Android 10 guide explains how the location access control in Android 10 protects your data, how to enter location access settings from location settings of from permission manager, and how to use location control on Android 10.

What does location access control in Android 10 do?

The location access control in Android 10 is an extension of the privacy controls in Android 10.

Previously in Android Pie (Android 9), app location access can only be changed from the application setting.  Users have to change the location access permission of each application one by one.

In Android 10, the Location Access control allows users to check, assign, and revoke location access for all apps in one centralised location.

This makes it easier for users to customise which apps can have access to the phone location.

Additionally, with the Android 10 location access control, it ensures external apps cannot easily view information about the phone’s location, and therefore enhances the privacy of the users.

How to enter the location access control page?

Firstly, you need to access Settings, as shown below, by tapping on the Settings icon in the Apps screen (App drawer), or Home screen.

Alternatively, you can access settings through the quick settings panel.

Accessing Settings through application Android 10 Quick Settings Panel

There are 2 ways to go to the location access settings page from the Settings page:

  • From the Location settings page
  • Through the Permission Manager

Method 1: Location settings page

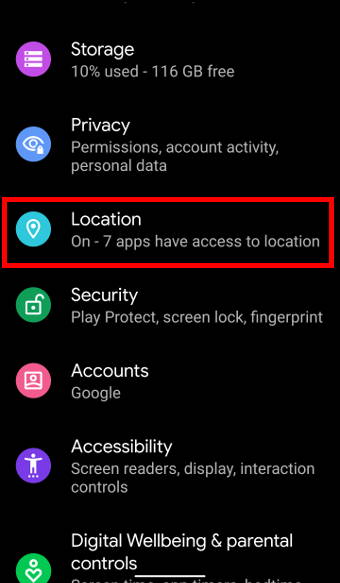
In Settings, scroll down and tap on Location, as seen below, to access the location settings page.

Android 10 Settings

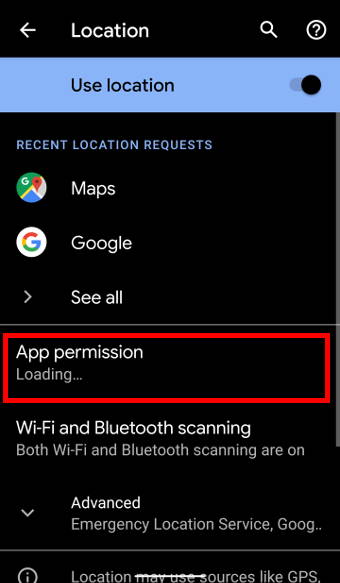
In the Location settings page, tap on App permissions, as shown below.

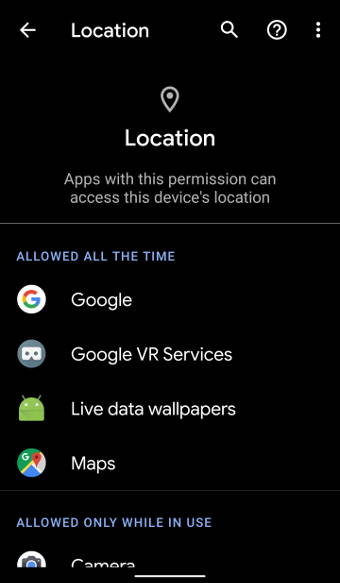
This will bring you to the location permissions page.

Android 10 Location settings Android 10 Location Access page

As shown above, in the location access control page, you can manage the location access (read on).

Method 2:  through Permission manager

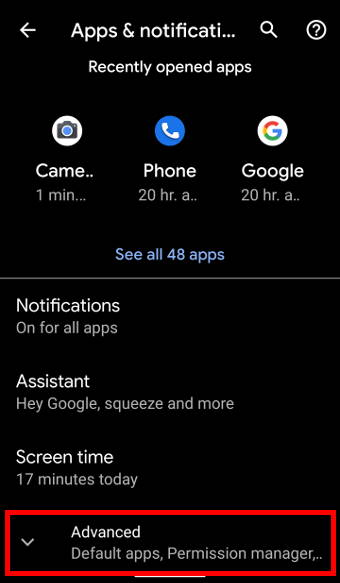
In Settings, tap on Apps & notification.

Android 10 Settings

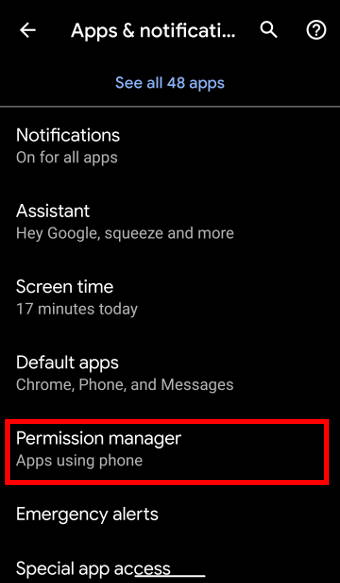
In the Apps & notification settings page, tap on Advanced to expand the list, as shown below.

Android 10 Apps manager Android 10 Apps manager

As shown above, tap on the Permission Manager to access permission managers of Android 10.

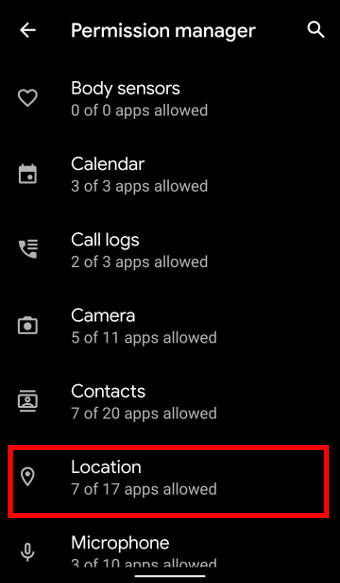
In Permission Manager page, tap on Location, as shown below.

This will bring you to the same location access control page.

Android 10 Permission manager Android 10 Location Access page

How to use location access control?

The location access age allows users to see which apps can view the phone’s location as well as apps that may require permission to use the phone location.… Read the rest
Filed Under: Android 10 Guides Tagged With: Android 10, Android 10 new features, Android 9, Android Pie, app permission, location access, location access control, privacy, privacy control, quick setting panel, quick settings, settings

How to use Android 10 dark mode (dark theme)?

You can use the system-wide dark theme on Android 10 to save battery and protect your eyes

by editorl Leave a Comment

Android 10 dark modeAndroid 10 dark mode can be regarded as one of the best Android 10 new features.

The dark mode is not an unfamiliar feature for Android phones. It was introduced previously in Android Pie (Android 9).

This Android 10 guide explains the new features of the dark mode, shows you how to enable and use the dark theme in three different ways, and answers some questions you may have on this feature.

In addition, now in Android 11, scheduling has been added to Android Dark theme. With this new feature, devices can automatically switch between dark and light mode according to its settings, reducing the hassle for users to manually switch between the 2 modes. Check out this page to learn more about what’s new in Android 11 Dark theme.

What is new in Android 10 dark mode?

Similar to the dark theme in Android Pie (Android 9), dark mode in Android 10 brings about the following benefits:

  • Improves visibility for users with low vision or are sensitive to bright lights.
  • Less eyestrain when using phones in low light environments.
  • Longer battery life as there is decreased power usage.

However, in Android Pie (Android 9),  the dark mode was not applied system-wide.

For example, in Android Pie (Android 9), the Settings menu remains white even if dark mode is enabled.

Now in Android 10, it can be applied to both the Android system UI as well as supported applications. This means that once dark mode is enabled, the entire Android system UI, as well as supported applications, will automatically switch to the dark theme according to the application’s settings.

How to enable and use Android 10 dark mode?

There are 3 ways to enable dark mode in Android 10:

Method 1:  through Settings

The first method to enable dark mode in Android 10 phones is through the Settings menu.

Step 1: Open Settings

To access Settings, as shown below,  tap on the Settings icon in the Apps screen (App drawer), or Home screen,  or through the quick settings panel.

Accessing Settings through apps screen Android 10 Quick Settings Panel

Step 2: Access Display settings

In Settings, scroll and tap on Display, as shown below.

Display Settings panel

Step 3: Enable the dark mode

In the Display Settings page,  you can find the option for the dark theme.

Tapping on it will turn on dark mode for the phone as well as all supported applications.

If the phone is already in the dark mode, tapping it will turn off dark mode.… Read the rest

Filed Under: Android 10 Guides Tagged With: Android 10, Android Pie, battery saver, dark mode, dark theme, quick setting panel, quick settings, settings

How to use the screenshot shortcut to take a screenshot on Android Pie?

by simon Leave a Comment

How to use the screenshot shortcut to take a screenshot on Android Pie?Android Pie (Android 9) added a new screenshot shortcut so that it is very easy to take screenshots in smartphones with Android Pie.

This Android Pie guide explains where to find the screenshot shortcut in Android Pie and how to use it to take a screenshot in Android Pie.

Why you may need the screenshot shortcut?

In all Android phones, the default method of taking a screenshot is pressing and holding the power button and volume down button simultaneously.

Using this button combination to take screenshots works on all Android phones and tablets. regardless of the version of Android.  Even on Amazon Fire tablets, you can take a screenshot with the power button and volume down button although Amazon tried very hard to de-Google in the Fire OS (which is based on Android).

The method is simple and easy if you “master” it.

The tricky part is that you need to press and hold the two buttons “simultaneously“. It means

  • If you hold the power button too early, you get the power menu (power button options).
  • If you hold the volume down button too early, you get the volume settings.

For many users who take screenshots only occasionally,  it is hard to control the timing.

So, a shortcut for taking screenshots is one of the most popular features in some Android phones.

Now, Google finally introduced the screenshot shortcut to take a screenshot on Android Pie.

Both new users and experienced users will find it very useful. Even your grandma can easily take a screenshot with the screenshot shortcut.

Where is the screenshot shortcut in Android Pie?

After hearing about this new Android Pie feature, Some Android Pie users tried to find the screenshot shortcut in the quick settings.

Of course, they cannot find it.

The screenshot shortcut is in power menu (aka power button options).

You can hold the power button for about 2 seconds to get the power menu /power button options as shown below.

Where is the screenshot shortcut in Android Pie

By default, the shortcut to screenshot is enabled in the power button options. Stock Android does not offer a standard method to hide/unhide it.

However, some Android manufactures may customize this feature and let you enable or disable the button.

How to use the screenshot shortcut to take a screenshot on Android Pie?

To take a screenshot, you just need to call out the power button options, then tap Screenshot as shown above to take a screenshot for the screen (without the power button options).… Read the rest

Filed Under: Android Oreo Guides Tagged With: Android Pie, Fire OS, power button, power menu, quick settings, screenshot, screenshot shortcut, shortcut, volume down button

How to play Android Oreo Easter egg game?

by editorl 19 Comments

Since Android Gingerbread, Google always hides an Easter egg in each major version of Android.

In Android Lollipop and Marshmallow, the Easter egg is the flappy bird-like game: dodging lollipops or flying bugdroid (to dodge Marshmallows).

The Easter egg in Android Nougat is even more interesting. The cat-catching game (Android Neko) is somewhat addictive for some users.

Android Oreo is not an exception. It also comes with an Easter egg.

What is Android Oreo Easter Egg?

Android Oreo’s Easter Egg features an octopus (because it is Android O).

It is a simple game: you can watch the octopus moving in the sea. Of course, you can drag it to move faster and change its path.

How to access the Android Oreo Easter egg game?

Google did not change the way to access Easter egg in Android Oreo.

If you are new to Android Easter egg, you may follow these steps to access the Android Oreo Easter egg game.

Step 1: Access phone settings

You can access phone settings via quick settings panel or settings app in the Home screen or Apps screen.

For example, as shown below, you can tap the settings icon (gear) in the quick settings panel to access phone settings.

Oreo easter game

Step 2: Access Android version

In settings, scroll all the way down until you find system (or about phone in some Android phones).

Then as shown below, tap on System.

Oreo easter game Oreo easter game

In System page, tap on About phone.

Oreo easter game

In the About phone page, you can find the Android version.

For example, as shown below, this Pixel XL is running Android 8.1.0.

Please note, some Android vendors may arrange the Android version in other locations.

Oreo easter game

Step 3: unhide Android Oreo Easter egg

You can unhide the Android Oreo Easter egg by tapping rapidly on Android version for more than 5 times.

An Android Oreo icon should appear as shown below.


Oreo easter game

Step 4: Play Android Oreo Easter egg game

Tap on the Android Oreo icon rapidly a few times and hold it to launch the game.

There are also a few other ways to launch the game as well.

The Android Oreo Easter egg- an octopus,  would appear.

You can drag the octopus by its head around the screen to move it.

Oreo easter game

To exit the game, simply press the back icon on the navigation bar.

Oreo easter game

Do you know how to unhide Android Oreo Easter egg?

… Read the rest

Filed Under: Android Oreo Guides Tagged With: Android Easter egg, Android Oreo, Android version, quick settings

How to use and manage notification channels in Android Oreo?

by editorl 2 Comments

Notification channels (notification categories) in Android Oreo give you granular control of notifications.

You can manage individual channels of notifications from all apps to meet your needs.  You can use notification categories (channels) together with notification dots and notification snooze to get total control of notifications in your Android Oreo phones.

This Android Oreo guide explains what notification channels are, 3 ways to access notification categories and how to manage notification channels in Android Oreo phones.

In addition to notification management, Android 11 has introduced notification history; a feature that allows users to track and access dismissed notifications on their devices. Check out this post to learn more about this new feature.

What are notification channels?

When an app pushes notifications, you may want to only allow a certain type of notifications, for example, important notifications related to certain activities, to appear in the notification panel.

Prior to Android Oreo 8.0, you can enable or disable notifications for individual apps.  You can also silence notification for individual apps.

But you cannot selectively disable or enable some notifications of an app.

In Android Ore0, developers can group notifications of their apps into different notification channels (aka notification categories). You, as a user, can disable or enable individual notification channel (notification category) based on your preferences. For example, you can allow notifications from a specific notification channel to bypass do not disturb.

In a nutshell, notification channels offer granular control of notifications of individual apps. You can manage the notifications of each channel as well as of individual app.

Notification channels are enabled by individual app developers for their apps.  Apps developed for older versions of Android (API level less than 27) will not have notification channels even if your phone was updated to Android Oreo.

How to access notification channels in Android Oreo?

There are at least 3 ways to access the notification channels for individual apps:

  • via Quick Settings panel;
  • Settings app;
  • in the notifications panel.

Accessing notification channel through the Quick Settings panel or settings app

Step 1: Access the Settings menu

You can tap the settings app icon in the Home screen or Apps screen to enter phone settings.

Alternatively, you can open the quick settings panel by pulling the status bar downwards (swiping down from the status bar).

Then in the quick settings panel, tap the settings icon as shown below to access phone settings.… Read the rest
Filed Under: Android Oreo Guides Tagged With: Android Oreo, Android Oreo 8.0, Android Oreo 8.1, Notification Channel, Notification Dots, notification panel, Notification Snooze, quick settings

  • Go to page 1
  • Go to page 2
  • Go to Next Page »

Primary Sidebar

Search the site

Follow Us

  • View gadgetguideonline’s profile on Facebook
  • View MadeBySimonMa’s profile on YouTube
  • View +SimonMaSg’s profile on Google+

RSS Galaxy S20 Guides

  • How to Use Enhanced Processing on Galaxy S20 with Android 11 update?
  • How to access, use, and customise widgets on Galaxy S20 lock screen and AOD screen with Android 11 update for Galaxy S20?
  • How to update Galaxy S20 to Android 11?
  • How to use Galaxy S20 lockdown mode?
  • Top 11 new features in Galaxy S20 Android 11 update
  • How to use Galaxy S20 recovery mode?
  • How to use 5 different shooting methods for Galaxy S20 camera?
  • How to use and customize power mode on Galaxy S20?
  • A Complete Guide Of Galaxy S20 Assistant Menu
  • How to manage location services on Galaxy S20 to protect your privacy?
  • How to manage home screen panels on Galaxy S20?
  • How to use Do Not Disturb on Samsung Galaxy S20?
  • How to use SanDisk Ultra Dual Drive USB Type-C on Galaxy S20, S10, S9 and S8?
  • How to customize Galaxy S20 ringtone quickly without using any third-party apps?
  • How to use, manage and master Galaxy S20 camera modes?
  • How to adjust volume for media, ringtones, notifications and alarm tones on Galaxy S20?
  • How to use Galaxy S20 face recognition (face unlock)?
  • How to use and force Galaxy S20 dark mode?
  • How to enter, use, and exit Galaxy S20 safe mode?
  • How to use different camera lens to zoom in and zoom out on Galaxy S20?

RSS Galaxy S10 Guides

  • Top 10 new features in Android 10 update for Galaxy S10
  • Top 5 new features added in Galaxy S10 September Update
  • How to move apps to the micro SD card to free phone storage on Galaxy S10 ?
  • Galaxy S10 wireless charging guide
  • How to use app folders on Galaxy S10 Home screen and Apps screen?
  • How to enable and use Galaxy S10 developer options?
  • How to hide suggested apps on Galaxy S10? and how to stop Finder uploading your data to Samsung servers?

RSS Galaxy S9 Guides

  • How to use the rotation toggle to change and lock screen orientation in Android Pie update for Galaxy S9 and S9 Plus?
  • How to lock Galaxy S9 home screen layout on Galaxy S9 and S9+ with Android Pie update?
  • How to use the night mode on Galaxy S9 and S9+ with Android Pie update?
  • Top 9 new features of Android Pie update for Galaxy S9 and S9+
  • How to use a USB flash drive on Galaxy S9 and S9+?
  • How to use Samsung DeX Station for Galaxy S9, S9+, S8, S8+, Note 8 and Note 9?
  • How to use app pair on Galaxy S9 and S9+?
  • How to use Galaxy S9 edge screen on Galaxy S9 and S9+?
  • How to use smart switch to transfer and migrate data to Galaxy S9 or S9+?
  • How to reboot Galaxy S9 and S9+ if Galaxy S9 hangs?

RSS Galaxy S7 Guides

  • Top 7 new features in Android Nougat update for Galaxy S7 and Galaxy S7 edge
  • Official user manual for Galaxy S7 with Android Nougat update
  • Galaxy S7 and Galaxy S7 edge Android Nougat update guide
  • How to use volume key to take photos in Galaxy S7 camera app?
  • How to use Galaxy S7 S View cover (for S7 and S7 edge)?
  • How to use apps edge in edge screen of Galaxy S7 edge (and Galaxy S6 edge, Galaxy S6 edge+, and Galaxy Note 7)

RSS Galaxy S8 Guides

  • How to use the new features in Android Pie update for Galaxy S8 and S8+?
  • How to use app shortcuts in Galaxy S8 Home screen in Android Oreo update for Galaxy S8 and S8+?
  • Use notification dots/notification number badge in Galaxy S8 Android Oreo update
  • How to Install Galaxy S8 Android Oreo Update for Galaxy S8 and S8+?

RSS Galaxy Note 10 Guides

  • Top 11 disappointments of Galaxy Note 20 and Galaxy Note 20 Ultra
  • How to use the Dynamic Lock screen on Galaxy Note 10?
  • Galaxy Note 10 LED View Cover Guide and Review
  • Install S Note app and Extension pack on Galaxy Note 10
  • How to Use Galaxy Note 10 Camera App?
  • Galaxy Note 10 SIM Card Guide
  • How to use Samsung DeX for PC with Galaxy Note 10 and Galaxy Note 10+?
  • How to use Galaxy Note 10 Clear View cover (S View cover)?
  • How to charge Galaxy Note 10 battery?
  • How to use and remap Galaxy Note 10 Side key?

RSS Google Home Guides

  • Meaning of Nest Audio LED lights
  • Nest Audio Layout
  • Nest Audio Guides
  • How to adjust the equalizer (EQ) of Google Home, Google Home Mini and Google Home Max?
  • How to use touch control for Google Home Mini?
  • Google Home Mini Guides

RSS Moto G Phone Guide

  • Moto G8 vs Moto G8 Power vs Moto G8 Power Lite vs Moto G Power vs Moto G Stylus vs Moto G Pro vs Moto G fast: What are the differences?
  • Moto G8 User Manual for Moto G8 Plus and Moto G8 Play
  • Moto G8 Plus vs Moto G8 Play: Differences and common features

RSS Samsung Galaxy S5 Guide

  • Samsung Galaxy S5 Android Lollipop Update Guide
  • How to save photos to SD card on Galaxy S5?
  • How to use Galaxy S5 camera effects?

RSS Moto X Owners Community

  • Official Moto X4 User manual (User guide for Moto X 4th Gen , Moto X 2017)
  • What’s new in Android Marshmallow update for Moto X (Moto X 2015, Moto X 2014, Moto X Style and Moto X Pure edition)?
  • Top 5 new features in Moto X 2015 (Moto X Style, Moto X Pure edition and Moto X Play) vs Moto X 2014

RSS Moto E Guide

  • How to use Moto E6 camera?
  • How to use SIM cards on Moto E6, E6 Plus, E6 Play, and E6s 2020?

RSS Galaxy S4 Guides

  • Top 10 new or improved features in Jelly Bean 4.3 update for your Samsung Galaxy S4
  • Samsung Galaxy S4 User Manual in Arabic (العربية al-ʻarabīyah)

RSS Galaxy S6 Guide

  • Official Galaxy S6 user manual with Android Nougat update
  • How to disable multi window in Samsung Galaxy S6, S6 edge and S6 edge+?
  • Changes on waiting time for wrong input on Galaxy S6 lock screen in Android Marshmallow update
  • Galaxy S6 auto factory reset in Android Marshmallow update

Footer

RSS Drive In Singapore

  • Top 5 rules of driving in Singapore safely and legally during COVID-19 Circuit Breaker period
  • Understand COE Price by 10 Simple Questions
  • How to convert a foreign driving license to a Singapore driving license?
  • How to get a Touch ‘n Go card as a Singapore driver?
  • What is covered in the car warranty in Singapore? What is not?
  • What is the Singapore Road Speed Limit?
  • How to register, collect and use Malaysia Vehicle Entry Permit (VEP)?
  • Why are cars in Singapore are so expensive?
  • Drive to Malaysia
  • Car Maintenance and Servicing in Singapore

RSS All About Chromecast

  • Chromecast vs Chromecast Audio: which one is for you?
  • Google released $15 Ethernet Adapter for Chromecast
  • Chromecast guest mode guide
  • How to use Chromecast backdrop to customize the TV screen?
  • How to change Chromecast time format and time zone?
  • How to use Android app to stream local media files to Chromecast?
  • How to rename Chromecast?
  • Google Cast SDK opens door to public: more apps will work with Chromecast
  • How to reset Chromecast (Factory Data Reset,FDR)?
  • All About Chromecast: a community for Chromecast owners

RSS Headphone Guides

  • Samsung Galaxy Buds Live vs Samsung Galaxy Buds Plus vs Apple AirPods Pro
  • A Complete Guide for Jabra Elite Sport
  • 5 best new features and improvements of Galaxy Buds Plus (Galaxy Buds+ vs Galaxy Buds)
  • Top 10 new features of AirPods Pro (vs AirPods 2)
  • How to use Samsung Galaxy Buds and Galaxy Buds+?
  • What is active noise canceling (ANC)? How active noise-cancelling headphone works?
  • What are the differences among in-ear, on-ear and over-ear headphones?
  • Wireless Earbuds Guides
  • Sports headphone guides
  • Noise-canceling headphone guides

© 2015–2021 · GadgetGuideOnline.com is a online community for Gadget Owners! · Hosted by PTRHosting
Android Guide, Android tips, tricks and hacks. Everything you need know about Android. These guides will teach you how to use your Android phones and other Android gadgets.
Powered by Genesis framework for WordPress
Disclaimer: Android is a trademark of Google. This website is NOT affiliated with Google in any way. All the information provided on this website is provided on an "as is" and "as available" basis and you agree that you use such information entirely at your own risk.

We use cookies to give you the best online experience. By using our website you agree to our use of cookies in accordance with our cookie policy.OKRead more