 The default photo size on Galaxy phones is fine most of the time. But occasionally, you may want to reduce photo size for various purposes.
This Galaxy S21 camera guide explains how to set photo size on Galaxy phones including Galaxy S21, S20, S10 and S9, how to use the Gallery app to resize photo size on these Samsung Galaxy phones, and how to revert back to the original photo size.
How to set photo size on Galaxy S21?
When Samsung switched from Samsung Experience (Samsung Launcher) to One UI with (Android Pie), the camera app was overhauled. One of the casualties is the photo size settings.
In the old Camera app, you can set different sizes (resolutions) for the photos to be taken, as in the Galaxy S7 Camera app. If the storage is limited and you mainly share the photos through social media, you can choose a smaller photo size (lower resolution). Of course, if you may need to print the photo or view the photo on a large screen (e.g., an 8K TV), you should choose a higher resolution.
But with the Android Pie update, the user can only set the aspect ratio (1:1, 16::9, 4:3, or full screen). The photos will always be saved in the highest resolution (largest size) limited by the camera sensor corresponding to each aspect ratio, as explained in this guide.
So, the photo size on Galaxy phones with Android Pie or later is locked to each aspect ratio. You can only set the aspect ratio to change photo size. This affects all variants of Galaxy S8, S9, S10, S20, and S21.
For example, you can use the following photo sizes on Galaxy S21 rear cameras:
- 4:3 aspect ratio: 12MP (4000*3000), and 108MP (12000*9000, for Galaxy S21 Ultra only).
- 16:9 aspect ratio: 9MP (4000*2252)
- 1:1 aspect ratio: 9MP (2992*2992)
- Full-screen (20:9): 7.2MP (4000*1800).
The native aspect ratio of the camera sensor is 4:3. So, photos saved with other aspect ratios are actually clipped from the baseline 4:3 camera sensor data.
For the selfie (front) camera, you can choose the following photo sizes on Galaxy S21.
- 4:3 aspect ratio: 10MP (3648*2736), and 40MP (5472*7296. Galaxy S21 Ultra only)
- 16:9 aspect ratio: 9MP (3968*2232).
- 1:1 aspect ratio: 7.5MP (2736*2736).
- Full-screen (20:9): 7.1MP (3968*1784).
Please note, the selfie camera on Galaxy S21 has a zoom-in mode. In this mode, the resolution is lower than the corresponding sizes mentioned above.
The usage of different aspect ratios was discussed here.
How to resize photo size on Galaxy S21 in Gallery app?
As mentioned above, in the Galaxy S21 Camera app, you can only adjust the aspect ratio. The photo size button only allows you to change the aspect ratio.
So, how can you resize photo size on Galaxy S21, S20, S10, and S9 without using third-party apps?
The answer is to use the Gallery app, which is always available on Galaxy phones.
But to resize the photos, the Gallery app needs the Photo Editor plugin, which is also preinstalled on Galaxy phones with One UI.
The resizing function was added in One UI 2. This means only Galaxy phones with Android 10, 11, and 12 have this feature. So, you can use the Gallery app to resize photos on Galaxy S21, S20, S10, S9, Note 20, Note 10, and Note 9, although the screenshots used in this guide is from Galaxy S21.
You may follow these steps to use the Gallery app to resize photo size on Samsung Galaxy phones
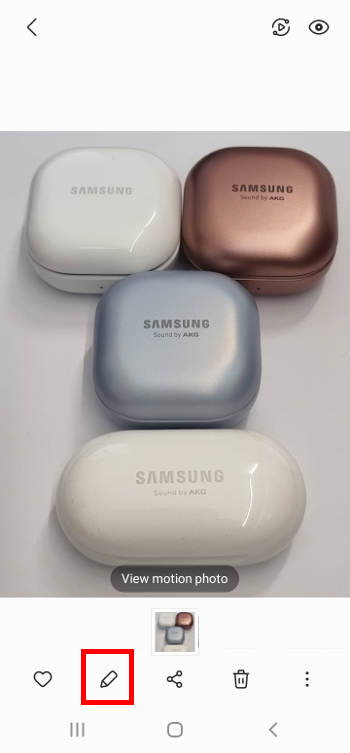
Step 1: Open the photo/image in the Gallery app
Gallery app is always pre-installed on all Samsung Galaxy phones. You cannot uninstall it.
To open a photo or image in the Gallery app, you just need to tap on it.
Please note, in addition to tapping the Gallery app icon on the Galaxy S21 Home screen (or Apps screen), you can access the Gallery app directly from the Camera app using the Gallery shortcut in the Galaxy S21 camera app.
Please note, if you access the camera app from the camera app shortcut on the Galaxy S21 Lock screen (or use Galaxy S21 camera quick launch without unlocking the phone) and then use the Gallery app shortcut, you can only access photos taken in this session. You need to unlock the phone to access all photos on the phone.
For example, as shown in the screenshot below, a photo is opened in the Gallery app.
Step 2: Tap the edit icon to access the Photo Editor
Tap the edit (pencil) icon to launch Photo Editor, which is a pre-installed plugin of the Gallery app.
Samsung tries to keep the photo editor outside of the Gallery app so that it is easier to update it.
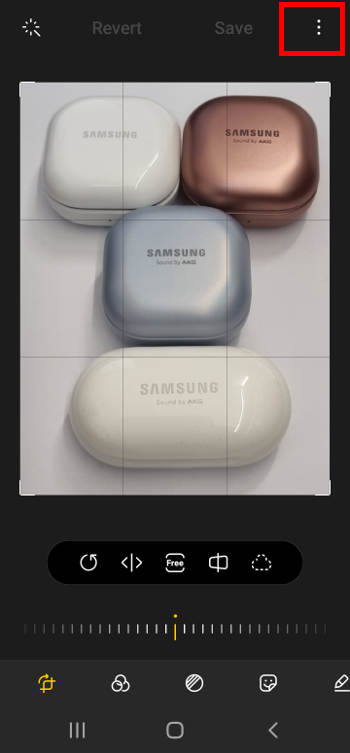
On the Photo Editor interface, as shown on the screenshot above, you can edit the photo in many ways.
In fact, Samsung’s latest Photo Editor is quite useful and handy. It is sufficient for most users in most scenarios. We will release a dedicated guide on how to use all features in the Photo Editor.
In this guide, I will show you how to resize photo size in this app.
Tap the Menu key (3 vertical dots), as illustrated above, to access the Photo Editor menu.
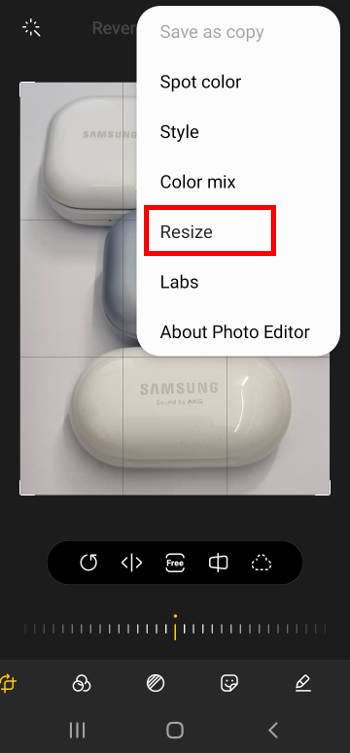
In the pop-out menu, tap Resize, as shown below, to resize the photo or image.
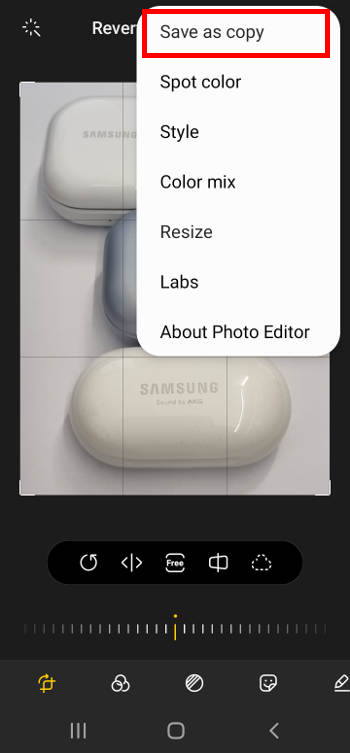
You may notice, there are a few additional features in the menu as well. For example, we will use the Save as copy option later, which is greyed out because we haven’t made any changes to the photo.
Step 4: Resize photo size
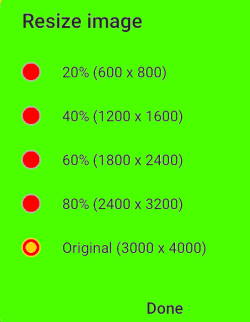
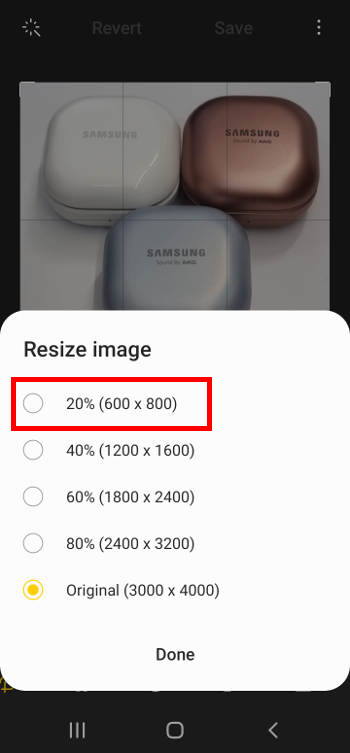
After tapping the Resize option, you can now set the photo size, as shown above.
You can resize photo size to 20, 40, 60, or 80% of its original size in both horizontal and vertical directions. This will keep the original aspect ratio and reduce the pixels in both directions.
So, the number of pixels will be 4% (20%*20%), 16% (40%*40%), 36% (60%*60%), and 64% (80%*80%) of the original number of pixels, respectively.
For example, in this guide, the original photo size is 12MP (3000*4000 pixels). If you chose 20% to resize this photo, the new size will be 0.48MP (600*800). Both the height and the length will shrink to 20% of the original size.
The file size (as in the storage) of the resized photo will reduce to roughly 4% of the original file.
Tap 20%, as shown above.
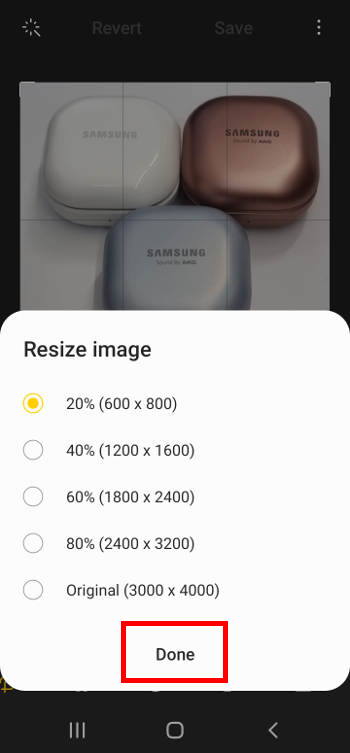
You will then need to confirm the size by tapping Done, as shown in the screenshot below.
Step 5: Save the resized photo
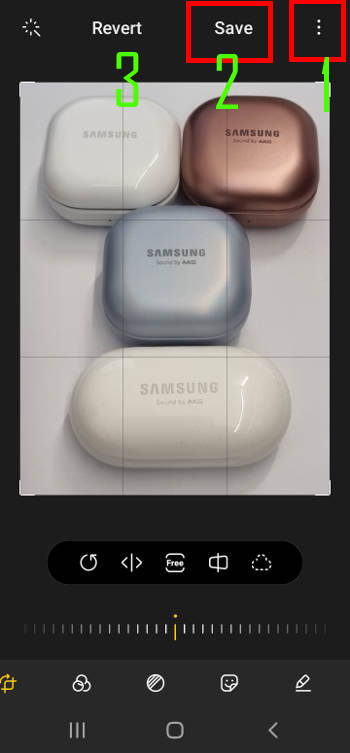
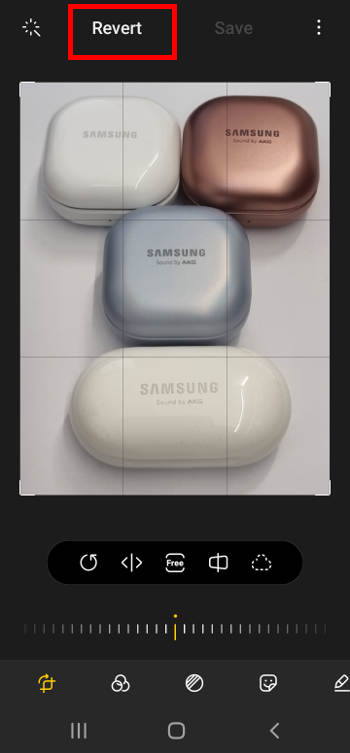
After tapping Done to confirm the new photo size, you will find the Revert and Save buttons on the top is no longer greyed out.
You can:
- Tap the menu key (marked as 1 in the screenshot above), then choose to save the resized photo as a copy. So, you can use both the original photo and resized photo independently on the phone.
- Tap the Save button (marked as 2) to overwrite the original photo. But a shadow copy (which you cannot access directly) of the original photo will automatically be saved. So, you can revert back to the original one as long as the photo is NOT moved out of the current folder. Read on.
- Tap Revert (marked as 3) to discard the resize operation.
As shown on the screenshot below, after you make any changes to the photo, the Save as copy option is not greyed out.
Normally, you should consider the Save as copy option. This allows you to use the resized photo as a new one.
How to revert the photo size to its original size?
One of the advantages of using the Gallery app to resize photo size (or edit photos) on Samsung Galaxy phones is that you can always revert back, as long as you do not manually move the photo out of the default folder.
If you share the resized photo with other users or other devices, they cannot revert to the original photo. The shadow copy is only saved on your device. And only your device has the information to revert.
Of course, the reverting back feature is applicable if you choose to save (to overwrite). If you choose Save as a copy option, then you do not need this feature (and it is not available) because the original photo is still there.
To revert the resized or any edited photo. you just need to open the photo in the Photo Editor (open the resized photo in the Gallery app, then tap the Pencil icon).
Once the resized photo is open, you will see the Revert button on the top, as shown in the screenshot above.
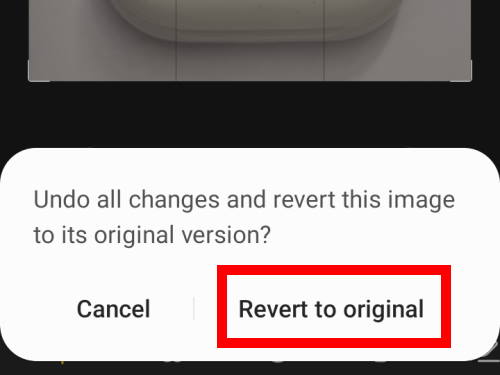
Tap Revert to revert the photo to the original size. If you made other changes, in addition to resizing, all the changes will be reverted.
You need to tap the Revert to original to confirm the operation, as shown below.
Can I resize the photo size in batch in the Gallery App?
No, the Photo Editor in the Gallery app does not support batch processing. You have to resize or edit the photos one by one.
Alternatively, you may use third-party apps to resize photos in batches. It is more convenient to do it on a desktop or laptop, instead of on the phone.
Can you set and resize photo size on Samsung Galaxy S21, S20, S10, and S9 without using any third-party apps? Do you know how to revert to the original photo?
If you have any questions about resizing your photos on Samsung Galaxy phones or need help to revert to the original photo size, please let us know in the comments.
The community will help you.
If you have any questions on using Galaxy S21, you may check our detailed step-by-step Galaxy S21 guides:
- Galaxy S21 new features guides.
- Galaxy S21 how-to guides.
- Galaxy S21 camera guides.
- Galaxy S21 accessories guides.
You can also post questions or share your thoughts on our Facebook page.
The official Samsung Galaxy S21 user manual (PDF) in your local language can be read and downloaded here.
If you want, you can drop us an email on the contact us page.

Leave a Reply