
You can use stickers to decorate your photos by overlaying custom stickers, word art, shapes, dates tamps, emojis, AR emojis, and images over them.
Android 14 (One UI 6) lets you create custom stickers using the Image Clipper.
This Galaxy S23 how-to guide explains what custom stickers are, how to create them with Image Clipper and Sticker Maker, how to use them to decorate your photos and pictures in the Gallery app, and how to manage them.
Because custom stickers were introduced in the Android 13 (One UI 5) update for Galaxy S20, S21, and S22, this guide applies to all Galaxy phones with Android 13 (One UI 5) or later, including Galaxy S23, S22, S21, and S20.
Update: The One UI 6.1 update for Galaxy S23, S23+, and S23 Ultra now allows you to apply styles such as outline, cutout, vintage, and cartoon to the new custom sticker when saving the clipped image as a sticker. It is no longer required to use the Sticker Maker to add such styles.
Table of Contents
- What are customer stickers in the Gallery app?
- How to create customer stickers on Galaxy S23, S22, S21, and S20?
- How to use custom stickers in the Gallery app on Galaxy S23, S22, S21, and S20?
- How to manage custom stickers in the Gallery app on Galaxy S23, S22, S21, and S20?
What are customer stickers in the Gallery app?
When editing photos, you can overlay text, shapes, emojis, or images over them. Stickers in Gallery app refers to photos of individual subjects. They differ from normal pictures with a transparent background so that you will only see the subject when you put them on a photo.
On smartphones and PCs, pictures are always defined in a rectangular shape. For example, a circular object will always have a background around it to make the photo a rectangle. A transparent background can “hide” all parts that are not part of the object. So, overlaying such a picture (sticker) over other photos will put the object without the annoying background on these photos.
On most smartphones, the PNG format is used for stickers because it allows you to define an alpha channel to mask out (i.e., make it transparent) any parts of the picture.
Custom stickers refer to the stickers created by the user, not those provided (pre-installed) by Samsung.
In One UI 3 (Android 11), you can use any images as stickers. But you can only position or resize the sticker. You cannot even crop the image if you add it directly as a sticker. In One UI 4/4.1, you can use freeform selection, and the photo editor can snap it to the object inside. But you cannot save the sticker as a custom sticker introduced in One UI 5 (Android 13).
How to create customer stickers on Galaxy S23, S22, S21, and S20?
There are at least two ways to create your own stickers from your photos:
- Use Image Clipper in the Samsung Internet or Gallery app.
- Use the Sticker Maker in the Gallery app.
Use Image Clipper
As explained in this guide, you can use Image Clipper to save the clip as a custom sticker in Galaxy S23, S22, and S21 with the Android 14 (One UI 6) update.
Image Clipper is available in the Samsung Internet and Gallery apps.
As Galaxy S20 stopped at One UI 5.1 (Android 13), you can use the Image Clipper to clip a subject from any pictures in the Samsung Internet or Gallery apps. But there is no option to save the clip as a sticker. In this case, you can save the clip as an image and use it later as a sticker. The only downside is that it will not appear in the list of custom stickers.
Please refer to this guide on how to use Imager Clipper.
Use Sticker Maker in the Gallery app
The major difference between Image Clipper and Sticker Maker is the latter requires you to draw around the object instead of holding onto the subject. You can also consider Image Clipper as automatic and Sticker Maker as manual.
You may follow these steps to use Sticker Maker on Galaxy S23, S22, S21, or S20.
Step 1: Open any photo
As the Sticker Maker is embedded in the Photo Editor (which is part of the Gallery app), you need to open an image to access the editor.
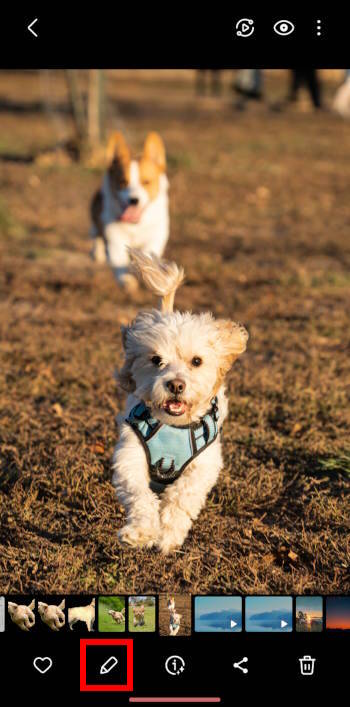
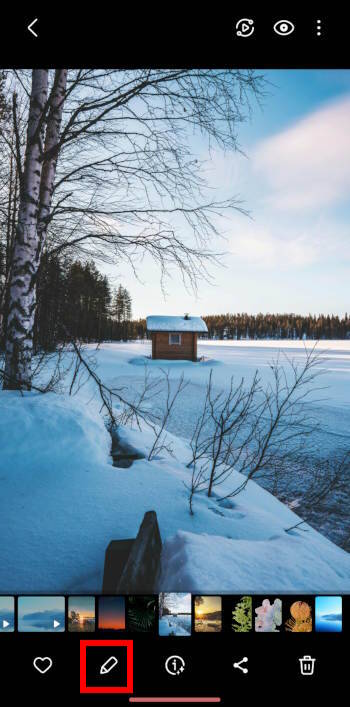
In the Gallery app, open any photo, as shown in the screenshot below.
Step 2: Enter Photo Editor
Tap the Edit button (pencil icon), as shown below, to launch the Photo Editor with this picture.
Step 3: Create the sticker
In this guide, we will try to create a custom sticker, not actually to edit the picture. So, we will go to the Decorations options directly.
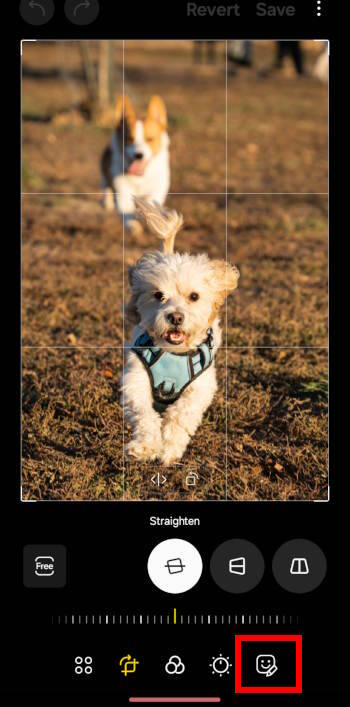
In the Photo Editor, tap Decorations (smiley face with a pencil), as shown in the screenshot above.
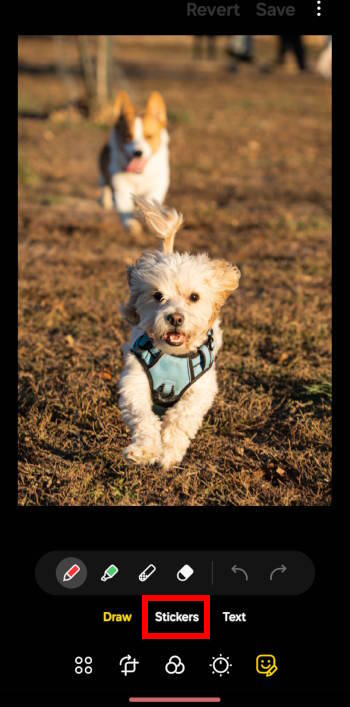
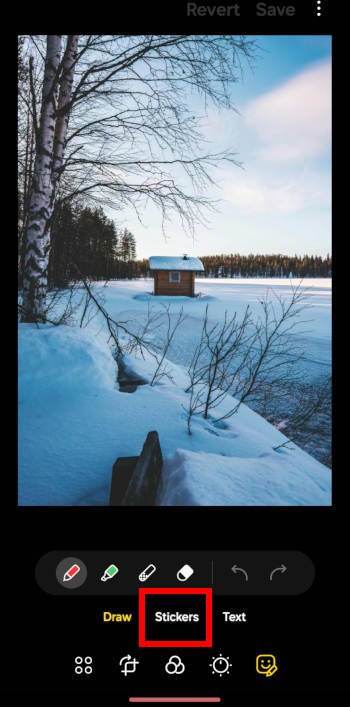
Decorations include three categories, as shown in the screenshot below:
- Draw. You can draw anything over the picture.
- Stickers. Here, you can create and use stickers, including custom stickers.
- Text. You can overlay text on the image to complement it with Word Art stickers.
In One UI 6 (Android 14) update, all decorations can be edited (or removed) after you save the edited picture. So, it is unnecessary to worry about accidentally adding something.
Tap Stickers, as shown below, to continue.
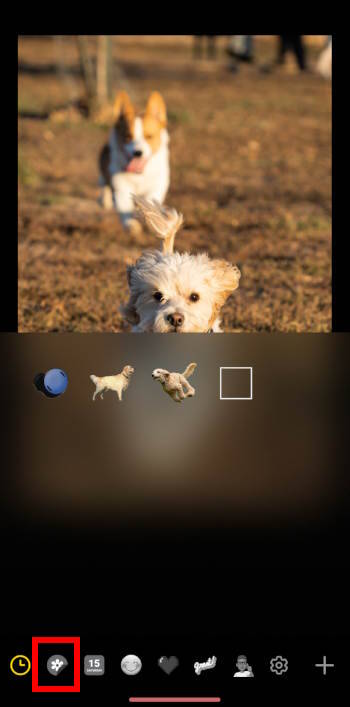
By default, you are in the tab of the recently used stickers, as shown in the screenshot above.
The buttons, from left to right, are:
- Recent.
- Custom stickers (Gallery icon).
- Date stamps and shapes.
- Emojis.
- Hearts, stars, and others.
- Word art.
- AR Emoji.
- Sticker settings (gear icon).
- Download stickers (+ button). You can download some free or paid stickers from the Galaxy Store.
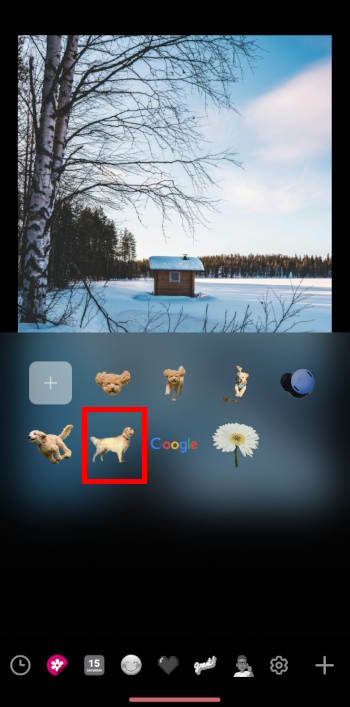
To make your own sticker, tap Custom stickers (Gallery icon).
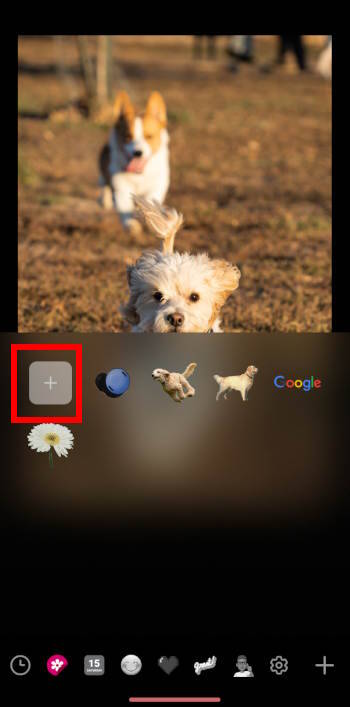
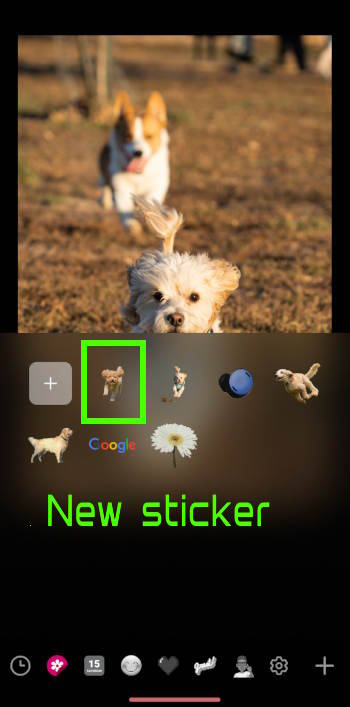
Now, all available custom stickers are displayed, as shown in the screenshot below. This is the only place where you can check your custom stickers.
When you use the Sticker Maker to create a new sticker, it will be automatically saved as a custom sticker by default. Of course, you can later delete any individual stickers if you want (read on).
Tap the “+” button, as shown below, to create your own custom stickers.
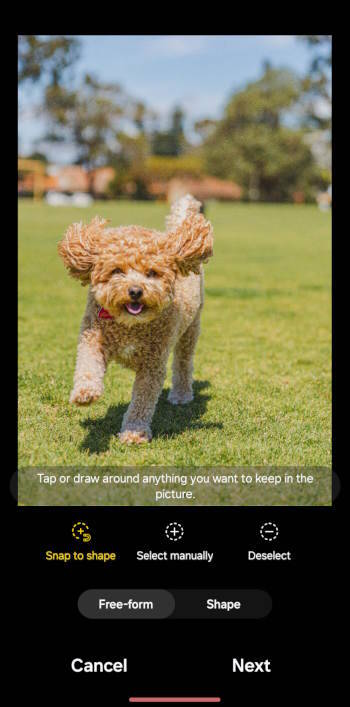
After tapping the + button, you will asked to select a picture from the phone to create the sticker.
For example, I chose a picture, as shown above.
Now, you can use the Sticker Maker to make your own stickers based on the picture selected.
By default, the “Snap to shape” and “Free-form” options are activated. Most of the time, you should use this combination if you want to clip an object from the background.
If you enable the Shape option, it will simply clip the picture with the shape you choose. The background will NOT be removed.
The Select manually option works somewhere between the default and the Shape option. Most of the time, the background is not removed.
In this example, we just use the default (Snap to shape + Free-form).
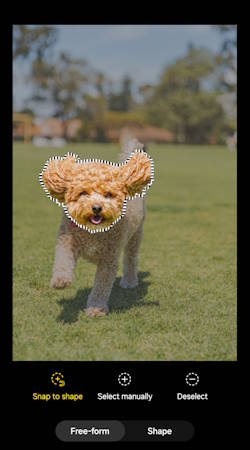
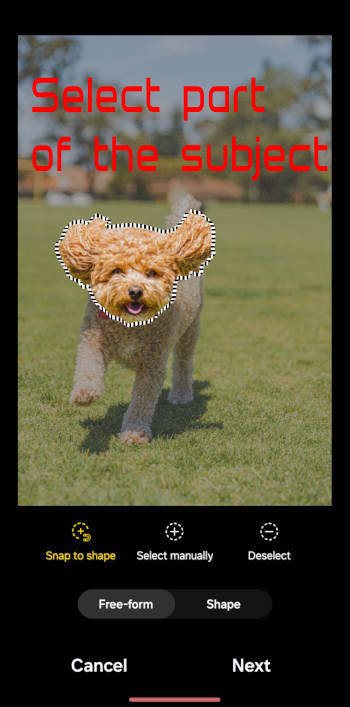
You can draw (with your finger or S Pen) around the object you want to clip on the screen, as shown in the screenshot below. It is NOT necessary to be precise. The only requirement is you should enclose the object.
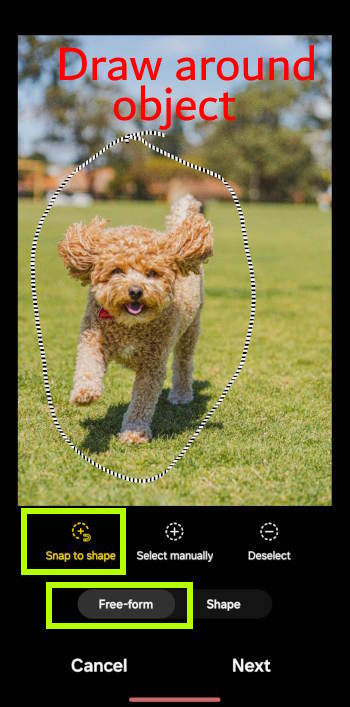
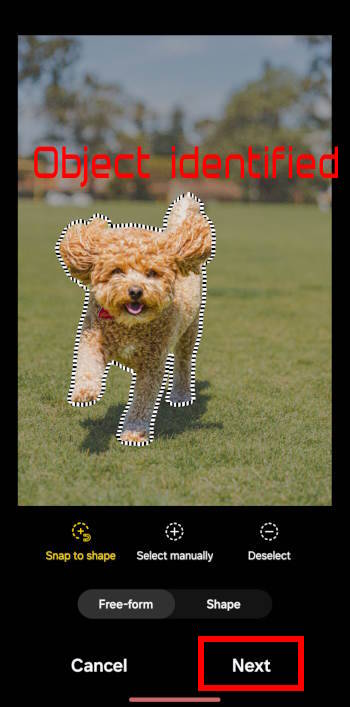
Once you finish enclosing the object, the Sticker Maker will identify the subject inside the enclosure.
In this example, the dog is identified. So, the selection is snap to the dog with the background removed, as shown above. This is similar to what Image Clipper does if you enclose the whole subject.
Sticker Maker allows you to enclose part of the subject, for example, the head of the dog and then clips the selected part only. This cannot be done in Image Clipper (read on).
Step 4: Save the sticker
If you are happy with the selection, tap Next, as shown above, to create the sticker.
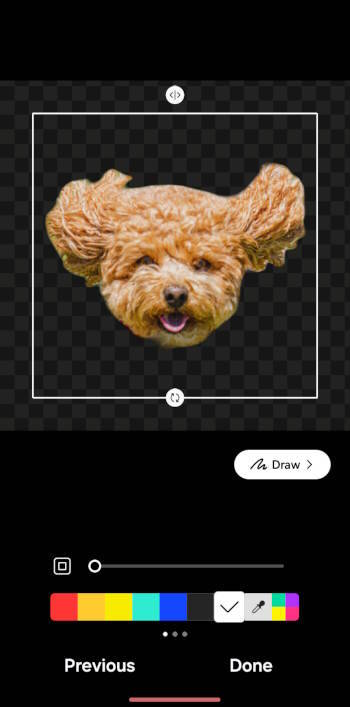
If you want, you can add an outline for the clipped subject. You can also draw anything on the rectangular canvas(remember, the canvas is always a rectangle, although the subject has its own shape.), as shown in the screenshot below.
You need to tap Done to save the sticker.
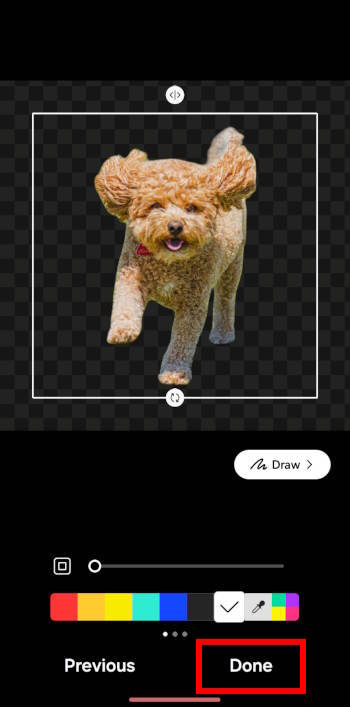
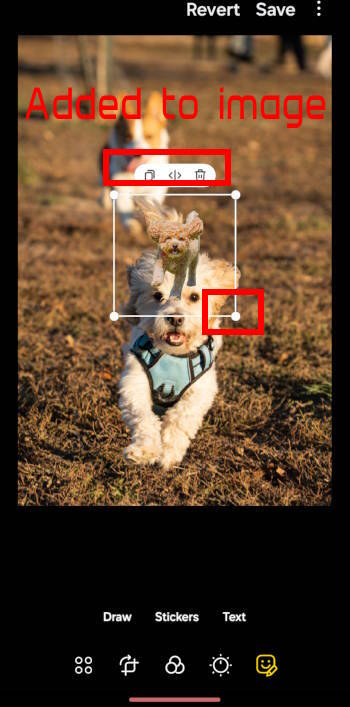
At the same time, the new sticker is added to the photo to be edited, as shown above. We will cover this later.
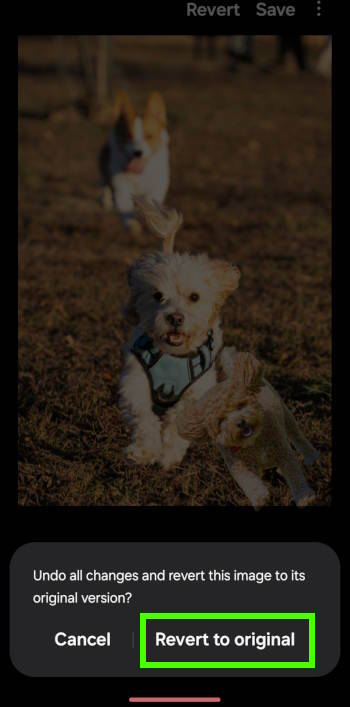
If you just want to create the custom sticker, you can always tap Revert and Revert to original, as shown below.
This would remove all decorations from this picture.
In One UI 6 (Android 14) update or later, you can always re-edit all decorations after you save them.
The new sticker is now listed in the Custom sticker, as shown above. You can use it for any future photo edits.
When do you need to use the Sticker Maker?
In most scenarios, the Image Clipper is more convenient for creating custom stickers than the Sticker Maker.
Bust the Sticker Maker has two features that are not available in the Image Clipper:
- Clip part of the subject. Image Clipper will identify the whole object where you tap and hold on the subject. However, the Sticker Maker allows you to draw around part of the subject and clip that part only.
- Clip multiple disconnect parts. Image Clipper usually identifies and clips one object only. Sticker Maker lets you draw around multiple objects in the picture and clip them into one sticker.
For example, the following two screenshots show you that the Sticker Maker can clip the head of the dog to make a sticker. This cannot be done with the Image Clipper.
Similarly, you can select multiple regions and clip them as one sticker with the Sticker Maker.
How to use custom stickers in the Gallery app on Galaxy S23, S22, S21, and S20?
Once a custom sticker is created (with Image Clipper or Sticker Maker), you can use it when editing any photos on the phone.
Unfortunately, as mentioned earlier, the Gallery app does not list these stickers (e.g., you cannot show them on the Home screen with the Gallery widget). You can only see them when editing photos (in the Photo Editor).
For example, in the Gallery app, open a picture and tap the Edit (pencil) button, as shown below, to start the editing.
Tap the Decorations button, as shown above.
Then, on the Decorations page, tap Stickers, as shown below.

Tap the Gallery icon (custom stickers), as shown above, to show all available custom stickers. Then select the sticker.
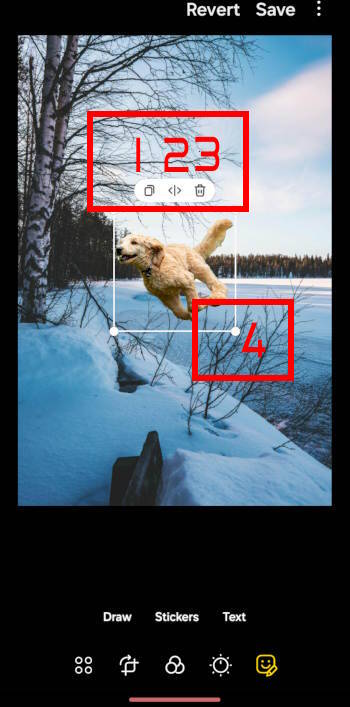
After tapping on the sticker, it will be added to the photo with some tools, as shown below. The tools include:
- Duplicate the sticker. You can make a carbon copy of the sticker, including the applied reflection, resizing, or rotation. But after duplicating, the two stickers are independent. You can then customize and manipulate them individually.
- Reflect/mirror the sticker.
- Delete the sticker.
- Resize and rotate the sticker.
You can also relocate the sticker by dragging the rectangle to any desired location.
If the rectangle disappears, you can simply tap on the sticker to call out the toolbox. This also works after you save the edit in One UI 6 (Android 14).
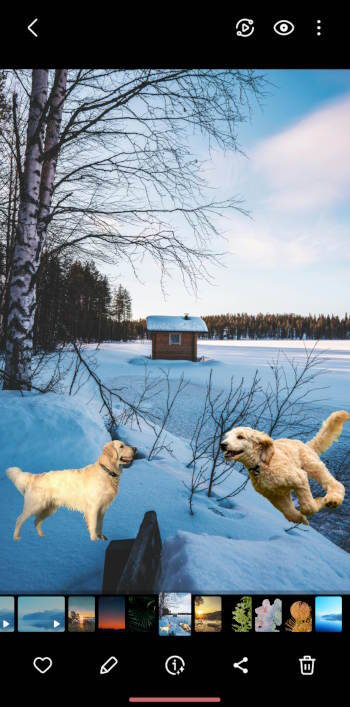
You can use multiple stickers on the photo. For example, as shown above, two custom stickers were added. You can also mix all available types of stickers for the photo.
How to manage custom stickers in the Gallery app on Galaxy S23, S22, S21, and S20?
You can easily manage the stickers you created on Galaxy S23, S22, S21, and S20.
When editing a photo, as shown in the screenshot below, on the Custom Stickers page, you can tap and hold on any sticker to select it.
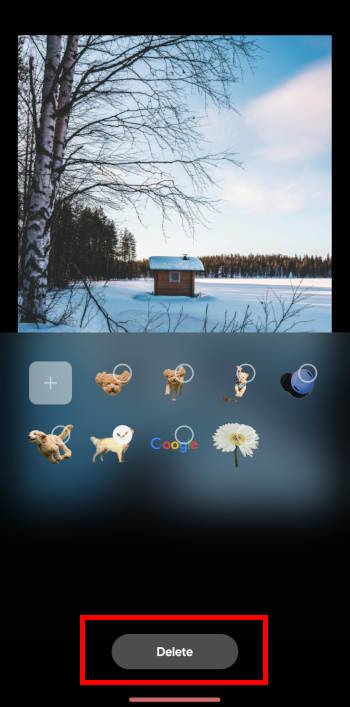
Once one of the stickers is selected, you can select more.
A Delete button will be shown at the bottom of the screen, above the navigation bar, as shown above. You can tap it to delete the selected stickers. If you change your mind, you may navigate back (tap the Back button if you are using navigation buttons or swipe back if you are using navigation gestures).
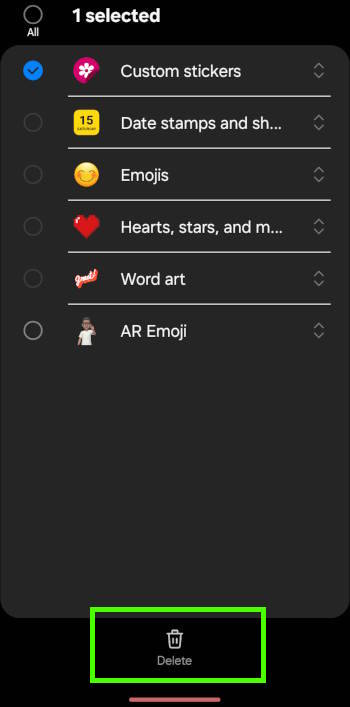
You can also delete all custom sticks by tapping the Gear icon on the stickers page and then selecting it, as shown in the screenshot below. The Delete button appears once you select it.
Please note you can only delete custom stickers and AR emojis, not the pre-installed ones.
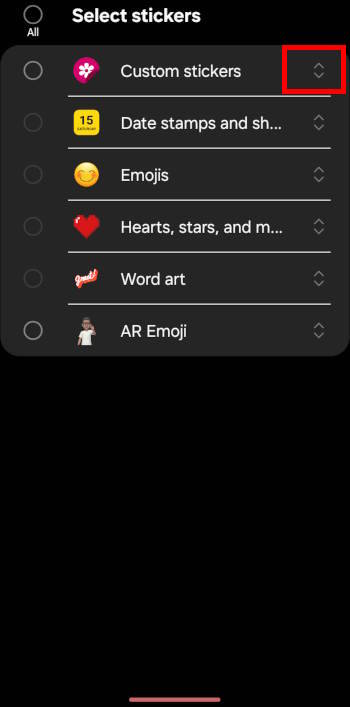
You can also customize the location of the custom sticker. By default, it is between Recent stickers (Clock icon) and Date stamps. You can relocate it to any spot between the Recents and Settings (gear icon).
To relocate the Custom Stickers, you can use the relocation button, as shown above, to drag and relocate it.
Do you have any questions about creating and using custom stickers in the Gallery app on Galaxy S23, S22, S21, and S20?
Please let us know in the comment box below if you need help with custom stickers, Image Clipper, or Sticker Maker.
The community will help you.
![Spigen Thin Fit Designed for Galaxy S23 Ultra Case (2023) [Military-Grade Protection] - Black](https://m.media-amazon.com/images/I/41i1xrzj2oL._SL160_.jpg)


![SAMSUNG Galaxy Buds2 Pro True Wireless Bluetooth Earbuds, Graphite, Hi-Fi Sound, 360 Audio, Active Noise Cancelling, Comfort Fit, HD Voice, IPX7 Water Resistant [US Version, 1Yr Manufacturer Warranty]](https://m.media-amazon.com/images/I/21Y3xVnL0BL._SL160_.jpg)
You may check other Galaxy S23 guides organized in the following 4 sections.
- Galaxy S23 new features guides. Galaxy S23 new features guides explain the new features of Galaxy S23 and show you how to use them. New features in the One UI 6 (Android 14) update are also covered in this section.
- Galaxy S23 how-to guides. Galaxy S23 how-to guides show you how to use and customize Galaxy S23, S23+, and S23 Ultra to meet your needs.
- Galaxy S23 camera guides. Galaxy S23 camera guides show you how to use Galaxy S23 camera features to shoot the best photos and videos with the top-notch camera system in Galaxy S23, S23+, and S23 Ultra. The new camera features in the One UI 6 (Android 14) update are also covered.
- Galaxy S23 accessories guides. Galaxy S23 accessories guides explore useful Galaxy S23 accessories and show you how to use them to protect your phone or increase your productivity (or fun).
Besides, you can read and download (in PDF format) the official Galaxy S23 user manual (including the updated Galaxy S23 user manual for Android 14 (One UI 6).
In addition to the comment box below, you can also reach us through the following channels:
Do not forget to subscribe to our newsletter to get the latest Tips and tricks on Galaxy S23.
Subscribe to our newsletter!
Enjoy your Galaxy S23!
