
You can use Camera Assistant on Galaxy S23, S22, S21, and S20 to access more camera settings (in addition to the standard Galaxy S23 camera settings). For example, you can choose to take multiple photos when using the timer.
This Galaxy S23 camera guide explains what the Camera Assistant is, two ways to install it, how to use it, and the meaning of each entry of the Camera Assistant on Galaxy S23, S22, S21, and S20.
The Camera Assistant is part of the One UI 5.1, and therefore it is similar to Galaxy S23, S22, S21, and S20. The screenshots used in this guide were taken from Galaxy S23. But the guide applies to Galaxy S22, S21, and S20 as well.
In the Android 14 (One UI 6) update for Galaxy S23, S22, and S21, the Camera Assistant was also updated with some new features, in addition to some other new camera features, e.g., the camera widget.
Update 2: In the One UI 6.1 update, Camera Assistant got three new features: 2x crop zoom shortcut, Distortion correction, and High-resolution settings.
Everything about Camera Assistant on Galaxy S23, S22, S21, and S20
- What is Camera Assistant on Galaxy S23, S22, S21, and S20?
- Two ways to install Camera Assistant on Galaxy S23, S22, S21, and S20
- Camera Assistant features explained
What is Camera Assistant on Galaxy S23, S22, S21, and S20?
Camera Assistant was first introduced in the One UI 5.0 update for Galaxy S22. With the release of Galaxy S23, Samsung updated the Camera Assistant dramatically and added many new features.
These new features were then packed into the One UI 5.1 update for Galaxy S22, S21, and S20. So, you can enjoy the almost identical (new models have slightly more options, as expected) Camera Assistant on Galaxy S23, S22, S21, and S20 with Android 13 (One UI 5.1).
In a nutshell, the Camera Assistant adds additional options to Galaxy S23 Camera Settings. So, you can further customize the camera features once you enable the Camera Assistant.
For example, you can choose to take up to 7 photos instead of 1 (multi-photo) when using the timer. You can even customize the interval between these pictures.
Also, you can choose to dim the screen while recording a long, unattended video.
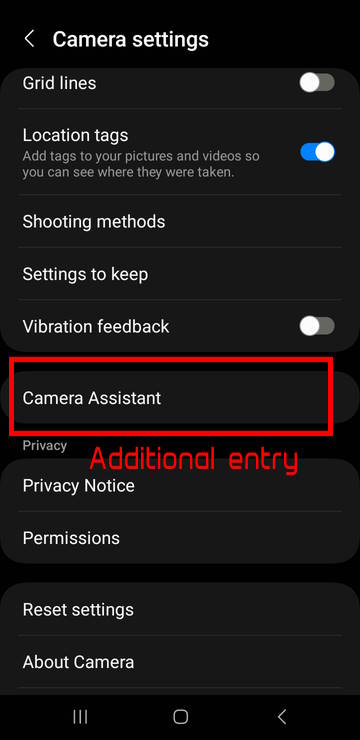
Once the Camera Assistant is installed, you can find that there is one additional entry for it on the Galaxy S23 Camera settings page, as shown below.
We will explain these features one by one below.
Two ways to install Camera Assistant on Galaxy S23, S22, S21, and S20
By default, Camera Assistant is NOT pre-installed. So, you have to install it manually.
Although the Camera Assistant is packaged as a module under the Good Lock app (just like NavStar to customize navigation buttons and navigation gestures), you can find it as a standalone app in Galaxy Store.
So, there are two ways to install Camera Assistant:
- From Galaxy Store.
- From the Good Lock app.
The results of these two methods are identical: a new entry of Camera Assistant will be added to the Galaxy S23 Camera Settings page.
Method 1: Install it as a standalone app.
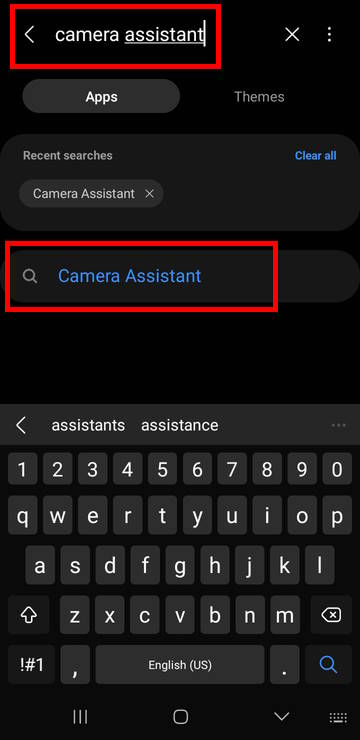
If you are not using the Good Lock, you can install the Camera Assistant as a normal app.
In Galaxy Store, search for Camera Assistant, as shown in the screenshot below.

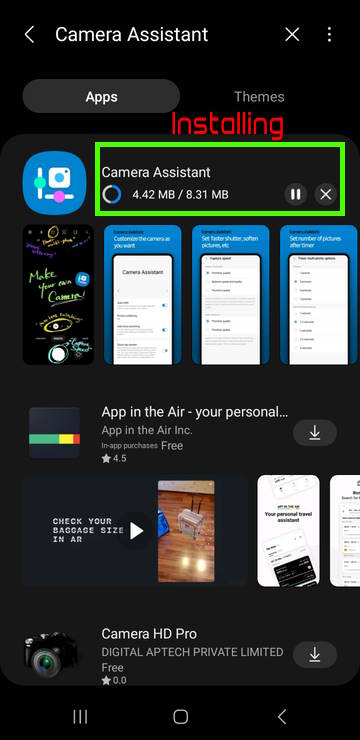
Once you locate the Camera Assistant, tap the download icon to install it, as shown above.
The Camera Assistant should now be installed on Galaxy S23, just like other apps.
You can check the progress of the installation, as shown in the screenshot below. The size of the package is less than 10MB. So, it should not take too long.
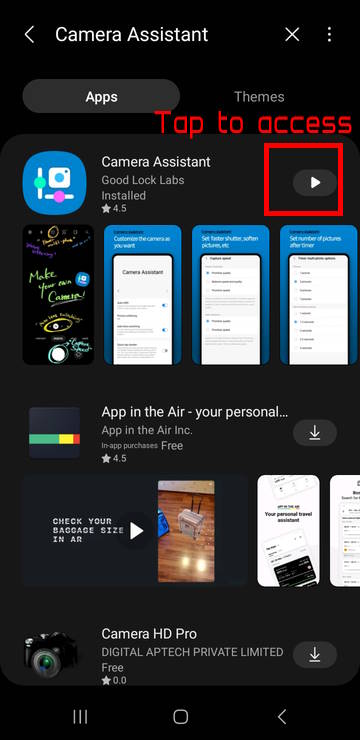
Once the Camera Assistant is installed, you will notice the download icon becomes the play icon, as shown in the screenshot above.
You can tap it to access the Camera Assistant directly.
At the same time, you should find the app icon for Camera Assistant on Galaxy S23 Home screen, as shown below.
You can also tap it to access the Camera Assistant page directly.
We will discuss the usage and meaning of the items in the Camera Assistant later in this guide (read on)
Method 2: Install it as a module in the Good Lock app
If you are using the Good Lock app, then you can find the Camera Assistant module in the Life Up tab, as shown in the screenshot below.
Good Lock is Samsung’s official app that offers many additional features and customizations for Galaxy phones. You may check this guide on using the Good Lock app.
In the Good Lock app, tap the download icon to install the Camera Assistant module.

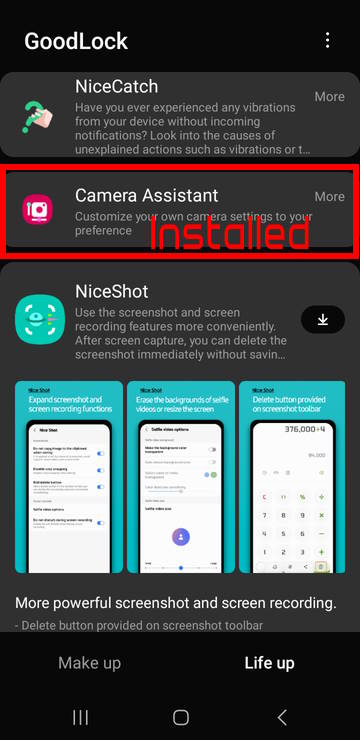
Once installed, the download icon disappears. You can tap it to access the Camera Assistant feature.
The result of the two installation methods is identical. So, you only need to choose one of them.
Camera Assistant features explained
You can access Camera Assistant with any of the following methods:
- From Galaxy S23 Camera Settings page.
- Tap the app icon on the Home screen.
- From Good Lock app.
- From Galaxy Store.
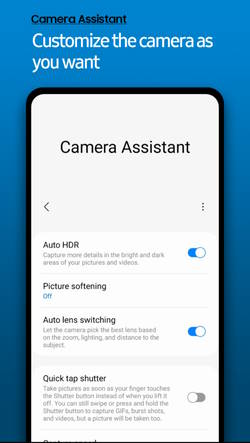
All of these four methods should bring you to an identical Camera Assistant page, as shown in the following two images.
There are 12 meaningful options in the Camera Assistant on Galaxy S23:
- Camera Assistant menu.
- Auto HDR.
- Picture softening.
- Auto lens switching.
- Quick tap shutter.
- Prioritize focus over speed.
- Capture speed.
- Video recording in Photo mode.
- Timer multi-photo options.
- Camera timeout.
- Dim screen while recording.
- Clean preview on HDMI displays.
We now go through them one by one.
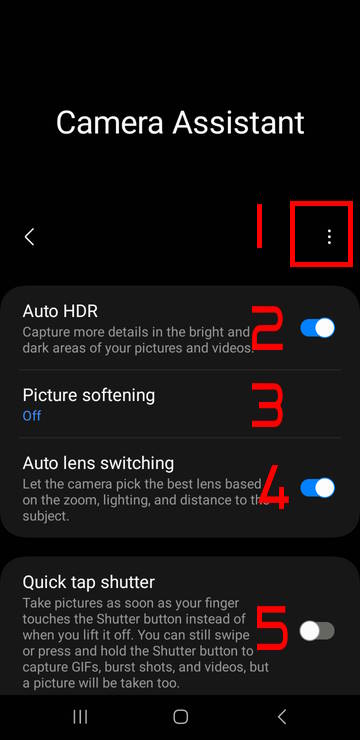
1. Camera Assistant menu
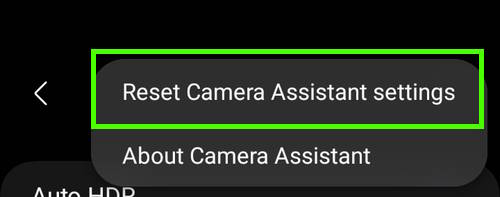
The standard menu (3 vertical dots) lets you reset the Camera Assistant.
Whenever you feel you messed up the options, you can tap the menu key and then tap Reset Camera Assistant settings, as shown in the screenshot below.
This will only reset Camera Assistant and will not affect any other camera settings or your photos/videos.
2. Auto HDR
Auto HDR option lets the system determine and use HDR (which usually can capture more details in most scenarios) so that you can capture more details in the bright and dark areas.
Auto HDR applies to both pictures and videos.
Please note by default, Auto HDR is enabled on almost all Galaxy phones. The option to turn it on/off was removed in Android 13. This option gives you the option to turn it off or on manually.
3. Picture softening
When taking photos, most Galaxy S23 owners may prefer “smooth” skin. To achieve this, you may use some filters. The scene optimizer in Galaxy S23 actually already does some heavy lifting when the face is detected.
Picture softening gives you more controls to smooth out sharp edges and textures. You can choose:
- Off. You essentially turn off picture softening.
- Medium.
- High.
Picture softening only works in the Photo mode.
4. Auto lens switching
By default, the Galaxy S23 camera app automatically picks the best lens (wide angle, ultra-wide angle, telephoto) based on the zoom, lighting, and distance to the subject. It usually works reasonably well.
However, it may not be the best option in a few scenarios. For example, when you zoom in on the photo in a low-light condition with a tripod, the camera tends to switch to the main camera and then crop the image because it may think the light is insufficient if the telephoto lens is used.
Anyway, the auto lens switching option gives you the option to disable it (and enable it).
5. Quick tap shutter
By default, the Galaxy S23 camera takes photos after you tap the Shutter button and release your finger from the screen.
The Quick tap shutter option, if enabled, lets you take pictures as soon as your finger touches the Shutter button instead of when you lift it off.
After enabling the Quick tap shutter, you can still swipe or tap and hold (long tap) the Shutter button to capture GIFs, burst shots, and videos, but a picture will be automatically taken, too.
6. Prioritize focus over speed
When taking a series of photos, sometimes, a few photos may lose focus. By default, the Galaxy S23 camera triggers the shutter to “capture” the scene when the shutter button is tapped.
Prioritize focus over speed option, if enabled, will wait for the camera to finish focusing before triggering the shutter. So, this may delay the shutter slightly.
You will unlikely feel the difference unless you are shooting continuously.
7. Capture speed
The Capture speed option lets you choose the priority between speed and quality. Also, when you take high-resolution photos (e.g., 200MP), you can choose to prioritize capture or postprocessing.
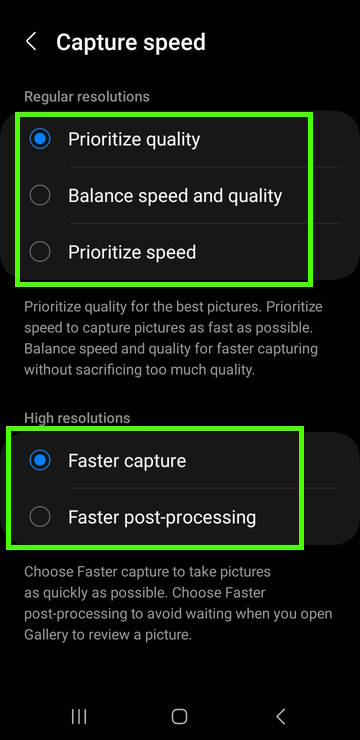
As shown in the screenshot above, you can:
- Prioritize quality for the best pictures.
- Prioritize speed to capture pictures as fast as possible.
- Balance speed and quality for faster capturing without sacrificing too much quality.
When taking high-resolution photos, you can choose:
- Fast capture to take photos as quickly as possible.
- Fast postprocessing to avoid waiting when you review the picture immediately after taking it.
In the One UI 6 (Android 14) update for Galaxy S23, S22, and S21, this Capture speed option becomes a core feature in Camera settings as Quality Optimization. So, it has been removed from the Camera Assistant.
8. Video recording in Photo mode
By default, on the Galaxy S23 camera app, if you tap and hold the Shutter button in the Photo mode, the camera will record a video automatically.
However, some Galaxy S23 owners may not like this feature.
Video recording in the Photo mode option gives you the control to disable this feature.
Please note, after disabling the Video recording in the Photo mode feature, you still cannot bind the tap and hold gesture to burst shot.
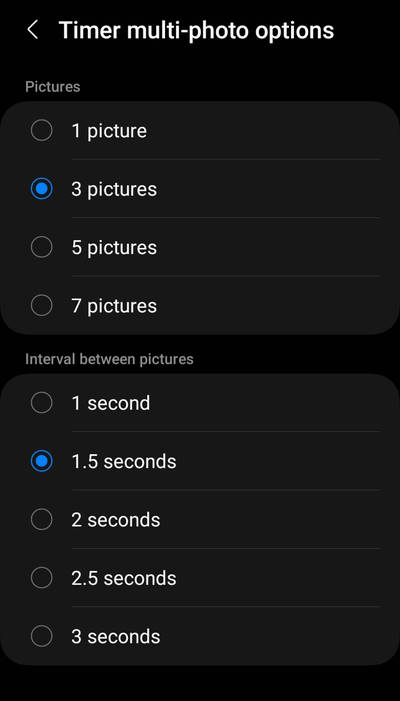
9. Timer multi-photo options
When using the timer on Galaxy S23 Camera app, by default, only one photo is taken.
The Timer multi-photo options allow you to take up to 7 pictures once the timer is triggered. You can also set the interval between these photos, as shown in the screenshot below.
Please note the timer setting is still in the Camera app interface. The interval between pictures is the duration between two photos if you choose to take more than one picture. It does not change your timer settings.
10. Camera timeout
By default, the Camera times out in 2 mins if there are no interactions.
The Camera timeout option lets you set the camera timeout as 1, 2,5, or 10 minutes.
Please note when the camera is on, the screen is also on, and therefore, the battery consumption can be significant.
11. Dim screen while recording
When long videos, by default, the screen is always at the normal brightness so that you can check what is being captured.
However, when recording long videos, very often, you do not need to check the preview screen constantly. The annoying bright screen can be a distraction. It also drains the battery considerably.
The Dim screen while recording option in the Camera Assistant gives you full control over when to dim the screen. You can turn off this feature (the default) or set the screen to dim after 1, 2, 5, or 10 minutes if there is no interaction on the touch screen.
12. Clean preview on HDMI displays
When you connect Galaxy S23 to an external display via an HDMI cable, you can see your phone display on a big screen. This means the camera app screen, including all buttons, will be shown.
The Clean Photo Preview option, if enabled, will show the previewed picture only without the buttons in the Camera app.
Do you know how to use the Camera Assistant to customize Galaxy S23 Camera now?
If you have any questions about the Camera Assistant on Galaxy S23, S22, S21, and S20, please let us know in the comment box below.
The community will help you.
![Spigen Thin Fit Designed for Galaxy S23 Ultra Case (2023) [Military-Grade Protection] - Black](https://m.media-amazon.com/images/I/41i1xrzj2oL._SL160_.jpg)


![SAMSUNG Galaxy Buds2 Pro True Wireless Bluetooth Earbuds, Graphite, Hi-Fi Sound, 360 Audio, Active Noise Cancelling, Comfort Fit, HD Voice, IPX7 Water Resistant [US Version, 1Yr Manufacturer Warranty]](https://m.media-amazon.com/images/I/21Y3xVnL0BL._SL160_.jpg)
You may check other Galaxy S23 guides organized in the following 4 sections.
- Galaxy S23 new features guides. Galaxy S23 new features guides explain the new features of Galaxy S23 and show you how to use them. New features in the One UI 6 (Android 14) update are also covered in this section.
- Galaxy S23 how-to guides. Galaxy S23 how-to guides show you how to use and customize Galaxy S23, S23+, and S23 Ultra to meet your needs.
- Galaxy S23 camera guides. Galaxy S23 camera guides show you how to use Galaxy S23 camera features to shoot the best photos and videos with the top-notch camera system in Galaxy S23, S23+, and S23 Ultra. The new camera features in the One UI 6 (Android 14) update are also covered.
- Galaxy S23 accessories guides. Galaxy S23 accessories guides explore useful Galaxy S23 accessories and show you how to use them to protect your phone or increase your productivity (or fun).
Besides, you can read and download (in PDF format) the official Galaxy S23 user manual (including the updated Galaxy S23 user manual for Android 14 (One UI 6).
In addition to the comment box below, you can also reach us through the following channels:
Do not forget to subscribe to our newsletter to get the latest Tips and tricks on Galaxy S23.
Subscribe to our newsletter!
Enjoy your Galaxy S23!

The clean HDMI preview option isn’t working on my S23+: whether it’s toggled on or off, the layout and buttons are still there.
Any guesses?
I can confirm this option works. You may try to reboot the phone to see whether this feature works.
I turn it off every night and this hasn’t changed a thing.
Could it be region dependant?
Unlikely it is a region-dependent feature. It should work in all regions.
Also, make sure you connect the phone to the display directly with a USB-C to HDMI adapter (not through HDMI splitters or HDMI switchers), and no other converters/adapters (e.g., HDMI–> VGA) or USB-C hubs between the phone and the display.
Lastly, make sure you turn off DeX (Settings –connected devices –Samsung DeX –Auto start when HDMI is connected) and do NOT start DeX.