
Mastering Galaxy S23 Camera Settings will help you take better photos and videos and get the full advantages of the Galaxy S23 camera. The default Galaxy S23 Camera settings (with the default camera mode) are good enough in most scenarios.
Tweaking the Galaxy 23 Camera Settings, simply lets the camera meet your special needs.
This Galaxy S23 Camera guide explains everything you need to know in the Galaxy S23 Camera Settings and shows you how to use them properly.
As Galaxy S23 Camera Settings are identical on Galaxy S23, S23+, and S23 Ultra, this guide applies to all Galaxy S23 models.
If you have updated your Galaxy S23 (S22 or S21) to Android 14 (One UI 6), you should see some of the new camera settings, e.g., turn off swipe up/down to switch cameras, document scan (Auto Scan), quality optimization (graduated from Camera Assistant), and new auto FPS options. Please refer to this guide on the new camera features in the Android 14 (One UI 6) update for Galaxy S23.
A definite guide to Galaxy S23 Camera Settings
- How to access Galaxy S23 Camera Settings?
- 1. Scene optimizer
- 2. Shot suggestions
- 3. Scan QR codes
- 4. Swipe Shutter button to
- 5. Watermark
- 6. Advanced picture options
- 7.Save selfies as previewed
- 8. Auto FPS
- 9. Video stabilization
- 10. Advanced video options
- 11. Tracking auto-focus
- 12. Gridlines
- 13. Location tags
- 14. Shotting methods
- 15. Settings to keep
- 16. Vibration feedback
- 17. Reset settings
How to access Galaxy S23 Camera Settings?
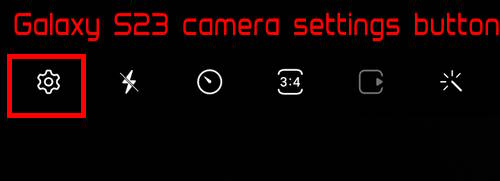
As explained in the Galaxy S23 Camera app guide, there is a dedicated Galaxy S23 Camera Settings button on the top left of the camera app interface.
You can tap this button, as shown in the screenshot below, to open Galaxy S23 Camera Settings immediately.
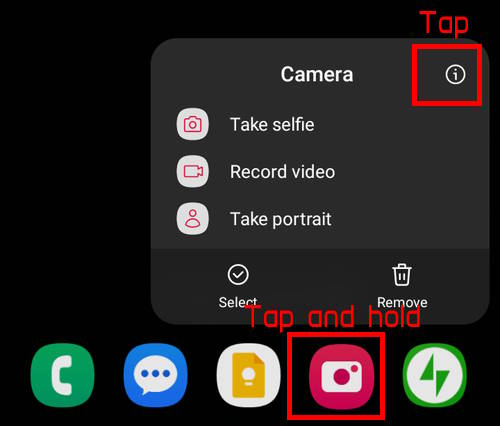
It is also possible to access Galaxy S23 Camera Settings without opening the Camera app, although using Galaxy S23 Camera Quick Launch is really fast.
For example, you can tap and hold the Camera app icon on the Galaxy S23 Home screen to show the context menu, as shown in the screenshot below.
Tap the “i” (info) icon, as shown in the picture, to open the App info page for the Camera app.
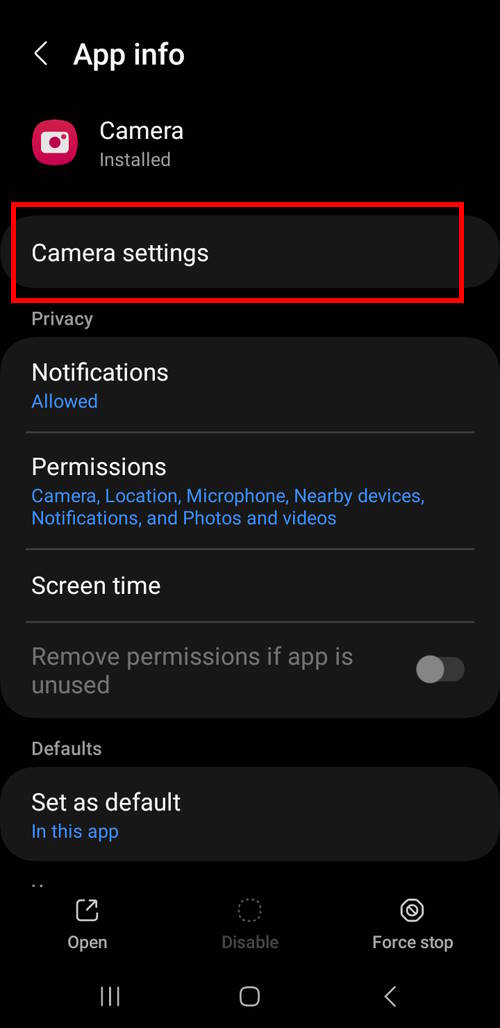
On the app info page for the Camera app, which is shown in the screenshot below, there is a shortcut to Galaxy S23 Camera Settings.
You can tap it to access Galaxy S23 Camera Settings.
Please note that you can also access the app info (app details) page through the Application Manager page (Settings — Apps).
In this guide, we will go through the following 17 entries in Galaxy S23 Camera Settings.
If you installed the Camera Assistant on Galaxy S23, you should find the additional Camera Assistant entry, which was discussed thoroughly in this guide.
- Scene optimizer.
- Shot suggestions.
- Scan QR codes.
- Swipe Shutter button to.
- Watermark.
- Advanced picture options.
- Save selfies as previewed.
- Auto FPS
- Video stabilization.
- Advanced video options.
- Tracking auto-focus.
- Grid lines.
- Location tags.
- Shotting methods.
- Settings to keep.
- Vibration feedback.
- Reset settings.

1. Scene optimizer
Galaxy S23 scene optimizer can automatically optimize camera settings based on the scene detected through Samsung’s AI technologies.
For example, if a face is detected in the focused area, the scene optimizer may adjust the camera settings to highlight (and beautify) the face instead of using the default settings.
By default, Scene Optimizer is enabled on Galaxy S23. You can use the switch to disable or enable it.
If you tap the Scene optimizer (not the switch), you can then enable or disable document and text scan, as shown in the screenshot below.
The document scan lets you use your Galaxy S23 camera as a scanner to “scan” instead of taking a photo. The difference is the minimized distortion in the “scan” mode.
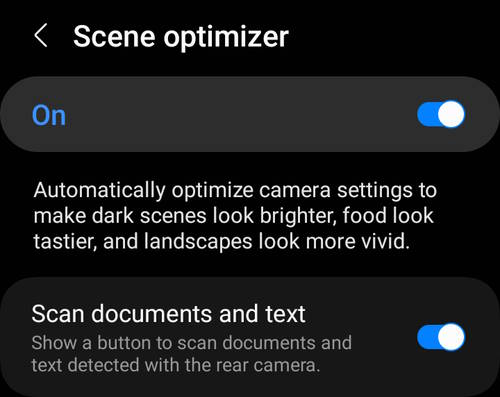
Text scan lets you extract text from the scene without saving the photo. You can copy or share the recognized text with other apps (or put it in the clipboard). This extract text from any images and photos feature was introduced in One UI 5.0 and works also on Galaxy S22, S21, and S20.
Please note that the document scan is independent of Scene Optimizer after you update Galaxy S23 to Android 14 (One UI 6). You may try to enable and use Auto Scan to scan documents after updating to Android 14 (One UI 6).
2. Shot suggestions
Shot suggestions on Galaxy S23 help you to get the best focus area based on the analysis of the current scene.
Unlike scene optimizer, which works silently in the background and adjusts camera settings automatically, shot suggestions “tell” you whether the focus is good. And it does not change any of the camera settings for you.
Once enabled, by default, a circle will be placed on the preview screen telling you that is the best focus area. If you follow the suggestion and change the focus to the circle , the circle turns yellow with 2 horizontal lines on each side.
3. Scan QR codes
Galaxy S23 camera can be used as a QR code scanner. It can automatically recognize QR codes and take actions (e.g., open the link in a browser) correspondingly.
This feature is enabled by default on Galax S23 in almost all regions. You can turn it off here if you are very sure you will not use the QR code scanner.
Galaxy S23 is intelligent enough to “recognize” QR codes that may be mixed with other objects. You can ignore the recognized QR code and take a photo if your intention is not to scan the QR code.
If you just want to scan a QR code, there is a quicker way to do it with the quick setting button. In this way, it will only recognize the QR code (and take corresponding actions). You cannot take a photo of the QR code.
If you have updated your Galaxy S23, S22, or S21 to Android 14 (One UI 6), you can use Quick Settings Instant Access to open all Quick Setting buttons.
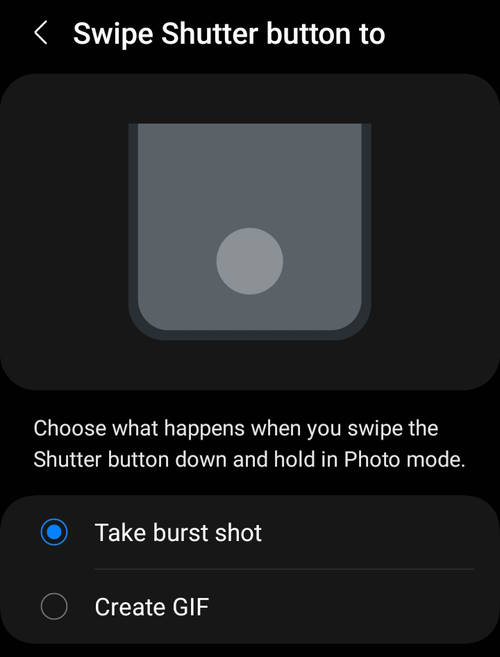
4. Swipe Shutter button to
Traditionally, you can tap and hold (long tap) the shutter button in the camera app to take burst shots (burst mode).
But Samsung has changed it since Galaxy S20. If you tap and hold the shutter button in Galaxy S23 Camera app in the Photo mode, it will record a video until you release the button.
So, Samsung added a swiping gesture to the shutter button. You can swipe (down to the bottom edge of the screen) from the shutter button to:
- Take burst shots.
- Create GIF (animation).
This Galaxy S23 camera setting lets you choose one of them. By default, it is assigned to the burst mode, as shown in the screenshot below.
5. Watermark
You can add a watermark, e.g., the date/time, to photos automatically when they are saved.
You can also add your own text as the watermark and customize the look and location of the watermark.
The Watermark feature was first introduced to Galaxy phones with the Android 13 (One UI 5.0) update. This guide explains how to use and customize watermarks on Galaxy phones with Android 13 (including Galaxy S23).
Android 14 (One UI 6) update adds more alignment options for the watermark. You can also enable date and time separately.
6. Advanced picture options
Similar to other Android phones, the Galaxy S23 camera, by default, saves photos in JPEG format, which can be opened on almost all devices.
But the compression efficiency of the JPEG format usually is not optimal. In other words, at a given quality level, the file size of JPEG is usually relatively large compared to many modern formats.
So, on Galaxy S23, Samsung offers you the option to save photos in HEIF (High-Efficiency Image Format) to save about 30-60% of phone storage.
The downside of the HEIF format is that some apps may not support it. But in general, there are no issues with switching to this more efficient format as all major OSes support it natively. Also, iPhone has used the HEIF format as the default since 2017.
So, under Advanced picture options of Galaxy S23 Camera settings, you can find the option to turn on High-efficiency pictures, as shown in the screenshot below.
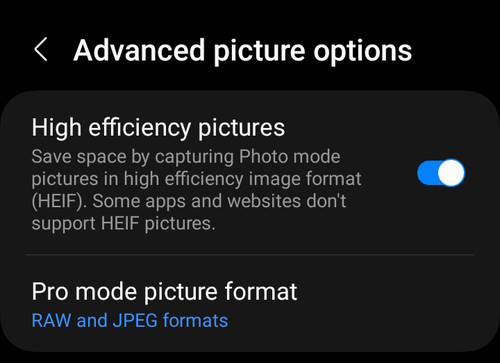
Also, under Advanced picture options, as shown in the screenshot above, you can choose file formats for the Pro Mode. You can choose to save photos taken in the Pro mode in:
- JPEG format only.
- RAW and JPEG format.
- RAW format only.
The RAW file includes detailed sensor info, and many professional-grade photo editing apps can use such info to post-process (e.g., correct) the photos. If storage is not a concern, you should save both JPEG and RAW formats so that you can perform some advanced editing on these photos if you want.
7.Save selfies as previewed
When using the front camera, the preview screen always shows a mirrored image (just like what you see with a mirror).
If you enable Save selfies as previewed, you will save the mirrored photo. Your right hand will be on the right side of the photo.
If you want to make your selfie look like a normal photo taken by someone else holding a camera, you can disable this option.
Please read this guide for a detailed explanation of avoiding and correcting mirrored photos on Galaxy S23, Galaxy S22, Galaxy S21, Galaxy S20, and Galaxy S10.

8. Auto FPS
Auto FPS, if enabled, can adjust the frame rate automatically in video mode. For example, in low-light conditions, you can record brighter videos by lowering the frame rate.
To enable this option, you need to switch the Video mode in the camera app interface. Then, the option will not be greyed out.
With the Android 14 (One UI 6) update, you can enable auto FPS based on the frame rate settings.
9. Video stabilization
Video stabilization in Galaxy S23 Camera settings can help you avoid shaky or blurry videos.
If you need more stabilization, for example, recording a running person while you are also running, you can enable super-steady.
10. Advanced video options
In Galaxy S23 camera settings, there are a few advanced video options, as shown in the screenshot below, including:
- High-efficiency videos.
- High bitrate videos.
- HDR10+ videos.
- Zoom-in mic.
- 360 audio recording.

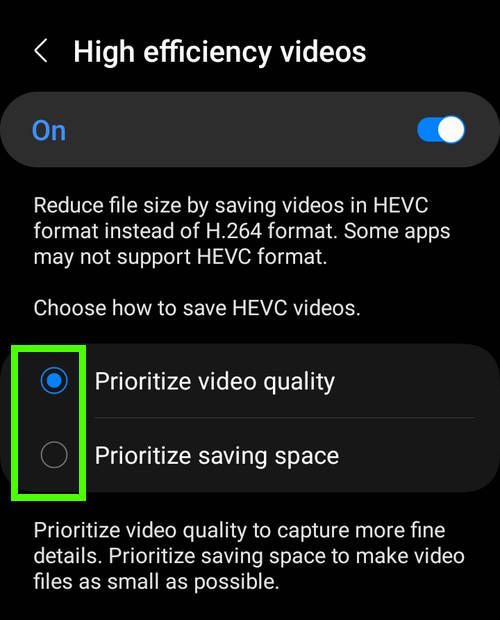
High efficiency videos
High efficiency videos in Galaxy S23 Camera settings let you save videos in the modern HEVC (High-Efficiency Video Coding, H.265) format. Compared to the default MP4 format, the file size is usually reduced by about 15-30% without sacrificing the quality.
On Galaxy S23, after enabling the high efficiency videos, you can even save more space by prioritising saving space (over quality), as shown in the screenshot below
High bitrate videos
The high bitrate videos option lets you increase the bitrate of videos recorded in the Video and Pro Video modes.
All high-bitrate videos will be saved in the HEVC format. So, when you enable high-bitrate videos in Galaxy S23 Camera settings, the high-efficiency videos option will be greyed out automatically.
HDR10+ videos
Galaxy S23 can record HDR 10+ videos in Video mode and Pro video mode. By default, the HDR10+ video is not enabled.
Please note Super Steady is not compatible with HDR10+.
Zoom-in mic
Zoom-in mic lets you keep the audio in focus automatically with the video when zooming in and out. Samsung first introduced the zoom-in mic in Galaxy Note 10 with a dedicated microphone.
On Galaxy S23, the dedicated zoom-in microphone is located between the bump of the 12MP ultra-wide camera (the top one) and the back panel, as explained in Galaxy S23 layout.
360 audio recording
360 audio recording on Galaxy S23 is a bit misleading. You can record the immersive 3D sound through your compatible Bluetooth headphones while recording the audio. It uses the microphones on the headphones to record the audio.
But 360 Audio Recording requires a Bluetooth headphone that supports 360 Audio Recording. Currently, only Galaxy Buds 2 Pro supports it. Unlikely, there are any third-party accessories with this feature.
360 audio recording on Galaxy S23 is not compatible with Zoom-in mic recording.
11. Tracking auto-focus
Tracking auto-focus in Galaxy S23 Camera settings helps you “lock” the moving object and keeps it always in focus when recording a video of a moving object.
12. Gridlines
On the Galaxy S23 Camera app preview screen, by default, there are no grid lines.
If you need the grid lines to assist you in composing the scene (e.g., reminding you about the rule of thirds), you can enable grid lines so that the preview screen will be divided into 9 equal portions by two horizontal lines and two vertical lines.
13. Location tags
Like other smartphones, Galaxy S23 has an advanced feature that allows you to save location information (known as location tags) along with your photos and videos. This data is stored as part of the metadata in the photo and video.
Location tags can be a useful tool for users wishing to recall the location of a photo or video taken years prior. Many prominent apps, such as Google Photos or Samsung Gallery, rely on this data to efficiently organize photos and create captivating stories automatically. You can see the location info in the detail view (or one-tap editing with the Android 14 update).
It should be noted that enabling location tags will expose the location of the photo or video to anyone with access to the file. As a result, some Galaxy S23 owners may opt to disable location tags to ensure their privacy.
Keep in mind, though, that changing the Galaxy S23 camera settings to disable location tags will only impact future photos and videos, not ones you’ve already taken.
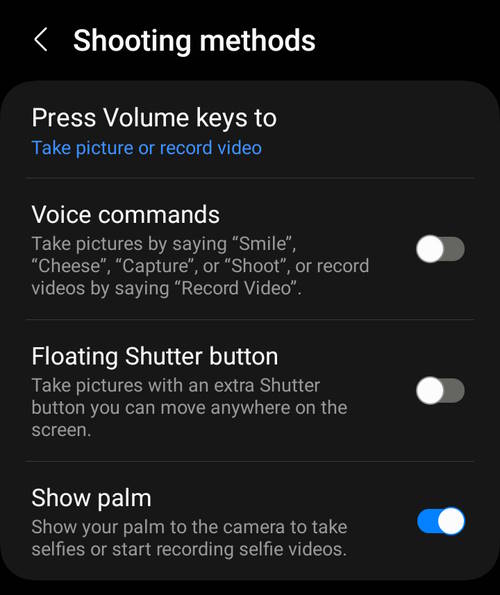
14. Shotting methods
In addition to tapping the shutter button, you can also use the volume key, voice dictation, showing palm or a floating shutter button to take photos on Galaxy S23, as shown in the screenshot below.
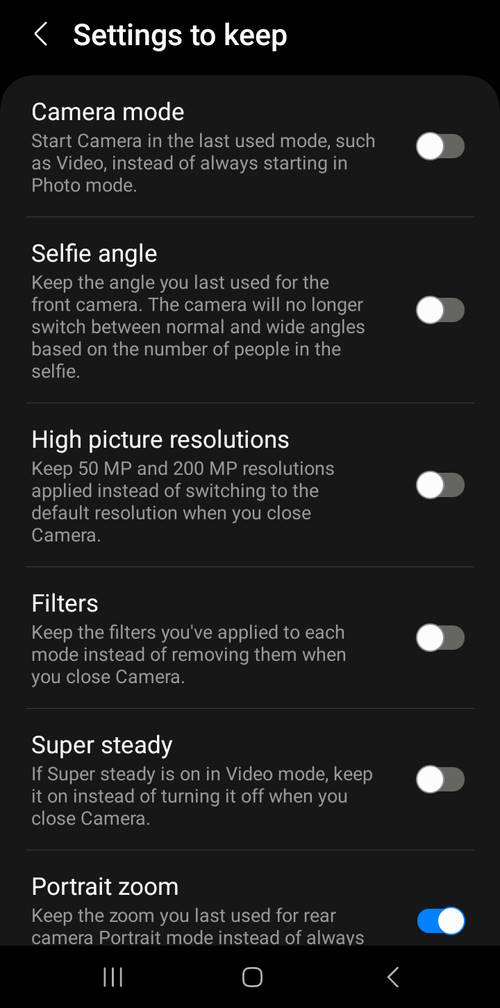
15. Settings to keep
By default, certain on-the-fly settings of the Galaxy S23 Camera app, such as the camera mode used, are reset when the app is exited. This means that if you had previously been using the Pro mode to take photos, but later closed the app, the next time you open the camera app, it will automatically default back to the Photo (Auto) mode.
However, there may be instances where you wish to retain their last used camera settings. Fortunately, there is a method for preserving settings in Galaxy S23. You can navigate to the Galaxy S23 camera settings page and select “Settings to keep (15)” to maintain their preferred camera settings. Doing so will ensure that the selected settings will remain unchanged, even after closing the app.
This option offers a convenient way to keep the camera settings with each use, streamlining the photo-taking process and making it more efficient.
As shown in the screenshot below, you can keep the following Galaxy S23 camera settings.
- Camera mode. Galaxy S23 camera can start with the last-used camera mode instead of the default Photo mode. With the Android 14 (One UI 6) update, you can use the camera widget to open the camera app with any specific camera mode, as explained in this guide.
- Selfie angle. The front camera offer normal and wide angles. You can let Galaxy S23 remember the last used selfie angle.
- High picture resolutions. When saving photos in the 4:3 (3:4) aspect ratio, you can choose the high resolution of 50MP (for Galaxy S23 and S23+) or 200 MP (for Galaxy S23 Ultra). This option, if enabled, let the phone keep this setting for future pictures.
- Filters.
- Super Steady.
- Portrait zoom. This option applies only when you use the Portrait mode with the rear camera.
You can enable or disable them individually based on your needs.
16. Vibration feedback
You can enable vibration feedback when taking photos or recording videos so that you are sure the photos are taken.
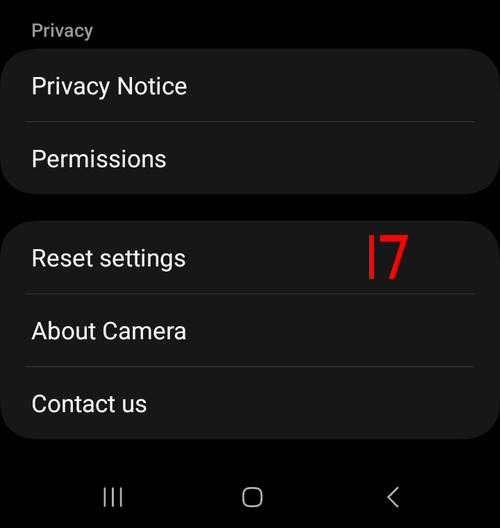
17. Reset settings
The Galaxy S23 is a high-end mobile device equipped with a sophisticated camera system that is capable of producing stunning photos and videos. However, there may be instances where owners may encounter unexpected issues or misconfigurations with the camera app settings.
In such situations, resetting the Galaxy S23 camera settings can be a simple and effective way to troubleshoot and resolve these issues. The reset operation is specifically designed to only affect the camera app settings and will not impact any personal data or images stored on the device. Therefore, it is a safe and viable solution to undertake whenever needed.
To reset the camera settings for the Galaxy S23 camera, you can tap the “reset” option and then confirm the reset operation, as shown in the screenshot below.
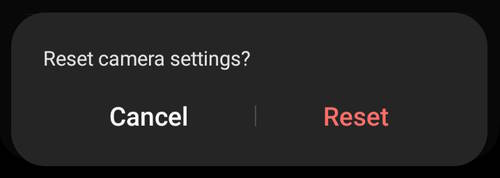
It is important to note that resetting the camera settings will restore all settings to their default state, so you will need to reconfigure any customizations or preferences after the reset has been performed.
Do you have any questions about Galaxy S23 Camera Settings on Galaxy S23, S23+, and S23 Ultra?
If you have any questions about the Galaxy S23 Camera settings on Galaxy S23, S23+, and S23 Ultra or encounter any issues with the Galaxy S23 Camera app, please let us know in the comment box below.
The community will help you.
![Spigen Thin Fit Designed for Galaxy S23 Ultra Case (2023) [Military-Grade Protection] - Black](https://m.media-amazon.com/images/I/41i1xrzj2oL._SL160_.jpg)


![SAMSUNG Galaxy Buds2 Pro True Wireless Bluetooth Earbuds, Graphite, Hi-Fi Sound, 360 Audio, Active Noise Cancelling, Comfort Fit, HD Voice, IPX7 Water Resistant [US Version, 1Yr Manufacturer Warranty]](https://m.media-amazon.com/images/I/21Y3xVnL0BL._SL160_.jpg)
You may check other Galaxy S23 guides organized in the following 4 sections.
- Galaxy S23 new features guides. Galaxy S23 new features guides explain the new features of Galaxy S23 and show you how to use them.
- Galaxy S23 how-to guides. Galaxy S23 how-to guides show you how to use and customize Galaxy S23, S23+, and S23 Ultra to meet your needs.
- Galaxy S23 camera guides. Galaxy S23 camera guides show you how to use Galaxy S23 camera features to shoot the best photos and videos with the top-notch camera system in Galaxy S23, S23+, and S23 Ultra.
- Galaxy S23 accessories guides. Galaxy S23 accessories guides explore useful Galaxy S23 accessories and show you how to use them to protect your phone or increase your productivity (or fun).
Besides, you can read and download (in PDF format) the official Galaxy S23 user manual.
In addition to the comment box below, you can also reach us through the following channels:
Do not forget to subscribe to our newsletter to get the latest Tips & Tricks on Galaxy S23.
Subscribe to our newsletter!
Enjoy your Galaxy S23!

How do you get 300dpi quality photos with a Samsung S23?
nowadays, dpi is not relevant for photos taken by the caemra. It shold be automartically set by the app when printing it.
Anyway, if anyonme asks your the dpi, he/she shoule also asks for the resoluation (i.e., size in pixels). You can safely ignore the DPI pqrt.
Can you please explain the various ways to reduce the picture size?
I find pictures to be massively larger than needed when emailing to view on the screen.
Is 3:4, 9:16, 1:1, full the smallest picture? How about 12 vs 50?
Thanx
Normally, you should not worry about the size of the photos. Almost all apps can downsize the pictures to fit the view. The benefit of large pictures (more pixels) is you can easily downsize for viewing in any size. If you have a small picture and a high-resolution screen, the upsizing will make the picture look pixelated.
On Galaxy S23, you only set the aspect ratio. The camera will crop the image from 4:3 to the ratio you specified (the camera sensor has a 4:3 ratio). So, 1:1 or 16:9 is just a cropped 4:3 (12Mp or 50MP/200MP) photo.
If you need to get a smaller version of the photo, you can open the photo in the Gallery app, tap the Pencil icon (edit), then tap the 3 menu icon (3 vertical dots on the top right corner, then tap resize. You can save the resized photo as a new copy so that you still keep the high-resolution photos in case you need them in the future. This was explained in an old guide here (The interface of the Gallery app changed a bit).
“Normally, you should not worry about the size of the photos.”
Photos take up a massive amount of room and 99.9% of the time they are only viewed on a screen.
It takes up my google space, phone space hard disk space, etc, etc.
In my previous s10e, I reduced the default size to the smallest possible and it was still larger than even needed on a canvas printing I made!
With 3 different cameras on the S23, I was hoping there’s a way to default the use of the one with the least resolution.
Thank you, EJ
Normally, most storage space is consumed by videos, not photos.
Generally, I do not recommed you to downsize the photos. If possible, back up photos to an external drive (most USB-C external drives or thumb drives work nicely with Galaxy S23).
You can resize the photos in the Gallery app. But it cannot be done in batch. There are many photo resize apps in the Google Play Store. Most of them support batch processing. Good luck.
Thank you