 Extra Dim is a less-known yet very useful new feature in Android 12.
It is not included in our top 12 new features in Android 12 because Extra Dim is a “niche” feature for very specific scenarios (if you often use the phone in a dark environment), not because it is not important.
Extra Dim is often misunderstood by even many professionals. Therefore, many users are confused the Extra Dim with the brightness control.
This Android 12 guide explains what the Extra Dim in Android 12 is, how it works, how to use it in Android 12, and corrects some common misunderstandings about Extra Dim in Android 12.
What is Extra Dim in Android 12?
Sometimes, you may feel the phone screen is too bright in a dark environment (e.g., in a theatre). However, the brightness level is already set to the minimum level or auto-brightness (adaptive brightness) is already on.
Basically, you are stuck on that uncomfortable brightness level.
Extra Dim, which was introduced in Android 12, is designed to solve this issue for you. It can further reduce up to 50% of the brightness of the screen for you.
In Android 12, Google implemented Extra Dim as an accessibility feature to further reduce the “brightness” of the screen below the minimum level specified by the hardware vendor.
This may sound ridiculous. How can the brightness be lower than the minimum level specified by the hardware vendor?
So, here is the catch. When Extra Dim is activated, the colour range will be reduced.
In other words, you get a dimmer screen at the price of the accuracy of the colours. Read on.
As this is a built-in accessibility feature in Android 12, none of the Android vendors has changed this feature.
In addition to the entry in the accessibility settings, a quick setting button for Extra Dim can be found in most Android 12 phones (e.g., in Galaxy S22).
How does Extra Dim in Android 12 work?
To understand how Extra Dim works, we need to know a bit (just a bit) about the colour and brightness.
Each colour on the screen has a value. For example, if the screen can only display 256 colours (8bit; most smartphone screens actually can display 16,777,216 colours or 24bit), the black colour will have a value of 0, and the white 255. The colour range is then 0-255.
When you change the brightness, the brightness of all pixels will be changed accordingly (maybe not proportionally) so that the colour (and therefore the image) is not altered (distorted). So, it is not easy to set the brightness too high or too low without distorting the colour space.
The minimum brightness level is set by the hardware vendor to make sure that the 256 colours (assume it is just 8bit depth) are still distinguishable at this level.
So, Extra Dim has no way to decrease the brightness directly.
Instead, Extra Dim compresses the colour space to reduce the brightness.
If you are now looking at the screen through your sunglasses, you will notice the brightness decreases. Of course, the number of distinguishable colours also drops.
Extra Dim does a similar trick.
Instead of filtering your screen with a sunglass, Extra Dim filters the output before sending it to the screen.
You may imagine Extra Dim actually is a black semi-transparent filter applied to the system generated image (for screen output). When the transparency is set to 50%, the 256 colours reduce to 128 (and shift to the black side).
The result is a dimmer screen. This is how Extra Dim in Android 12 works.
Of course, the implementation is not as simple as a black filter. The phone needs to analyse the spectrum of the output image and tweak some settings accordingly to make the screen easy to read.
How to customise Extra Dim in Android 12?
You may check and adjust Extra Dim in Android 12 before using it.
Open the Settings app on your phone, then tap Accessibility, as shown below.
You can open the Settings for your Android device in various ways, for example:
- Tap the Settings app icon on the Home screen or Apps screen.
- Tap the gear icon in the quick settings panel.
- Use voice command.
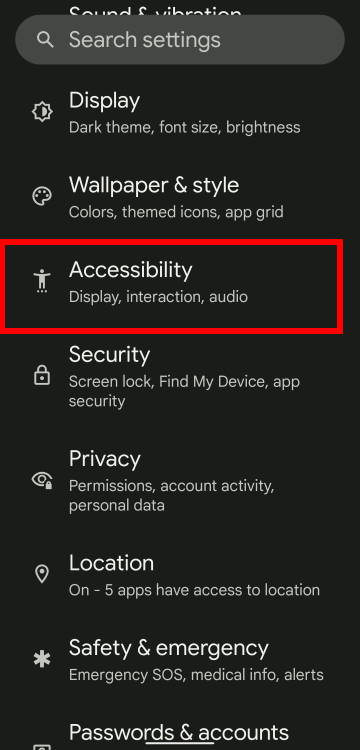
On the Accessibility settings page, as shown above, you can find many accessibility-related settings for visual or hearing enhancement.
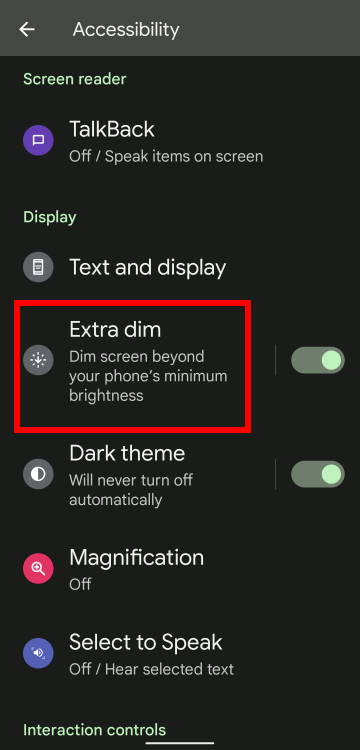
Tap Extra dim, as shown above, to access its settings.
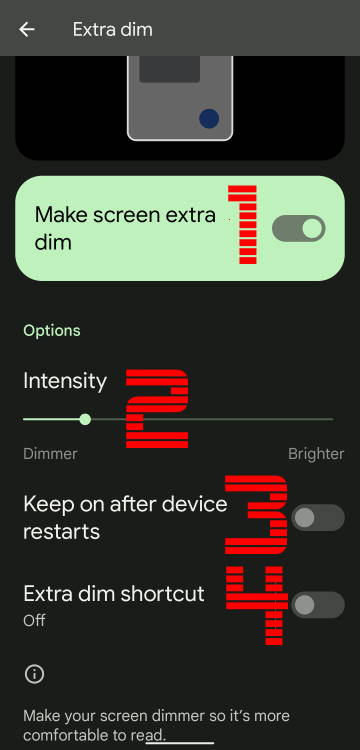
Now, you should be on the Extra Dim settings page, as shown below.
A few features/aspects of the Extra Dim can be adjusted and customised.
1. Enable/disable Extra Dim
The Make screen extra dim button lets you enable or disable Extra Dim immediately.
Please note, if you just need to enable or disable the Extra Dim, you do not need to navigate to this page. For example, you can find the button one level up (on the Accessibility settings page).
2. Adjust the intensity of Extra Dim
You can adjust the intensity of the “filter”.
Dimmer means lower brightness. The maximum reduction in brightness in Android 12 is limited to 50%.
If you feel the Extra Dim is too aggressive, you can drag the slider to the brighter side.
Some vendors (e.g., Samsung) removed the dimmer and brighter annotation. You need to test whether you should drag the slider to the left or right side. For example, on Galaxy S22, you have to drag the slider to the right side to make it dimmer (opposite to that on the Pixel 6).
3. Keep Extra Dim after the phone restarts
By default, Extra Dim will be disabled after your reboot the phone.
You can use this option to make sure it is turned on after a reboot (if it is on before the reboot).
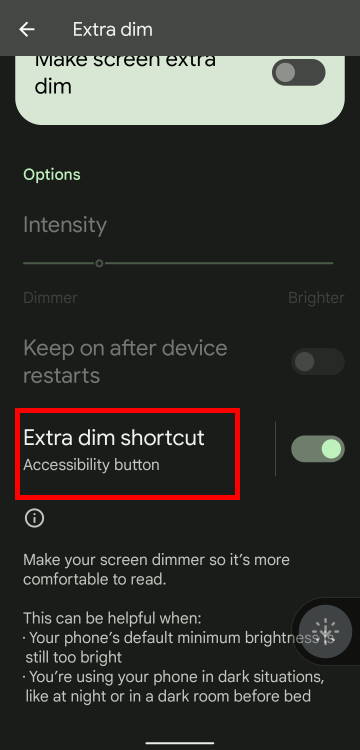
4. Add/remove an Extra Dim shortcut on the screen
Although there is a quick setting button for the Extra Dim, you can use Extra Dim even faster by using the shortcut.
The shortcut of the Extra Dim will be added as a floating button on all screens except the lock screen. So, you can tap the button even when you are using an app.
You can tap the Extra Dim shortcut to add (or remove) the floating button.
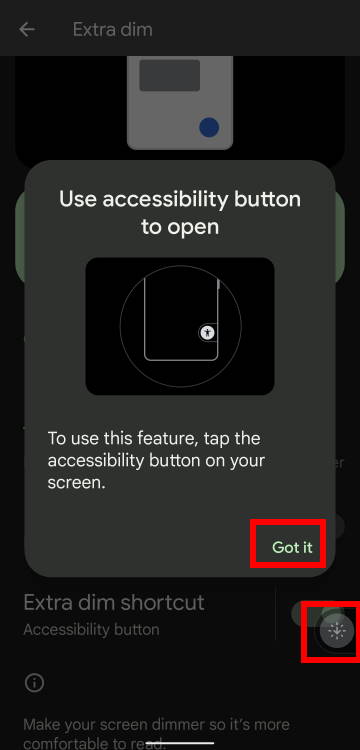
When the shortcut is added, there is a pop-up screen reminding you how to use it, as shown in the screenshot above. At the same time, you can find the floating button.
You can tap Got it to close the pop-up notification.
The floating button can be relocated to desired locations. However, on different Android 12 devices, the possible locations may be slightly different.
For example, on Pixel phones, you can relocate the shortcut (floating button) to any location on the left or right side of the screen. But on Galaxy S22, it will be located in the bottom right of the screen in the navigation bar.
The floating button can be further customized (read on).
3 ways to use Extra Dim in Android 12
On different devices, you may access the Extra Dim feature slightly different. In this guide, we will use Pixel 6 Pro as an example to show you how to use the Extra Dim in 3 different methods.
In the Quick settings panel, you can find the Extra Dim button, as shown in the screenshot below.
You just need to tap it to enable or disable the feature.
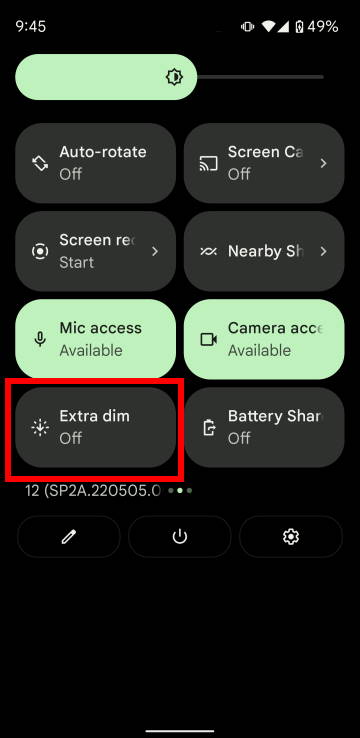
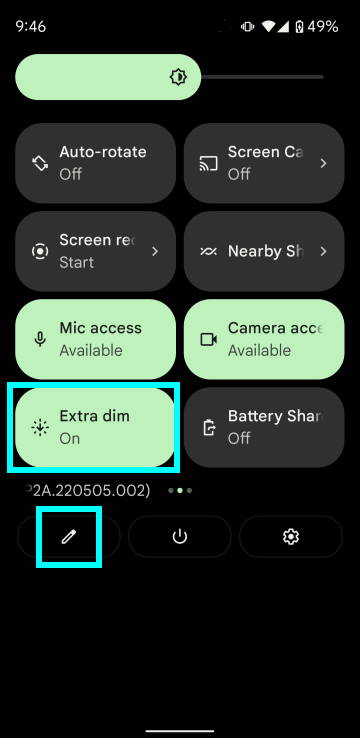
On some Android 12 devices, especially those upgraded from Android 11, the Extra Dim button may be not activated by default.
In this case, you can tap the Edit button (pencil icon) in the quick settings panel, as shown above, to add the button.
Method 2: Use the Settings app
As mentioned earlier, you can also enable or disable the Extra Dim in phone settings.
On the phone Settings, navigate to the Accessibility settings page, as shown below.
You can use the switch right to the Extra Dim field to enable or disable the feature.
If you tap the Extra Dim field, you will be directed to the Extra Dim settings page, as discussed earlier.


When the feature is enabled, the switch should be on the right side, as shown in the screenshot above.
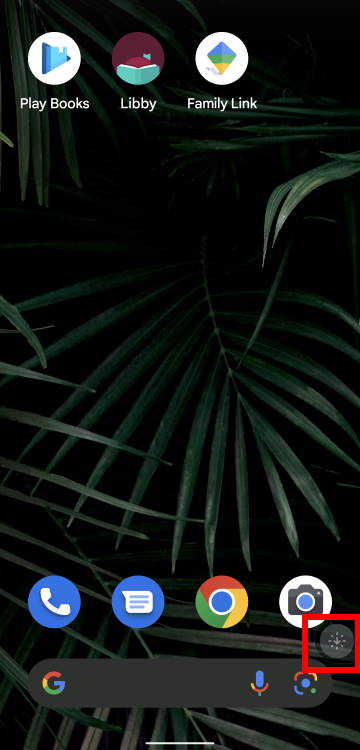
Of course, the quickest way to enable or disable the Extra Dim is to use the shortcut (floating button).
The floating button, once added, will be shown on all screens (except the lock screen).
For example, as shown below, on the Home screen, you can just tap the floating button to enable or disable Extra Dim directly.
By default, the Extra Dim shortcut is added as a floating button. You can change its size and transparency, or even change it to a gesture.
On the Extra Dim settings page, as shown below, tap the Extra Dim shortcut text to further customize the floating button.
As mentioned earlier, the switch on the right side of the Extra Dim shortcut is only for you to enable or disable the floating button.
Anyway, you need to tap the text field to access the settings for the floating button.
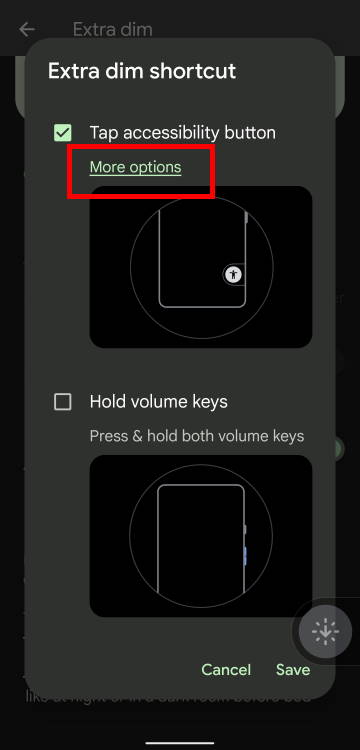
After tapping the text field of the Extra Dim shortcut, you will get a pop-up window, as shown in the screenshot above.
By default, after you enable the floating button, the Tap accessibility button is selected as shown in the picture.
Tap More options to access the settings for the floating accessibility button (Extra Dim shortcut).
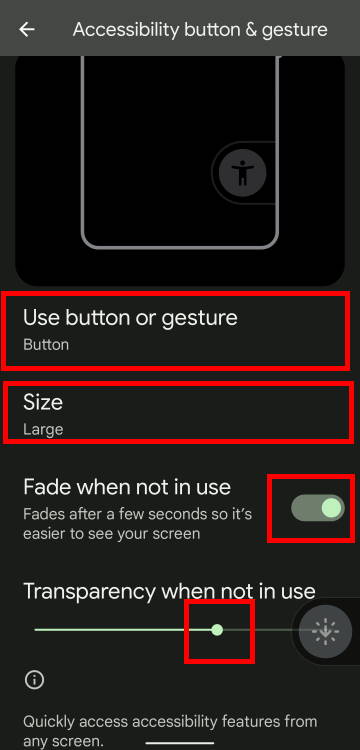
On the Accessibility button & gesture page, as shown below, you can now find the options to customize the floating button:
- Use button or gesture. You can choose to use a gesture, instead of the button to enable or disable the Extra Dim.
- Size. On Pixel 6, there are two size options for the floating button.
- Fade when not in use. By default, the button fades when not in use. You can choose to disable it.
- Transparency when not in use. You can choose the transparency of the button if you choose to fade the button when not in use. So, this option is available only when the Fade when not in use is enabled.
For example, you can tap the Use button or gesture to change the floating button to a gesture.
You will see a pop-up window, as shown below, to let you choose whether to use the floating button or gesture.
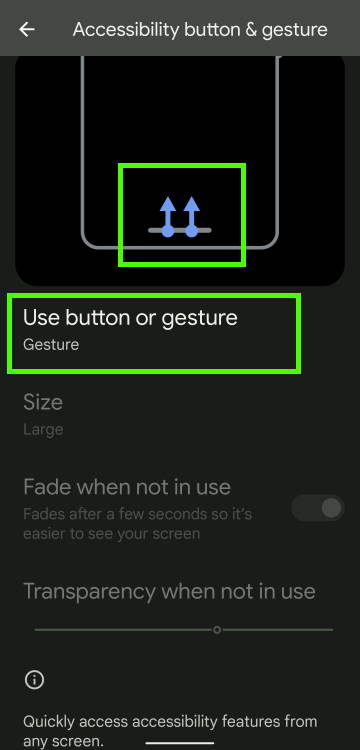
If you choose Gesture, you will find the illustration of the gesture to be used to enable or disable Extra Dim in Android 12, as shown in the screenshot above.
The gesture to be used is swiping upwards from the bottom of the screen with two fingers as illustrated.
Of course, if you choose to use this gesture, the size and transparency options will be greyed out because they are no longer relevant, as shown in the screenshot.
Remember to save the option if you want to make the change.
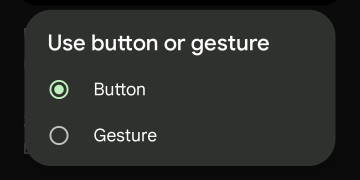
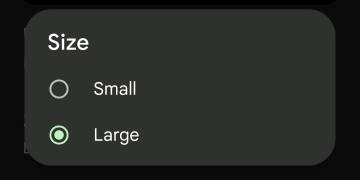
If you choose to use the floating button, then you can choose between a small or large button, as shown above.
Top misunderstandings of Extra Dim in Android 12
As a new feature in Android 12, there are some misunderstandings about the Extra Dim in Android 12.
Let me explain some of these misunderstandings.
1. Wrong: Extra Dim adjusts the minimum brightness level
There is no way for you to adjust the minimum brightness level of the screen. It is set by the hardware vendor.
Extra Dim makes your screen dimmer by compressing (and distorting) the colour space of the output image before it is sent to the screen to display
2. Wrong: Extra Dim only adjust the brightness
As mentioned, Extra Dim in Android 12 does NOT adjust the brightness directly. It is a software feature adjusting the image (including text) to be shown on the screen.
So, the output quality actually degrades due to the distorted colour space and reduced colour range.
3. Wrong: Extra Dim can reduce the brightness level by more than 50%
In stock Android 12, the maximum reduction of brightness is up to 50% only.
4. Misleading: You can leave the Extra Dim always on
Extra Dim is an accessibility feature designed for using the phone in a dark environment. It may save a bit (maybe negligible) battery for you.
However, you have to sacrifice colour accuracy to get a dimmer screen. So, it is recommended to turn on the Extra Dim only when you really need it.
In other words, you should adjust the brightness first. Extra Dim is the last resort when the brightness is already set to the minimum.
In almost all Android devices, the adaptive brightness also has a slider for you to adjust the “default” brightness level.
Anyway, it is not recommended to leave the Extra Dim always on unless you need to use the phone in a dark environment most of the time.
Do you have any questions about Extra Dim in Android 12?
If you have any questions on Extra Dim in Android 12, please let us know in the comments section below.
For other Android 12 guides, you may check the Android 12 guides page.
If you are still on other versions of Android, you may check these guides:
- For Android 11, please check the Android 11 guides page.
- For Android 10, please check the Android 10 guides page.
- For Android Pie (Android 9), please check the Android Pie guides page.
- For Android Oreo (Android 8.0 and 8.1), please check the Android Oreo guides page.
- For Android Nougat (Android 7.0 and 7.1), please check the Android Nougat guides page.
- For Android Marshmallow (Android 6.0), please check the Android Marshmallow guide page.
- For Android Lollipop (Android 5.0 and 5.1), please check the Android Lollipop guide page.
- For other general Android questions or problems, please check the Android 101 page.
You may also reach us through our Facebook page.
Enjoy your Android 12!
Leave a Reply