
With the release of Android 11, Google integrated Android Debug Bridge (ADB) wireless debugging as a native feature within the operating system. This major update in ADB introduced a secure pairing mechanism that completely eliminates the need for an initial USB connection. This modern approach, fully integrated into both Android’s Developer Options and Android Studio, uses on-screen pairing codes or QR codes to establish a cryptographically secure connection, representing a significant improvement in both usability and security over the legacy method.
This was not an architectural overhaul, but rather an enhancement to the connection establishment and security protocol built upon the existing transport-agnostic foundation.
Although most developers and many Android users still use USB debugging, wireless debugging may sometimes be the easier solution, for example, when connecting to a Google TV Streamer or Chromecast with Google TV (the only USB port is occupied for power). Some Android TV boxes may not have an additional USB port as well.
This Android 101 guide explains how ADB works, what Android ADB wireless debugging is, the prerequisites for using Android Wireless Debugging, detailed steps for using Android Wireless Debugging, and how to use Android Wireless Debugging on older (pre-Android 11) devices.
This guide applies to almost all Android devices, Android phones, Android tablets, Android TV, Chromecast with Google TV, and Google TV Streamer.
What is Android ADB Wireless Debugging?
First, let’s recall the ADB Architecture.
The ADB system is composed of three distinct components that work in concert to facilitate communication and command execution.
- The Client: This component resides on the host machine (the development workstation) and is invoked by the user through the adb command in a terminal or command prompt. The client is responsible for translating user-issued commands, such as adb install or adb shell, into the ADB protocol and sending them to the ADB server.
- The Server: The server is a background process that runs on the host machine. When an ADB client is started for the first time, it checks for a running server process; if one is not found, it initiates one. The server binds to the local TCP port 5037 and acts as a central hub, managing communication between all running clients and the daemons on all connected devices (physical or emulated). Its role is to multiplex commands and responses, ensuring that requests from various clients are routed to the correct device daemon.
- The Daemon (adbd): The daemon is a background process that runs with elevated permissions within the Android user space on the target device (i.e., Android phones, tablets, Android TV, Google TV Streamer). It is always listening for incoming commands. Upon receiving a command from the server, the adbd process executes it on the device’s operating system and sends the result back to the server, which then relays it to the originating client.
The interaction follows a clear and sequential flow: a command initiated by the user from a client is transmitted to the server via port 5037. The server then identifies the target device and forwards the command to the relevant adbd process. The daemon executes the command and returns the output through the same communication channel.
The core protocol for sending commands and receiving data is layered on top of a transport mechanism, which can be interchanged without altering the fundamental behavior of the client, server, or daemon. This abstraction is what enables both wired and wireless debugging.
- USB Transport: This is the traditional and default transport method. The ADB server on the host communicates with the adbd process on the device via the USB bus. This communication is facilitated by platform-specific USB drivers on the host machine (development workstation) and the Android USB framework on the device.
- TCP/IP Transport: This is the mechanism that underpins all forms of wireless debugging. Instead of communicating over USB, the server and daemon communicate over a standard TCP/IP network socket. The adbd process is configured to listen on a specific network port for incoming connections from the ADB server.
Therefore, Android wireless debugging is simply the act of configuring the server and daemon to utilize the TCP/IP transport layer instead of the USB transport layer.

Prerequisites for Android Wireless Debugging
Before any wireless debugging session can be established, a series of foundational steps must be completed on both the Android device and the development workstation. Failures in wireless debugging frequently originate from an incomplete or incorrect initial setup rather than from issues with the wireless protocol itself. Overlooking these prerequisites is a common source of user frustration and can lead to errors that are mistakenly attributed to the wireless connection.
#1. Enable developer options on your Android device
By default, the Developer options menu is hidden on Android devices. This is a deliberate security measure designed to prevent inexperienced users from accidentally changing important system settings that could affect the device’s functionality. Enabling this menu is a necessary first step for any form of debugging.
The procedure to enable developer options is largely universal across Android devices: navigate to Settings – About phone and then tap the Build number field seven consecutive times. A toast notification will appear, counting down the remaining taps and finally confirming, “You are now a developer!”. While the general method is consistent, the exact path to the “Build number” can vary slightly between manufacturers, for example,
- Google Pixel: Settings > About phone > Build number.
- Samsung: Settings > About phone > Software information > Build number. You may check this detailed guide on how to enable developer options on Galaxy phones.
- Google TV Streamer (Chromecast with Google TV) and most Android TVs: Settings > System > About > Android TV Build. Please check this guide on detailed steps to enable developer options on Google TV Streamer and Chromecast with Google TV>
You should see a new entry of Developer Options under Settings (Samsung Galaxy devices) or Settings > System (for Pixel, Android TV, Google TV Stream, and other stock Android devices).
#2. Enabling USB Debugging and Wireless Debugging on your Android device
Once the Developer Options menu is visible , two key toggles become relevant.
- USB Debugging: This is the master switch that permits the adbd daemon to accept debugging connections on your Android device. It must be enabled. Even when using the cable-free wireless debugging method on Android 11+, enabling USB Debugging is often a necessary prerequisite for the system to properly initialize the debugging framework.
- Wireless Debugging: This toggle, introduced in Android 11, is the specific control for the native wireless debugging feature. Activating it prompts the user to allow debugging on the current Wi-Fi network and makes the pairing options available. This allows adbd to listen for connections over Wi-Fi without requiring a preliminary adb tcpip command via USB.
If you enable wireless debugging for the first time, you will be asked to confirm the operation, as shown in the screenshot below. You may enable “always allow on this network” so that it will not ask you again when the device is connected to this network. Remember to tap Allow to close the pop-up and enable wireless debugging..

#3. Install and configure the SDK Platform-Tools on your workstation
To establish a fully operational ADB environment, you must install the necessary command-line tools on your workstation.
You may follow this guide to install the platform tools on your workstation (Windows, Mac, or Linux). This allows you to use Android Wireless Debugging without installing Android Studio.
For those who prefer not to use command-line tools, installing Android Studio is an option. However, be mindful that it requires a significant amount of disk space. In this guide, we will use the command line interface.
Steps to use Android Wireless Debugging
To use Android Wireless Debugging, you must follow a two-step sequence that employs two distinct ports. This design choice deliberately differentiates between a temporary pairing port and a persistent connection port, enhancing security. The pairing port is transient (temporary), facilitating the initial secure exchange of authentication keys. Following this, the connection port is utilized for all subsequent ADB traffic, which is encrypted. Most user errors arise from a lack of differentiating these two ports.

- Google Pixel 9a is engineered by Google with more than you expect, for less than you think; like Gemini, your built-in AI assistant[1], the incredible Pixel Camera, and an all-day battery and durable design[2]
- Take amazing photos and videos with the Pixel Camera, and make them better than you can imagine with Google AI; get great group photos with Add Me and Best Take[4,5]; and use Macro Focus for spectacular images of tiny details like raindrops and flowers
- Google Pixel’s Adaptive Battery can last over 30 hours[2]; turn on Extreme Battery Saver and it can last up to 100 hours, so your phone has power when you need it most[2]
- Get more info quickly with Gemini[1]; instead of typing, use Gemini Live; it follows along even if you change the topic[8]; and save time by asking Gemini to find info across your Google apps, like Maps, Calendar, Gmail, and YouTube Music[7]
- Pixel 9a can handle spills, dust, drops, and dings; and with IP68 water and dust protection and a scratch-resistant display, it’s the most durable Pixel A-Series phone yet[6]
Step 1: Pair
- On the Android device, navigate to Developer options > Wireless debugging and tap Pair device with pairing code, as shown in the screenshot below. Take note of the three pieces of information displayed: the IP address, the pairing port number, and the six-digit pairing code. In the screenshot below, 192.168.50.252 is the IP address of the device (Pixel 9a), and port 34587 is the ADB connection port you will need later. The pairing port will be shown after tapping Pair device with pairing code. Note that pairing with QR code requires Android Studio and is not covered here.


The pairing info you need is on the pop-up screen. For example, in this example, one must use port 36473 with pairing code 236182. The port number and pairing code are transient. It will change whenever you close the pop-up window. The ADB port shown in the previous screen will not change until you reboot the phone.
- On the workstation, open a terminal or command prompt. If the platform-tools directory is not in the system PATH, navigate into that directory first.
- Execute the pairing command using the IP address and port number from the device:
adb pair IP_ADDRESS:PAIRING_PORT
(Example: adb pair 192.168.50.2520:36473)
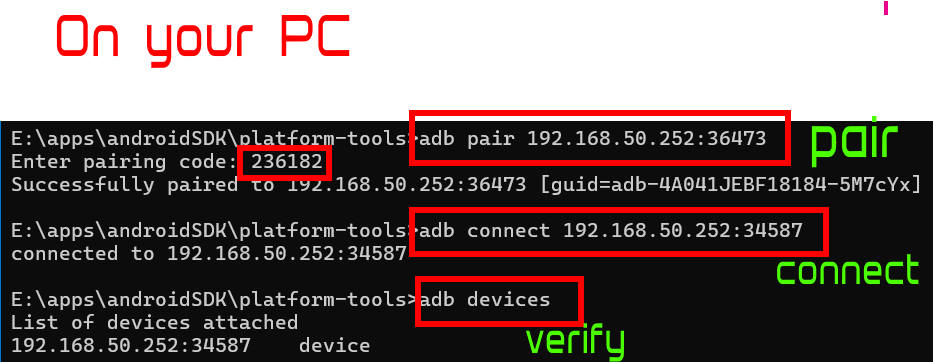
- The terminal will prompt for the pairing code. Enter the six-digit code displayed on the device and press Enter. A confirmation message, “Successfully paired to…”, will appear, as shown in the screenshot above.
Step 2: Connect
- Important: After successful pairing, return to the main Wireless debugging screen on the Android device. Under the main toggle, the ADB port number should not be changed and will be listed (e.g., 192.168.50.252:34587), as shown in the screenshot below. This is the connection port. You may also notice that the entry for Paired devices is no longer empty.
- In the workstation terminal, execute the connection command using this new port information:
adb connect IP_ADDRESS:CONNECTION_PORT
(Example: adb connect 192.168.50.252:34587) - A confirmation message, “connected to…”, will indicate an active debugging session, as shown in the screenshot above.
- Run adb devices to verify. The device will be listed with its network address (e.g., 192.168.50.252:34587 device), as shown in the screenshot above.

Step 3: Managing Paired Devices and Connections
Paired devices are remembered by the Android devices, allowing for quicker reconnections in the future. To manage these pairings, navigate to the Wireless debugging screen on the device. Under the Paired devices list, tapping on a workstation’s name will present an option to Forget it, revoking its authorization.
For convenience, a Quick Settings developer tile for Wireless Debugging can be enabled in Developer options. As shown in the screenshot below, you can tap Quick settings developer tiles to enable some developer options in the quick settings panel. This adds a toggle to the device’s quick settings panel, allowing the feature to be turned on and off rapidly without navigating through the settings menu.


For example, as shown in the screenshot above, you can enable the quick serttings tile for Wireless debugging.
Once enabled, you can find the wireless debugging icon in the quick settings panel, as shown in the screenshot below. If you cannot find it, you may try to manage the tiles.

How to use Android Wireless Debugging on older (pre-Android 11) devices
On older Android versions, enabling wireless debugging was a functional but cumbersome process.
It requires an initial, trusted connection via USB to “bootstrap” the wireless mode. The developer would issue the command adb tcpip <port> (e.g., adb tcpip 5555) over the USB connection. This command instructed the adbd daemon to restart and begin listening for connections on the specified TCP port instead of the USB bus.
Do you have any questions on Android Wireless Debugging?
Please let us know your questions about Android ADB Wireless Debugging in the comment box below.
The community will help you.
If you are looking for guides for features introduced in other versions of Android (most of the “new” features in old versions of Android should work in newer ones), you may use the search bar to search or navigate to other sections of this site.


If your Android phone or tablet is on any of the following Android versions, you may check these guides respectively:
- For Android 16, please check the Android 16 guides page.
- For Android 15, please check the Android 15 guides page.
- For Android 14, please check the Android 14 guides page.
- For Android 13, please check the Android 13 guides page.
- For Android 12, please check the Android 12 guides page.
- For Android 11, please check the Android 11 guides page.
- For Android 10, please check the Android 10 guides page.
- For Android Pie (Android 9), please check the Android Pie guides page.
- For Android Oreo (Android 8.0 and 8.1), please check the Android Oreo guides page.
- For Android Nougat (Android 7.0 and 7.1), please check the Android Nougat guides page.
- For Android Marshmallow (Android 6.0), please check the Android Marshmallow guide page.
- For Android Lollipop (Android 5.0 and 5.1), please check the Android Lollipop guide page.
- For other general Android questions or problems, please check the Android 101 page.
You may also reach us through:
Leave a Reply