
The Galaxy S25 Camera app is essential for unlocking the device's outstanding photographic potential. Mastering the Galaxy S25 Camera app is crucial for capturing high-quality photos and videos.
This Galaxy S25 Camera app guide explains the 5 sections of the Galaxy S25 Camera app user interface and their functions. It covers how to use the shutter button in the Camera app, how to switch between the front and rear cameras on the Galaxy S25, and how to manage the various camera modes in the Galaxy S25 Camera app. Additionally, the guide provides a detailed explanation of the meanings and usage of all the settings found in the Galaxy S25 Camera app user interface.
Although Galaxy S25, S25+, and S25 Ultra differ in camera capabilities, the Camera app on these 3 phones is identical. So, this guide applies to all Galaxy S25 phones. Some features that are exclusive to the Galaxy S25 Ultra are highlighted explicitly.
- Understand the Galaxy S25 Camera app user interface
- How to use the shutter button on the Galaxy S25 Camera App?
- How to switch between the front and rear cameras on the Galaxy S25 Camera app?
- How to manage camera modes on the Galaxy S25 Camera app?
- Meaning of all options on the Galaxy S25 Camera App user interface
- Flash
- Photo resolution
- Motion photo
- Filter effects
- Super Steady
- Frame rate for hyperlapse videos
- Video resolution
- HDR
- Metering method (Pro Mode only)
- Pre-recording in Single Take mode
- Photo aspect ratio
- Timer
- Exposure compensation
- Facial effects (beauty filter)
- Camera settings
- Blur effect in Food mode
- Macro mode (Galaxy S25 Ultra only)
- Do you have any questions about the Galaxy S25 camera app?
Understand the Galaxy S25 Camera app user interface
The Galaxy S25 Camera App user interface can be divided into 5 sections, as shown in the screenshot below:
- Preview screen section.
- Zoom and the quick tools section
- Functional buttons section.
- Camera mode selection section
- Current options section.

1. Preview screen section
In the Galaxy S25 Camera app, the preview screen section has three functions:
- Preview the photo or video to be captured. This allows you to preview the scene before capturing it.
- Enhance your photo-taking experience with exposure adjustment and lock, focus lock, pinch-to-zoom, and swipe-to-switch between front and rear cameras.
- Display some status info, e.g., macro mode, low-light mode, grid lines, and level.
Besides, you can also use Circle to Search on the preview screen by holding the Home button. You may use this trick if you seldom use the Google Lens app.
2. Zoom and quick tools section
Galaxy S25 and S25+ support up to 3x optical zoom, and Galaxy S25 Ultra supports up to 5x optical zoom. These are the limitations of the hardware sensors. However, with computational photography (especially super-resolution) and Galaxy AI, you can still take high-quality photos with higher zoom levels. For example, on Galaxy S25 and S25+, you may go up to 5x, and 10x on Galaxy S25 Ultra without compromising photo quality. If you choose a zoom level that is too high, the image quality will deteriorate quickly.
By default, on Galaxy S25 Ultra, 6 pre-set zoom levels (0.6x, 1x, 2x, 3x, 5x, and 10x) are shown when using the rear-facing camera. You can select the zoom level by tapping any of the 6 icons. Once you tap an icon, you will see additional preset zoom levels up to 100x (for Galaxy S25 Ultra), as shown in the screenshot below.

Alternatively, you can pinch (spread) on the preview screen to zoom to any level.
With One UI 7 (Android 15), the Galaxy S25 Camera quick tools (options) are now combined with the zoom-level selections below the preview screen section, instead of above the preview screen as in the Galaxy S24. Once you tap the quick tools button (4 dots), the whole section will be filled with the camera options icons, as shown in the screenshot below. You can swipe left or right to access all options.
We will explain all these settings later (read on).

3. Functional buttons section
There are three function buttons in this section:
- Shutter button (middle). The shutter button serves dual purposes: it enables users to capture still images and initiates or halts video recording with a simple tap. Additionally, the button is designed to recognize several gestures that trigger specific functionalities (read on).
- Shortcut to Gallery app (left). The thumbnail in the button features the final photograph taken. You can take advantage of this handy shortcut to the Gallery app, letting you check out or edit photos without leaving the Galaxy S25 Camera app. When you're done exploring in the Gallery, simply use the Back button or swipe back to quickly return to the Camera app.
- Camera switch button (right). You can use this switch button to switch between the front and rear cameras on the Galaxy S25. As mentioned earlier, you can also swipe up and down to switch the camera in the preview screen. However, this gesture can be disabled if it causes inadvertent camera switching frequently. In the One UI 8 update for Galaxy S25, S24, S23, and S22, you can assign the swipe (up/down) gesture to open the Galaxy S25 camera quick tools.
4. Camera mode selection section
You can unlock the full potential of your Galaxy S25 camera and elevate your photography experience. With a range of camera modes at your disposal, you can capture stunning photos and videos in various lighting conditions and environments.
While the default Photo mode (Auto mode) is sufficient for everyday use, there are moments when you may want to switch to a different mode to enhance your shots. And, fortunately, accessing these alternative Galaxy S25 camera modes is simple and user-friendly (Read on).
By default, you have quick access to three essential modes: Portrait, Photo, and Video. You can tap the “More” button to discover additional camera modes that will help you unleash your creativity. Furthermore, if you find a mode that you may use again in the future, you can easily add it here for even quicker access.
Additionally, since One UI 6, the Expert RAW mode has been integrated directly into the Camera app, eliminating the need for a separate Expert RAW app installation. You can also use the camera widget to launch the camera app directly in your preferred mode.
5. Current options section
The options displayed above the preview screen correspond to the active camera mode and are updated in real time based on several factors:
- Active Camera Mode: Options will dynamically adjust according to the selected camera mode. Non-applicable options will be omitted, while relevant options may be introduced as the mode changes.
- Altered Default Values: Certain features, such as timer settings, exposure compensation, and facial effects, will only be visible if activated. If these options are set to their defaults and not engaged, they will not appear in the interface.
This ensures a streamlined user experience by presenting only the controls pertinent to the current configuration.
You can tap on the button to change the option on the fly.
When launching the Galaxy S25 Camera app, expect a brief display of the camera access status icon. Additionally, if you switch to Video mode, you may notice the microphone access icon momentarily appear in the status bar.


How to use the shutter button on the Galaxy S25 Camera App?
The shutter button in the Galaxy S25 Camera app serves a dual purpose: it allows users to capture still images or to start and stop video recordings with a simple tap.
The shutter button supports three gestures:
- Tap (single tap): Use this to capture a still image or start video recording.
- Tap and Hold (long tap): Initiate video recording in Photo mode. Recording stops when the button is released. This gesture can be disabled in the Camera Assistant.
- Swipe Downwards and Hold (swipe and hold): Activate burst shooting mode, capturing a rapid sequence of images or creating a GIF.
For burst shots, swiping downward on the shutter button engages burst mode, permitting up to 100 consecutive images to be captured until the button is released or the limit is reached. You can also customize this gesture to create GIF animations instead of utilizing the burst mode.
In addition to the shutter button, the Galaxy S25 offers alternative methods for capturing images, including a floating shutter button interface, use of the volume keys, or a palm gesture for added convenience, as explained in this guide.
How to switch between the front and rear cameras on the Galaxy S25 Camera app?
There are at least two ways to switch between the front and rear cameras on the Galaxy S25:
- Use the camera switch button.
- Use the swipe gesture in the preview screen.
The functional buttons section features a switch button that is always available. Simply tap it to switch between the front and rear cameras.
If you prefer gestures (regardless of whether you use navigation buttons or navigation gestures), you can swipe up or down in the preview section to switch between the front and rear cameras. By default, this feature is enabled. But if you often trigger the switch inadvertently, you can disable the feature and use the functional button only.
Update: if you have updated your Galaxy S25 to One UI 8 (Android 16), you can customize the swiping gesture in the camera app. In addition to switching front/rear cameras, you may assign it to open Galaxy S25 camera quick settings (quick tools).
How to manage camera modes on the Galaxy S25 Camera app?
Please refer to this guide on how to manage camera modes on the Galaxy S25 camera app, and the meaning of all available camera modes on the Galaxy S25.
Meaning of all options on the Galaxy S25 Camera App user interface
The meaning of the options in the Galaxy S25 Camera app is summarized in the following table.

Flash
The LED flash located on the rear of the Galaxy S25 (refer to the Galaxy S25 layout for precise location) is designed to enhance image quality in low-light scenarios. However, it often produces adverse effects, such as increased noise and degradation in overall image clarity under many conditions. As such, if there is uncertainty about its efficacy, it's advisable to disable the flash.
In the Galaxy S25 Camera app, you can configure the flash settings by tapping the flash icon, which offers the following options
- On: Generally unnecessary for most shooting scenarios.
- Off: Disables the flash entirely.
- Auto (Default): Automatically engages the flash when low-light conditions are detected.

Notably, the Galaxy S25 lacks an LED flash for the front camera. Instead, it utilizes the display as a light source, effectively serving as a makeshift flash. You can toggle this feature on or off as required. It's essential to note that flash settings for the front and rear cameras are managed independently, requiring separate adjustments for each.

Photo resolution
The Galaxy S25 Camera app allows you to adjust the photo resolution, with higher resolution requiring more storage due to increased pixel count.
The dedicated resolution setting has been introduced in the One UI 6 (Android 14) update for Galaxy S23, S22, and S21. Previously, on Galaxy phones, you could only set the aspect ratio, and the maximum resolution was always used. A dedicated photo size button was added in the One UI 6 (Android 14) update.
If you need to resize the photo, you can do it in the Gallery app, as explained in this guide.
The photo resolution settings are only available for the rear camera. The front camera will always use the maximum resolution (up to 12MP), depending on the aspect ratio.
The Galaxy S25 Camera app supports the following photo resolutions:
- 12MP
- 50MP
- 200MP (for Galaxy S25 Ultra only).
It is important to note that the specified resolutions denote a 4:3 aspect ratio (or 3:4). Utilizing 16:9 or 1:1 aspect ratios will result in a reduction of the total pixel count.

Motion photo
The Galaxy S25's Motion Photo feature is a valuable tool for capturing the perfect moment. By recording a few seconds of video before and after you press the shutter button, Motion Photo ensures that you never miss the ideal shot.
You have the flexibility to share these Motion Photos in multiple formats, either as engaging videos that showcase the scene's dynamism or as still images that highlight the chosen perfect moment.
Of course, more storage is required when Motion Photo is turned on.
It is important to note that Google Photos is compatible with motion photos. Therefore, it is safe to back up motion photos to Google Photos.

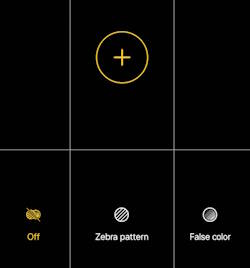
Filter effects
The filter effects allow you to apply pre-defined filters to the photos when they are taken. Of course, you can add filter effects when editing them.
In the Galaxy S25 Camera app, Face effects are separated from the filter effects.

Super Steady
The Super Steady feature in the Galaxy S25 Camera app employs advanced stabilization algorithms to effectively minimize motion blur in videos, even when the device is in motion. This technology enhances video clarity by compensating for unintentional camera movements during recording.

Frame rate for hyperlapse videos
When using the Hyperlapse video mode, you can adjust the video speed (how fast) up to 300x, as shown in the screenshot below.
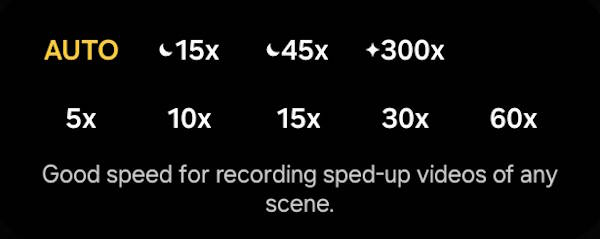
The Auto frame rate setting is advisable as it enables the Galaxy S25 camera app to dynamically adjust the frame rate in response to variations in the scene’s composition and motion.
It's worth noting that since Android 12 (One UI 4) on Galaxy devices, the Scene Relighting feature enables users to transform still images into hyperlapse videos.

Video resolution
Unlike photo size (resolution),video resolution actually includes two parts:
- Resolution (how many pixels?).
- Frame rate (how many frames per second?).
As shown in the screenshot below, you can set the resolution as HD (720*1280), FHD (1080*1920), UHD(2160*3840), or 8K (4320*7680)
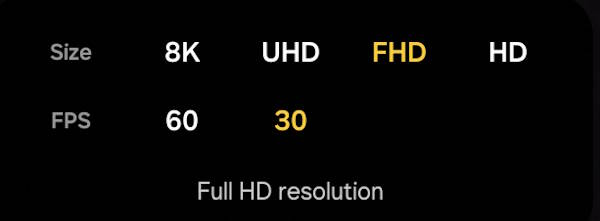
Please note, this option is only for the Video mode in the Galaxy S25 Camera app. In other camera modes, for example, slow motion mode, you can record videos up to 240 frames per second.
FYI, since Galaxy S24, Samsung has removed the super slow-mo mode. If you need a frame rate higher than 240 fps, you can export the slow-motion video in the Gallery app.

HDR
The HDR option, if enabled, allows you to record 10-bit HDR videos with a wider range of colour and contrast.


Metering method (Pro Mode only)
The metering method determines how light values are calculated. In Galaxy S25 Pro mode, you can choose three different metering methods:
- Centre-weighted metering (the default) uses the light in the centre portion of the shot to calculate the exposure of the shot.
- Matrix metering averages the entire scene.
- Spot metering uses the light in a concentrated centre area of the shot to calculate the exposure of the shot.

Pre-recording in Single Take mode
In SINGLE TAKE mode, you have the option to enable or disable pre-recording. When activated, the system captures a video segment starting a few seconds before the camera button is pressed, allowing for more extended coverage of the moment.

Photo aspect ratio
You can select an aspect ratio for photos in the Galaxy S25 Camera app.
The Galaxy S25 Camera app supports the following four aspect ratios:
- 1:1. Some designers and markets may prefer this aspect ratio.
- 16:9. This aspect ratio is good for most TVs, monitors, and digital photo frames.
- 4:3. The 4:3 ratio is best for printing.
- Full. This would set the aspect ratio to the Galaxy S25 screen aspect ratio (20:9).
Be aware that the native aspect ratio of the camera sensor on the Galaxy S25 (as is common with most smartphones) is 4:3. Consequently, when capturing images at a 16:9 or 1:1 aspect ratio, these formats are simply crops of the original 4:3 frame. Therefore, if you require optimal image fidelity, it's advisable to select the 4:3 aspect ratio for your shots.
You may check this photo size guide for Galaxy S10, S20, S21, S22, S23, S24, and S25.

Timer
The Galaxy S25 Camera app offers the option to set a timer, allowing you to delay the photo capturing by 2, 5, or 10 seconds(after pressing the shutter button), as shown in the screenshot below.

The timer functionality is independent for both the front and rear cameras; each camera must be configured individually. They do not operate on a shared timer system. Moreover, it’s important to note that the timer will remain active until manually deactivated, as simply opening and closing the camera interface does not reset or cancel the timer settings.
By default, only one picture is taken when using the timer. You can enable Camera Assistant to take multiple (up to 7) photos for the timer (timer multi-photo options).
![SAMSUNG Galaxy Ring, AI Smart Ring, Size First w/Sizing Kit, No App Subscription, Fitness Monitor, Sleep Tracker, Up to 7-Day Battery, Size 10, Titanium Gold [US Version, 1Yr Manufacturer Warranty]](https://m.media-amazon.com/images/I/41R1PkmCQxL._SL160_.jpg)
![Samsung Galaxy Watch 7 40mm Bluetooth AI Smartwatch w/Energy Score, Wellness Tips, Heart Rate Tracking, Sleep Monitor, Fitness Tracker, 2024, Green [US Version, 1Yr Manufacturer Warranty]](https://m.media-amazon.com/images/I/41ew4GQ5kML._SL160_.jpg)

Exposure compensation
You can use exposure compensation to adjust the overall brightness of the photo when the default metering does not produce the optimal result.
Please note, you can lock the focus and exposure to any object in the scene without adjusting the exposure compensation on the Galaxy S25.

Facial effects (beauty filter)
In the Galaxy S25 Camera app, the facial effects are separated from other filters. You can use the beauty filter to smooth your skin, adjust your skin tone, highlight your jawline, and enhance the beauty of your eyes, as shown in the screenshot below.


Camera settings
To adjust various settings for the Galaxy S25 camera, use the gear icon. It allows you to configure options such as scene optimizer, the picture file format, e.g., JPEG or High Efficiency Image Format (HEIF), and the inclusion of geolocation tags in your images.
To unlock advanced camera configurations, consider installing the Camera Assistant app. Once installed, additional settings will be available.

Blur effect in Food mode
In the Food camera mode, you can skillfully direct your attention to a delectable dish or ingredient within the frame, allowing it to stand out in sharp focus. Simultaneously, the background softens into a beautiful blur, creating an artistic contrast that highlights the subject's vibrancy and texture, making it truly captivating.

Macro mode (Galaxy S25 Ultra only)
You can use macro mode (also known as focus enhancer) to take close-up photos with the Galaxy S25 Ultra.
This icon/button is automatically activated in the preview screen upon detection of a close-up shot. You can deactivate this mode by tapping the icon.
Do you have any questions about the Galaxy S25 camera app?
If you have any questions about the Galaxy S25 camera app, especially the functions of each button, please let us know in the comment box below.
The community will help you.
You may check other sections of Galaxy S25 Guides: Everything about Galaxy S25:


- The Galaxy S25 News and Updates section provides the latest news, updates, and analyses for Samsung Galaxy S25, S25+, S25 Ultra, and S25 Slim. You can find a broad range of topics, including Galaxy S25 specifications, design features, One UI updates, and market dynamics so that Galaxy S25 owners or potential owners can remain well-informed about the latest updates and trends of Galaxy S25.
- The Galaxy S25 New Features Guides deliver an in-depth analysis of the advancements and new capabilities of the Galaxy S25, S25+, and S25 Ultra models compared to their predecessors in the Galaxy S series, as well as other leading Android flagship devices. These guides are an invaluable resource for answering technical questions related to Galaxy S25, while also offering detailed insights and comparative evaluations to facilitate informed decision-making in the purchasing process.
- The Galaxy AI Guides section comprises a thorough collection of resources and tools aimed at assisting users in effectively navigating and using the features of Galaxy AI on Galaxy S25, S25+, and SD25 Ultra. This section includes detailed explanations, comprehensive step-by-step instructions, and expert recommendations. Each guide is specifically designed to address particular functionalities, ensuring that individuals, regardless of their experience level, can enhance their knowledge and efficiency in utilizing Galaxy AI.
- The Galaxy S25 How-to Guides provide an extensive array of resources that deliver comprehensive instructions on using and personalizing the Galaxy S25, S25+, and S25 Ultra. These thorough guides encompass all facets of operating the Galaxy S25 series, including hardware and software features, functionalities of the Android operating system and One UI, as well as procedures for migration and data sharing. By consulting the Galaxy S25 How-to Guides, you can gain an in-depth understanding of both the capabilities and customization options available for your Galaxy S25, S25+, and S25 Ultra.
- The Galaxy S25 Camera Guides section offers a comprehensive compilation of instructional resources designed to assist Galaxy S25 owners in effectively using the Galaxy S25 camera for capturing exceptional photographs and recording high-quality videos. Additionally, it includes guidance on the application of the photo (and video) editor available on the Galaxy S25, S25+, and S25 Ultra.
- The Galaxy S25 Accessories Guides section offers detailed guides on the usage of various accessories specifically designed to enhance functionality and protect the Galaxy S25, S25+, and S25 Ultra. These guides cover a wide range of topics, including protective accessories and feature augmentation accessories. Furthermore, this section provides comprehensive reviews of specific accessories for Galaxy S25, S25+, and S25 Ultra.
- The Galaxy S25 User Manual section comprises the official user manual for the Samsung Galaxy S25, S25+, and S25 Ultra, available in PDF format. These user manuals have been released by Samsung across various regions and are organized according to the respective languages. The content of this material is comprehensive and structured, facilitating easier access to the necessary information for Galaxy S25 owners.
- The Galaxy S25 Reviews section is dedicated to reviews of the Galaxy S25, S25+, and S25 Ultra and their accessories. These reviews are all based on our own usage as consumers. Depending on the objects being reviewed, Galaxy S25 reviews include detailed technology and design evaluations, everyday usage and performance, and comparison to other similar products.
You can also reach us through:
- Our Facebook page.
- Our YouTube channel.
- Contact Us page.
Don't miss out on the latest updates, guides, tips, and tricks for the Samsung Galaxy S25 – sign up for our newsletter now!
A very useful guide, especially for someone who hasn’t used a phone camera before. A couple of questions:
1. In the S25 manual under Pro mode there is listed an icon to ‘reset the settings’; I don’t seem to have this icon and I’m not entirely sure what it means.
2. Nowhere in the manual does it indicate how to download images onto a computer. I have a cable that links the S25 to my desktop but no images appear when I click on the phone’s icon in File Explorer. Nor is there initially any notification that there is a connection. Am I not doing something properly?