• Skip to primary navigation
  • Skip to main content
  • Skip to primary sidebar

Galaxy S9 Guides

a community for owners of Samsung Galaxy S9 and S9+

  • Home
    • About Galaxy S9 Guides
    • Contact Us
  • How-to Guides
    • Galaxy S9 Android Pie update guides
      • Official user manuals for Galaxy S9 and S9 Plus with Android Pie update
      • Top 9 new features of Android Pie update for Galaxy S9 and S9+
      • How to use the new navigation gestures in Android Pie update for Galaxy S9 and S9+?
      • How to use the lockdown mode on Galaxy S9 and S9+ with Android Pie update?
      • How to use the night mode on Galaxy S9 and S9+ with Android Pie update?
      • How to remap Bixby button on Galaxy S9 and S9+ after updating to Android Pie?
      • How to use Bixby quick commands on Galaxy S9, S9+, S8, S8+, Note 8, and Note 9 with the Android Pie update?
      • How to update Galaxy S9 or S9 Plus to Android Pie (Android 9)?
      • How to use the lift to wake feature on Galaxy S9 and S9+ with Android Pie update?
      • How to use the new Recents screen in Android Pie update for Galaxy S9 and S9 Plus?
      • How to use the floating keyboard on Galaxy S9 and S9+ with Android Pie update?
      • How to lock Galaxy S9 home screen layout on Galaxy S9 and S9+ with Android Pie update?
      • How to use the rotation toggle to change and lock screen orientation in Android Pie update for Galaxy S9 and S9 Plus?
      • How to use the updated camera app in Android Pie update for Galaxy S9 and S9 Plus?
    • Meaning of Galaxy S9 status icons and notification icons in Samsung Galaxy S9 and S9+
      • How to use Samsung DeX with Galaxy S9 and S9+ and other Samsung phones?
      • How to use Multi Window on Galaxy S9 and S9+?
      • How to use app pair on Galaxy S9 and S9+?
      • Samsung DeX Station vs Samsung DeX Pad vs Samsung DeX cable
      • How to use Samsung DeX Station for Galaxy S9, S9+, S8, S8+, Note 8 and Note 9?
      • How to use Samsung DeX Pad for Galaxy S9, S9+, S8, S8+, Note 8 and Note 9?
      • How to use a USB flash drive on Galaxy S9 and S9+?
    • How to charge Galaxy S9 battery?
    • Galaxy S9 SIM card guide
      • How to use two SIM cards on Galaxy S9, S10, and S20?
      • How to use Galaxy S9 dual messenger to run two accounts of messenger apps simultaneously on Galaxy S9 and S9+?
      • How to use micro SD card on Galaxy S9 and S9+?
      • How to back up Galaxy S9 and S9+?
      • How to use smart switch to transfer and migrate data to Galaxy S9 or S9+?
      • How to reset Galaxy S9 and S9+? What is Galaxy S9 factory data reset?
    • How to disable Bixby button in Galaxy S9 and S9+?
      • How to remove Bixby Home from Galaxy S9 Home screen?
    • Understand and Use Galaxy S9 Home screen
      • How to use Galaxy S9 edge screen on Galaxy S9 and S9+?
      • How to show photos on Galaxy S9 Home screen?
      • How to pin files to Galaxy S9 Home screen (add file shortcuts to Galaxy S9 Home screen)?
      • How to use Galaxy S9 Apps screen on Galaxy S9 and S9+?
      • How to use Galaxy S9 Home screen edit mode to customize Galaxy S9 Home screen?
      • How to use Galaxy S9 home screen landscape mode?
      • How to hide Galaxy S9 apps screen and how to hide Galaxy Apps button?
      • How to use and customize Galaxy S9 navigation bar and navigation buttons?
      • How to manage Galaxy S9 Home screen panels on Galaxy S9 and S9+?
    • How to use and customize Galaxy S9 lock screen?
      • How to use Galaxy S9 always-on display (AOD) on Galaxy S9 and S9+?
    • How to use Galaxy S9 notification panel on Galaxy S9 and S9+?
      • How to use Do Not Disturb on Galaxy S9 and S9+?
      • Understand and use Galaxy S9 notification number badge (notification dots, app icon badge)
      • How to use quick setting buttons on Galaxy S9 and S9+?
      • How to use quick-open notification panel on Galaxy S9 and S9+ to check notifications?
    • Galaxy S9 layout (and layout of Galaxy S9+)
      • How to use adapt sound on Galaxy S9 and S9+?
      • 5 ways to take screenshots on Galaxy S9 and S9+ without using any apps
      • How to use Galaxy S9 touchscreen gestures?
      • How to use wireless printing on Galaxy S9 and S9+?
      • How to use Galaxy S9 themes to customize the look and feel of Galaxy S9 and S9+?
      • Unbox Galaxy S9: understand package contents in Galaxy S9 box and S9+ box
    • How to reboot into Galaxy S9 recovery mode and to clear Galaxy S9 cache partition on Galaxy S9 and S9+?
      • How to reboot Galaxy S9 and S9+ if Galaxy S9 hangs?
      • How to use Galaxy S9 safe mode on Galaxy S9 and S9+?
    • How to use Galaxy S9 camera app?
      • 6 ways to start Galaxy S9 camera app in Galaxy S9 and S9+
      • Understanding and use Galaxy S9 camera settings
      • How to use super slow motion mode (super Slow-mo) on Galaxy S9 and S9+?
      • How to use Galaxy S9 camera Pro Mode on Galaxy S9 and S9+?
  • New features
    • Top 9 new features of Android Pie update for Galaxy S9 and S9+
      • How to use the lockdown mode on Galaxy S9 and S9+ with Android Pie update?
      • How to use the new navigation gestures in Android Pie update for Galaxy S9 and S9+?
      • How to use the night mode on Galaxy S9 and S9+ with Android Pie update?
      • How to remap Bixby button on Galaxy S9 and S9+ after updating to Android Pie?
      • How to update Galaxy S9 or S9 Plus to Android Pie (Android 9)?
      • How to use the lift to wake feature on Galaxy S9 and S9+ with Android Pie update?
      • How to use the new Recents screen in Android Pie update for Galaxy S9 and S9 Plus?
      • How to use the floating keyboard on Galaxy S9 and S9+ with Android Pie update?
      • How to lock Galaxy S9 home screen layout on Galaxy S9 and S9+ with Android Pie update?
      • How to use the rotation toggle to change and lock screen orientation in Android Pie update for Galaxy S9 and S9 Plus?
      • How to use the updated camera app in Android Pie update for Galaxy S9 and S9 Plus?
      • How to use Bixby quick commands on Galaxy S9, S9+, S8, S8+, Note 8, and Note 9 with the Android Pie update?
    • Top 10 new features of Samsung Galaxy S9 and Galaxy S9+
    • How to remove Bixby Home from Galaxy S9 Home screen?
    • How to use and customize Galaxy S9 navigation bar and navigation buttons?
    • How to use super slow motion mode (super Slow-mo) on Galaxy S9 and S9+?
    • Understand and use Galaxy S9 notification number badge (notification dots, app icon badge)
    • How to use Samsung DeX Pad for Galaxy S9, S9+, S8, S8+, Note 8 and Note 9?
    • How to use Galaxy S9 home screen landscape mode?
    • Understanding and use Galaxy S9 camera settings
    • How to use dual aperture to manually switch Galaxy S9 camera aperture in Pro mode?
    • Galaxy S9 layout (and layout of Galaxy S9+)
    • How to use app pair on Galaxy S9 and S9+?
  • Camera
    • How to use Galaxy S9 camera app?
    • How to use the updated camera app in Android Pie update for Galaxy S9 and S9 Plus?
    • Understanding and use Galaxy S9 camera settings
    • 6 ways to start Galaxy S9 camera app in Galaxy S9 and S9+
    • How to use dual aperture to manually switch Galaxy S9 camera aperture in Pro mode?
    • How to use super slow motion mode (super Slow-mo) on Galaxy S9 and S9+?
    • How to use Galaxy S9 camera Pro Mode on Galaxy S9 and S9+?
    • How to show photos on Galaxy S9 Home screen?
  • Official User Guides
    • Official user manuals for Galaxy S9 and S9 Plus with Android Pie update
    • Official Samsung Galaxy S9 user guides (Oreo)
  • Accessories
    • How to use Samsung Galaxy S9 clear view standing cover (S-view cover)?
    • Samsung Galaxy S9 LED wallet cover guide
    • How to use micro SD card on Galaxy S9 and S9+?
    • How to use Samsung DeX with Galaxy S9 and S9+ and other Samsung phones?
      • Samsung DeX Station vs Samsung DeX Pad vs Samsung DeX cable
      • How to use Samsung DeX Station for Galaxy S9, S9+, S8, S8+, Note 8 and Note 9?
      • How to use Samsung DeX Pad for Galaxy S9, S9+, S8, S8+, Note 8 and Note 9?
      • How to use a USB flash drive on Galaxy S9 and S9+?

Galaxy S9 layout

How to remap Bixby button on Galaxy S9 and S9+ after updating to Android Pie?

You can now map the single or double press gesture of the Bixby key to a third-party app or a quick command.

simon · Leave a Comment

How to remap Bixby button on Galaxy S9 and S9+ after updating to Android Pie?
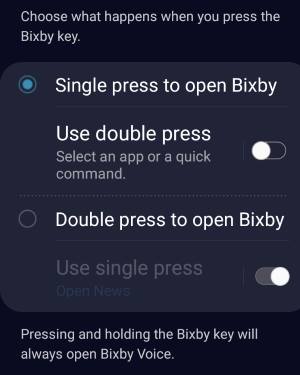
After the February update of Bixby (version 2.1.04.18), you can now remap Bixby button to an app or a Bixby quick command.

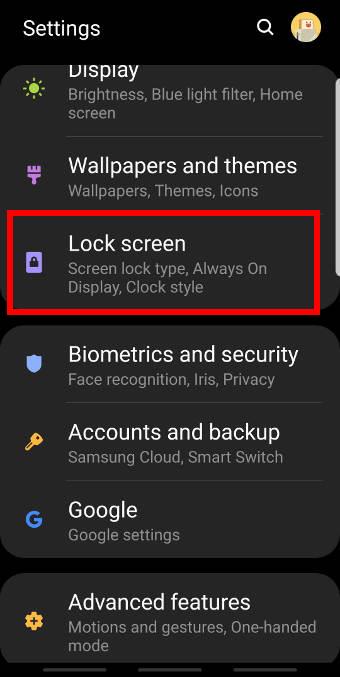
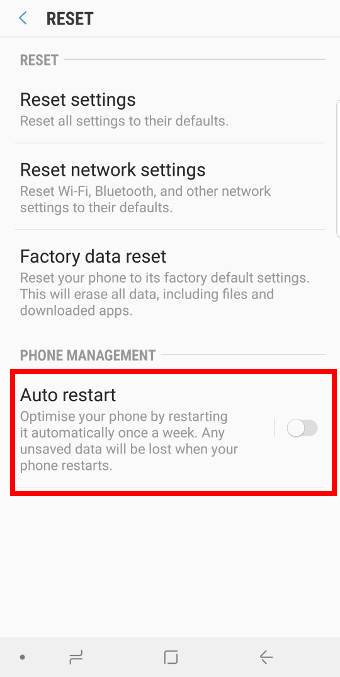
This Galaxy S9 Android Pie update guide explains the new features of Bixby in Android Pie update, and how to remap the Bixby button to other apps or a quick command.

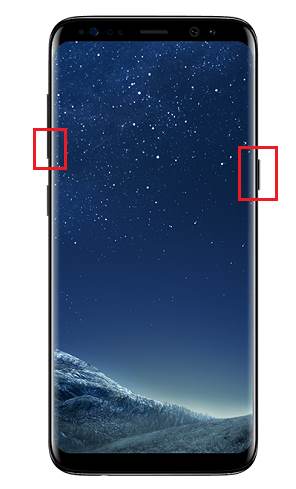
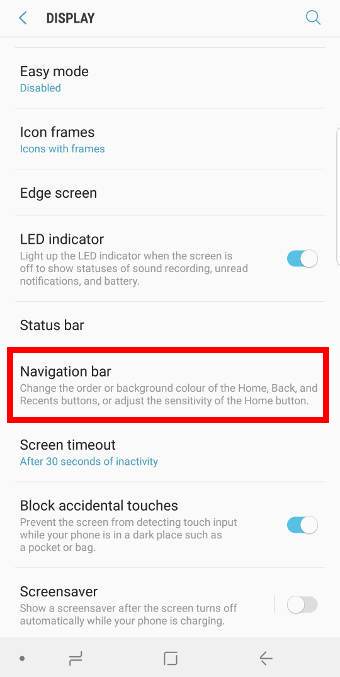
New gestures for the Bixby button on Galaxy S9 and S9+ after updating to Android Pie

Traditionally, the Bixby button in Galaxy S9, S9+, S8, S8+, Note 8, and Note 9 only supports one gesture: press.

You can choose to press to open Bixby (Bixby Home), or do nothing (this essentially disables the Bixby button).  Of course, you cannot remap the press gesture to anything else, or disable Bixby in your phone.

In Android Pie update for Galaxy S19, S9+, Note 9, Note 8, S8, and S8+, Bixby was updated to a new version with new gestures for the Bixby button. Now, the Bixby button supports 3 gestures:

  1. Single press.
  2. Double press.
  3. Long press.

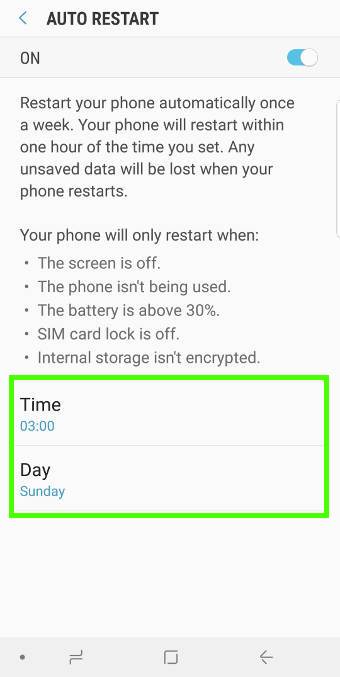
The long press is reserved for Bixby Voice command.  You cannot change it.  When you long press the Bixby button, you can continue with voice commands immediately.

The single press OR the double press MUST be assigned to Bixby Voice page.  For example, if you assign the single press to Bixby Voice, then you can customize (remap) the double press to something else.

Please note, Bixby Voice page, which is different from Bixby Home,  is new in Galaxy S9 Android Pie update. Bixby Home still exists in Galaxy S9 Home screen, and you can still hide it if you want.

Major changes of Bixby in Android Pie update for Galaxy S9, S9+, S8, S8+, Note 8, and Note 9

In Android Pie update for Galaxy S9, S9+, S8, S8+, Note 8, and Note 9, Bixby Service, Bixby Voice, and Bixby Vision, were bumped to version 2.1.x, and Bixby Home to version 3.x.

The major changes of Bixby in the Android Pie update include:

  • New gestures for the Bixby button. Remapping the Bixby button to third-party apps was added in February update of Bixby.
  • New Bixby quick commands.
  • New Bixby Vision integration in the new camera app.
  • New Bixby Voice page (showing tips, features, and suggestions for Bixby Voice, and accessing Bixby Voice settings).

You can update Bixby in Galaxy Store.

How to remap Bixby button on

… Read the rest

Filed Under: Galaxy S9 Guides, Galaxy S9 New Features Tagged With: Android Pie, Android Pie update guide, Bixby, Bixby button, Bixby Home, Bixby quick command, Bixby vision, Bixby voice, Galaxy S9 layout, remap Bixby button

How to use the lockdown mode on Galaxy S9 and S9+ with Android Pie update?

Everything you need to know about Android Pie lockdown mode on Galaxy S9 and S9+

simon · Leave a Comment

Everything you need to know about Android Pie lockdown mode on Galaxy S9 and S9+ You can use Android Pie lockdown mode on Galaxy S9 and S9+ with Android Pie (Android 9) update to temporally disable biometric unlock and smart lock. PIN or password will be required to unlock the phones.

The lockdown mode is a standard security feature in Android Pie (Android 9).  Luckily, Samsung did not mess up this feature in the One UI.

This Galaxy S9 Android Pie update guide explains everything you need to know about the lockdown mode on Galaxy S9 and S9+ with Android Pie update and shows you how to use it.

You may also check this updated guide on using lockdown mode on Galaxy S9, S10, S20, S21, and S22.

What is the lockdown mode on Galaxy S9 and S9+ with Android Pie update?

If enabled, Galaxy S9 and S9+ offer many ways to unlock the phone.

In addition to PIN/password/pattern, you can also unlock Galaxy S9 and S9+ using:

  • Fingerprints.
  • Iris.
  • Face.
  • Trusted devices, trusted places, trusted faces, and matched voices through the smart lock.

All these additional unlock methods are provided for your convenience.  Many Galaxy S9 and S9+ owners enjoy these fast unlock methods.

However, in some special situations, for example, someone attempts to force you to unlock the phone to get your data, you may try to disable these unlock methods temporally (and quickly), then type the wrong password/PIN a few times so that you have to wait longer and longer to try again.

When the lockdown mode is enabled, notifications will not be shown on the Galaxy S9 lock screen.

The lockdown mode is one of the new features in Android Pie.  Samsung kept the stock feature and did not mess it up this time in the Android update for Galaxy S9 and S9+, unlike what they did to the navigation gestures.

How to enable the lockdown mode on Galaxy S9 and S9+ with Android Pie update?

By default,  the lockdown mode on Galaxy S9 and S9+ with Android Pie update is not enabled.

You need to enable it in the power button options (power menu) before you can use it.

As shown in the screenshot below, tap Lock screen in Galaxy S9 Settings.

enable the lockdown mode on Galaxy S9 and S9+ with Android Pie update enable the lockdown mode on Galaxy S9 and S9+ with Android Pie update

As shown above, in the lock screen settings page, tap Secure lock settings.

In the secure lock settings, as shown below, you can find the Show lockdown option.… Read the rest

Filed Under: Galaxy S9 Guides, Galaxy S9 New Features Tagged With: Android Pie, Android Pie update guide, Galaxy S9 apps screen, Galaxy S9 home screen, Galaxy S9 layout, Galaxy S9 lock screen, Galaxy S9 notifications, Galaxy S9 safe mode, Galaxy S9 touch screen gesture, lock down, lockdown mode, navigation gestures, power button, power button options, power off Galaxy S9, power on Galaxy S9, screenshot, smart lock

How to use a USB flash drive on Galaxy S9 and S9+?

You can use a USB flash drive or even a 2TB USB drive to expand Galaxy S9 storage

simon · 7 Comments

use USB flash drive on Samsung phonesA USB flash drive is often the most convenient tool to quickly share files between Galaxy S9, Galaxy S8, Galaxy S10, Galaxy S20  and other devices.

So, in addition to using a micro SD card, you can further expand Galaxy S9 and other Galaxy phones storage with a USB storage.

This Galaxy S9 guide explains when you need to use a USB flash drive, the limitations of using USB storage on Galaxy S9 and other Galaxy phones, how to use and manage USB storage on Galaxy S9 and S9+.

Since Galaxy S8, Samsung has moved to USB-C port on all Galaxy S and Galaxy Note phones. So, this guide applies to all Galaxy phones with USB-C port, including Galaxy S8, Galaxy S9, Galaxy S10, Galaxy S20, Galaxy Note 8, Galaxy Note 9, Galaxy Note 10, and Galaxy Note 20.

In this guide, we use SanDisk Ultra Dual Drive in some examples. You may get a detailed guide on how to use SanDisk Ultra Dual Drive here.

When do you need to use external USB storage on Galaxy S9 and S9+?

Although you can expand Galaxy S9/S9+ storage with a micro SD card as explained in this guide, sometimes you may find you have to use a USB flash drive or using a flash drive is more convenient than other tools/methods.

For example, if you use two SIM cards on Galaxy S9 or S9+, you then cannot use the micro SD card because slot 2 in the SIM card tray was used by the SIM card already.

Or if you want to share some large videos on your phone with others and you do not want to hand over the phone to that person, you can then directly transfer files from Galaxy S9 to a USB flash drive, or even an external USB drive.

Or when you want to transfer some large files between Galaxy S9 and the PC/notebook without using the USB cable, then a USB flash drive probably is the fastest solution.

Some Galaxy S9 owners also use a USB flash drive to save offline videos and music files.  They can use the drive on multiple devices without making copies on each device.

What are the limitations of using a USB flash drive on Galaxy S9 and S9+?

Although a USB flash drive is a plug-and-play (PnP) device, sometimes you may find the USB flash … Read the rest

Filed Under: Galaxy S9 Accessories Guides, Galaxy S9 Guides Tagged With: device maintenance, eject SD card, exFAT, FAT32, Galaxy S9 layout, Galaxy S9 notification icon, Galaxy S9 notification panel, Galaxy S9 status bar, Galaxy S9 status icon, micro SD card, My Files, NTFS, pin files to Galaxy S9 home screen, unmount SD card, unmount USB storage, USB 2.0, USB 3.0, USB connector, USB flash drive, USB OTG, USB storage, USB-C

How to use Samsung DeX Pad for Galaxy S9, S9+, S8, S8+, Note 8 and Note 9?

simon · 2 Comments

use Samsung DeX Pad for Galaxy S9, S9+, S8, S8+, Note 8 and Note 9Samsung DeX Pad lets you instantly transform Galaxy S9, S9+, S8, S8+, Note 8 and Note 9 into an Android PC.

Compared to Samsung DeX Station, Samsung DeX Pad has an improved design and offers generous accessories in the box.  For a detailed comparison of the Samsung DeX Pad, DeX Station and DeX Cable, please check this guide.

This Galaxy S9 accessories guide shows you the contents in the Samsung DeX Pad box, the layout of the DeX Pad, and how to use Samsung DeX Pad.

What is Samsung DeX Pad?

Samsung DeX Pad, announced together with Galaxy S9 and S9+, is the 2nd generation of Samsung DeX dock accessories. But it is NOT a replacement of Samsung DeX Station. Rather it is a compliment to the DeX Station.

DeX Pad features a smaller footprint than its predecessor (DeX Station). And one of the significant changes is your phone can lay down on the DeX Pad.  So, it is very easy to use the phone screen as a touchpad.

Samsung DeX Pad works with all DeX-enabled devices: Galaxy S9, S9+, S8, S8+, Note 8, Note 9 and Tab S4. It also offers identical Samsung DeX features as the DeX Station and DeX cable.

For the detailed comparison of three current DeX accessories DeX Pad vs DeX Station vs DeX cable, please check this page.

What is included in the Samsung DeX Pad package?

Samsung DeX Pad package includes the essentials you need to use Samsung DeX.

You can find the following items in the package:

  • One Samsung DeX Pad.
  • One HDMI cable.
  • One USB cable. The USB-A to USB-C cable is for you to connect the power adapter/wall charger to the DeX Pad. It can also be used for data transfer between your phone and a PC (e..g, for backing up Galaxy S9). The cable itself is similar to the USB cable included in Galaxy S9 box.
  • One USB power adapter/wall charger. In most regions, the included wall charger is identical to that in your Galaxy S9 box. Of course, you can use this power adapter to charge Galaxy S9 battery.
  • One quick start guide in multiple languages.

Basically, you just need a monitor to try Samsung DeX immediately.  Remember Samsung DeX Station package does not include the cables and power adapter as explained in … Read the rest

Filed Under: Galaxy S9 Accessories Guides, Galaxy S9 Guides, Galaxy S9 New Features Tagged With: adaptive charger, charge Galaxy S9 battery, DeX, DeX mode, Galaxy S9 layout, Galaxy S9 new features, Galaxy S9 touch screen gesture, HDMI, Linux on DeX, Samsung DeX, Samsung DeX cable, Samsung DeX Pad, Samsung DeX settings, Samsung DeX station, touchpad, touchpad gestures, USB Ethernet, USB-C

How to use Samsung DeX Station for Galaxy S9, S9+, S8, S8+, Note 8 and Note 9?

Everything you need to know about Samsung DeX Station.

simon · Leave a Comment

use Samsung DeX Station for Galaxy S9, S9+, S8, S8+, Note 8 and Note 9Samsung DeX Station works with all Samsung DeX-enabled devices: Galaxy S9, S9+, S8, S8+, Note 8 and Note 9. You can instantly convert your phone as an Android PC (or a Linux PC if you enable Linux on DeX beta) with a DeX Station.

Although Samsung DeX Pad, Dex Station and DeX cable (for Note 9 and Tab S4) share identical DeX features, the design of these DeX accessories is substantially different. You may check this guide on using Samsung DeX Pad, and this guide (coming soon) on using Samsung DeX cable on Galaxy Note 9.  For the comparison of Samsung DeX Station vs Samsung DeX Pad vs Samsung DeX cable, please check this guide.

This Galaxy S9 accessories guide explains everything you need to know about Samsung DeX Station: contents in the package (box), the layout of the DeX Station, step-by-step guide on using the DeX Station. Frequently asked questions on Ethernet port, display resolution, charging and covers are also covered.

What is Samsung DeX Station?

Samsung DeX Station, as shown above,  is the first DeX accessory required by Samsung DeX. It was announced together with Galaxy S8 and S8+ in 2017.

Although it was announced as a companion to Galaxy S8/S8+, Samsung DeX Station works with all DeX-enabled devices: Galaxy S8, S8+, S9, S9+, Note 8, Note 9 and Tab S4.

The design of the Samsung DeX Pad is similar to Samsung’s fast wireless charging stand.  You need to push the top part so that it stands up to support the phone.

You may check this guide on the differences among three Samsung DeX accessories: Samsung DeX Station vs Samsung DeX Pad vs Samsung DeX Cable.

What is included in the Samsung DeX Station package?

In the Samsung DeX Station package, there are only two (maybe one if you find the quick start guide is useless) useful items:

  • Samsung DeX Station (aka multimedia dock).
  • Quick start guide in multiple languages.

Nothing else. No cables. No power adapters.

So, you need to prepare the following items to use Samsung DeX Station:

  • A Samsung fast wall charger (adaptive wall charger). The wall charger included in your Galaxy S9, S9+, S8, S8+, Note 8 and Note 9 is sufficient.
  • An HDMI cable.
  • (optional) A USB (or wireless)  mouse/keyboard. You can use the phone screen as the trackpad. But unlike Samsung DeX Pad, 
… Read the rest

Filed Under: Galaxy S9 Accessories Guides, Galaxy S9 Guides Tagged With: 4K, Bluetooth, DeX, DeX mode, fast charger, Galaxy S9 clear view standing cover, Galaxy S9 layout, Galaxy S9 LED wallet cover, HDMI, keyboard, Linux on DeX, mouse, Samsung DeX, Samsung DeX cable, Samsung DeX Labs, Samsung DeX Pad, Samsung DeX station, USB Ethernet, USB-C, USB-C to HDMI, wall charger

Samsung DeX Station vs Samsung DeX Pad vs Samsung DeX cable

Which one do you need to use Samsung DeX on Galaxy S9, S9+, S8, S8+, Note 8 and Note 9?

simon · Leave a Comment

Samsung DeX Station vs Samsung DeX Pad vs Samsung DeX cableSamsung DeX is one of the best productivity features offered in Galaxy S9, S9+, S8, S8+, Note 8 and Note 9.  You need either a Samsung DeX Station, or a Samsung DeX Pad, or a Samsung DexX cable to enjoy this feature.

But these 3 accessories may work differently in the supported devices. Please check this guide on how to use Samsung DeX Station and this guide on how to use Samsung DeX Pad.

This Galaxy S9 accessories guide explains the difference among the Samsung DeX accessories: Samsung DeX Station vs Samsung DeX Pad vs Samsung DeX cable, to help you get the correct DeX accessories for your phone.

What are the available Samsung DeX accessories needed to use Samsung DeX?

To use Samsung DeX, you need one of the following official accessories:

  • Samsung DeX Station; or
  • Samsung DeX Pad; or
  • Samsung DeX cable.

Samsung DeX Station was released in 2017 for Galaxy S8 and S8+. So, in addition to Galaxy S8 and S8+,  Samsung DeX station works with all later devices: Galaxy S9, S9+ Note 8 and Note 9.

Samsung DeX Pad was released in 2018 for Galaxy S9 and S9+. So, it officially supports Galaxy S9, S9+ and Note 9. But in Android Oreo update, Galaxy S8, S8+ and Note 8 can also use Samsung DeX  Pad to enjoy Samsung DeX.  So, Samsung DeX Pad supports similar devices as Samsung DeX Station unless you haven’t updated your S8 (or S8+ or Note 8) to Android Oreo.

Samsung DeX cable was released in 2018 for Galaxy Note 9. Currently, it only supports Galaxy Note 9 (and Tab S4)  in DeX mode. For Galaxy S8, S8+, S9, S9+ and Note 8, the cable is identical to other normal USB-C to HDMI cable: you can only use it for screen mirroring without a Chromecast (or Miracast device).

Which phones support Samsung DeX?

As mentioned, currently, you can use Samsung DeX in the following devices:

  • Galaxy S8
  • Galaxy S8+
  • Galaxy Note 8
  • Galaxy S9
  • Galaxy S9+
  • Galaxy Note 9
  • Galaxy Tab S4

To use Samsung DeX Pad, Galaxy S8, S8+, and Note 8 must upgrade to Android Oreo. DeX Station does not have this requirement.

Samsung DeX Station vs Samsung DeX Pad: what are the differences?

If your Galaxy S8, S8+ or Note 8 are still using Android Nougat, then  Samsung DeX … Read the rest

Filed Under: Galaxy S9 Accessories Guides, Galaxy S9 Guides, Galaxy S9 New Features Tagged With: Bluetooth, DeX mode, Galaxy S9 layout, Samsung DeX, Samsung DeX cable, Samsung DeX Pad, Samsung DeX station, screen mirroring, USB Ethernet, USB-C, USB-C to HDMI, wall charger

How to reboot Galaxy S9 and S9+ if Galaxy S9 hangs?

Everything you need to know on powering on, powering off and rebooting Galaxy S9 and S9+.

simon · Leave a Comment

How to reboot Galaxy S9 and S9+ if Galaxy S9 hangs?You may already know to use the power button to power on, power off and reboot Galaxy S9 or S9+.

But occasionally, the power button may be not working as expected. You may have to use button (key) combinations to power off, power on or restart Galaxy S9 or S9+.

This Galaxy S9 guide explains how to reboot, power on and power off Galaxy  S9 and S9+ in both normal situations and abnormal situations (e.g. when Galaxy S9 or S9+ hangs.).

Please note, in this guide, we do not differ reboot and restart.  They are used interchangeably.

Why do you need to reboot Galaxy S9 or S9+ periodically?

You may know you have to reboot Galaxy S9 when you update the phone (for example, updating Galaxy S9 or S9+ to Android Pie).  In this case, some system files being used have to be replaced. Therefore, you need to “stop” the system, then restart the system with the updated files.

For apps, normally, it is not necessary to reboot Galaxy S9 if you update them. Apps in Android are running in its own container. The system can destroy the container and then reload the app with updated apps on Galaxy S9 or S9+. Therefore rebooting Galaxy S9 or S9+ is generally not required for updating apps on the phone.

But some tech guys may tell you to reboot Galaxy S9 or S9+ periodically (from once a month to once a week, NOT daily) to make the phone more responsive.

This is actually a valid suggestion.

When you reboot Galaxy S9 or S9+, all app leftovers (some apps sometimes may fail to clean up their own files after you close them) and ghost processes will be cleaned.

How to automatically reboot Galaxy S9 or S9+?

Samsung added the feature of “auto restart” feature in Galaxy S9 and S9+.

You can enable auto restart on Galaxy S9 and S9+ in Settings — General management — Reset— Auto Restart.

As shown in the screenshots below, you can enable auto restart so that Galaxy S9 or S9+ will be rebooted automatically within one hour of the specified time.

automatically reboot Galaxy S9 or S9+ automatically reboot Galaxy S9 or S9+

You can only set the schedule as once a week only. Frequently restarting/rebooting Galaxy S9 and S9+ will not be helpful.

How to power off and reboot Galaxy S9 and S9+ with the power button options?

The safest way to power off or reboot … Read the rest

Filed Under: Galaxy S9 Guides Tagged With: Android Pie, charge Galaxy S9 battery, Galaxy S9 layout, Galaxy S9 lock screen, Galaxy S9 recovery mode, Galaxy S9 safe mode, Galaxy S9 settings, lockdown mode, long tap gesture, power button, power button options, power off Galaxy S9, power on Galaxy S9, reboot Galaxy S9, reset Galaxy S9

5 ways to take screenshots on Galaxy S9 and S9+ without using any apps

simon · 4 Comments

There are at least 5 methods to take screenshots on Galaxy S9 and S9+ without using any apps:  hardware buttons (power+volume down), palm swipe, the assistant menu, Bixby voice command and Google Assistant.

This Galaxy S9 how-to guide explains to you how to use them and how to use scroll capture to take screenshots on Galaxy S9 and S9+

Why do you need to take screenshots on Galaxy S9 and S9+?

Sometimes, you may need to keep a record of a conversation, to share a webpage, to show some locations on Google maps to others, or to record some transactions when you are using the Galaxy S9 or S9+.

A screenshot is the easiest and the most effective way to keep info and pieces of evidence. The image saved can be read on almost any devices.

Although you can edit them after you take screenshots on Galaxy S9 and S9+, most people give more trust in screenshots than the text you typed.

Sometimes, if you want to report a problem of an app, or request technical services, you may be asked to take some screenshots so that the technical staffs can understand the problem quickly.

How to take screenshots on Galaxy S9 and S9+ without using any apps (and without using your PC)?

There are at least 5 ways to take screenshots on Galaxy S9 and S9+ without using any apps:

  1. Using hardware buttons (volume down + power button).
  2. Palm swipe.
  3. Using the Assistant menu.
  4. Using Bixby voice command.
  5. Using Google Assistant.

This guide will show you the details of these 5 methods in the following sections individually.

Method 1: use hardware buttons to take screenshots on Galaxy S9 and S9+

You can take a screenshot on Galaxy S9 and S9+ by pressing the holding  Power button and Volume down button simultaneously, as illustrated below. You should hear a click /shutter sound once screenshot is taken.

use hardware buttons to take screenshots on Galaxy S9 and S9+

This method works on almost all Android phones.

In old Samsung phones with a physical Home button, the physical home button was used with the power button to take screenshots. But this does NOT work on Galaxy S9 and S9+ because the Home button on S9 and S9+ is considered as a software-based button.

The key point of using physical buttons to take screenshots is to press the two buttons simultaneously.

As a human, we always press one button earlier than … Read the rest

Filed Under: Galaxy S9 Guides Tagged With: Assistant menu, Bixby button, Bixby voice, Galaxy S9 layout, Galaxy S9 navigation bar, Galaxy S9 status bar, Galaxy S9 touch screen gesture, Google Assistant, palm swipe, quick setting buttons, screenshot, scroll capture, voice command

How to use Galaxy S9 safe mode on Galaxy S9 and S9+?

Galaxy S9 safe mode guide: what is Galaxy S9 safe mode? when you need it? how to enter Galaxy S9 safe mode? how to use it?

simon · Leave a Comment

You can use Galaxy S9 safe mode to identify possible causes of some problems or strange behaviours of Galaxy S9 and S9+.

This safe mode is safe for your data, settings and apps. They will not be affected or altered when using the safe mode on Galaxy S9 and S9+.

This Galaxy S9 how-to guide shows you when you may need Galaxy S9 safe mode, two ways to enter the safe mode for Galaxy S9 and S9+, and how to use and exit Galaxy S9 safe mode.

What is Galaxy S9 safe mode? And when do you need Galaxy S9 safe mode?

Like most other Android phones, Galaxy S9 and S9+ have a special Galaxy S9 safe mode letting you troubleshoot possible problems caused by third-party apps.

In Galaxy S9 safe mode, all third-party apps installed by you were temporally disabled so that you can determine whether the problem is caused by such apps.

Your data, settings, and app data are not affected when you reboot Galaxy S9 or S9+ into Galaxy S9 safe mode

Galaxy S9 safe mode can only determine whether some strange behaviours or problems are caused by third-party apps.  It is not able to pinpoint the app.

Unlike Galaxy S9 recovery mode which is not part of Android OS, Galaxy S9 safe mode is a special mode of Android OS.

So, under the Galaxy S9 safe mode, you can still make and receive calls,  connect to the Internet, use pre-installed apps. The safe mode only prevents you from using apps installed by you.

You need to try Galaxy S9 safe mode before you visit the service centre because technical support in most service centres does not solve issues due to third-party apps. They only diagnose problems in the firmware and pre-installed apps.

Although Galaxy safe mode does not change your data and settings, you may lose some home screen customizations after you exit the safe mode. So, you may still consider to back up Galaxy S9 before rebooting into the safe mode.

How to reboot into Galaxy S9 safe mode?

There are two ways to reboot into Galaxy S9 safe mode:

  1. Use the power button options if Galaxy S9 or S9+ is currently powered on.
  2. Use buttons if the phone is powered off.

Method 1: Use power button options to reboot into Galaxy S9 safe mode

If the phone is powered on, you can… Read the rest

Filed Under: Galaxy S9 Guides Tagged With: Android Pie, Galaxy S9 home screen, Galaxy S9 layout, Galaxy S9 lock screen, Galaxy S9 recovery mode, Galaxy S9 safe mode, lockdown mode, power button, power button options, power off Galaxy S9, reboot Galaxy S9, wipe Galaxy S9 cache partition

How to use Galaxy S9 touchscreen gestures?

Seven Galaxy S9 touchscreen gestures: tap, double tap (and triple-tap), long tap, swipe, drag, pinch and spread, are explained and illustrated.

simon · 2 Comments

use Galaxy S9 touchscreen gesturesYou have to use some Galaxy S9 touchscreen gestures if you want Galaxy S9 or S9+ to do anything for you.

Although most Galaxy S9 touchscreen gestures work on all other Android phones, you may not be aware of some gestures that help you use Galaxy S9 and S9+ effectively.

This Galaxy S9 how-to guide illustrates the 7 Galaxy S9 touchscreen gestures with animations, explains the features of these gestures and gives examples of using these gestures.

What are Galaxy S9 touchscreen gestures?

As Galaxy S9 and S9+ do not have a physical keyboard or other input devices, you have to interact with the phone either through the touchscreen or voice (e.g., Bixby or Google Assistant).

In addition to the on-screen keyboard or keypad, Galaxy S9 and S9+ also accept some touchscreen gestures.

When your finger(s) or other capacitive pens (please note S Pen on Galaxy Note devices does NOT work with Galaxy S9 or S9+ screen) move on the screen, Galaxy S9 and S9 can recognize certain patterns and therefore responds accordingly.

These moving patterns are usually referred to as Galaxy S9 touchscreen gestures.

So, understanding and correctly using Galaxy S9 touchscreen gestures are essential if you want to use the phone efficiently.

Similar to other Android phones, there is nothing special in Galaxy S9 touchscreen gestures.  These gestures can be used in almost all other Android phones.

Although most of Galaxy S9 touchscreen gestures are used on the screen, some can also be used on the physical buttons. e.g., the power button accepts press, double press and long press gestures.

List of  Galaxy S9 touchscreen gestures in Galaxy S9 and S9+

You can use the following 7 Galaxy S9 touchscreen gestures on Galaxy S9 and S9+ for various operations.

1. Tap gesture (press)

Tap is one of the most used Galaxy S9 touchscreen gestures.

As shown in the animation below, you need to tap an icon or a specific area to activate something, for example, to start an app, or to open a menu item.

The tap gesture actually mimics “click” of a mouse (e.g., when using Samsung DeX with Galaxy S9 or S9+).

Galaxy S9 touchscreen gestures: tap

Of course, the action or response of the tap gesture depends on what was tapped, or where you tapped.

Some example of using tap gesture includes:

  • You can open an app by tapping an app icon in Galaxy S9 home screen or 
… Read the rest

Filed Under: Galaxy S9 Guides Tagged With: app folders, Bixby button, double tap gesture, drag gesture, Galaxy S9 always-on display (AOD), Galaxy S9 camera quick launch, Galaxy S9 edge screen, Galaxy S9 Home button, Galaxy S9 home screen, Galaxy S9 layout, Galaxy S9 multiwindow, Galaxy S9 navigation bar, Galaxy S9 navigation button, Galaxy S9 notification panel, Galaxy S9 quick settings panel, Galaxy S9 status bar, Galaxy S9 status icon, Galaxy S9 touch screen gesture, long tap gesture, Multi Window, pin files to Galaxy S9 home screen, pinch gesture, power button, Samsung DeX, show photos on Galaxy S9 home screen, spread gesture, swipe gesture, tap gesture

How to reboot into Galaxy S9 recovery mode and to clear Galaxy S9 cache partition on Galaxy S9 and S9+?

simon · 8 Comments

You can use Galaxy S9 recovery mode to flash new ROMs, clear Galaxy S9 cache partition, and to check recovery logs.

Although Galaxy S9 recovery mode was designed for some advanced users, you may need some of the features, especially clearing the cache partition to fix some problems after a major update.

This Galaxy S9 guide explains to you the functions of Galaxy S9 recovery mode, the way to reboot Galaxy S9 or S9+ into recovery mode, usage of the recovery mode, and methods of clearing Galaxy S9 cache partition.

What is Galaxy S9 recovery mode?

All Android phones have a special mode: recovery mode, which allows you to fix any Android problems and perform some actions (for example, patch the system) to the Android system without loading Android OS.

In the phone storage layout, there is a special partition for recovery. This partition is protected from Android OS and other partitions.

Galaxy S9  is not an exception.

If you think you never used Galaxy S9 recovery mode, you are very likely wrong.

When you install updates (including monthly security updates) for Galaxy S9 and S9+, you may notice the phone will reboot twice automatically.

During this updating process, Galaxy S9 or S9+ would reboot into Galaxy S9 recovery mode first to apply the update, then reboot into Android OS so that you can use Galaxy S9 and S9+.

Of course, Galaxy S9 recovery mode offers more functions including:

  • To apply Android OS update
  • To reset (factory data reset) Galaxy S9 or S9+.
  • To wipe/clear Galaxy S9 cache partition.
  • To boot into bootloader (download mode).
  • To flash official or third-party ROMs for Galaxy S9 and S9+.
  • To mount /system partition manually.
  • To check recovery logs.
  • To run a graphics test.

Although Galaxy S9 recovery mode is seldom used for most Galaxy S9 and S9+ owners,  you may need to reboot into Galaxy S9 recovery mode to fix some problem with your S9 or S9+.

In fact, most Galaxy S9 and S9+ owners reboot the phone into Galaxy S9 recovery mode to clear the cache partition to fix some issues after a major Android update.

You should not confuse Galaxy S9 recovery mode with Galaxy S9 safe mode, which is a special mode of Android OS.

How to reboot into Galaxy S9 recovery mode?

The key combination to reboot into Galaxy S9 recovery mode is Bixby button+ … Read the rest

Filed Under: Galaxy S9 Guides Tagged With: Galaxy S9 layout, Galaxy S9 recovery mode, power button, power button options, power off Galaxy S9, reboot Galaxy S9, update Galaxy S9, wipe Galaxy S9 cache partition

Samsung Galaxy S9 LED wallet cover guide

Everything you need to know about Galaxy S9 LED wallet cover: unique features, how does the cover work, pros and cons of the cover, how to customize and use the cover.

simon · 129 Comments

Samsung Galaxy S9 LED wallet cover guideSamsung Galaxy S9 LED wallet cover is one of the official accessories for Galaxy S9 and S9+.

In addition to protecting your Galaxy S9 and S9+, Samsung Galaxy S9 LED wallet cover offers a few unique features to make it fun and effective to use your Galaxy S9 and S9+.

This Galaxy S9 accessories guide shows you everything you need to know about the Samsung Galaxy S9 LED wallet cover: unique features, how does the cover work, pros, and cons of the cover, how to customize and use the cover.

Update: Added a new section of How to solve Samsung Galaxy S9 LED wallet cover problems after Android Pie update? If you get any issues with the LED cover after you update Galaxy S9 or S9+ to Android Pie, you may check this section. It solves two possible problems:

  • The LED wallet cover is not recognized by the phone.
  • Notifications are not shown on the LED cover.

For other new features in Galaxy S9 Android Pie update, for example, new navigation gestures, lockdown mode, night mode, screen orientation lock (rotation toggle), new Recents screen, lock Galaxy S9 Home screen layout, floating keyboard, remap the Bixby butt, Bixby quick commands, updated camera app, lift to wake, tap to show (display mode) for Galaxy S9 always-on display (AOD) screen, are discussed here.

What are the unique features of Samsung Galaxy S9 LED wallet cover?

The official Galaxy S9 accessories were designed to enhance some features or improve the user experiences of Galaxy S9 and S9+.

Unlike the Galaxy S9 clear view cover, Galaxy S9 LED wallet cover does not have a translucent front. It is opaque.

So, Galaxy S9 LED cover uses LED dots on the cover to display icons for calls and notifications on the front cover.

The unique features of Samsung Galaxy S9 LED wallet cover includes:

  • LED icons for incoming calls, notifications, alarms, battery status, clock, and music controls. You can assign different LED icons for different contacts and different apps so that you can know who is calling or where is the notification from without opening the cover.
  • LED with colors. You can assign border colors to the LED icons for Galaxy S9 LED cover. In previous generations of LED cover, there is no border color option.
  • Powered by the phone battery through the NFC connection
… Read the rest

Filed Under: Galaxy S9 Accessories Guides Tagged With: Android Pie, Android Pie update guide, app permission, charge Galaxy S9 battery, customize LED icon, Galaxy S9 clear view standing cover, Galaxy S9 cover, Galaxy S9 layout, Galaxy S9 LED wallet cover, Galaxy S9 LED wallet cover review, Galaxy S9 lock screen, Galaxy S9 settings, Galaxy S9 themes, LED icon editor, NFC, notification access

How to disable Bixby button in Galaxy S9 and S9+?

You can disable both the press and long press gesture of Bixby button in Galaxy S9 and S9+ to disable Bixby button in Galaxy S9 and S9+.

simon · 19 Comments

disable Bixby button in Galaxy S9 and S9+Some Galaxy S9 and S9 owners are not excited about Samsung Bixby and the dedicated button.  They may want to disable Bixby button in Galaxy S9 and S9+.

You can easily disable Bixby button in Galaxy S9 and S9+ if you frequently pressed the button inadvertently, or if you do not want to use Bixby.

Update: After updating Galaxy S9 or S9+ to Android Pie, you cannot disable the Bixby button. Instead, you can remap the Bixby button to any third-party apps or any Bixby quick commands.

This Galaxy S9 guide explains the functions of Bixby button in Galaxy S9 and S9+, and shows you how to disable Bixby button in Galaxy S9 and S9+.

What is Bixby button? Why may you want to disable Bixby button in Galaxy S9 and S9+?

Since Galaxy S8 (and S8+), Samsung added a dedicated button for Bixby with the hope of boosting the usage of Samsung’s AI assistant.

As shown in Galaxy S9 and S9+ layout, Bixby button is located on the left side of the phone below the volume keys.

By default,

  • If you press the Bixby button on Galaxy S9 or S9+,  the phone will open Bixby Home.
  • If you long press (press and hold) the Bixby button, the phone will open Bixby Voice.

Samsung does not allow you to map the Bixby button on Galaxy S9 and S9+ to any other apps. It can only be used for Samsung Bixby unless you root the phone and mess up a few system settings.

Although Samsung Bixby has been dramatically improved since the initial release with Galaxy S8, in many aspects, it is still not comparable to Google Assistant, which can be enabled in Galaxy S9 or S9 by long tapping  (tap and hold) the Home button. Some Galaxy S9 and S9+ owners may not want to use Samsung’s Bixby at all. They are happy with Google Assistant.

Some other owners may do not use either Google Assistant or Bixby. But they may press the Bixby button accidentally when they want to press the volume button or the power button.

Even some Bixby users may not want to use the Bixby Home, which comes out when you press the Bixby button. You can use other Bixby features without the button.

So, there are sizeable Galaxy S9 and S9+ owners who may want to disable … Read the rest

Filed Under: Galaxy S9 Guides Tagged With: Android Pie, Android Pie update guide, Bixby, Bixby button, Bixby Home, Bixby quick command, Bixby vision, Bixby voice, Galaxy S9 home screen, galaxy S9 home screen edit mode, Galaxy S9 layout, Google Assistant, remap Bixby button

Galaxy S9 SIM card guide

Everything you need to know about Galaxy S9 SIM card, mobile network settings and mobile network status

simon · 46 Comments

In almost all regions, you still need a physic SIM card in Galaxy S9 0r S9+ to make calls or use mobile data connections.

Galaxy S9 SIM card guide will help you understand everything about using a SIM card in Galaxy S9 and S9+

The guide will cover the correct size of Galaxy S9 SIM card, how to use the two slots in Galaxy SIM card tray, insert or change SIM card for Galaxy S9 and S9+, change mobile network settings in Galaxy S9 and S9+, and check mobile network connection and signal strength in Galaxy S9 and S9+.

Some questions related to using Galaxy SIM card are also answered.

What is the correct size of Galaxy S9 SIM card?

Galaxy S9 and Galaxy S9 and S9+ use nano-SIM cards, which is the smallest SIM card you can get from your phone company.

So, if you migrated to Galaxy S9 or S9+ from any of the following phones, you can use the existing SIM card for Galaxy S9 and S9+:

  • Samsung Galaxy S6, S7 and S8 and all their variants (e.g., S8+, S7 edge, S6 edge and S6 edge+).
  • Samsung Galaxy Note 5 and Note 8.
  • Any of Samsung Galaxy A series: Galaxy A3, A5, A7, A8 and A9.
  • Galaxy J3 2017 and later, Galaxy J5 2017 and later, Galaxy J7 and later.
  • iPhone 5, 6, 7, 8 and X (and all variants).
  • Moto X (all generations).
  • Pixel and Pixel XL (all generations).
  • LG G5, G6 (all variants), V10, V20 and V30.
  • many others phones released after 2016

If you are not sure whether your existing SIM card can be used in Galaxy S9 and S9+, please post your question in the comments box below.

We will check it for you.

You MUST use the correct size of Galaxy S9 SIM card because the slot in the Galaxy S9 SIM card tray can only hold nano-SIM cards.

In theory, there are four possible sizes of SIM cards:

  1. Full-sizeSIM (1FF). Full-size SIM is  “giant” in size: 85.60 mm × 53.98 mm × 0.76 mm. No Android phones used it.
  2. Mini-SIM (2FF). Mini-SIM usually is now often referred as “big” or “normal”  or “standard” SIM card in some countries. Most carriers and phone manufacturers phased out mini-SIM a few years ago.  Very few Android phones in the market now use this big SIM card.
  3. Micro-SIM
… Read the rest

Filed Under: Galaxy S9 Guides Tagged With: dual messenger, dual-SIM, Galaxy S9 layout, Galaxy S9 settings, Galaxy S9 SIM card, micro SD card, mobile network, SIM card ejection, SIM card status, voLTE

How to use Galaxy S9 home screen landscape mode?

simon · 8 Comments

Samsung added the Galaxy S9 home screen landscape mode in Galaxy S9 and S9+.

You can change Galaxy S9 home screen to landscape orientation when you hold Galaxy S9 and S9+ horizontally.  Of course, this also applies to Galaxy S9 apps screen (app drawer), which essentially is a special home screen.

This Galaxy S9 guide explains what Galaxy S9 home screen landscape mode is, how to enable and disable Galaxy S9 home screen landscape mode, and how to use Galaxy S9 home screen landscape mode.

Update: in Android Pie update for Galaxy S9 and S9+, you can use the rotation toggle button to quickly change and lock screen orientation, including the home screen.  You may check this guide on using the rotation toggle to change and lock the Galaxy S9 screen orientation.

In addition, you can also lock the layout of Galaxy S9 home screen in Android Pie update as explained in this guide.

What is Galaxy S9 home screen landscape mode?

By default, the home screen (and apps screen) was always in portrait mode on most Android phones even if you hold the phone horizontally, and if you turn on auto-rotate.

So, it is hard to use the home screen in landscape mode, and you may have to hold the phone in portrait orientation to use the home screen and apps screen.

Please do not confuse this limitation in home screen with the auto-rotate.

Most apps including system apps like Settings support landscape mode for a long time. When you turn on auto-rotate, you can use most apps in the landscape orientation.

In Android tablet, since Android Honeycomb 3.0, the home screen landscape mode has been supported.

However, on the phone, the home screen landscape mode is still new.

The larger screen aspect ratio beyond 16:9 in many recent flagship Android phones exacerbates the implementation of landscape mode for the home screen. The screen simply looks too narrow for the icons.

Anyway, Samsung now offers the option to use Galaxy S9 home screen landscape mode in Galaxy S9 and S9+.

This means the Galaxy S9 home screen can automatically rotate to landscape mode when you hold the phone in landscape position.

Undoubtedly, the app icons and widgets in Galaxy S9 home screen will be re-organised in landscape mode. Simple rotation is not enough due to insufficient height in the landscape mode.

In a nutshell, Galaxy … Read the rest

Filed Under: Galaxy S9 Guides, Galaxy S9 New Features Tagged With: Android Pie, auto-rotate, Galaxy S9 apps screen, Galaxy S9 home screen, Galaxy S9 home screen landscape mode, Galaxy S9 layout, Galaxy S9 lock screen, Galaxy S9 multiwindow, Galaxy S9 navigation bar, Galaxy S9 notification panel, Galaxy S9 quick settings panel, Galaxy S9 settings, landscape mode, lock Galaxy S9 home screen layout, Multi Window, navigation gestures, portrait mode, rotation toggle, show photos on Galaxy S9 home screen

How to remove Bixby Home from Galaxy S9 Home screen?

You can hide the annoying Bixby Home panel in Galaxy S9 Home screen.

simon · 9 Comments

In the leftmost of Galaxy S9 Home screen, Samsung reserved it for the Bixby Home. But  Many Galaxy S9 and S9+ owners are not impressed with Bixby. They want to remove Bixby Home from Galaxy S9 Home screen.

By removing Bixby Home from Galaxy S9 Home screen, you would at least get a cleaner Galaxy S9 Home screen.

This Galaxy S9 guide explains how to remove Bixby Home from Galaxy S9 Home screen, and how to access Bixby Home when it is removed.

Why may you want to remove Bixby Home from Galaxy S9 Home screen?

Bixby Home is supposed to show you the most relevant info for you when you open it.  The info is pulled from both your data (e.g., calendar) and news feed based (e.g., Linkedin).

Such an informational page can be very useful when you are busy. You can just glimpse the Bixby Home to get informed quickly.

By default, there are at least two quick ways to access Bixby Home:

  1. Navigating to the leftmost panel of Galaxy S9 home screen.
  2. Pressing Bixby button once.

It is obvious that method 2 is faster and more intuitive to access Bixby Home, and therefore method 1 is redundant.  You may want to remove Bixby Home from Galaxy S9 Home screen to clean up Galaxy S9 home screen.

In addition,  some Galaxy S9 and S9+ owners are not fans of Samsung’s Bixby. Google Assistant, which is available on almost all Android phones now, in most cases can be a better job.

They may feel it is annoyed when they accidentally access the Bixby Home when they want to access the home panel of Galaxy S9 home screen.

Although it is almost impossible to disable Bixby in Galaxy S9 and S9+, it is easy to remove Bixby Home from Galaxy S9 Home screen.

You can also easily disable Bixby button in Galaxy S9 and S9+.

How to remove Bixby Home from Galaxy S9 Home screen?

As shown below, in Galaxy S9 and S9+, the leftmost panel in Galaxy S9 Home screen is reserved for Bixby Home.

The double-line icon (marked in the red rectangle) in the panel indicator (indicating panel you are in currently) suggests Bixby Home is active.

remove Bixby Home from Galaxy S9 Home screen

To remove Bixby Home from Galaxy S9 Home screen, you may follow these steps.

Step 1: Tap and hold (long tap) any empty space in Galaxy S9 Home

… Read the rest

Filed Under: Galaxy S9 Guides Tagged With: Bixby, Bixby button, Bixby Home, Galaxy S9 Home button, Galaxy S9 home screen, galaxy S9 home screen edit mode, Galaxy S9 layout

6 ways to start Galaxy S9 camera app in Galaxy S9 and S9+

simon · 2 Comments

Galaxy S9 and S9+ feature some significantly new camera features such as the dual-aperture lens, and super slow motion mode. As the first step of trying the new camera in Galaxy S9 and S9+, you need to start Galaxy S9 camera app first.

In addition to tapping the camera app icon, you can have several other ways to start Galaxy S9 camera app in S9 and S9+.

This Galaxy S9 camera guide shows you the six ways to open Galaxy S9 camera app in your Samsung Galaxy S9 and S9+.

#1. Use Galaxy S9 camera quick launch to start Galaxy S9 camera app

The fastest way to launch Galaxy S9 camera app is to use Galaxy S9 camera quick launch feature, which is enabled by default.

You can quickly press the power button twice to start Galaxy S9 camera app immediately.  Samsung named this as Galaxy S9 camera quick launch.

The good thing about Galaxy S9 camera quick launch is that it works at any times: when the screen is on or off, or when you are using any apps, or when the screen is locked or unlocked.

When you use the Galaxy S9 camera quick launch first time, it will remind you of this feature as shown below.

You can then keep it on or turn it off if you want.

If you want, you can enable or disable Galaxy S9 camera quick launch in Galaxy S9 camera settings.

Use Galaxy S9 camera quick launch to start Galaxy S9 camera app

#2. Use camera app shortcut on Galaxy S9 lock screen to start Galaxy S9 camera app.

By default, in Galaxy S9 lock screen as shown below, there are two app shortcuts on the left and right sides of the bottom.

One is the phone app for you to make emergency calls without unlocking the phone. And the other is the camera app as shown below.

Of course, you can use other apps to replace them in Settings — Lock screen and security — App shortcuts.

You can tap the camera app icon to open Galaxy S9 camera app without unlocking the screen.

If you launch Galaxy S9 camera app without unlocking the screen, you can only access photos taken in this session. You cannot access any other photos or pictures saved in the phone before the screen was locked.

This is a security feature, not a bug. For example, if someone gets your phone, he/she … Read the rest

Filed Under: Galaxy S9 Camera Guides, Galaxy S9 Guides Tagged With: Bixby, Bixby button, Bixby voice, Galaxy S9 apps screen, Galaxy S9 camera, Galaxy S9 camera app, Galaxy S9 camera quick launch, Galaxy S9 home screen, Galaxy S9 layout, Galaxy S9 lock screen, Google Assistant, power button, voice command

How to use and customize Galaxy S9 navigation bar and navigation buttons?

Learn to hide and unhide Galaxy S9 navigation bar, to customize Galaxy S9 navigation button layout, and to use Galaxy S9 Home button when the screen is off.

simon · 37 Comments

Similar to Galaxy S8, Galaxy S9 features software navigation buttons. And Samsung allows you to hide and customize the Galaxy S9 navigation bar and navigation buttons in Galaxy S9 and S9+.

You can also use the software home button even when the screen is off.

This Galaxy S9 guide shows you how to hide and unhide Galaxy S9 navigation bar, customize the background colour of Galaxy S9 navigation bar, customize the Galaxy S9 navigation button layout, and how to use Galaxy S9 Home button when the screen is off.

Update: after updating Galaxy S9 or S9 Plus to Android Pie, you will get the new navigation gestures. You can choose to use the navigation bar with navigation buttons (Home, Back, and  Recents) or use the new navigation gesture.  But you will not be able to hide the navigation bar if you choose to use the navigation bar/buttons.  If you want to use these features and other navigation button customizations, you can use the NavStar app to customize the Galaxy S9 navigation bar and navigation buttons.

Please check this guide for the details about the navigation gestures on Galaxy S9 and S9+ with Android Pie update.

How to use and customize Galaxy S9 navigation bar and navigation buttons?

How to lock Galaxy S9 navigation bar?

By default, when you get the new Galaxy S9 or S9+, the navigation bar is shown, but not locked.

The dot (official name: show and hide button) on the left side of the Galaxy S9  navigation bar indicates you can hide the status bar if you want.

Sometimes, you may not want to use the feature of hiding and unhiding the navigation bar, i.e., you may want to lock Galaxy S9 navigation bar.

Please note, when using an app in the split screen view, the Recents button changes to the multiwindow button. You may refer to this guide on how to use apps in Multi Window mode on Galaxy S9 and S9+.

To lock the Galaxy S9 navigation bar, you may go to Galaxy S9 Setting, tap Display as shown below.

How to hide Galaxy S9 navigation bar? And how to access Galaxy S9 navigation bar when it is hidden? How to hide Galaxy S9 navigation bar? And how to access Galaxy S9 navigation bar when it is hidden?

Then in the Display settings page,  tap the Navigation bar as shown above.

In the Navigation bar settings page, tap the Show and hide button (marked as 1 in the screenshot below).

After you hide the button, then you lock the navigation bar in Galaxy S9 and S9+.

If you want to hide Galaxy S9 navigation bar, then you need to enable … Read the rest

Filed Under: Galaxy S9 Guides, Galaxy S9 New Features Tagged With: Android Pie, Galaxy S9, Galaxy S9 always-on display, Galaxy S9 always-on display (AOD), Galaxy S9 Home button, Galaxy S9 home screen, Galaxy S9 layout, Galaxy S9 lock screen, Galaxy S9 multiwindow, Galaxy S9 navigation bar, Galaxy S9 navigation button, lift to wake, Multi Window, navigation gestures, night mode

Galaxy S9 layout (and layout of Galaxy S9+)

get to know the layout of Galaxy S9 and S9+

simon · 8 Comments

To effectively use your new phone, you need to know and understand the Galaxy S9 layout and Galaxy S9+ layout.

Sometimes, common sense works; sometimes it may not.

This Galaxy S9 how-to guide explains the layout of Galaxy S9 and S9+, the difference between the Galaxy S9 layout and Galaxy S9+ layout, and the meaning of essential parts in the layouts of Galaxy S9 and S9+.

Why do you need to know Galaxy S9 layout and Galaxy S9+ layout?

Although Galaxy S9 and S9+ are not a revolutionary product, the layout of Galaxy S9 and S9+ is substantially different from Android phones from other Android manufacturers.

Even compared to Galaxy S8 and S8+ layout, there are a few changes in the Galaxy S9 layout and Galaxy S9+ layout.

You need to know and understand Galaxy S9 layout when you want to know the functions of all buttons in Galaxy S9 and S9+.

The Galaxy S9 and S9+ layout can also help you find the locations of some parts. For example, a few Galaxy S9 and S9+ owners accidentally inserted the SIM card ejection pin into the top microphone hole. They may spoil the microphone.  Had they known the layout of Galaxy S9 and S9+, they wouldn’t have made this mistake.

Besides,  it is also beneficial to know the location of antennas and wireless charging coils when using some Galaxy S9 accessories.

Anyway, before using your Galaxy S9 or Galaxy S9+, you should spend a few minutes to learn and understand the layout of S9 and S9+ even if you are a seasoned Samsung phone user.

The difference between Galaxy S9 layout and Galaxy S9+ layout

Unlike Galaxy S8 and S8+, which differ only in size, Galaxy S9 and S9+ have a few considerable differences in the hardware configuration.

Due to dual rear camera configuration in Galaxy S9+, the back of Galaxy S9+ layout is different from that of Galaxy S9.

The second rear camera is the only difference between Galaxy S9 layout and Galaxy S9+ layout.

Galaxy S9 and S9+ layout: front view

The front view of Galaxy S9 layout is illustrated in the picture below. The front view of Galaxy S9+ is identical except the screen size.

As shown below, you can find in the front of Galaxy S9 and S9+:

  • touchscreen;
  • edge screens;
  • front camera;
  • LED indicator;
  • top speaker (earpiece);
  • proximity/light sensor;
  • iris recognition camera;
… Read the rest

Filed Under: Galaxy S9 Guides, Galaxy S9 New Features Tagged With: Android Pie, Bixby button, charge Galaxy S9 battery, Galaxy S9 edge screen, Galaxy S9 Home button, Galaxy S9 home screen, Galaxy S9 layout, Galaxy S9 lock screen, Galaxy S9 navigation bar, Galaxy S9 navigation button, Galaxy S9 new features, Galaxy S9 recovery mode, lift to wake, lock Galaxy S9 home screen layout, lockdown mode, navigation gestures, night mode, power button, rotation toggle, SIM card ejection

Top 10 new features of Samsung Galaxy S9 and Galaxy S9+

New features of Galaxy S9: Android Oreo, dual aperture camera, intelligent scan, positioning of fingerprint scanner, 960p slow motion, stereo speakers, latest processor, 64/128/256GB storage, new DeX pad, and AR emoji

simon · Leave a Comment

Top 10 new features of Samsung Galaxy S9 and Galaxy S9+Samsung announced Galaxy S9 and Galaxy S9+, the 9th generation of Galaxy S phones, on February 25, 2018, in Barcelona, Spain, immediately ahead of  MWC 2018. You may want to know the new features of Samsung Galaxy S9.

As in previous Galaxy S phones, Samsung staffed some new features of Samsung Galaxy S9 and Galaxy S9+ to lure new customers and keep existing customers.

This post details the top 10 new features of Galaxy S9 and S9+ to help you decide whether Galaxy S9 or S9+ is the right phone for you.

#1. Android Oreo

Android Oreo is the latest Android OS.

Samsung packed Galaxy S9 and S9+ with Android Oreo 8.0 out of the box.

You can enjoy many new features and improvements of Android 8.0 in Galaxy S9 and S9+, although Samsung tweaks a lot of the stock Android.

For Galaxy S9 notification dots (notification number badge, app icon badges) on Galaxy S9 and S9+, you may check this guide.

#2. Dual-aperture in the main camera: one of the most welcomed new features of Samsung Galaxy S9

Samsung tried to direct your attention to one of the best new features in Galaxy S9 and S9+: the camera.

And the most prominent features of the Galaxy S9 camera is dual-aperture.

In Auto mode, the Galaxy S9 and S9+ main camera can switch between two apertures of f/2.4 (under normal lighting conditions) and f/1.5 (in low-light conditions) automatically.

In Pro mode, you can set the two apertures manually. Unfortunately, you cannot set anything in between.

Essentially, the dual-aperture camera makes it easier to capture good photos in low-light conditions.

Galaxy S9 and S9+ are the only smartphones in the market with such a feature.

You may check this guide on how to use the two apertures in Galaxy S9 and S9+.

#3.  Intelligent scan

Iris scanner and face recognition is not new in Galaxy phones.  You can enable either of them to unlock the phone in your Galaxy S8, S8+ or Note 8.

Both methods work well in contrast conditions: iris scanner does not work well under the sun ( or under intense light), and face recognition refuses to work in darkness.

In Galaxy S8 and Note 8, these two methods are mutually exclusive: you can only enable one of them.

As another one of the top new features of Galaxy S9 and S9+,  these two methods … Read the rest

Filed Under: Galaxy S9 New Features, Galaxy S9 News Tagged With: Android Oreo, app pair, AR emoji, DeX, dual aperture, Galaxy S9, Galaxy S9 edge screen, Galaxy S9 layout, Galaxy S9 multiwindow, Galaxy S9 navigation bar, Galaxy S9 new features, Galaxy S9 slow-mo mode, intelligent scan, Pro mode, Samsung DeX, Samsung DeX Pad, Samsung DeX station, super slow-motion

Primary Sidebar

RSS Samsung Galaxy S21 Guides

  • Top 12 new features in Android 12 update for Galaxy S21, S20 and S10
  • Android 12 update vs One UI 4.0 vs One UI 4.1: update Galaxy S21, S20 and S10 to Android 12
  • How to set and resize photo size on Samsung Galaxy S21, S20, S10, and S9 without using any third-party apps?
  • How to Customize Galaxy S21 Home Screen?
  • Master Galaxy S21 Lock Screen Settings
  • How to use widgets on Galaxy S21?
  • How to Use and Customize Galaxy S21 Side Key?
  • How to hide Galaxy S21 password and PIN when typing?
  • How to power on, power off, and reboot Galaxy S21,even when the phone hangs?
  • How to use Galaxy S21 quick settings panel?

RSS Galaxy S20 Guides

  • How to Use Enhanced Processing on Galaxy S20 with Android 11 update?
  • How to access, use, and customise widgets on Galaxy S20 lock screen and AOD screen with Android 11 update for Galaxy S20?
  • How to update Galaxy S20 to Android 11?
  • How to use Galaxy S20 lockdown mode?
  • Top 11 new features in Galaxy S20 Android 11 update
  • How to use Galaxy S20 recovery mode?
  • How to use 5 different shooting methods for Galaxy S20 camera?
  • How to use and customize power mode on Galaxy S20?
  • A Complete Guide Of Galaxy S20 Assistant Menu

RSS Galaxy Note Guides

  • Top 11 disappointments of Galaxy Note 20 and Galaxy Note 20 Ultra
  • How to use the Dynamic Lock screen on Galaxy Note 10?
  • Galaxy Note 10 LED View Cover Guide and Review
  • Install S Note app and Extension pack on Galaxy Note 10
  • How to Use Galaxy Note 10 Camera App?
  • Galaxy Note 10 SIM Card Guide
  • How to use Samsung DeX for PC with Galaxy Note 10 and Galaxy Note 10+?
  • How to use Galaxy Note 10 Clear View cover (S View cover)?
  • How to charge Galaxy Note 10 battery?
  • How to use and remap Galaxy Note 10 Side key?

RSS Drive In Singapore

  • Top 5 rules of driving in Singapore safely and legally during COVID-19 Circuit Breaker period
  • Understand COE Price by 10 Simple Questions
  • How to convert a foreign driving license to a Singapore driving license?
  • How to get a Touch ‘n Go card as a Singapore driver?
  • What is covered in the car warranty in Singapore? What is not?
  • What is the Singapore Road Speed Limit?
  • How to register, collect and use Malaysia Vehicle Entry Permit (VEP)?
  • Why are cars in Singapore are so expensive?
  • Drive to Malaysia
  • Car Maintenance and Servicing in Singapore

RSS Moto G Guides

  • Moto G8 vs Moto G8 Power vs Moto G8 Power Lite vs Moto G Power vs Moto G Stylus vs Moto G Pro vs Moto G fast: What are the differences?
  • Moto G8 User Manual for Moto G8 Plus and Moto G8 Play
  • Moto G8 Plus vs Moto G8 Play: Differences and common features
  • Official Moto G7 user manual

RSS Chromecast Guides

  • Chromecast 4th Gen (Chromecast with Google TV) is coming!
  • How to use VLC media player on PC to stream music and video to Chromecast and Chromecast Audio?
  • How to use VLC for Android to stream local media to Chromecast?
  • How to play games on Chromecast from mobile devices (Android and iOS)?

RSS Headphone Guide Pro

  • AirPods Pro 2 New features explained
  • What is Samsung Seamless Codec? 4 things you should know about this new codec
  • How to use widgets to check battery levels and control Galaxy Buds 2, Galaxy Buds Pro, Galaxy Buds Live, Galaxy Buds+, and Galaxy Buds?
  • AirPods 3 vs AirPods Pro: which one should you choose?
  • AirPods 3 vs AirPods 2: Top 8 improvements and new features of AirPods 3

© 2015–2023 · GadgetGuideOnline.com is an online community for Gadget Owners! · Hosted by PTRHosting
· Powered by Genesis framework for WordPress

Samsung Galaxy S9 how-to guides, user manuals and tutorials! Everything about Samsung Galaxy S9 and Galaxy S9+.
Disclaimer: Samsung, Galaxy, Galaxy S9, and Galaxy S9+ are trademarks of Samsung. Android is a trademark of Google. This website is NOT affiliated with Samsung or Google in any way. All the information provided on this website is provided on an "as is" and "as available" basis and you agree that you use such information entirely at your own risk.