• Skip to primary navigation
  • Skip to main content
  • Skip to primary sidebar

Galaxy S9 Guides

a community for owners of Samsung Galaxy S9 and S9+

  • Home
    • About Galaxy S9 Guides
    • Contact Us
  • How-to Guides
    • Galaxy S9 Android Pie update guides
      • Official user manuals for Galaxy S9 and S9 Plus with Android Pie update
      • Top 9 new features of Android Pie update for Galaxy S9 and S9+
      • How to use the new navigation gestures in Android Pie update for Galaxy S9 and S9+?
      • How to use the lockdown mode on Galaxy S9 and S9+ with Android Pie update?
      • How to use the night mode on Galaxy S9 and S9+ with Android Pie update?
      • How to remap Bixby button on Galaxy S9 and S9+ after updating to Android Pie?
      • How to use Bixby quick commands on Galaxy S9, S9+, S8, S8+, Note 8, and Note 9 with the Android Pie update?
      • How to update Galaxy S9 or S9 Plus to Android Pie (Android 9)?
      • How to use the lift to wake feature on Galaxy S9 and S9+ with Android Pie update?
      • How to use the new Recents screen in Android Pie update for Galaxy S9 and S9 Plus?
      • How to use the floating keyboard on Galaxy S9 and S9+ with Android Pie update?
      • How to lock Galaxy S9 home screen layout on Galaxy S9 and S9+ with Android Pie update?
      • How to use the rotation toggle to change and lock screen orientation in Android Pie update for Galaxy S9 and S9 Plus?
      • How to use the updated camera app in Android Pie update for Galaxy S9 and S9 Plus?
    • Meaning of Galaxy S9 status icons and notification icons in Samsung Galaxy S9 and S9+
      • How to use Samsung DeX with Galaxy S9 and S9+ and other Samsung phones?
      • How to use Multi Window on Galaxy S9 and S9+?
      • How to use app pair on Galaxy S9 and S9+?
      • Samsung DeX Station vs Samsung DeX Pad vs Samsung DeX cable
      • How to use Samsung DeX Station for Galaxy S9, S9+, S8, S8+, Note 8 and Note 9?
      • How to use Samsung DeX Pad for Galaxy S9, S9+, S8, S8+, Note 8 and Note 9?
      • How to use a USB flash drive on Galaxy S9 and S9+?
    • How to charge Galaxy S9 battery?
    • Galaxy S9 SIM card guide
      • How to use two SIM cards on Galaxy S9, S10, and S20?
      • How to use Galaxy S9 dual messenger to run two accounts of messenger apps simultaneously on Galaxy S9 and S9+?
      • How to use micro SD card on Galaxy S9 and S9+?
      • How to back up Galaxy S9 and S9+?
      • How to use smart switch to transfer and migrate data to Galaxy S9 or S9+?
      • How to reset Galaxy S9 and S9+? What is Galaxy S9 factory data reset?
    • How to disable Bixby button in Galaxy S9 and S9+?
      • How to remove Bixby Home from Galaxy S9 Home screen?
    • Understand and Use Galaxy S9 Home screen
      • How to use Galaxy S9 edge screen on Galaxy S9 and S9+?
      • How to show photos on Galaxy S9 Home screen?
      • How to pin files to Galaxy S9 Home screen (add file shortcuts to Galaxy S9 Home screen)?
      • How to use Galaxy S9 Apps screen on Galaxy S9 and S9+?
      • How to use Galaxy S9 Home screen edit mode to customize Galaxy S9 Home screen?
      • How to use Galaxy S9 home screen landscape mode?
      • How to hide Galaxy S9 apps screen and how to hide Galaxy Apps button?
      • How to use and customize Galaxy S9 navigation bar and navigation buttons?
      • How to manage Galaxy S9 Home screen panels on Galaxy S9 and S9+?
    • How to use and customize Galaxy S9 lock screen?
      • How to use Galaxy S9 always-on display (AOD) on Galaxy S9 and S9+?
    • How to use Galaxy S9 notification panel on Galaxy S9 and S9+?
      • How to use Do Not Disturb on Galaxy S9 and S9+?
      • Understand and use Galaxy S9 notification number badge (notification dots, app icon badge)
      • How to use quick setting buttons on Galaxy S9 and S9+?
      • How to use quick-open notification panel on Galaxy S9 and S9+ to check notifications?
    • Galaxy S9 layout (and layout of Galaxy S9+)
      • How to use adapt sound on Galaxy S9 and S9+?
      • 5 ways to take screenshots on Galaxy S9 and S9+ without using any apps
      • How to use Galaxy S9 touchscreen gestures?
      • How to use wireless printing on Galaxy S9 and S9+?
      • How to use Galaxy S9 themes to customize the look and feel of Galaxy S9 and S9+?
      • Unbox Galaxy S9: understand package contents in Galaxy S9 box and S9+ box
    • How to reboot into Galaxy S9 recovery mode and to clear Galaxy S9 cache partition on Galaxy S9 and S9+?
      • How to reboot Galaxy S9 and S9+ if Galaxy S9 hangs?
      • How to use Galaxy S9 safe mode on Galaxy S9 and S9+?
    • How to use Galaxy S9 camera app?
      • 6 ways to start Galaxy S9 camera app in Galaxy S9 and S9+
      • Understanding and use Galaxy S9 camera settings
      • How to use super slow motion mode (super Slow-mo) on Galaxy S9 and S9+?
      • How to use Galaxy S9 camera Pro Mode on Galaxy S9 and S9+?
  • New features
    • Top 9 new features of Android Pie update for Galaxy S9 and S9+
      • How to use the lockdown mode on Galaxy S9 and S9+ with Android Pie update?
      • How to use the new navigation gestures in Android Pie update for Galaxy S9 and S9+?
      • How to use the night mode on Galaxy S9 and S9+ with Android Pie update?
      • How to remap Bixby button on Galaxy S9 and S9+ after updating to Android Pie?
      • How to update Galaxy S9 or S9 Plus to Android Pie (Android 9)?
      • How to use the lift to wake feature on Galaxy S9 and S9+ with Android Pie update?
      • How to use the new Recents screen in Android Pie update for Galaxy S9 and S9 Plus?
      • How to use the floating keyboard on Galaxy S9 and S9+ with Android Pie update?
      • How to lock Galaxy S9 home screen layout on Galaxy S9 and S9+ with Android Pie update?
      • How to use the rotation toggle to change and lock screen orientation in Android Pie update for Galaxy S9 and S9 Plus?
      • How to use the updated camera app in Android Pie update for Galaxy S9 and S9 Plus?
      • How to use Bixby quick commands on Galaxy S9, S9+, S8, S8+, Note 8, and Note 9 with the Android Pie update?
    • Top 10 new features of Samsung Galaxy S9 and Galaxy S9+
    • How to remove Bixby Home from Galaxy S9 Home screen?
    • How to use and customize Galaxy S9 navigation bar and navigation buttons?
    • How to use super slow motion mode (super Slow-mo) on Galaxy S9 and S9+?
    • Understand and use Galaxy S9 notification number badge (notification dots, app icon badge)
    • How to use Samsung DeX Pad for Galaxy S9, S9+, S8, S8+, Note 8 and Note 9?
    • How to use Galaxy S9 home screen landscape mode?
    • Understanding and use Galaxy S9 camera settings
    • How to use dual aperture to manually switch Galaxy S9 camera aperture in Pro mode?
    • Galaxy S9 layout (and layout of Galaxy S9+)
    • How to use app pair on Galaxy S9 and S9+?
  • Camera
    • How to use Galaxy S9 camera app?
    • How to use the updated camera app in Android Pie update for Galaxy S9 and S9 Plus?
    • Understanding and use Galaxy S9 camera settings
    • 6 ways to start Galaxy S9 camera app in Galaxy S9 and S9+
    • How to use dual aperture to manually switch Galaxy S9 camera aperture in Pro mode?
    • How to use super slow motion mode (super Slow-mo) on Galaxy S9 and S9+?
    • How to use Galaxy S9 camera Pro Mode on Galaxy S9 and S9+?
    • How to show photos on Galaxy S9 Home screen?
  • Official User Guides
    • Official user manuals for Galaxy S9 and S9 Plus with Android Pie update
    • Official Samsung Galaxy S9 user guides (Oreo)
  • Accessories
    • How to use Samsung Galaxy S9 clear view standing cover (S-view cover)?
    • Samsung Galaxy S9 LED wallet cover guide
    • How to use micro SD card on Galaxy S9 and S9+?
    • How to use Samsung DeX with Galaxy S9 and S9+ and other Samsung phones?
      • Samsung DeX Station vs Samsung DeX Pad vs Samsung DeX cable
      • How to use Samsung DeX Station for Galaxy S9, S9+, S8, S8+, Note 8 and Note 9?
      • How to use Samsung DeX Pad for Galaxy S9, S9+, S8, S8+, Note 8 and Note 9?
      • How to use a USB flash drive on Galaxy S9 and S9+?

5 ways to take screenshots on Galaxy S9 and S9+ without using any apps

simon · 4 Comments

There are at least 5 methods to take screenshots on Galaxy S9 and S9+ without using any apps:  hardware buttons (power+volume down), palm swipe, the assistant menu, Bixby voice command and Google Assistant.

This Galaxy S9 how-to guide explains to you how to use them and how to use scroll capture to take screenshots on Galaxy S9 and S9+

Table of Contents hide
1) How to take screenshots on Galaxy S9 and S9+ without using any apps (and without using your PC)?
2) Method 1: use hardware buttons to take screenshots on Galaxy S9 and S9+
3) Method 2: use palm swipe to take screenshots on Galaxy S9 and S9+
4) Method 3: use the Assistant menu to take screenshots on Galaxy S9 and S9+
5) Method 4: use Bixby voice command to take screenshots on Galaxy S9 and S9+
6) Method 5: use Google Assistant to take screenshots on Galaxy S9 and S9+
7) How to use scroll capture to take a multiple-screen screenshot in Galaxy S9 and S9+

Why do you need to take screenshots on Galaxy S9 and S9+?

Sometimes, you may need to keep a record of a conversation, to share a webpage, to show some locations on Google maps to others, or to record some transactions when you are using the Galaxy S9 or S9+.

A screenshot is the easiest and the most effective way to keep info and pieces of evidence. The image saved can be read on almost any devices.

Although you can edit them after you take screenshots on Galaxy S9 and S9+, most people give more trust in screenshots than the text you typed.

Sometimes, if you want to report a problem of an app, or request technical services, you may be asked to take some screenshots so that the technical staffs can understand the problem quickly.

How to take screenshots on Galaxy S9 and S9+ without using any apps (and without using your PC)?

There are at least 5 ways to take screenshots on Galaxy S9 and S9+ without using any apps:

  1. Using hardware buttons (volume down + power button).
  2. Palm swipe.
  3. Using the Assistant menu.
  4. Using Bixby voice command.
  5. Using Google Assistant.

This guide will show you the details of these 5 methods in the following sections individually.

Method 1: use hardware buttons to take screenshots on Galaxy S9 and S9+

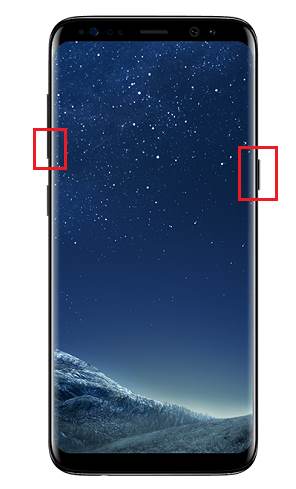
You can take a screenshot on Galaxy S9 and S9+ by pressing the holding  Power button and Volume down button simultaneously, as illustrated below. You should hear a click /shutter sound once screenshot is taken.

use hardware buttons to take screenshots on Galaxy S9 and S9+

This method works on almost all Android phones.

In old Samsung phones with a physical Home button, the physical home button was used with the power button to take screenshots. But this does NOT work on Galaxy S9 and S9+ because the Home button on S9 and S9+ is considered as a software-based button.

The key point of using physical buttons to take screenshots is to press the two buttons simultaneously.

As a human, we always press one button earlier than the other. It is normally OK to press the power button slightly earlier than pressing the volume down button.

After pressing the two buttons,

  • If you get the power button option, it means you press the power button too early.
  • If you get volume settings, it means you press the volume button too early.
  • If the screen is turned off, it means, you release the power button too early.
  • If the phone reboots, it means you are holding the two buttons too long.

Anyway, once you master the timing of pressing the two buttons, using physical buttons is the fastest way to take screenshots on Galaxy S9 and S9+.

And, as mentioned earlier, it works on other Android phones as well.

Method 2: use palm swipe to take screenshots on Galaxy S9 and S9+

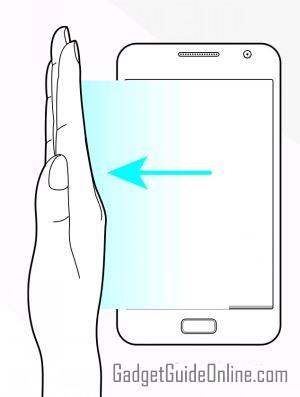
You can swipe your palm over the screen to take a screenshot for Galaxy S9 and S9+, as shown below.

use palm swipe to take screenshots on Galaxy S9 and S9+

The palm swiping method is not enabled by default. You need to enable it in Settings —Advanced features— Palm swipe to capture.

Many owners complained about the success rate of the palm swipe method for taken screenshots on Galaxy phones.

When using this method to take a screenshot of Galaxy S9 and S9+, you palm needs to “slightly” touch the screen.

This method requires a lot of practice. But it is fun.

Method 3:  use the Assistant menu to take screenshots on Galaxy S9 and S9+

Some Android phone manufacturers like LG allows you to add the screenshot button in the navigation bar or in quick settings. But Samsung refused to add such a feature in all Galaxy phones.

You may be not aware that there is a screenshot button in Galaxy S9 and S9+.

But Samsung hides the screenshot button in the Assistant menu, an accessibility tool in Galaxy phones.

You can enable Assistant menu in Settings — Accessibility — Dexterity and interaction —Assistant menu.

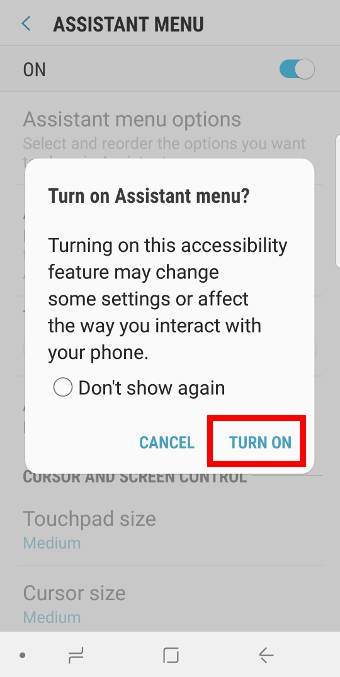
As shown below, when you try to enable the assistant menu, it will ask you to confirm the choice.

Turn on Assistant menu?

Turning on this accessibility feature may change some settings or affect the way you interact with your phone.

Tap Turn on as shown below to enable the assistant menu.

using the Assistant menu to take screenshots on Galaxy S9 and S9+ using the Assistant menu to take screenshots on Galaxy S9 and S9+

Before you leave the confirmation page, the button for the assistant menu will be shown on the screen.

The screenshot above indicates the button, which also serves as a preview. You can change your mind by tapping Cancel.

Once enabled, you can find the floating button for the assistant menu. This button will be shown everywhere: home screen, lock screen, apps screen and all apps.

Of course, you can tap and hold (long tap) the button, then move it to any location of the screen (except the regions for the status bar and navigation bar)

using the Assistant menu to take screenshots on Galaxy S9 and S9+ using the Assistant menu to take screenshots on Galaxy S9 and S9+

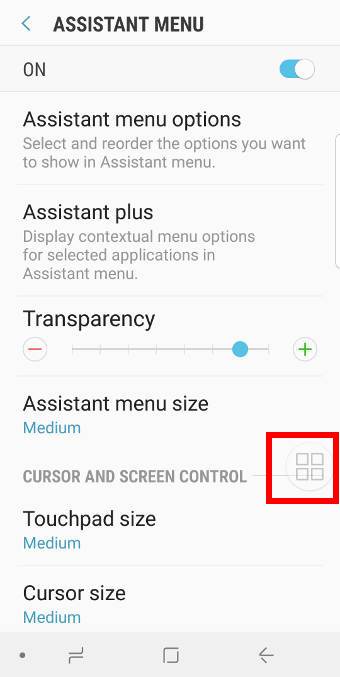
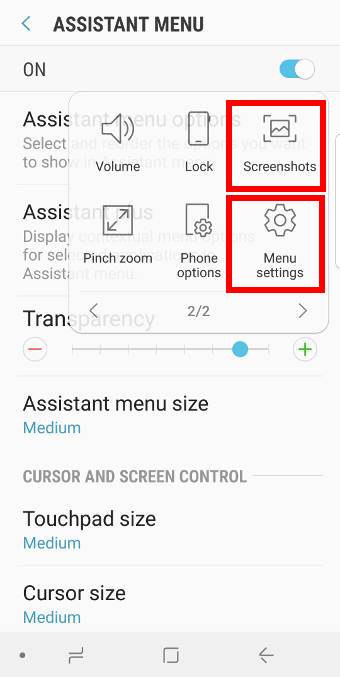
Tap the button to access the assistant menu items as shown above.

By default, on the second page of the assistant menu, you can find the button of Screenshots.

Tap Screenshots as shown above to take a screenshot of the page you are using now.

The assistant menu and the button will NOT be included in the screenshot. Only the underlying screen will be captured.

Method 4: use Bixby voice command to take screenshots on Galaxy S9 and S9+

Although some Galaxy S9 and S9+ owners do not like Bixby and find ways to disable Bixby in Galaxy S9 and S9+, you may find Bixby has some many practical features you may like.

You can use Bixby voice command to take a screenshot on Galaxy S9 and S9+.

There are two ways to activate Bixby voice command:

  1. Press and hold (long press) the Bixby button below the volume keys.
  2. Use Bixby wake-up phase “Hi Bixby”.

Once the Bixby voice is activated, you can see the Bixby button as shown below.

using Bixby voice command to take screenshots on Galaxy S9 and S9+ using Bixby voice command to take screenshots on Galaxy S9 and S9+

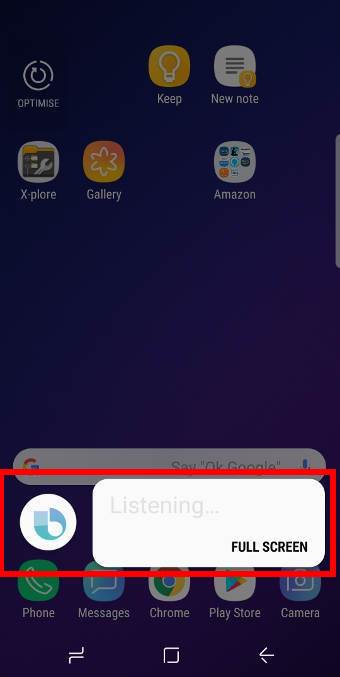
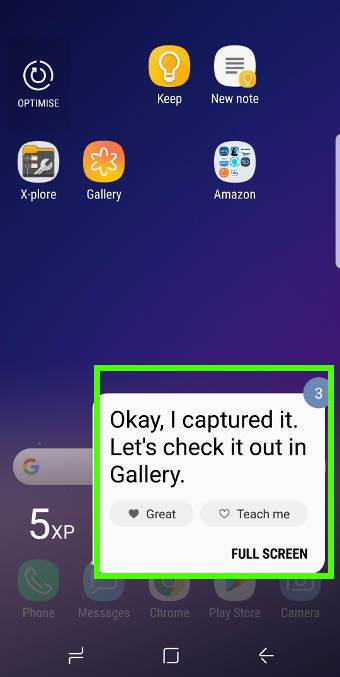
Once you see Bixby button on the screen, you can proceed to say “take a screenshot” to take a screenshot of the current screen.

After the screenshot was taken, you will see the notification on the screen as shown above.

Method 5: use Google Assistant to take screenshots on Galaxy S9 and S9+

Besides the Bixby, you can also use Google Assistant to take screenshots on Galaxy S9 and S9+. Google Assistant is enabled by default in Galaxy S9 and S9+.

You can access Google Assistant on Galaxy S9 and S9+ via one of the following methods:

  1. Tap and hold (long tap) the Home button.
  2. Use your voice by saying “OK Google” (if you enabled it).

If you access Google Assistant through voice, you can take the screenshot by directly speaking “OK Google, take a screenshot”.  The screenshot will then be taken immediately for the current screen.

If you access Google assistant though Home button, you can use the on-screen guide as shown below.

You can tap the microphone icon, then speak “take a screenshot”. That’s it.

using Google Assistant to take screenshots on Galaxy S9 and S9+ using Google Assistant to take screenshots on Galaxy S9 and S9+

After you use the voice command to take screenshots on Galaxy S9 and S9+ a few times, Google Assistant will be smart enough to add a button for you.

For example, as shown in the screenshot above, you can find the “share screenshot” button in Google Now.  In this case, you can tap the “Share screenshot” button to take a screenshot immediately.

How to use scroll capture to take a multiple-screen screenshot in Galaxy S9 and S9+

If the contents of the current screen cannot be fit into one screen and you need to scroll down to read more contents, you may want to take a screenshot of all contents.

By default, when you take a screenshot on Galaxy S9 and S9+, only contents displayed on the screen will be captured.  You need to take one more screenshot after scroll down.

In Galaxy S9 and S9+, this problem was solved with the feature of scroll capture, which allows you to take a screenshot for the multiple-screen contents, for example, a long article, or a long webpage. This feature was first introduced in Galaxy Note 5 as smart capture.

Scroll capture does NOT work with voice commands. So, you can use scroll capture on Galaxy S9 and S9+ only when you are using method 1, 2 or 3 mentioned above.

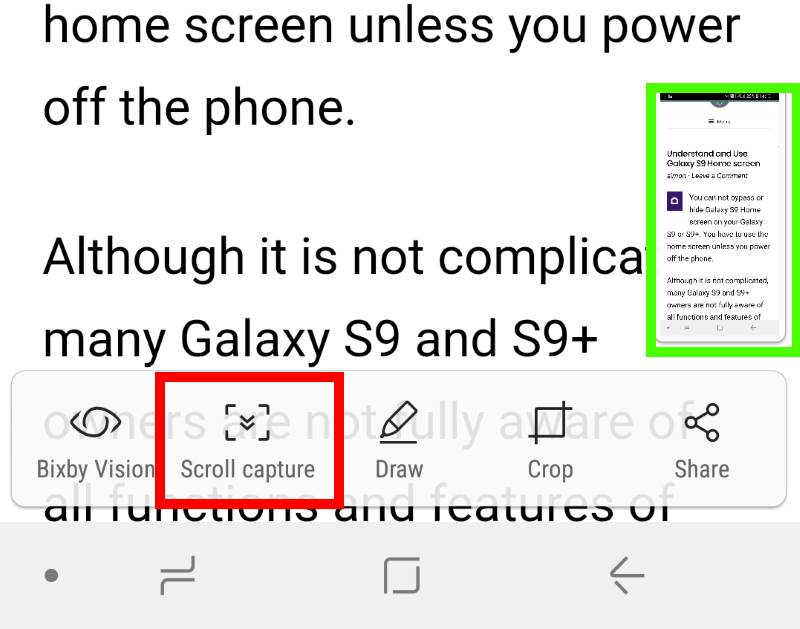
If the contents require more than one screen, you will see the toolbar with scroll capture on the screenshot taken,  as shown below.

You can tap scroll capture button to cover one more screen. The preview of the screenshot will be shown on the right side. The final screenshot will be one image file.

When you reach the bottom of the contents, the scroll capture button should disappear.

use scroll capture to take a multiple-screen screenshot in Galaxy S9 and S9+

If you ignore the toolbar for more than 5 seconds, it will disappear, and the screenshot will be saved. There is no way to call out the toolbar without taking a screenshot first.

Why can you not take screenshots on Galaxy S9 and S9+ sometimes?

In some screens, taking a screenshot is not allowed to protect your sensitive data or for copyright reasons.

For example, you cannot take screenshots on Galaxy S9 or S9+ when you set up your fingerprints or iris scanner.

You may not be able to take a screenshot when playing some videos through some apps.

Can you use these 5 methods to take screenshots on Galaxy S9 and S9+ without using any apps now?

If you have any questions or encounter any problems with taking screenshots on Galaxy S9 and S9+, please let us know in the comment box below.

The community will help you find the answer

For the user guide for new features of Samsung Galaxy S9 and S9+, please check Galaxy S9 new features guides page.

For using Galaxy S9 and S9+, please check Galaxy S9 how-to guides page.

For using Galaxy S9 camera, please check Galaxy S9 camera guides page.

For accessories for Galaxy S9 and S9+, please check Galaxy S9 accessories guides page.

For the official Samsung Galaxy S9 and S9+ user guides (in PDF format), please check Galaxy S9 user guides page.

Share this:

  • Click to share on Twitter (Opens in new window)
  • Click to share on Facebook (Opens in new window)

Filed Under: Galaxy S9 Guides Tagged With: Assistant menu, Bixby button, Bixby voice, Galaxy S9 layout, Galaxy S9 navigation bar, Galaxy S9 status bar, Galaxy S9 touch screen gesture, Google Assistant, palm swipe, quick setting buttons, screenshot, scroll capture, voice command

Reader Interactions

Comments

  1. Craig says

    June 14, 2018 at 3:36 am

    I really appreciate the info regarding “scroll capture”!
    Thank you.

    Reply
    • simon says

      June 14, 2018 at 5:15 am

      Enjoy the phone.


      -- Our Facebook page || Galaxy S6 Guides || Galaxy S7 Guides || Android Guides || Galaxy S8 Guides || Galaxy S9 Guides || Google Home Guides || Headphone Guides || Galaxy Note Guides || Fire tablet guide || Moto G Guides || Chromecast Guides || Moto E Guides || Galaxy S10 Guides || Galaxy S20 Guides || Samsung Galaxy S21 Guides || Samsung Galaxy S22 Guides || Samsung Galaxy S23 Guides

      Reply
  2. Ariff Ibrahim says

    September 1, 2018 at 10:47 am

    Hello… I usually use Google Assistant to do screenshots for me. I recently upgraded to a Note 9. However I am unable to do the screenshot using Google Assistant. The phone will show that it is processing a screenshot and then nothing happens. When I try again, it gives me the error msg”Something is wrong, try again later…” I tried resetting the phone but the same thing occurs again and again. This is so frustrating!!!

    Reply
    • simon says

      September 1, 2018 at 1:15 pm

      There are two stages when using Google Assistant to take a screenshot: 1).taking screenshot; 2). sharing (pop out apps that receive the screenshot),

      Which stage did it stop? If it stops at stage 1, it is probably due to Google account settings or permission settings for the Google app.

      If screenshot was taken, but the pop up does not appear, then it is probably caused by phone settings. You can try to reset the settings in Settings –General management — reset — Reset settings.

      Also, if you turned on the battery saver, you should turn it off. Sometimes, Google Assistant has issues with battery saver mode in Samsung phones.

      Besides, it is safe to clear the cache partition to see whether it helps.


      -- Our Facebook page || Galaxy S6 Guides || Galaxy S7 Guides || Android Guides || Galaxy S8 Guides || Galaxy S9 Guides || Google Home Guides || Headphone Guides || Galaxy Note Guides || Fire tablet guide || Moto G Guides || Chromecast Guides || Moto E Guides || Galaxy S10 Guides || Galaxy S20 Guides || Samsung Galaxy S21 Guides || Samsung Galaxy S22 Guides || Samsung Galaxy S23 Guides

      Reply

Leave a Reply Cancel reply

Your email address will not be published. Required fields are marked *

Primary Sidebar

RSS Samsung Galaxy S21 Guides

  • Top 12 new features in Android 12 update for Galaxy S21, S20 and S10
  • Android 12 update vs One UI 4.0 vs One UI 4.1: update Galaxy S21, S20 and S10 to Android 12
  • How to set and resize photo size on Samsung Galaxy S21, S20, S10, and S9 without using any third-party apps?
  • How to Customize Galaxy S21 Home Screen?
  • Master Galaxy S21 Lock Screen Settings
  • How to use widgets on Galaxy S21?
  • How to Use and Customize Galaxy S21 Side Key?
  • How to hide Galaxy S21 password and PIN when typing?
  • How to power on, power off, and reboot Galaxy S21,even when the phone hangs?
  • How to use Galaxy S21 quick settings panel?

RSS Galaxy S20 Guides

  • How to Use Enhanced Processing on Galaxy S20 with Android 11 update?
  • How to access, use, and customise widgets on Galaxy S20 lock screen and AOD screen with Android 11 update for Galaxy S20?
  • How to update Galaxy S20 to Android 11?
  • How to use Galaxy S20 lockdown mode?
  • Top 11 new features in Galaxy S20 Android 11 update
  • How to use Galaxy S20 recovery mode?
  • How to use 5 different shooting methods for Galaxy S20 camera?
  • How to use and customize power mode on Galaxy S20?
  • A Complete Guide Of Galaxy S20 Assistant Menu

RSS Galaxy Note Guides

  • Top 11 disappointments of Galaxy Note 20 and Galaxy Note 20 Ultra
  • How to use the Dynamic Lock screen on Galaxy Note 10?
  • Galaxy Note 10 LED View Cover Guide and Review
  • Install S Note app and Extension pack on Galaxy Note 10
  • How to Use Galaxy Note 10 Camera App?
  • Galaxy Note 10 SIM Card Guide
  • How to use Samsung DeX for PC with Galaxy Note 10 and Galaxy Note 10+?
  • How to use Galaxy Note 10 Clear View cover (S View cover)?
  • How to charge Galaxy Note 10 battery?
  • How to use and remap Galaxy Note 10 Side key?

RSS Drive In Singapore

  • Top 5 rules of driving in Singapore safely and legally during COVID-19 Circuit Breaker period
  • Understand COE Price by 10 Simple Questions
  • How to convert a foreign driving license to a Singapore driving license?
  • How to get a Touch ‘n Go card as a Singapore driver?
  • What is covered in the car warranty in Singapore? What is not?
  • What is the Singapore Road Speed Limit?
  • How to register, collect and use Malaysia Vehicle Entry Permit (VEP)?
  • Why are cars in Singapore are so expensive?
  • Drive to Malaysia
  • Car Maintenance and Servicing in Singapore

RSS Moto G Guides

  • Moto G8 vs Moto G8 Power vs Moto G8 Power Lite vs Moto G Power vs Moto G Stylus vs Moto G Pro vs Moto G fast: What are the differences?
  • Moto G8 User Manual for Moto G8 Plus and Moto G8 Play
  • Moto G8 Plus vs Moto G8 Play: Differences and common features
  • Official Moto G7 user manual

RSS Chromecast Guides

  • Chromecast 4th Gen (Chromecast with Google TV) is coming!
  • How to disable Google Home and Chromecast casting notification?
  • Chromecast Ultra vs Chromecast 2nd Gen
  • Chromecast Preview Program: Everything you need to know

RSS Headphone Guide Pro

  • AirPods Pro 2 New features explained
  • What is Samsung Seamless Codec? 4 things you should know about this new codec
  • How to use widgets to check battery levels and control Galaxy Buds 2, Galaxy Buds Pro, Galaxy Buds Live, Galaxy Buds+, and Galaxy Buds?
  • AirPods 3 vs AirPods Pro: which one should you choose?
  • AirPods 3 vs AirPods 2: Top 8 improvements and new features of AirPods 3

© 2015–2023 · GadgetGuideOnline.com is an online community for Gadget Owners! · Hosted by PTRHosting
· Powered by Genesis framework for WordPress

Samsung Galaxy S9 how-to guides, user manuals and tutorials! Everything about Samsung Galaxy S9 and Galaxy S9+.
Disclaimer: Samsung, Galaxy, Galaxy S9, and Galaxy S9+ are trademarks of Samsung. Android is a trademark of Google. This website is NOT affiliated with Samsung or Google in any way. All the information provided on this website is provided on an "as is" and "as available" basis and you agree that you use such information entirely at your own risk.