• Skip to primary navigation
  • Skip to main content
  • Skip to primary sidebar

Galaxy S9 Guides

a community for owners of Samsung Galaxy S9 and S9+

  • Home
    • About Galaxy S9 Guides
    • Contact Us
  • How-to Guides
    • Galaxy S9 Android Pie update guides
      • Official user manuals for Galaxy S9 and S9 Plus with Android Pie update
      • Top 9 new features of Android Pie update for Galaxy S9 and S9+
      • How to use the new navigation gestures in Android Pie update for Galaxy S9 and S9+?
      • How to use the lockdown mode on Galaxy S9 and S9+ with Android Pie update?
      • How to use the night mode on Galaxy S9 and S9+ with Android Pie update?
      • How to remap Bixby button on Galaxy S9 and S9+ after updating to Android Pie?
      • How to use Bixby quick commands on Galaxy S9, S9+, S8, S8+, Note 8, and Note 9 with the Android Pie update?
      • How to update Galaxy S9 or S9 Plus to Android Pie (Android 9)?
      • How to use the lift to wake feature on Galaxy S9 and S9+ with Android Pie update?
      • How to use the new Recents screen in Android Pie update for Galaxy S9 and S9 Plus?
      • How to use the floating keyboard on Galaxy S9 and S9+ with Android Pie update?
      • How to lock Galaxy S9 home screen layout on Galaxy S9 and S9+ with Android Pie update?
      • How to use the rotation toggle to change and lock screen orientation in Android Pie update for Galaxy S9 and S9 Plus?
      • How to use the updated camera app in Android Pie update for Galaxy S9 and S9 Plus?
    • Meaning of Galaxy S9 status icons and notification icons in Samsung Galaxy S9 and S9+
      • How to use Samsung DeX with Galaxy S9 and S9+ and other Samsung phones?
      • How to use Multi Window on Galaxy S9 and S9+?
      • How to use app pair on Galaxy S9 and S9+?
      • Samsung DeX Station vs Samsung DeX Pad vs Samsung DeX cable
      • How to use Samsung DeX Station for Galaxy S9, S9+, S8, S8+, Note 8 and Note 9?
      • How to use Samsung DeX Pad for Galaxy S9, S9+, S8, S8+, Note 8 and Note 9?
      • How to use a USB flash drive on Galaxy S9 and S9+?
    • How to charge Galaxy S9 battery?
    • Galaxy S9 SIM card guide
      • How to use two SIM cards on Galaxy S9, S10, and S20?
      • How to use Galaxy S9 dual messenger to run two accounts of messenger apps simultaneously on Galaxy S9 and S9+?
      • How to use micro SD card on Galaxy S9 and S9+?
      • How to back up Galaxy S9 and S9+?
      • How to use smart switch to transfer and migrate data to Galaxy S9 or S9+?
      • How to reset Galaxy S9 and S9+? What is Galaxy S9 factory data reset?
    • How to disable Bixby button in Galaxy S9 and S9+?
      • How to remove Bixby Home from Galaxy S9 Home screen?
    • Understand and Use Galaxy S9 Home screen
      • How to use Galaxy S9 edge screen on Galaxy S9 and S9+?
      • How to show photos on Galaxy S9 Home screen?
      • How to pin files to Galaxy S9 Home screen (add file shortcuts to Galaxy S9 Home screen)?
      • How to use Galaxy S9 Apps screen on Galaxy S9 and S9+?
      • How to use Galaxy S9 Home screen edit mode to customize Galaxy S9 Home screen?
      • How to use Galaxy S9 home screen landscape mode?
      • How to hide Galaxy S9 apps screen and how to hide Galaxy Apps button?
      • How to use and customize Galaxy S9 navigation bar and navigation buttons?
      • How to manage Galaxy S9 Home screen panels on Galaxy S9 and S9+?
    • How to use and customize Galaxy S9 lock screen?
      • How to use Galaxy S9 always-on display (AOD) on Galaxy S9 and S9+?
    • How to use Galaxy S9 notification panel on Galaxy S9 and S9+?
      • How to use Do Not Disturb on Galaxy S9 and S9+?
      • Understand and use Galaxy S9 notification number badge (notification dots, app icon badge)
      • How to use quick setting buttons on Galaxy S9 and S9+?
      • How to use quick-open notification panel on Galaxy S9 and S9+ to check notifications?
    • Galaxy S9 layout (and layout of Galaxy S9+)
      • How to use adapt sound on Galaxy S9 and S9+?
      • 5 ways to take screenshots on Galaxy S9 and S9+ without using any apps
      • How to use Galaxy S9 touchscreen gestures?
      • How to use wireless printing on Galaxy S9 and S9+?
      • How to use Galaxy S9 themes to customize the look and feel of Galaxy S9 and S9+?
      • Unbox Galaxy S9: understand package contents in Galaxy S9 box and S9+ box
    • How to reboot into Galaxy S9 recovery mode and to clear Galaxy S9 cache partition on Galaxy S9 and S9+?
      • How to reboot Galaxy S9 and S9+ if Galaxy S9 hangs?
      • How to use Galaxy S9 safe mode on Galaxy S9 and S9+?
    • How to use Galaxy S9 camera app?
      • 6 ways to start Galaxy S9 camera app in Galaxy S9 and S9+
      • Understanding and use Galaxy S9 camera settings
      • How to use super slow motion mode (super Slow-mo) on Galaxy S9 and S9+?
      • How to use Galaxy S9 camera Pro Mode on Galaxy S9 and S9+?
  • New features
    • Top 9 new features of Android Pie update for Galaxy S9 and S9+
      • How to use the lockdown mode on Galaxy S9 and S9+ with Android Pie update?
      • How to use the new navigation gestures in Android Pie update for Galaxy S9 and S9+?
      • How to use the night mode on Galaxy S9 and S9+ with Android Pie update?
      • How to remap Bixby button on Galaxy S9 and S9+ after updating to Android Pie?
      • How to update Galaxy S9 or S9 Plus to Android Pie (Android 9)?
      • How to use the lift to wake feature on Galaxy S9 and S9+ with Android Pie update?
      • How to use the new Recents screen in Android Pie update for Galaxy S9 and S9 Plus?
      • How to use the floating keyboard on Galaxy S9 and S9+ with Android Pie update?
      • How to lock Galaxy S9 home screen layout on Galaxy S9 and S9+ with Android Pie update?
      • How to use the rotation toggle to change and lock screen orientation in Android Pie update for Galaxy S9 and S9 Plus?
      • How to use the updated camera app in Android Pie update for Galaxy S9 and S9 Plus?
      • How to use Bixby quick commands on Galaxy S9, S9+, S8, S8+, Note 8, and Note 9 with the Android Pie update?
    • Top 10 new features of Samsung Galaxy S9 and Galaxy S9+
    • How to remove Bixby Home from Galaxy S9 Home screen?
    • How to use and customize Galaxy S9 navigation bar and navigation buttons?
    • How to use super slow motion mode (super Slow-mo) on Galaxy S9 and S9+?
    • Understand and use Galaxy S9 notification number badge (notification dots, app icon badge)
    • How to use Samsung DeX Pad for Galaxy S9, S9+, S8, S8+, Note 8 and Note 9?
    • How to use Galaxy S9 home screen landscape mode?
    • Understanding and use Galaxy S9 camera settings
    • How to use dual aperture to manually switch Galaxy S9 camera aperture in Pro mode?
    • Galaxy S9 layout (and layout of Galaxy S9+)
    • How to use app pair on Galaxy S9 and S9+?
  • Camera
    • How to use Galaxy S9 camera app?
    • How to use the updated camera app in Android Pie update for Galaxy S9 and S9 Plus?
    • Understanding and use Galaxy S9 camera settings
    • 6 ways to start Galaxy S9 camera app in Galaxy S9 and S9+
    • How to use dual aperture to manually switch Galaxy S9 camera aperture in Pro mode?
    • How to use super slow motion mode (super Slow-mo) on Galaxy S9 and S9+?
    • How to use Galaxy S9 camera Pro Mode on Galaxy S9 and S9+?
    • How to show photos on Galaxy S9 Home screen?
  • Official User Guides
    • Official user manuals for Galaxy S9 and S9 Plus with Android Pie update
    • Official Samsung Galaxy S9 user guides (Oreo)
  • Accessories
    • How to use Samsung Galaxy S9 clear view standing cover (S-view cover)?
    • Samsung Galaxy S9 LED wallet cover guide
    • How to use micro SD card on Galaxy S9 and S9+?
    • How to use Samsung DeX with Galaxy S9 and S9+ and other Samsung phones?
      • Samsung DeX Station vs Samsung DeX Pad vs Samsung DeX cable
      • How to use Samsung DeX Station for Galaxy S9, S9+, S8, S8+, Note 8 and Note 9?
      • How to use Samsung DeX Pad for Galaxy S9, S9+, S8, S8+, Note 8 and Note 9?
      • How to use a USB flash drive on Galaxy S9 and S9+?

How to use Galaxy S9 always-on display (AOD) on Galaxy S9 and S9+?

simon · Leave a Comment

Galaxy S9 always-on display (AOD) on Galaxy S9 and S9+Galaxy S9 always-on display (AOD) is an extension of the lock screen. You can choose to display some useful info after the lock screen times out.

Update: a new section explaining the changes of Galaxy S9 always-on display (AOD) in Android Pie update for Galaxy S9 and S9+ was added. The new display mode (tap to show) was added.

This Galaxy S9 how-to guide explains everything you need to know about Galaxy S9 always-on display (AOD) on Galaxy S9 and S9+: how to turn on/off the AOD, how to use and customize Galaxy S9 AOD screen, how to customize clock style for AOD screen, how to pin photos to Galaxy S9 AD screen, and how to use AOD themes.

Table of Contents hide
1) What is Galaxy S9 always-on display (AOD) on Galaxy S9 and S9+?
2) How to turn on/turn off Galaxy S9 always-on display (AOD) on Galaxy S9 and S9+?
2.1) Method 1: Use quick setting buttons to turn on/turn off Galaxy S9 always-on display (AOD) on Galaxy S9 and S9+
2.2) Method 2: Use Galaxy S9 Settings to turn on/turn off Galaxy S9 always-on display (AOD) on Galaxy S9 and S9+
2.3) Method 3: Use Bixby voice to turn on/turn off Galaxy S9 always-on display (AOD) on Galaxy S9 and S9+
3) How to use Galaxy S9 always-on display (AOD) on Galaxy S9 and S9+?
4) How to customize Galaxy S9 always-on display (AOD) on Galaxy S9 and S9+?
5) How to customize clock style for Galaxy S9 always-on display (AOD) on Galaxy S9 and S9+?
6) How to use photos and animations on Galaxy S9 always-on display (AOD) on Galaxy S9 and S9+?
7) How to pin pictures to Galaxy S9 always-on display (AOD) on Galaxy S9 and S9+?
8) How to use AOD themes for Galaxy S9 always-on display (AOD) on Galaxy S9 and S9+?
9) The new Display mode for Galaxy S9 always-on display (AOD) screen in Android Pie update for Galaxy S9 and S9+
10) Why can I not customize Galaxy S9 always-on display (AOD) on Galaxy S9 and S9+ when I use the clear view cover?
11) Frequently asked questions on Galaxy S9 always-on display (AOD) on Galaxy S9 and S9+

What is Galaxy S9 always-on display (AOD) on Galaxy S9 and S9+?

Traditionally, the phone screen will be turned off after you lock the screen, or if the screen times out.

But more and more smartphone owners use the phone to check time. Some Android phone manufacturers came out the idea of the always-on display (AOD), which shows selected info after the screen times out.

Samsung first introduced the always-on display on Galaxy S7 and S7  Edge.  Galaxy S9 always-on display (AOD) offers an evolutionary update for this feature.

Besides the clock, notification icons, music control, next calendar event and next alarm can also be shown on the Galaxy S9 AOD screen.

Compared to Galaxy S9 lock screen, Galaxy S9 always-on display (AOD) on Galaxy S9 and S9+ does NOT offer the following features:

  • App shortcuts in the bottom.
  • Notification preview.
  • Quick setting buttons.

You can consider Galaxy S9 always-on display (AOD) is a slimmed-down version or an extension of the lock screen.

How to turn on/turn off Galaxy S9 always-on display (AOD) on Galaxy S9 and S9+?

By default, in some regions, Galaxy S9 always-on display (AOD) is turned off on Galaxy S9 and S9+. In other markets, it is on.

Anyway, you can easily turn on or turn off Galaxy S9 always-on display (AOD) whenever you want.

And there are at least 3 different methods to turn on and turn off AOD on Galaxy S9 and S9+.

Method 1: Use quick setting buttons to turn on/turn off Galaxy S9 always-on display (AOD) on Galaxy S9 and S9+

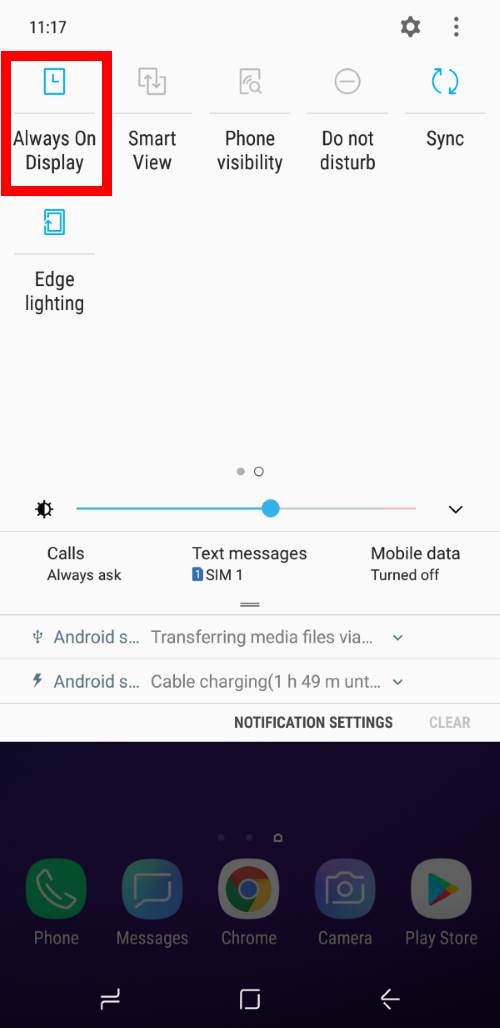
By default, Always-on display button is included in Galaxy S9 quick setting buttons as shown in the screenshot below.

As explained in this guide, you can swipe downwards twice from the status bar, or swipe down with two fingers to access quick setting buttons.

Alternatively, you can swipe down from the notification panel to access quick setting buttons.

To turn on or turn off Galaxy S9 always-on display (AOD), you just need to tap the button.

Please note, if you tap and hold (long tap) the button, you will be directed to the corresponding AOD settings page (read on).

Use quick setting buttons to turn on/turn off Galaxy S9 always-on display (AOD) on Galaxy S9 and S9+

Method 2: Use Galaxy S9 Settings to turn on/turn off Galaxy S9 always-on display (AOD) on Galaxy S9 and S9+

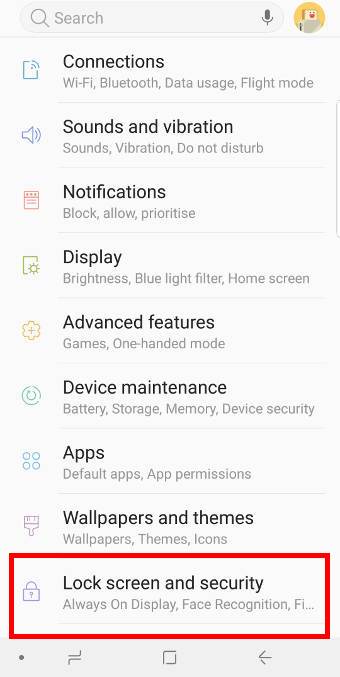
The traditional way to turn on,  turn off and customize the Galaxy S9 always-on display (AOD)  is through Galaxy S9 Settings.

As shown below, you can tap lock screen and security in Galaxy S9 Settings page to access always-on display settings.

Please note, AOD settings are not under display as in some other Android phones. Samsung put AOD together with lock screen because they share some customizations.

Use Galaxy S9 Settings to turn on/turn off Galaxy S9 always-on display (AOD) on Galaxy S9 and S9+ Use Galaxy S9 Settings to turn on/turn off Galaxy S9 always-on display (AOD) on Galaxy S9 and S9+

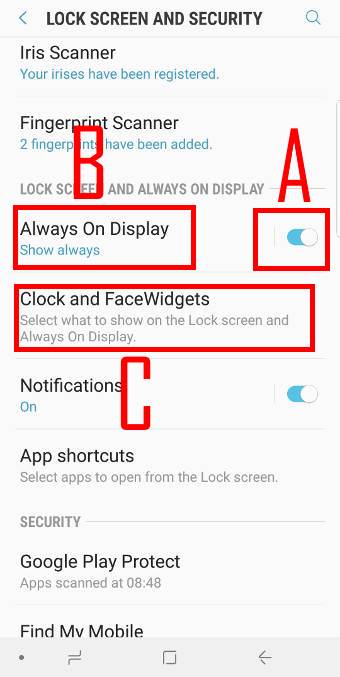
As shown in the screenshot above, you can find the Always on display entry in lock screen and security page.

If you just want to turn on or turn off AOD on Galaxy S9 or S9+, you just tap the switch on the right side (marked as A).

If you tap Always on display (marked as B), you will then access Galaxy S9 always-on display settings.

Method 3: Use Bixby voice to turn on/turn off Galaxy S9 always-on display (AOD) on Galaxy S9 and S9+

The quickest way to turn on and turn off Galaxy S9 always-on display is to use your voice (Bixby Voice) if you did not disable Bixby Voice on Galaxy S9 or S9+.

You can wake up Bixby voice with the hotword (“Hey Bixby”) or press the Bixby button.

Then speak “turn on always-on display” to turn on AOD.

As shown below, it will turn on the always-on display on Galaxy S9 or S9 immediately, and open the AOD settings page.

Use Bixby voice to turn on/turn off Galaxy S9 always-on display (AOD) on Galaxy S9 and S9+ Use Bixby voice to turn on/turn off Galaxy S9 always-on display (AOD) on Galaxy S9 and S9+

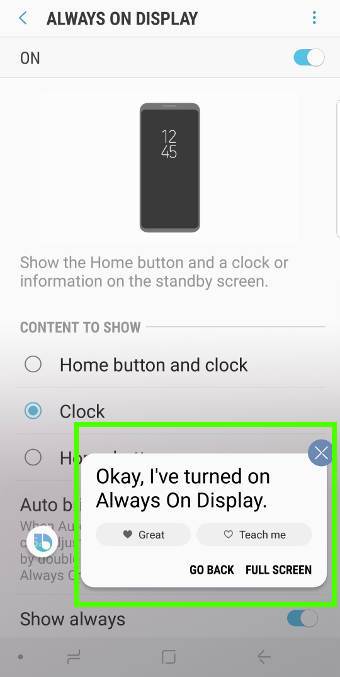
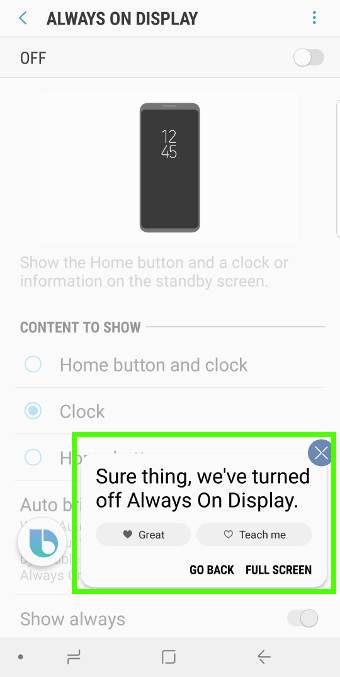
Similarly, you can say “Hey Bixby, turn off always-on display” to turn off the always-on display.

As shown above, the always-on display will be turned off immediately. The settings page for Galaxy S9 always-on dispaly will be opened.

How to use Galaxy S9 always-on display (AOD) on Galaxy S9 and S9+?

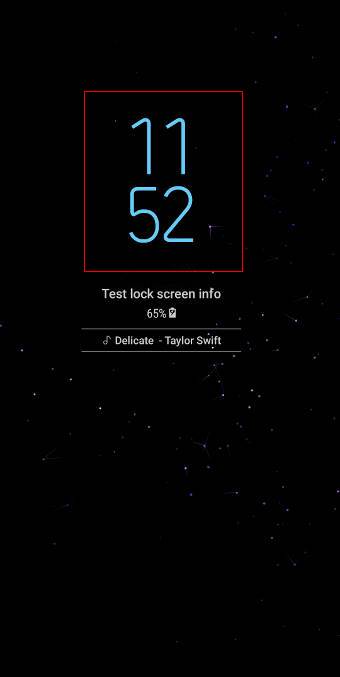
As shown below, by default, on the Galaxy S9 always-on display screen, there are a few elements including:

  • A clock.
  • Lock screen info. You can set this info in Galaxy S9 lock screen settings.
  • Battery level. If you are charging the battery, the charging icon will be shown inside the battery icon.
  • Notification icons. In AOD screen, only notification icons will be shown. You cannot preview any notifications.
  • Music info if you are playing music.

Besides this main screen, there are actually a few other screens (Facewidgets).

To access other screens in the Galaxy S9 always-on display, you need to double tap the display area. e.g., the clock as shown below.

use Galaxy S9 always-on display (AOD) on Galaxy S9 and S9+ use Galaxy S9 always-on display (AOD) on Galaxy S9 and S9+

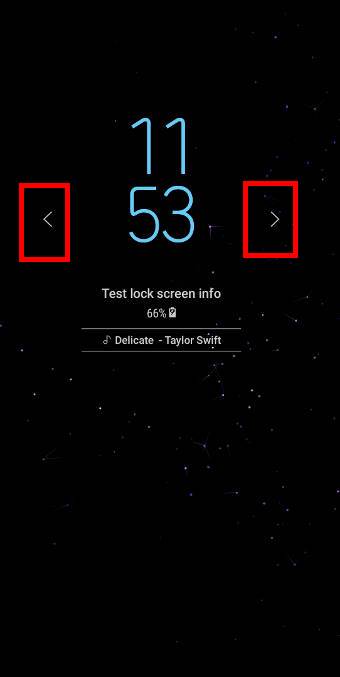
You can then find the < and > icons as shown in the screenshot above.

Once you see these icons, you can tap them to navigate to other screens of Galaxy S9 AOD.

You can also swipe to the left or to the right side to access different AOD screens. It works only after you see the < and > icons.

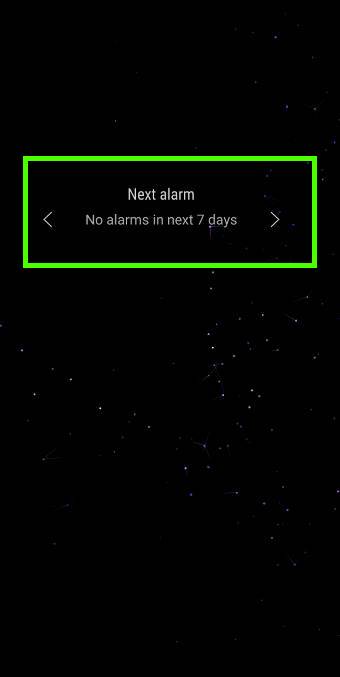
For example, the following two pictures illustrate the music control and next alarm screens.

These additional screens are just FaceWidgets. They are shared with Galaxy S9 lock screen.

use Galaxy S9 always-on display (AOD) on Galaxy S9 and S9+ use Galaxy S9 always-on display (AOD) on Galaxy S9 and S9+

On Galaxy S9 always-on display (AOD) screen, Home button is always active (although you can choose to show it or not, read on).

At any time, you can press and hold (long press) or double tap the area near home button to wake up the screen.

How to customize Galaxy S9 always-on display (AOD) on Galaxy S9 and S9+?

Besides FaceWidgets, you can also customize some other aspects of Galaxy S9 always-on display (AOD).

In the Lock screen and security settings page, tap Always-on display (marked as B in the screenshot shown earlier) to access settings for Galaxy S9 always-on display.

Alternatively, you can long tap the always-on display icon in quick setting buttons to access the same page.

Also, when you use Bixby Voice to turn on or turn off always-on display, you will always be landed on the AOD settings page.

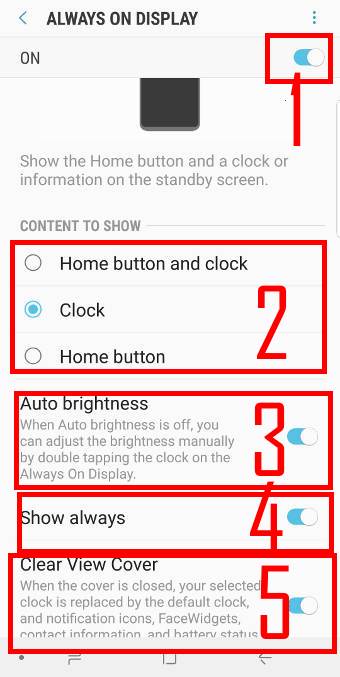
As shown in the screenshot below, in the AOD settings, you can:

  1. Turn on/turn off always on display on Galaxy S9 or S9+. The switch/button was marked as 1 in the screenshot.
  2. Choose to show or hide the clock and home button. You can choose to show both the clock and home button, or only one of them (marked as 2).
  3. Turn on or off auto brightness.
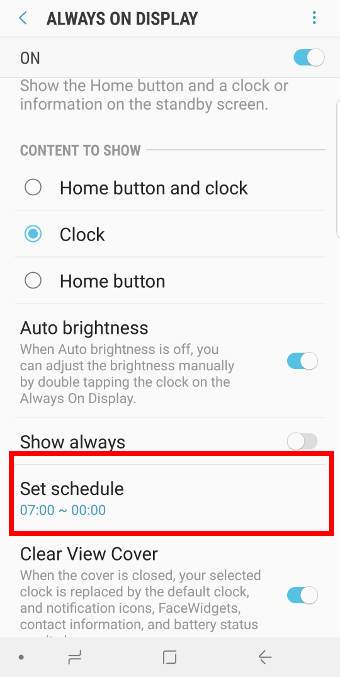
  4. Schedule Galaxy S9 always-on display (AOD). By default, if you turn AOD on, then it shows all the time unless you manually turn it off.  You can tap Show always (marked as 4), then set the schedule for Galaxy S9 always-on display as shown in the subsequent screenshot.
  5. Turn on or turn off always on display for Galaxy S9 clear view cover. By default, the always-on display will not be activated if you close the Galaxy S9 clear view (S View) cover. You can choose to enable Galaxy S9 AOD when the clear view cover is closed.  But in this case, the customization (the clock style, FaceWidgets) for Galaxy S9 always on display will be ignored.

As mentioned, FaceWidgets settings are shared between Galaxy S9 lock screen and AOD screen as explained in this guide. You can choose to show or hide FaceWidgets on the AOD screen.

customize Galaxy S9 always-on display (AOD) on Galaxy S9 and S9+ customize Galaxy S9 always-on display (AOD) on Galaxy S9 and S9+

How to customize clock style for Galaxy S9 always-on display (AOD) on Galaxy S9 and S9+?

You can customize the clock style on the AOD screen if you want.

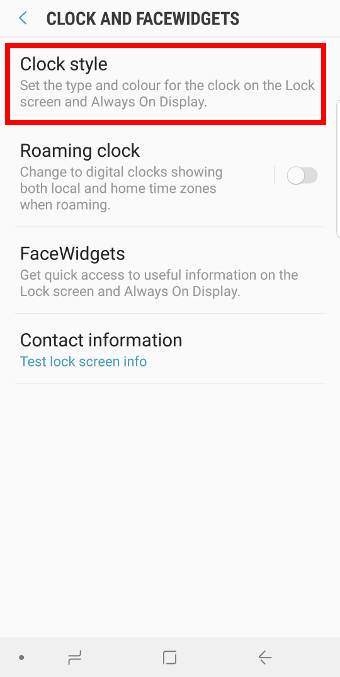
In Lock screen and security settings page, tap Clock and FaceWidgets (marked as C in the screenshot shown earlier).

In the Clock and FaceWidgets page, as shown below, tap Clock style to customize the clock in the AOD screen.

customize clock style for Galaxy S9 always-on display (AOD) on Galaxy S9 and S9+ customize clock style for Galaxy S9 always-on display (AOD) on Galaxy S9 and S9+

When you set the clock style, as shown above, you can find the different tabs for the lock screen and always-on screen.  This means you can use different clock faces on the lock screen and AOD screen.

There are a few pre-installed clock faces on Galaxy S9 and S9+. You can swipe left or right as shown above.

Once you find the desired one, tap it to select.

After choosing the clock face, you can set the color for the clock face.

Tap Color (palette) button as shown above to set the clock style.

As shown below, you can choose from the pre-defined colors for the clock. For example, you want to use cyan color for the clock.

Tap the cyan color as shown below.  The preview screen will update immediately.

Tap Done to apply the new clock style.

If you forget to tap the Done button, the settings will NOT be saved.

customize clock style for Galaxy S9 always-on display (AOD) on Galaxy S9 and S9+ customize clock style for Galaxy S9 always-on display (AOD) on Galaxy S9 and S9+

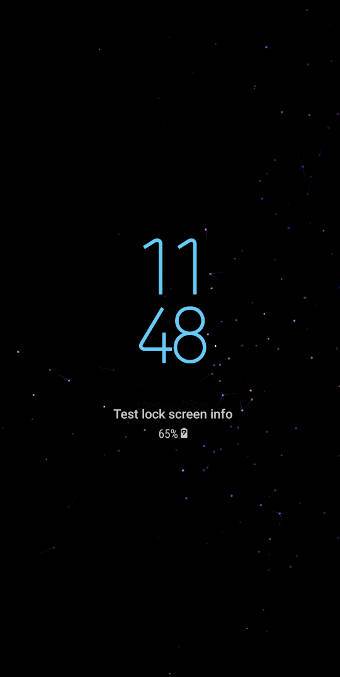
Now you can see the new clock in the always-on display screen as shown above.

How to use photos and animations on Galaxy S9 always-on display (AOD) on Galaxy S9 and S9+?

You can also add a photo or animation to the clock face of Galaxy S9 always-on display (AOD) on Galaxy S9 and S9+.

As shown below, when you select the clock face, you can tap anyone with a picture as shown below.

If none of the clock faces has a picture, you can install an AOD theme (see the section below).

use photos and animations on Galaxy S9 always-on display (AOD) on Galaxy S9 and S9+ use photos and animations on Galaxy S9 always-on display (AOD) on Galaxy S9 and S9+

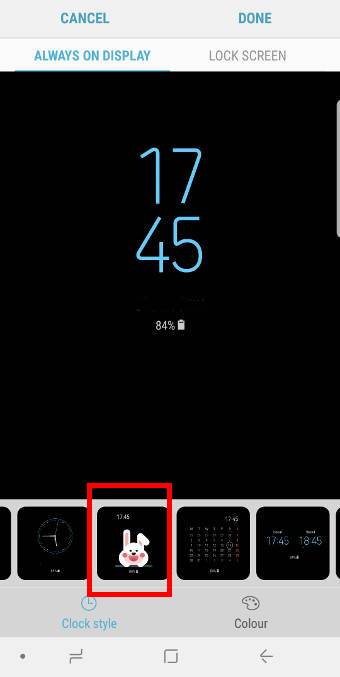
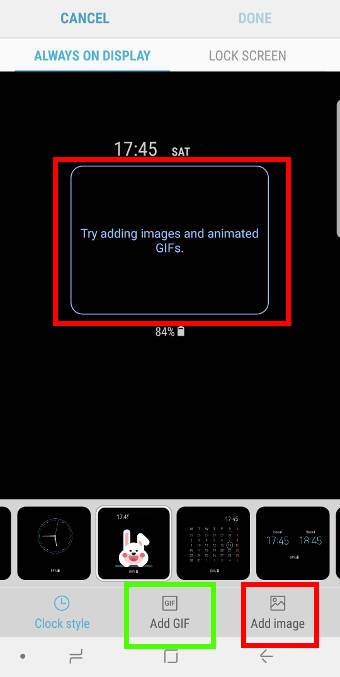
You can then choose to replace the photo or animation as shown above.

For animations, you can tap Add GIF. Then choose one of the 20 pre-installed animations.

If you want to use a photo or an image, tap Add image as shown above.

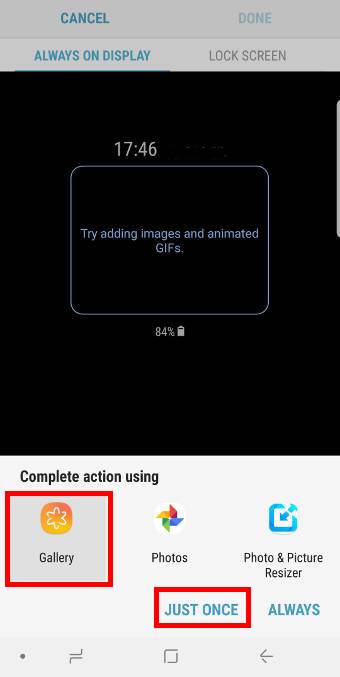
Now, the phone may ask you to choose an app to select the photo/picture.

For example, you want to use the Gallery app to select a picture.

Tap Gallery, then tap Just Once (if you do not want to set Gallery as the default app for selecting photos) as shown below.

use photos and animations on Galaxy S9 always-on display (AOD) on Galaxy S9 and S9+ use photos and animations on Galaxy S9 always-on display (AOD) on Galaxy S9 and S9+

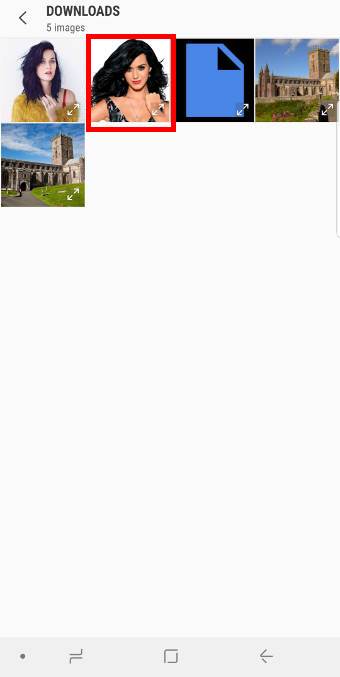
In the Gallery app, you can now select a photo as shown above.

Once the photo is selected, you can preview it in the AOD screen as shown below.

Tap Done as shown below to apply the photo to Galaxy S9 always-on display screen.

use photos and animations on Galaxy S9 always-on display (AOD) on Galaxy S9 and S9+ use photos and animations on Galaxy S9 always-on display (AOD) on Galaxy S9 and S9+

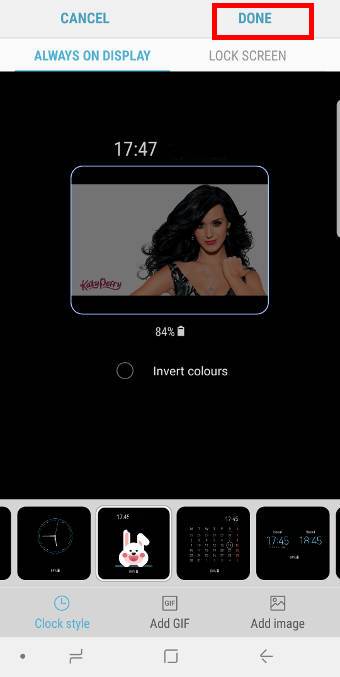
Now, you can see the updated AOD screen with the photo you selected as shown above.

You can also assign a photo or picture for Galaxy S9 AOD screen directly in the Gallery app.

For example, in Gallery app, open a photo.

Tap the menu key (3 vertical dots) on the top right as shown below.

If you only see photos without any icons/buttons, just tap the screen to exit full-screen mode.

use photos and animations on Galaxy S9 always-on display (AOD) on Galaxy S9 and S9+ use photos and animations on Galaxy S9 always-on display (AOD) on Galaxy S9 and S9+

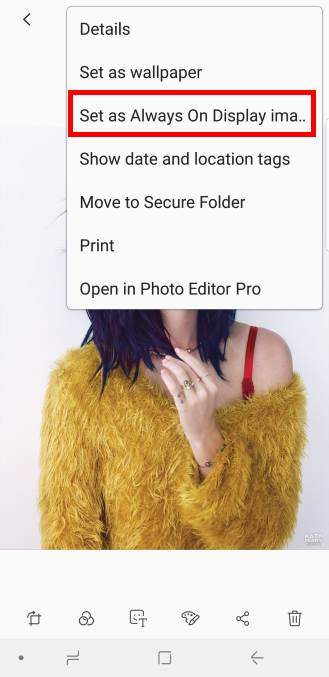
In the menu, tap Set as Always on display image as shown in the screenshot above.

Now, you will be directed to the preview screen for the new AOD screen as shown below.

Tap Done as shown in the screenshot below if you are happy with the new photo on the AOD screen.

use photos and animations on Galaxy S9 always-on display (AOD) on Galaxy S9 and S9+ use photos and animations on Galaxy S9 always-on display (AOD) on Galaxy S9 and S9+

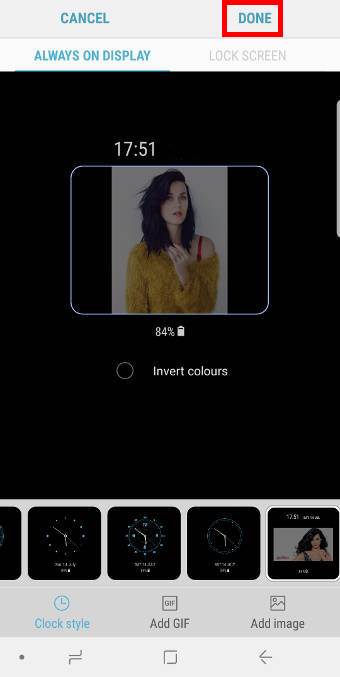
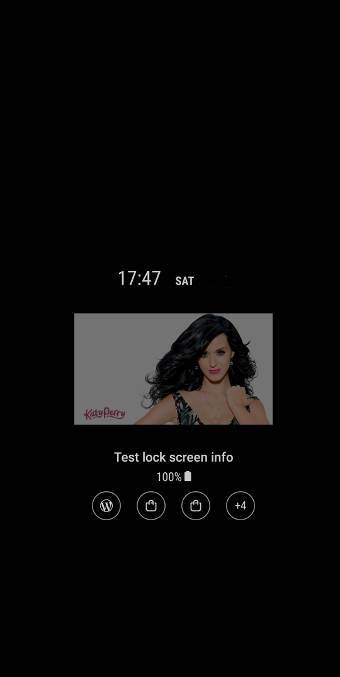
In the always on display screen, you can find the new photo was applied as shown above.

How to pin pictures to Galaxy S9 always-on display (AOD) on Galaxy S9 and S9+?

In addition to using photos or animations on the clock face of Galaxy S9 always-on display (AOD) on Galaxy S9 and S9+, you can also pin photos or videos to the Galaxy S9 AOD screen.

To pin pictures or videos to AOD screen, you need to open the photo or video in the Gallery app.

As shown below, tap the picture (or video) if you want to pin it to the Galaxy AOD screen.

pin pictures to Galaxy S9 always-on display (AOD) on Galaxy S9 and S9+ pin pictures to Galaxy S9 always-on display (AOD) on Galaxy S9 and S9+

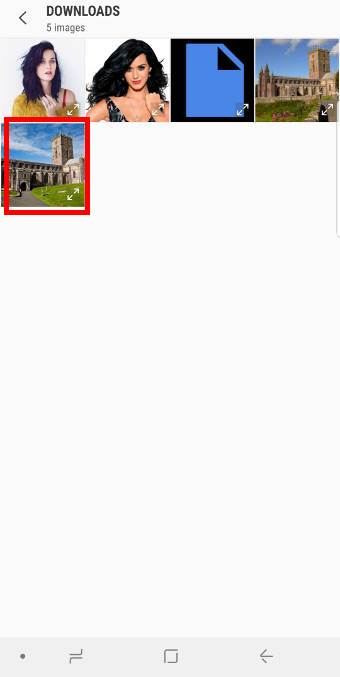
This would simply open the picture.

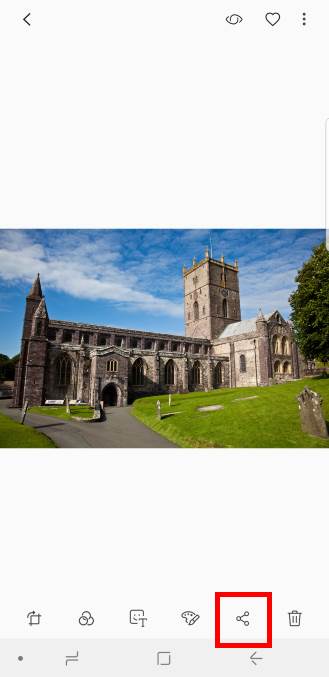
Tap the share icon below the picture as shown in the screenshot above.

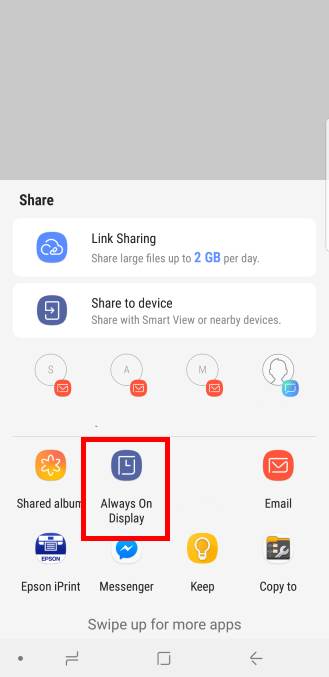
Now, Galley app asks you where to share (actually with which app) this picture as shown below.

Because you want to pin the picture to Galaxy S9 always on display, you tap Always on display as shown below.

pin pictures to Galaxy S9 always-on display (AOD) on Galaxy S9 and S9+ pin pictures to Galaxy S9 always-on display (AOD) on Galaxy S9 and S9+

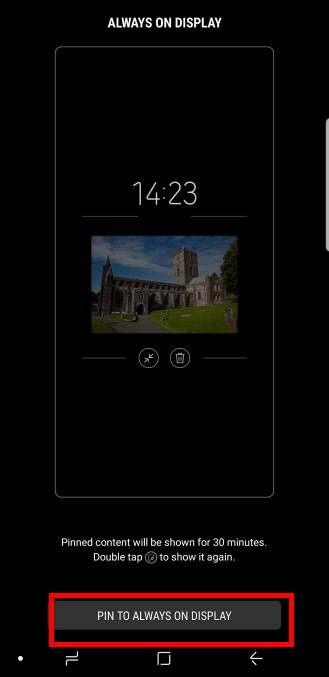
You can now preview the always-on display (AOD) screen with the pinned picture as shown above.

Tap Pin to always on display to proceed.

Now, you will see the pinned picture when always on display is activated.

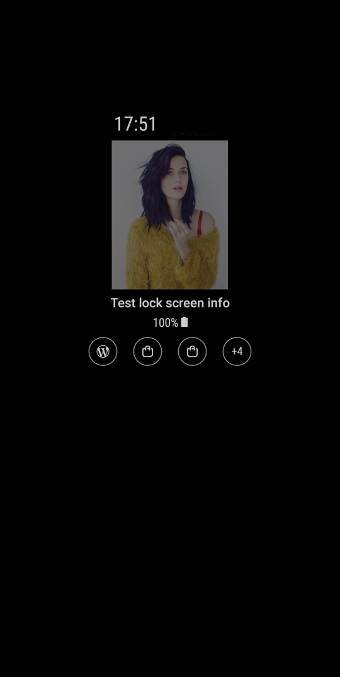
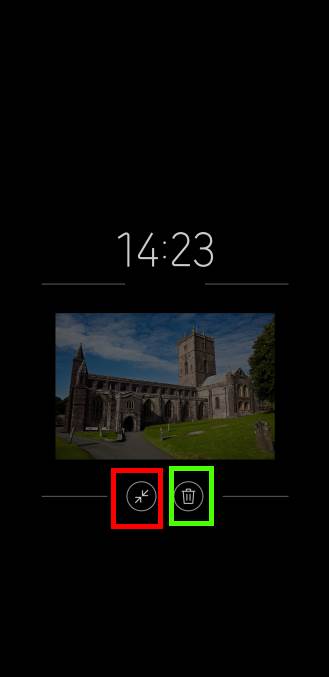
As shown below, when the pinned photo is shown, in addition to the time and the photo, there are two buttons below the picture.

  • The minimizing button (highlighted in red rectangle) allows you to minimize the photo and switch to the standard Galaxy S9 AOD screen.
  • The recycle bin button(highlighted in the green rectangle)  allows you to unpin the picture from the always-on display screen.

Please note, you need to tap the button twice (double tap) to activate the function.

For example, you double tap the minimizing button as shown below to hide the pinned photo temporally.

pin pictures to Galaxy S9 always-on display (AOD) on Galaxy S9 and S9+ pin pictures to Galaxy S9 always-on display (AOD) on Galaxy S9 and S9+

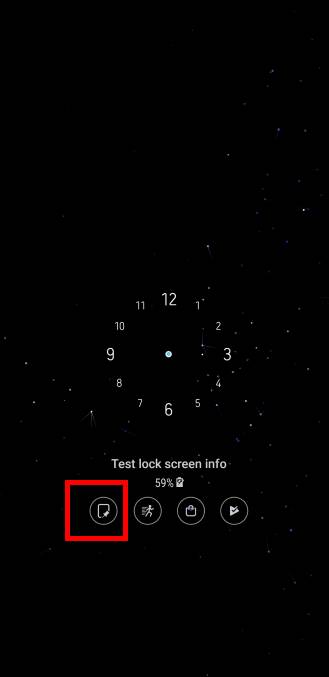
As shown above, you can find that it switches to the standard Galaxy S9 always-on display screen.

But there is one additional button in front of notification buttons.  If you double tap the button, you will switch back to the pinned picture as shown earlier.

Besides the always-on display screen, you can also show photos on Galaxy S9 Home screen as well. You can choose multiple photos or albums to show on the home screen as a full-page widget. You may check this guide if you want to show photos on Galaxy S9 home screen.

How to use AOD themes for Galaxy S9 always-on display (AOD) on Galaxy S9 and S9+?

Some Galaxy S9 themes include their own AOD themes. When you install a third-party theme for Galaxy S9 or S9+, you will automatically install the AOD theme included in that S9 theme.

You can also just download AOD themes for the always on display without changing your current S9 theme.

As shown below, in Galaxy themes, you can switch to the AOD themes section by tapping the AODs button.

use AOD themes for Galaxy S9 always-on display (AOD) on Galaxy S9 and S9+ use AOD themes for Galaxy S9 always-on display (AOD) on Galaxy S9 and S9+

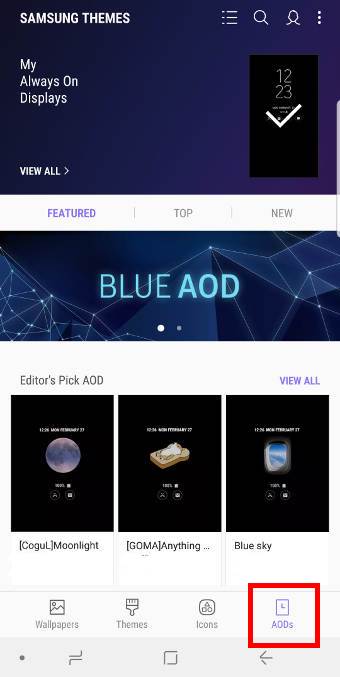
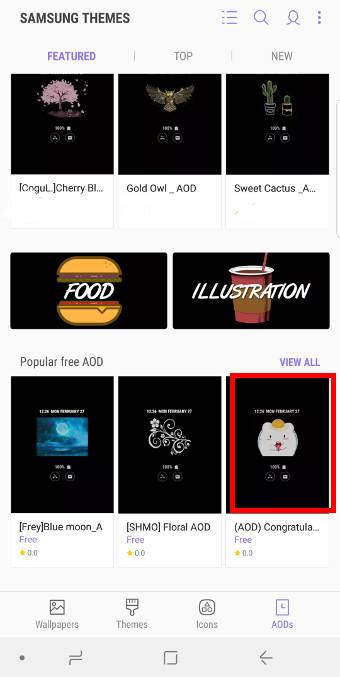
In AOD themes page, you can check paid and free AOD themes as shown above.

If you find an AOD theme you like, tap it to see its details.

You can tap Download as shown below to install it to your Galaxy S9 or S9+.

use AOD themes for Galaxy S9 always-on display (AOD) on Galaxy S9 and S9+ use AOD themes for Galaxy S9 always-on display (AOD) on Galaxy S9 and S9+

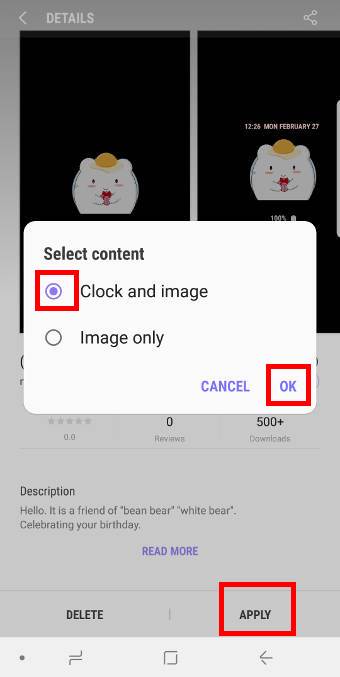
After the AOD theme is downloaded, you can tap Apply as shown above to use the new AOD theme to replace the current one.

Some AOD themes may ask whether you want to use clock and image or use image only.

In this case, you need to choose one, then tap OK to apply the new AOD theme for Galaxy S9 always-on display screen.

The new Display mode for Galaxy S9 always-on display (AOD) screen in Android Pie update for Galaxy S9 and S9+

After updating Galaxy S9 or S9+ to Android Pie, you may find the always-on display screen will be turned off automatically after 30 seconds. If you tap the screen, the always-on display appears again for about 30 seconds.

This is caused by the new display mode for the always-on display (AOD) on Galaxy S9 and S9+ in the Android Pie update.

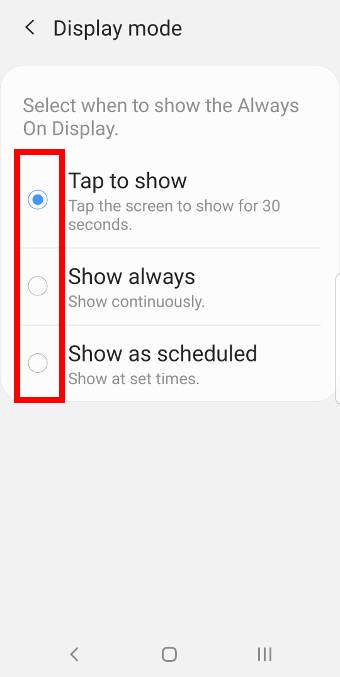
Now, there are 3 display modes of Galaxy S9 always-on display as shown below:

  • Tap to show.
  • Show always.
  • Show as scheduled.

And the default is tap to show, which is new. So, the AOD screen will be turned off after about 30 seconds. You need to tap it to show it again for another 30 seconds.

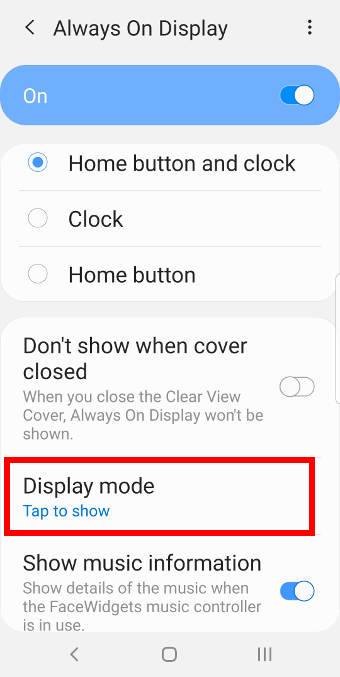
Of course, you can change the display mode of always-on display to Show always or Show as scheduled in Settings —Lock screen — Always On Display (AOD) —Display mode, as shown below.

Please do not confuse the tap to show with the lift to wake feature in the Android Pie update.

The new Display mode of Galaxy S9 always-on display (AOD) in Android Pie update for Galaxy S9 and S9+ The new Display mode of Galaxy S9 always-on display (AOD) in Android Pie update for Galaxy S9 and S9+

Besides tap to show (display mode) for the always-on display (AOD) and the lift to to wake feature, there are also many other new features in Android Pie update for Galaxy S9and S9, for example, navigation gestures, lockdown mode, night mode, screen orientation lock (rotation toggle), new Recents screen, lock Galaxy S9 Home screen layout, floating keyboard, remap the Bixby button, Bixby quick commands, and the updated camera app.

You may check the top 9 new features in Android Pie update for Galaxy S9 and S9+. The list of detailed how-to guides for these new Android Pie features can be found here.

Why can I not customize Galaxy S9 always-on display (AOD) on Galaxy S9 and S9+ when I use the clear view cover?

If you are using a Galaxy S9 clear view (S View) cover, the AOD screen will revert to the default digital clock only. FaceWidgets, notification icons and all customization will not be activated after you close the cover.

It is designed to work in this way.

If the cover is not closed, normal Galaxy S9 always-on display will be activated with full features and customization.

Frequently asked questions on Galaxy S9 always-on display (AOD) on Galaxy S9 and S9+

1. AOD screen is not responding.

You need to double tap on the AOD screen to use AOD features.

2. AOD drains the battery.

It is normal. In a 24-hour period, AOD may drain about 2-5% additional battery.

3. I do not have the option to use pictures in the clock face.

You need to install an AOD theme with pictures first.

4. I cannot pin a video to the Galaxy S9 AOD screen.

The length of the video should be less than 15s. You also need to make sure your Gallery app can play the video.

Do you know how to use Galaxy S9 always-on display (AOD) on Galaxy S9 and S9+now? Can you customize AOD for Galaxy S9 and S9+?

If you have any questions on Galaxy S9 always-on display (AOD) on Galaxy S9 and S9+,  please let us know them in the comment box below.

The community will help you find the answer.

For the user guide for new features of Samsung Galaxy S9 and S9+, please check Galaxy S9 new features guides page.

For using Galaxy S9 and S9+, please check Galaxy S9 how-to guides page.

For using Galaxy S9 camera, please check Galaxy S9 camera guides page.

For accessories for Galaxy S9 and S9+, please check Galaxy S9 accessories guides page.

For the official Samsung Galaxy S9 and S9+ user guides (in PDF format), please check Galaxy S9 user guides page.

You may also contact us through our Facebook page.

Share this:

  • Click to share on Twitter (Opens in new window)
  • Click to share on Facebook (Opens in new window)

Filed Under: Galaxy S9 Guides Tagged With: Android Pie, Android Pie update guide, AOD, Bixby button, Bixby quick command, Bixby voice, clock style, display mode, facewidgets, Galaxy S9 always-on display, Galaxy S9 camera app, Galaxy S9 clear view cover, Galaxy S9 clear view standing cover, Galaxy S9 Home button, Galaxy S9 lock screen, Galaxy S9 settings, Galaxy S9 themes, Galaxy S9 touch screen gesture, lift to wake, lockdown mode, navigation gestures, night mode, quick setting buttons, Recents screen, remap Bixby button, rotation toggle, Samsung keyboard floating mode, tap to show, wallpapers

Reader Interactions

Leave a Reply Cancel reply

Your email address will not be published. Required fields are marked *

Primary Sidebar

RSS Samsung Galaxy S21 Guides

  • Top 12 new features in Android 12 update for Galaxy S21, S20 and S10
  • Android 12 update vs One UI 4.0 vs One UI 4.1: update Galaxy S21, S20 and S10 to Android 12
  • How to set and resize photo size on Samsung Galaxy S21, S20, S10, and S9 without using any third-party apps?
  • How to Customize Galaxy S21 Home Screen?
  • Master Galaxy S21 Lock Screen Settings
  • How to use widgets on Galaxy S21?
  • How to Use and Customize Galaxy S21 Side Key?
  • How to hide Galaxy S21 password and PIN when typing?
  • How to power on, power off, and reboot Galaxy S21,even when the phone hangs?
  • How to use Galaxy S21 quick settings panel?

RSS Galaxy S20 Guides

  • How to Use Enhanced Processing on Galaxy S20 with Android 11 update?
  • How to access, use, and customise widgets on Galaxy S20 lock screen and AOD screen with Android 11 update for Galaxy S20?
  • How to update Galaxy S20 to Android 11?
  • How to use Galaxy S20 lockdown mode?
  • Top 11 new features in Galaxy S20 Android 11 update
  • How to use Galaxy S20 recovery mode?
  • How to use 5 different shooting methods for Galaxy S20 camera?
  • How to use and customize power mode on Galaxy S20?
  • A Complete Guide Of Galaxy S20 Assistant Menu

RSS Galaxy Note Guides

  • Top 11 disappointments of Galaxy Note 20 and Galaxy Note 20 Ultra
  • How to use the Dynamic Lock screen on Galaxy Note 10?
  • Galaxy Note 10 LED View Cover Guide and Review
  • Install S Note app and Extension pack on Galaxy Note 10
  • How to Use Galaxy Note 10 Camera App?
  • Galaxy Note 10 SIM Card Guide
  • How to use Samsung DeX for PC with Galaxy Note 10 and Galaxy Note 10+?
  • How to use Galaxy Note 10 Clear View cover (S View cover)?
  • How to charge Galaxy Note 10 battery?
  • How to use and remap Galaxy Note 10 Side key?

RSS Drive In Singapore

  • Top 5 rules of driving in Singapore safely and legally during COVID-19 Circuit Breaker period
  • Understand COE Price by 10 Simple Questions
  • How to convert a foreign driving license to a Singapore driving license?
  • How to get a Touch ‘n Go card as a Singapore driver?
  • What is covered in the car warranty in Singapore? What is not?
  • What is the Singapore Road Speed Limit?
  • How to register, collect and use Malaysia Vehicle Entry Permit (VEP)?
  • Why are cars in Singapore are so expensive?
  • Drive to Malaysia
  • Car Maintenance and Servicing in Singapore

RSS Moto G Guides

  • Moto G8 vs Moto G8 Power vs Moto G8 Power Lite vs Moto G Power vs Moto G Stylus vs Moto G Pro vs Moto G fast: What are the differences?
  • Moto G8 User Manual for Moto G8 Plus and Moto G8 Play
  • Moto G8 Plus vs Moto G8 Play: Differences and common features
  • Official Moto G7 user manual

RSS Chromecast Guides

  • How to use Chromecast to stream music to dumb speakers (as Chromecast Audio does)?
  • How to play games on Chromecast from mobile devices (Android and iOS)?
  • How to use the new Chromecast app?
  • What’s new in the new Chromecast (Chromecast 2015)

RSS Headphone Guide Pro

  • AirPods Pro 2 New features explained
  • What is Samsung Seamless Codec? 4 things you should know about this new codec
  • How to use widgets to check battery levels and control Galaxy Buds 2, Galaxy Buds Pro, Galaxy Buds Live, Galaxy Buds+, and Galaxy Buds?
  • AirPods 3 vs AirPods Pro: which one should you choose?
  • AirPods 3 vs AirPods 2: Top 8 improvements and new features of AirPods 3

© 2015–2023 · GadgetGuideOnline.com is an online community for Gadget Owners! · Hosted by PTRHosting
· Powered by Genesis framework for WordPress

Samsung Galaxy S9 how-to guides, user manuals and tutorials! Everything about Samsung Galaxy S9 and Galaxy S9+.
Disclaimer: Samsung, Galaxy, Galaxy S9, and Galaxy S9+ are trademarks of Samsung. Android is a trademark of Google. This website is NOT affiliated with Samsung or Google in any way. All the information provided on this website is provided on an "as is" and "as available" basis and you agree that you use such information entirely at your own risk.