• Skip to primary navigation
  • Skip to main content
  • Skip to primary sidebar

Galaxy S9 Guides

a community for owners of Samsung Galaxy S9 and S9+

  • Home
    • About Galaxy S9 Guides
    • Contact Us
  • How-to Guides
    • Galaxy S9 Android Pie update guides
      • Official user manuals for Galaxy S9 and S9 Plus with Android Pie update
      • Top 9 new features of Android Pie update for Galaxy S9 and S9+
      • How to use the new navigation gestures in Android Pie update for Galaxy S9 and S9+?
      • How to use the lockdown mode on Galaxy S9 and S9+ with Android Pie update?
      • How to use the night mode on Galaxy S9 and S9+ with Android Pie update?
      • How to remap Bixby button on Galaxy S9 and S9+ after updating to Android Pie?
      • How to use Bixby quick commands on Galaxy S9, S9+, S8, S8+, Note 8, and Note 9 with the Android Pie update?
      • How to update Galaxy S9 or S9 Plus to Android Pie (Android 9)?
      • How to use the lift to wake feature on Galaxy S9 and S9+ with Android Pie update?
      • How to use the new Recents screen in Android Pie update for Galaxy S9 and S9 Plus?
      • How to use the floating keyboard on Galaxy S9 and S9+ with Android Pie update?
      • How to lock Galaxy S9 home screen layout on Galaxy S9 and S9+ with Android Pie update?
      • How to use the rotation toggle to change and lock screen orientation in Android Pie update for Galaxy S9 and S9 Plus?
      • How to use the updated camera app in Android Pie update for Galaxy S9 and S9 Plus?
    • Meaning of Galaxy S9 status icons and notification icons in Samsung Galaxy S9 and S9+
      • How to use Samsung DeX with Galaxy S9 and S9+ and other Samsung phones?
      • How to use Multi Window on Galaxy S9 and S9+?
      • How to use app pair on Galaxy S9 and S9+?
      • Samsung DeX Station vs Samsung DeX Pad vs Samsung DeX cable
      • How to use Samsung DeX Station for Galaxy S9, S9+, S8, S8+, Note 8 and Note 9?
      • How to use Samsung DeX Pad for Galaxy S9, S9+, S8, S8+, Note 8 and Note 9?
      • How to use a USB flash drive on Galaxy S9 and S9+?
    • How to charge Galaxy S9 battery?
    • Galaxy S9 SIM card guide
      • How to use two SIM cards on Galaxy S9, S10, and S20?
      • How to use Galaxy S9 dual messenger to run two accounts of messenger apps simultaneously on Galaxy S9 and S9+?
      • How to use micro SD card on Galaxy S9 and S9+?
      • How to back up Galaxy S9 and S9+?
      • How to use smart switch to transfer and migrate data to Galaxy S9 or S9+?
      • How to reset Galaxy S9 and S9+? What is Galaxy S9 factory data reset?
    • How to disable Bixby button in Galaxy S9 and S9+?
      • How to remove Bixby Home from Galaxy S9 Home screen?
    • Understand and Use Galaxy S9 Home screen
      • How to use Galaxy S9 edge screen on Galaxy S9 and S9+?
      • How to show photos on Galaxy S9 Home screen?
      • How to pin files to Galaxy S9 Home screen (add file shortcuts to Galaxy S9 Home screen)?
      • How to use Galaxy S9 Apps screen on Galaxy S9 and S9+?
      • How to use Galaxy S9 Home screen edit mode to customize Galaxy S9 Home screen?
      • How to use Galaxy S9 home screen landscape mode?
      • How to hide Galaxy S9 apps screen and how to hide Galaxy Apps button?
      • How to use and customize Galaxy S9 navigation bar and navigation buttons?
      • How to manage Galaxy S9 Home screen panels on Galaxy S9 and S9+?
    • How to use and customize Galaxy S9 lock screen?
      • How to use Galaxy S9 always-on display (AOD) on Galaxy S9 and S9+?
    • How to use Galaxy S9 notification panel on Galaxy S9 and S9+?
      • How to use Do Not Disturb on Galaxy S9 and S9+?
      • Understand and use Galaxy S9 notification number badge (notification dots, app icon badge)
      • How to use quick setting buttons on Galaxy S9 and S9+?
      • How to use quick-open notification panel on Galaxy S9 and S9+ to check notifications?
    • Galaxy S9 layout (and layout of Galaxy S9+)
      • How to use adapt sound on Galaxy S9 and S9+?
      • 5 ways to take screenshots on Galaxy S9 and S9+ without using any apps
      • How to use Galaxy S9 touchscreen gestures?
      • How to use wireless printing on Galaxy S9 and S9+?
      • How to use Galaxy S9 themes to customize the look and feel of Galaxy S9 and S9+?
      • Unbox Galaxy S9: understand package contents in Galaxy S9 box and S9+ box
    • How to reboot into Galaxy S9 recovery mode and to clear Galaxy S9 cache partition on Galaxy S9 and S9+?
      • How to reboot Galaxy S9 and S9+ if Galaxy S9 hangs?
      • How to use Galaxy S9 safe mode on Galaxy S9 and S9+?
    • How to use Galaxy S9 camera app?
      • 6 ways to start Galaxy S9 camera app in Galaxy S9 and S9+
      • Understanding and use Galaxy S9 camera settings
      • How to use super slow motion mode (super Slow-mo) on Galaxy S9 and S9+?
      • How to use Galaxy S9 camera Pro Mode on Galaxy S9 and S9+?
  • New features
    • Top 9 new features of Android Pie update for Galaxy S9 and S9+
      • How to use the lockdown mode on Galaxy S9 and S9+ with Android Pie update?
      • How to use the new navigation gestures in Android Pie update for Galaxy S9 and S9+?
      • How to use the night mode on Galaxy S9 and S9+ with Android Pie update?
      • How to remap Bixby button on Galaxy S9 and S9+ after updating to Android Pie?
      • How to update Galaxy S9 or S9 Plus to Android Pie (Android 9)?
      • How to use the lift to wake feature on Galaxy S9 and S9+ with Android Pie update?
      • How to use the new Recents screen in Android Pie update for Galaxy S9 and S9 Plus?
      • How to use the floating keyboard on Galaxy S9 and S9+ with Android Pie update?
      • How to lock Galaxy S9 home screen layout on Galaxy S9 and S9+ with Android Pie update?
      • How to use the rotation toggle to change and lock screen orientation in Android Pie update for Galaxy S9 and S9 Plus?
      • How to use the updated camera app in Android Pie update for Galaxy S9 and S9 Plus?
      • How to use Bixby quick commands on Galaxy S9, S9+, S8, S8+, Note 8, and Note 9 with the Android Pie update?
    • Top 10 new features of Samsung Galaxy S9 and Galaxy S9+
    • How to remove Bixby Home from Galaxy S9 Home screen?
    • How to use and customize Galaxy S9 navigation bar and navigation buttons?
    • How to use super slow motion mode (super Slow-mo) on Galaxy S9 and S9+?
    • Understand and use Galaxy S9 notification number badge (notification dots, app icon badge)
    • How to use Samsung DeX Pad for Galaxy S9, S9+, S8, S8+, Note 8 and Note 9?
    • How to use Galaxy S9 home screen landscape mode?
    • Understanding and use Galaxy S9 camera settings
    • How to use dual aperture to manually switch Galaxy S9 camera aperture in Pro mode?
    • Galaxy S9 layout (and layout of Galaxy S9+)
    • How to use app pair on Galaxy S9 and S9+?
  • Camera
    • How to use Galaxy S9 camera app?
    • How to use the updated camera app in Android Pie update for Galaxy S9 and S9 Plus?
    • Understanding and use Galaxy S9 camera settings
    • 6 ways to start Galaxy S9 camera app in Galaxy S9 and S9+
    • How to use dual aperture to manually switch Galaxy S9 camera aperture in Pro mode?
    • How to use super slow motion mode (super Slow-mo) on Galaxy S9 and S9+?
    • How to use Galaxy S9 camera Pro Mode on Galaxy S9 and S9+?
    • How to show photos on Galaxy S9 Home screen?
  • Official User Guides
    • Official user manuals for Galaxy S9 and S9 Plus with Android Pie update
    • Official Samsung Galaxy S9 user guides (Oreo)
  • Accessories
    • How to use Samsung Galaxy S9 clear view standing cover (S-view cover)?
    • Samsung Galaxy S9 LED wallet cover guide
    • How to use micro SD card on Galaxy S9 and S9+?
    • How to use Samsung DeX with Galaxy S9 and S9+ and other Samsung phones?
      • Samsung DeX Station vs Samsung DeX Pad vs Samsung DeX cable
      • How to use Samsung DeX Station for Galaxy S9, S9+, S8, S8+, Note 8 and Note 9?
      • How to use Samsung DeX Pad for Galaxy S9, S9+, S8, S8+, Note 8 and Note 9?
      • How to use a USB flash drive on Galaxy S9 and S9+?

Bixby button

How to use Bixby quick commands on Galaxy S9, S9+, S8, S8+, Note 8, and Note 9 with the Android Pie update?

simon · Leave a Comment

use Bixby quick commandsBixby quick commands allow you to use your own phrases to execute a set of commands (tasks) defined by you. No other voice assistant systems have this feature yet.

You can execute Bixby quick commands using voice, or just tap an icon on the home screen without using your voice.

This Galaxy S9 Android Pie update explains everything you need to know about Bixby quick commands and shows you how to create, modify and use Bixby quick commands on Galaxy S9 and S9+.

The Bixby quick commands feature are also available on all Galaxy phones with Android Pie update. So, this guide also applies to Galaxy S8, S8+, Note 8, Note 9, and S10 (all 4 S10 models).

What are Bixby quick commands on Galaxy S9, S9+, S8, S8+, Note 8, and Note 9 with the Android Pie update?

In a nutshell, a Bixby quick command lets you encapsulate multiple commands in one simple phrase you choose. Once created, you can use the simple phrase (which becomes one of your Bixby quick commands) to execute all commands encapsulated in sequence (as you defined).

You can also make a long command shorter with a Bixby quick command.

In fact, this is NOT a new feature in Android Pie update.  The feature is available before the Android Pie update. But it was buried deep in My Bixby. So, many Bixby users are not aware of the feature.

In the Android Pie update for Galaxy phones, in addition to allowing you to remap the Bixby button, Samsung made the Bixby quick commands feature more prominent and improved it significantly.

For example, after the February update, you can even add any of the Bixby quick commands to the Home screen and use it without using your voice. You can use it just like using an app.

Another improvement of the Bixby quick commands feature in the Android Pie update is that some examples were added.  You can add them to your Bixby quick commands directly, or modify them as a template to create your own quick commands.

How to create, modify, and manage your Bixby quick commands on Galaxy S9, S9+, S8, S8+, Note 8, and Note 9 with the Android Pie update?

Bixby quick commands are tied to your Samsung account. By default, there are no quick commands in your account.

So, you have to create your quick commands … Read the rest
Filed Under: Galaxy S9 New Features Tagged With: Android Pie, Android Pie update guide, Bixby, Bixby button, Bixby Home, Bixby quick command, Bixby vision, Bixby voice, Galaxy Note 8, Galaxy Note 9, Galaxy S10, Galaxy S8, Galaxy S9 home screen

How to remap Bixby button on Galaxy S9 and S9+ after updating to Android Pie?

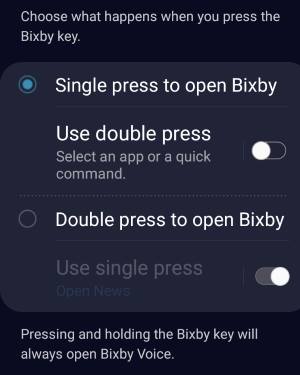
You can now map the single or double press gesture of the Bixby key to a third-party app or a quick command.

simon · Leave a Comment

How to remap Bixby button on Galaxy S9 and S9+ after updating to Android Pie?After the February update of Bixby (version 2.1.04.18), you can now remap Bixby button to an app or a Bixby quick command.

This Galaxy S9 Android Pie update guide explains the new features of Bixby in Android Pie update, and how to remap the Bixby button to other apps or a quick command.

New gestures for the Bixby button on Galaxy S9 and S9+ after updating to Android Pie

Traditionally, the Bixby button in Galaxy S9, S9+, S8, S8+, Note 8, and Note 9 only supports one gesture: press.

You can choose to press to open Bixby (Bixby Home), or do nothing (this essentially disables the Bixby button).  Of course, you cannot remap the press gesture to anything else, or disable Bixby in your phone.

In Android Pie update for Galaxy S19, S9+, Note 9, Note 8, S8, and S8+, Bixby was updated to a new version with new gestures for the Bixby button. Now, the Bixby button supports 3 gestures:

  1. Single press.
  2. Double press.
  3. Long press.

The long press is reserved for Bixby Voice command.  You cannot change it.  When you long press the Bixby button, you can continue with voice commands immediately.

The single press OR the double press MUST be assigned to Bixby Voice page.  For example, if you assign the single press to Bixby Voice, then you can customize (remap) the double press to something else.

Please note, Bixby Voice page, which is different from Bixby Home,  is new in Galaxy S9 Android Pie update. Bixby Home still exists in Galaxy S9 Home screen, and you can still hide it if you want.

Major changes of Bixby in Android Pie update for Galaxy S9, S9+, S8, S8+, Note 8, and Note 9

In Android Pie update for Galaxy S9, S9+, S8, S8+, Note 8, and Note 9, Bixby Service, Bixby Voice, and Bixby Vision, were bumped to version 2.1.x, and Bixby Home to version 3.x.

The major changes of Bixby in the Android Pie update include:

  • New gestures for the Bixby button. Remapping the Bixby button to third-party apps was added in February update of Bixby.
  • New Bixby quick commands.
  • New Bixby Vision integration in the new camera app.
  • New Bixby Voice page (showing tips, features, and suggestions for Bixby Voice, and accessing Bixby Voice settings).

You can update Bixby in Galaxy Store.

How to remap Bixby button on

… Read the rest

Filed Under: Galaxy S9 Guides, Galaxy S9 New Features Tagged With: Android Pie, Android Pie update guide, Bixby, Bixby button, Bixby Home, Bixby quick command, Bixby vision, Bixby voice, Galaxy S9 layout, remap Bixby button

How to use Do Not Disturb on Galaxy S9 and S9+?

simon · 4 Comments

use Do Not Disturb on Galaxy S9 and S9+You can use Galaxy S9 Do Not Disturb (DND) to keep you undisturbed by any apps.

You can also allow selected apps or specific contacts to reach you when the Do Not Disturb on Galaxy S9 or S9+ is activated.

This Galaxy S9 guide shows you how to turn on/off and schedule Galaxy S9 Do Not Disturb (DND) and how to manage exceptions for the DND on Galaxy S9 and S9+. App rules and Do Not Disturb access were also discussed.

What is Do Not Disturb on Galaxy S9 and S9+?

In some situations, you may want not to get disturbed by the phone. Do Not Disturb on Galaxy S9 or S9+ was designed to help you escape from annoying notifications and sounds.

With DND on Galaxy S9 or S9+, you can silence the phone during a scheduled period, or at any time you need it. You can also allow certain apps or certain contacts to bypass the Galaxy S9 Do Not Disturb settings.

Google introduced Do Not Disturb (DND) in Android Marshmallow (Android 6.0). It is an extension of Downtime introduced in Android Lollipop (Android 5.0).

As usual, Samsung tweaked the Do Not Disturb on Galaxy S9 and S9+. Therefore, the Do Not Disturb on Galaxy S9 and S9+ may not work as in stock Android, or other Android phones.

How to enable and disable Do Not Disturb on Galaxy S9 and S9+?

By default, Galaxy S9 Do Not Disturb (DnD) is off. You need to enable it if you want to use it.

There are a couple of ways to turn on and turn off Do Not Disturb on Galaxy S9 and S9+. Here let’s try two of them.

Method 1: Use quick setting buttons

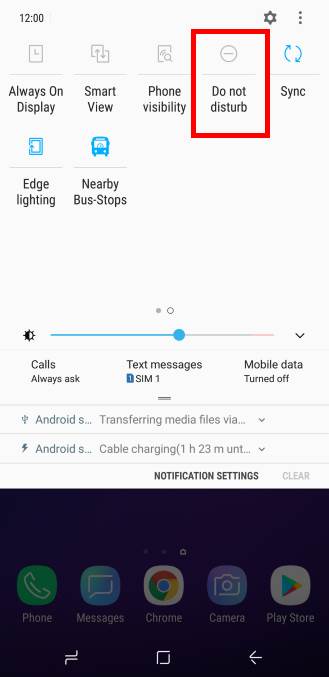
In quick setting buttons, you can find the Do Not Disturb button as shown in the screenshot below.

You may check this guide on how to use Galaxy S9 quick setting buttons.

Tap the button to enable (if currently off) or disable (if currently on) Galaxy S9 Do Not Disturb.

If you tap and hold (long tap) the button, you will get the settings page for Do Not Disturb.

enable and disable Do Not Disturb on Galaxy S9 and S9+ enable and disable Do Not Disturb on Galaxy S9 and S9+

Method 2:  Use Galaxy S9 Settings

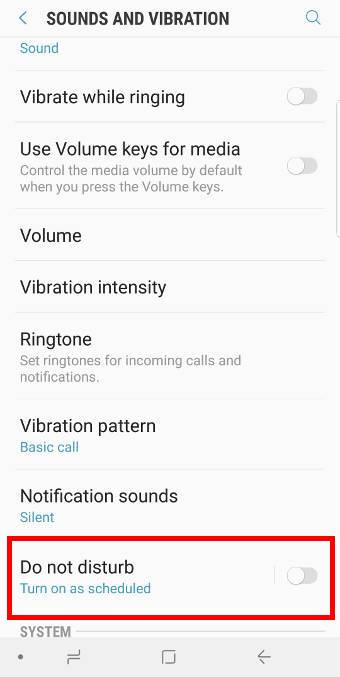
The traditional (not so efficient) way to turn on DND on Galaxy S9 is through Settings — Sounds and Vibration.

As shown above, in the sounds and vibration page, you can use the switch to turn … Read the rest

Filed Under: Galaxy S9 Guides Tagged With: app permission, application manager, Bixby button, Bixby voice, DND, do not distrurb, Galaxy S9 Do Not Disturb, Galaxy S9 notification panel, Galaxy S9 notifications, Galaxy S9 touch screen gesture, notification channel, quick setting buttons

How to use Galaxy S9 always-on display (AOD) on Galaxy S9 and S9+?

simon · Leave a Comment

Galaxy S9 always-on display (AOD) on Galaxy S9 and S9+Galaxy S9 always-on display (AOD) is an extension of the lock screen. You can choose to display some useful info after the lock screen times out.

Update: a new section explaining the changes of Galaxy S9 always-on display (AOD) in Android Pie update for Galaxy S9 and S9+ was added. The new display mode (tap to show) was added.

This Galaxy S9 how-to guide explains everything you need to know about Galaxy S9 always-on display (AOD) on Galaxy S9 and S9+: how to turn on/off the AOD, how to use and customize Galaxy S9 AOD screen, how to customize clock style for AOD screen, how to pin photos to Galaxy S9 AD screen, and how to use AOD themes.

What is Galaxy S9 always-on display (AOD) on Galaxy S9 and S9+?

Traditionally, the phone screen will be turned off after you lock the screen, or if the screen times out.

But more and more smartphone owners use the phone to check time. Some Android phone manufacturers came out the idea of the always-on display (AOD), which shows selected info after the screen times out.

Samsung first introduced the always-on display on Galaxy S7 and S7  Edge.  Galaxy S9 always-on display (AOD) offers an evolutionary update for this feature.

Besides the clock, notification icons, music control, next calendar event and next alarm can also be shown on the Galaxy S9 AOD screen.

Compared to Galaxy S9 lock screen, Galaxy S9 always-on display (AOD) on Galaxy S9 and S9+ does NOT offer the following features:

  • App shortcuts in the bottom.
  • Notification preview.
  • Quick setting buttons.

You can consider Galaxy S9 always-on display (AOD) is a slimmed-down version or an extension of the lock screen.

How to turn on/turn off Galaxy S9 always-on display (AOD) on Galaxy S9 and S9+?

By default, in some regions, Galaxy S9 always-on display (AOD) is turned off on Galaxy S9 and S9+. In other markets, it is on.

Anyway, you can easily turn on or turn off Galaxy S9 always-on display (AOD) whenever you want.

And there are at least 3 different methods to turn on and turn off AOD on Galaxy S9 and S9+.

Method 1: Use quick setting buttons to turn on/turn off Galaxy S9 always-on display (AOD) on Galaxy S9 and S9+

By default, Always-on display button is included in Galaxy S9 quick setting buttons as shown in the … Read the rest

Filed Under: Galaxy S9 Guides Tagged With: Android Pie, Android Pie update guide, AOD, Bixby button, Bixby quick command, Bixby voice, clock style, display mode, facewidgets, Galaxy S9 always-on display, Galaxy S9 camera app, Galaxy S9 clear view cover, Galaxy S9 clear view standing cover, Galaxy S9 Home button, Galaxy S9 lock screen, Galaxy S9 settings, Galaxy S9 themes, Galaxy S9 touch screen gesture, lift to wake, lockdown mode, navigation gestures, night mode, quick setting buttons, Recents screen, remap Bixby button, rotation toggle, Samsung keyboard floating mode, tap to show, wallpapers

5 ways to take screenshots on Galaxy S9 and S9+ without using any apps

simon · 4 Comments

There are at least 5 methods to take screenshots on Galaxy S9 and S9+ without using any apps:  hardware buttons (power+volume down), palm swipe, the assistant menu, Bixby voice command and Google Assistant.

This Galaxy S9 how-to guide explains to you how to use them and how to use scroll capture to take screenshots on Galaxy S9 and S9+

Why do you need to take screenshots on Galaxy S9 and S9+?

Sometimes, you may need to keep a record of a conversation, to share a webpage, to show some locations on Google maps to others, or to record some transactions when you are using the Galaxy S9 or S9+.

A screenshot is the easiest and the most effective way to keep info and pieces of evidence. The image saved can be read on almost any devices.

Although you can edit them after you take screenshots on Galaxy S9 and S9+, most people give more trust in screenshots than the text you typed.

Sometimes, if you want to report a problem of an app, or request technical services, you may be asked to take some screenshots so that the technical staffs can understand the problem quickly.

How to take screenshots on Galaxy S9 and S9+ without using any apps (and without using your PC)?

There are at least 5 ways to take screenshots on Galaxy S9 and S9+ without using any apps:

  1. Using hardware buttons (volume down + power button).
  2. Palm swipe.
  3. Using the Assistant menu.
  4. Using Bixby voice command.
  5. Using Google Assistant.

This guide will show you the details of these 5 methods in the following sections individually.

Method 1: use hardware buttons to take screenshots on Galaxy S9 and S9+

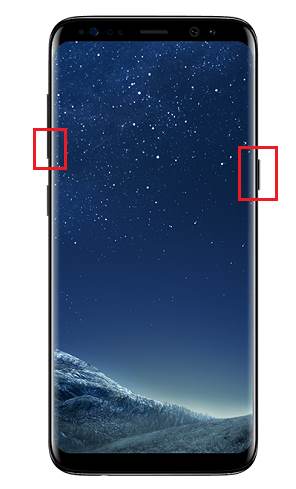
You can take a screenshot on Galaxy S9 and S9+ by pressing the holding  Power button and Volume down button simultaneously, as illustrated below. You should hear a click /shutter sound once screenshot is taken.

use hardware buttons to take screenshots on Galaxy S9 and S9+

This method works on almost all Android phones.

In old Samsung phones with a physical Home button, the physical home button was used with the power button to take screenshots. But this does NOT work on Galaxy S9 and S9+ because the Home button on S9 and S9+ is considered as a software-based button.

The key point of using physical buttons to take screenshots is to press the two buttons simultaneously.

As a human, we always press one button earlier than … Read the rest

Filed Under: Galaxy S9 Guides Tagged With: Assistant menu, Bixby button, Bixby voice, Galaxy S9 layout, Galaxy S9 navigation bar, Galaxy S9 status bar, Galaxy S9 touch screen gesture, Google Assistant, palm swipe, quick setting buttons, screenshot, scroll capture, voice command

How to use Galaxy S9 touchscreen gestures?

Seven Galaxy S9 touchscreen gestures: tap, double tap (and triple-tap), long tap, swipe, drag, pinch and spread, are explained and illustrated.

simon · 2 Comments

use Galaxy S9 touchscreen gesturesYou have to use some Galaxy S9 touchscreen gestures if you want Galaxy S9 or S9+ to do anything for you.

Although most Galaxy S9 touchscreen gestures work on all other Android phones, you may not be aware of some gestures that help you use Galaxy S9 and S9+ effectively.

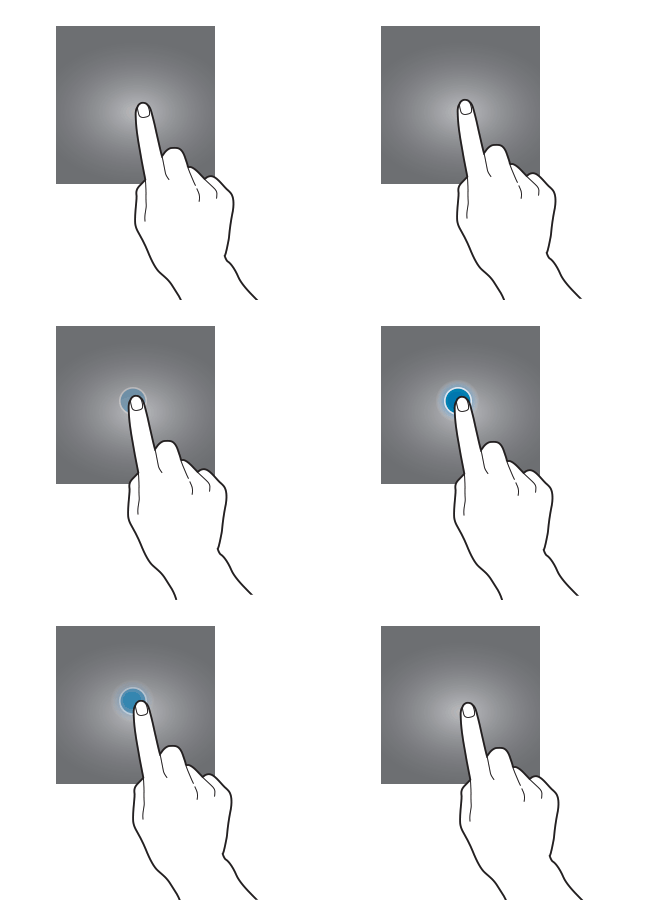
This Galaxy S9 how-to guide illustrates the 7 Galaxy S9 touchscreen gestures with animations, explains the features of these gestures and gives examples of using these gestures.

What are Galaxy S9 touchscreen gestures?

As Galaxy S9 and S9+ do not have a physical keyboard or other input devices, you have to interact with the phone either through the touchscreen or voice (e.g., Bixby or Google Assistant).

In addition to the on-screen keyboard or keypad, Galaxy S9 and S9+ also accept some touchscreen gestures.

When your finger(s) or other capacitive pens (please note S Pen on Galaxy Note devices does NOT work with Galaxy S9 or S9+ screen) move on the screen, Galaxy S9 and S9 can recognize certain patterns and therefore responds accordingly.

These moving patterns are usually referred to as Galaxy S9 touchscreen gestures.

So, understanding and correctly using Galaxy S9 touchscreen gestures are essential if you want to use the phone efficiently.

Similar to other Android phones, there is nothing special in Galaxy S9 touchscreen gestures.  These gestures can be used in almost all other Android phones.

Although most of Galaxy S9 touchscreen gestures are used on the screen, some can also be used on the physical buttons. e.g., the power button accepts press, double press and long press gestures.

List of  Galaxy S9 touchscreen gestures in Galaxy S9 and S9+

You can use the following 7 Galaxy S9 touchscreen gestures on Galaxy S9 and S9+ for various operations.

1. Tap gesture (press)

Tap is one of the most used Galaxy S9 touchscreen gestures.

As shown in the animation below, you need to tap an icon or a specific area to activate something, for example, to start an app, or to open a menu item.

The tap gesture actually mimics “click” of a mouse (e.g., when using Samsung DeX with Galaxy S9 or S9+).

Galaxy S9 touchscreen gestures: tap

Of course, the action or response of the tap gesture depends on what was tapped, or where you tapped.

Some example of using tap gesture includes:

  • You can open an app by tapping an app icon in Galaxy S9 home screen or 
… Read the rest

Filed Under: Galaxy S9 Guides Tagged With: app folders, Bixby button, double tap gesture, drag gesture, Galaxy S9 always-on display (AOD), Galaxy S9 camera quick launch, Galaxy S9 edge screen, Galaxy S9 Home button, Galaxy S9 home screen, Galaxy S9 layout, Galaxy S9 multiwindow, Galaxy S9 navigation bar, Galaxy S9 navigation button, Galaxy S9 notification panel, Galaxy S9 quick settings panel, Galaxy S9 status bar, Galaxy S9 status icon, Galaxy S9 touch screen gesture, long tap gesture, Multi Window, pin files to Galaxy S9 home screen, pinch gesture, power button, Samsung DeX, show photos on Galaxy S9 home screen, spread gesture, swipe gesture, tap gesture

How to disable Bixby button in Galaxy S9 and S9+?

You can disable both the press and long press gesture of Bixby button in Galaxy S9 and S9+ to disable Bixby button in Galaxy S9 and S9+.

simon · 19 Comments

disable Bixby button in Galaxy S9 and S9+Some Galaxy S9 and S9 owners are not excited about Samsung Bixby and the dedicated button.  They may want to disable Bixby button in Galaxy S9 and S9+.

You can easily disable Bixby button in Galaxy S9 and S9+ if you frequently pressed the button inadvertently, or if you do not want to use Bixby.

Update: After updating Galaxy S9 or S9+ to Android Pie, you cannot disable the Bixby button. Instead, you can remap the Bixby button to any third-party apps or any Bixby quick commands.

This Galaxy S9 guide explains the functions of Bixby button in Galaxy S9 and S9+, and shows you how to disable Bixby button in Galaxy S9 and S9+.

What is Bixby button? Why may you want to disable Bixby button in Galaxy S9 and S9+?

Since Galaxy S8 (and S8+), Samsung added a dedicated button for Bixby with the hope of boosting the usage of Samsung’s AI assistant.

As shown in Galaxy S9 and S9+ layout, Bixby button is located on the left side of the phone below the volume keys.

By default,

  • If you press the Bixby button on Galaxy S9 or S9+,  the phone will open Bixby Home.
  • If you long press (press and hold) the Bixby button, the phone will open Bixby Voice.

Samsung does not allow you to map the Bixby button on Galaxy S9 and S9+ to any other apps. It can only be used for Samsung Bixby unless you root the phone and mess up a few system settings.

Although Samsung Bixby has been dramatically improved since the initial release with Galaxy S8, in many aspects, it is still not comparable to Google Assistant, which can be enabled in Galaxy S9 or S9 by long tapping  (tap and hold) the Home button. Some Galaxy S9 and S9+ owners may not want to use Samsung’s Bixby at all. They are happy with Google Assistant.

Some other owners may do not use either Google Assistant or Bixby. But they may press the Bixby button accidentally when they want to press the volume button or the power button.

Even some Bixby users may not want to use the Bixby Home, which comes out when you press the Bixby button. You can use other Bixby features without the button.

So, there are sizeable Galaxy S9 and S9+ owners who may want to disable … Read the rest

Filed Under: Galaxy S9 Guides Tagged With: Android Pie, Android Pie update guide, Bixby, Bixby button, Bixby Home, Bixby quick command, Bixby vision, Bixby voice, Galaxy S9 home screen, galaxy S9 home screen edit mode, Galaxy S9 layout, Google Assistant, remap Bixby button

How to remove Bixby Home from Galaxy S9 Home screen?

You can hide the annoying Bixby Home panel in Galaxy S9 Home screen.

simon · 9 Comments

In the leftmost of Galaxy S9 Home screen, Samsung reserved it for the Bixby Home. But  Many Galaxy S9 and S9+ owners are not impressed with Bixby. They want to remove Bixby Home from Galaxy S9 Home screen.

By removing Bixby Home from Galaxy S9 Home screen, you would at least get a cleaner Galaxy S9 Home screen.

This Galaxy S9 guide explains how to remove Bixby Home from Galaxy S9 Home screen, and how to access Bixby Home when it is removed.

Why may you want to remove Bixby Home from Galaxy S9 Home screen?

Bixby Home is supposed to show you the most relevant info for you when you open it.  The info is pulled from both your data (e.g., calendar) and news feed based (e.g., Linkedin).

Such an informational page can be very useful when you are busy. You can just glimpse the Bixby Home to get informed quickly.

By default, there are at least two quick ways to access Bixby Home:

  1. Navigating to the leftmost panel of Galaxy S9 home screen.
  2. Pressing Bixby button once.

It is obvious that method 2 is faster and more intuitive to access Bixby Home, and therefore method 1 is redundant.  You may want to remove Bixby Home from Galaxy S9 Home screen to clean up Galaxy S9 home screen.

In addition,  some Galaxy S9 and S9+ owners are not fans of Samsung’s Bixby. Google Assistant, which is available on almost all Android phones now, in most cases can be a better job.

They may feel it is annoyed when they accidentally access the Bixby Home when they want to access the home panel of Galaxy S9 home screen.

Although it is almost impossible to disable Bixby in Galaxy S9 and S9+, it is easy to remove Bixby Home from Galaxy S9 Home screen.

You can also easily disable Bixby button in Galaxy S9 and S9+.

How to remove Bixby Home from Galaxy S9 Home screen?

As shown below, in Galaxy S9 and S9+, the leftmost panel in Galaxy S9 Home screen is reserved for Bixby Home.

The double-line icon (marked in the red rectangle) in the panel indicator (indicating panel you are in currently) suggests Bixby Home is active.

remove Bixby Home from Galaxy S9 Home screen

To remove Bixby Home from Galaxy S9 Home screen, you may follow these steps.

Step 1: Tap and hold (long tap) any empty space in Galaxy S9 Home

… Read the rest

Filed Under: Galaxy S9 Guides Tagged With: Bixby, Bixby button, Bixby Home, Galaxy S9 Home button, Galaxy S9 home screen, galaxy S9 home screen edit mode, Galaxy S9 layout

6 ways to start Galaxy S9 camera app in Galaxy S9 and S9+

simon · 2 Comments

Galaxy S9 and S9+ feature some significantly new camera features such as the dual-aperture lens, and super slow motion mode. As the first step of trying the new camera in Galaxy S9 and S9+, you need to start Galaxy S9 camera app first.

In addition to tapping the camera app icon, you can have several other ways to start Galaxy S9 camera app in S9 and S9+.

This Galaxy S9 camera guide shows you the six ways to open Galaxy S9 camera app in your Samsung Galaxy S9 and S9+.

#1. Use Galaxy S9 camera quick launch to start Galaxy S9 camera app

The fastest way to launch Galaxy S9 camera app is to use Galaxy S9 camera quick launch feature, which is enabled by default.

You can quickly press the power button twice to start Galaxy S9 camera app immediately.  Samsung named this as Galaxy S9 camera quick launch.

The good thing about Galaxy S9 camera quick launch is that it works at any times: when the screen is on or off, or when you are using any apps, or when the screen is locked or unlocked.

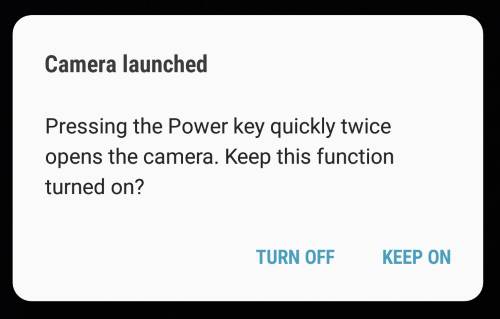
When you use the Galaxy S9 camera quick launch first time, it will remind you of this feature as shown below.

You can then keep it on or turn it off if you want.

If you want, you can enable or disable Galaxy S9 camera quick launch in Galaxy S9 camera settings.

Use Galaxy S9 camera quick launch to start Galaxy S9 camera app

#2. Use camera app shortcut on Galaxy S9 lock screen to start Galaxy S9 camera app.

By default, in Galaxy S9 lock screen as shown below, there are two app shortcuts on the left and right sides of the bottom.

One is the phone app for you to make emergency calls without unlocking the phone. And the other is the camera app as shown below.

Of course, you can use other apps to replace them in Settings — Lock screen and security — App shortcuts.

You can tap the camera app icon to open Galaxy S9 camera app without unlocking the screen.

If you launch Galaxy S9 camera app without unlocking the screen, you can only access photos taken in this session. You cannot access any other photos or pictures saved in the phone before the screen was locked.

This is a security feature, not a bug. For example, if someone gets your phone, he/she … Read the rest

Filed Under: Galaxy S9 Camera Guides, Galaxy S9 Guides Tagged With: Bixby, Bixby button, Bixby voice, Galaxy S9 apps screen, Galaxy S9 camera, Galaxy S9 camera app, Galaxy S9 camera quick launch, Galaxy S9 home screen, Galaxy S9 layout, Galaxy S9 lock screen, Google Assistant, power button, voice command

Galaxy S9 layout (and layout of Galaxy S9+)

get to know the layout of Galaxy S9 and S9+

simon · 8 Comments

To effectively use your new phone, you need to know and understand the Galaxy S9 layout and Galaxy S9+ layout.

Sometimes, common sense works; sometimes it may not.

This Galaxy S9 how-to guide explains the layout of Galaxy S9 and S9+, the difference between the Galaxy S9 layout and Galaxy S9+ layout, and the meaning of essential parts in the layouts of Galaxy S9 and S9+.

Why do you need to know Galaxy S9 layout and Galaxy S9+ layout?

Although Galaxy S9 and S9+ are not a revolutionary product, the layout of Galaxy S9 and S9+ is substantially different from Android phones from other Android manufacturers.

Even compared to Galaxy S8 and S8+ layout, there are a few changes in the Galaxy S9 layout and Galaxy S9+ layout.

You need to know and understand Galaxy S9 layout when you want to know the functions of all buttons in Galaxy S9 and S9+.

The Galaxy S9 and S9+ layout can also help you find the locations of some parts. For example, a few Galaxy S9 and S9+ owners accidentally inserted the SIM card ejection pin into the top microphone hole. They may spoil the microphone.  Had they known the layout of Galaxy S9 and S9+, they wouldn’t have made this mistake.

Besides,  it is also beneficial to know the location of antennas and wireless charging coils when using some Galaxy S9 accessories.

Anyway, before using your Galaxy S9 or Galaxy S9+, you should spend a few minutes to learn and understand the layout of S9 and S9+ even if you are a seasoned Samsung phone user.

The difference between Galaxy S9 layout and Galaxy S9+ layout

Unlike Galaxy S8 and S8+, which differ only in size, Galaxy S9 and S9+ have a few considerable differences in the hardware configuration.

Due to dual rear camera configuration in Galaxy S9+, the back of Galaxy S9+ layout is different from that of Galaxy S9.

The second rear camera is the only difference between Galaxy S9 layout and Galaxy S9+ layout.

Galaxy S9 and S9+ layout: front view

The front view of Galaxy S9 layout is illustrated in the picture below. The front view of Galaxy S9+ is identical except the screen size.

As shown below, you can find in the front of Galaxy S9 and S9+:

  • touchscreen;
  • edge screens;
  • front camera;
  • LED indicator;
  • top speaker (earpiece);
  • proximity/light sensor;
  • iris recognition camera;
… Read the rest

Filed Under: Galaxy S9 Guides, Galaxy S9 New Features Tagged With: Android Pie, Bixby button, charge Galaxy S9 battery, Galaxy S9 edge screen, Galaxy S9 Home button, Galaxy S9 home screen, Galaxy S9 layout, Galaxy S9 lock screen, Galaxy S9 navigation bar, Galaxy S9 navigation button, Galaxy S9 new features, Galaxy S9 recovery mode, lift to wake, lock Galaxy S9 home screen layout, lockdown mode, navigation gestures, night mode, power button, rotation toggle, SIM card ejection

Primary Sidebar

RSS Samsung Galaxy S21 Guides

  • Top 12 new features in Android 12 update for Galaxy S21, S20 and S10
  • Android 12 update vs One UI 4.0 vs One UI 4.1: update Galaxy S21, S20 and S10 to Android 12
  • How to set and resize photo size on Samsung Galaxy S21, S20, S10, and S9 without using any third-party apps?
  • How to Customize Galaxy S21 Home Screen?
  • Master Galaxy S21 Lock Screen Settings
  • How to use widgets on Galaxy S21?
  • How to Use and Customize Galaxy S21 Side Key?
  • How to hide Galaxy S21 password and PIN when typing?
  • How to power on, power off, and reboot Galaxy S21,even when the phone hangs?
  • How to use Galaxy S21 quick settings panel?

RSS Galaxy S20 Guides

  • How to Use Enhanced Processing on Galaxy S20 with Android 11 update?
  • How to access, use, and customise widgets on Galaxy S20 lock screen and AOD screen with Android 11 update for Galaxy S20?
  • How to update Galaxy S20 to Android 11?
  • How to use Galaxy S20 lockdown mode?
  • Top 11 new features in Galaxy S20 Android 11 update
  • How to use Galaxy S20 recovery mode?
  • How to use 5 different shooting methods for Galaxy S20 camera?
  • How to use and customize power mode on Galaxy S20?
  • A Complete Guide Of Galaxy S20 Assistant Menu

RSS Galaxy Note Guides

  • Top 11 disappointments of Galaxy Note 20 and Galaxy Note 20 Ultra
  • How to use the Dynamic Lock screen on Galaxy Note 10?
  • Galaxy Note 10 LED View Cover Guide and Review
  • Install S Note app and Extension pack on Galaxy Note 10
  • How to Use Galaxy Note 10 Camera App?
  • Galaxy Note 10 SIM Card Guide
  • How to use Samsung DeX for PC with Galaxy Note 10 and Galaxy Note 10+?
  • How to use Galaxy Note 10 Clear View cover (S View cover)?
  • How to charge Galaxy Note 10 battery?
  • How to use and remap Galaxy Note 10 Side key?

RSS Drive In Singapore

  • Top 5 rules of driving in Singapore safely and legally during COVID-19 Circuit Breaker period
  • Understand COE Price by 10 Simple Questions
  • How to convert a foreign driving license to a Singapore driving license?
  • How to get a Touch ‘n Go card as a Singapore driver?
  • What is covered in the car warranty in Singapore? What is not?
  • What is the Singapore Road Speed Limit?
  • How to register, collect and use Malaysia Vehicle Entry Permit (VEP)?
  • Why are cars in Singapore are so expensive?
  • Drive to Malaysia
  • Car Maintenance and Servicing in Singapore

RSS Moto G Guides

  • Moto G8 vs Moto G8 Power vs Moto G8 Power Lite vs Moto G Power vs Moto G Stylus vs Moto G Pro vs Moto G fast: What are the differences?
  • Moto G8 User Manual for Moto G8 Plus and Moto G8 Play
  • Moto G8 Plus vs Moto G8 Play: Differences and common features
  • Official Moto G7 user manual

RSS Chromecast Guides

  • How to enable developer options in Chromecast with Google TV?
  • What’s new in Chromecast 2018 (3rd gen of Chromecast)?
  • How to use Chromecast Audio to stream music? and how to control Chromecast Audio?
  • How to use the new Chromecast app?

RSS Headphone Guide Pro

  • AirPods Pro 2 New features explained
  • What is Samsung Seamless Codec? 4 things you should know about this new codec
  • How to use widgets to check battery levels and control Galaxy Buds 2, Galaxy Buds Pro, Galaxy Buds Live, Galaxy Buds+, and Galaxy Buds?
  • AirPods 3 vs AirPods Pro: which one should you choose?
  • AirPods 3 vs AirPods 2: Top 8 improvements and new features of AirPods 3

© 2015–2023 · GadgetGuideOnline.com is an online community for Gadget Owners! · Hosted by PTRHosting
· Powered by Genesis framework for WordPress

Samsung Galaxy S9 how-to guides, user manuals and tutorials! Everything about Samsung Galaxy S9 and Galaxy S9+.
Disclaimer: Samsung, Galaxy, Galaxy S9, and Galaxy S9+ are trademarks of Samsung. Android is a trademark of Google. This website is NOT affiliated with Samsung or Google in any way. All the information provided on this website is provided on an "as is" and "as available" basis and you agree that you use such information entirely at your own risk.