 Galaxy S9 camera Pro mode gives you full control of your shootings: ISO, aperture, shutter speed, autofocus mode, filters, white balance, and exposure. If you properly use the Galaxy S9 camera Pro mode, you may get far better pictures than using the Auto mode (default).
But for many users without photographic backgrounds, sometimes, it is overwhelming to adjust the settings for Galaxy S9 camera Pro mode to get the desired photos.
This Galaxy S9 camera guide explains the what Galaxy S9 camera Pro mode is, when you may need it, and all settings for Galaxy S9 camera Pro mode.
Please note, Galaxy S8, S8+, Note 8 and Note 9 have a similar Pro mode to that on Galaxy S9 and S9+. So, this guide also applies to the Pro mode in these Samsung phones.
What's Galaxy S9 camera Pro mode? When do you need it?
In the old days, smartphone cameras are usually inferior to many middle-range (sometimes, even entry-level) point-and-shoot cameras. And it is impossible to compare them to DSLRs.
But in recent years, with the advances in camera sensor technology and software, more and more high-end smartphones can replace middle-range point-and-shoot cameras. Some Android phone vendors started to offer some photographic features that used to be exclusive in DSLR cameras
Since Galaxy S6, Samsung has included the Pro mode in many of its phones. But the quality of photos taken in the Pro mode depends on the phone hardware and software.
With Galaxy S9 camera Pro mode, some users now can easily get many far better photos than in the Auto mode.
Galaxy S9 camera Pro mode allows you:
- Adjust the ISO value
- Adjust the aperture to use the dual apertures as explained in this guide.
- Adjust the shutter speed.
- Adjust the autofocus mode.
- Choose camera filters.
- Adjust the white balance.
- Adjust exposure compensation.
- Save photos in RAW format.
You may want to try the Pro mode whenever you are not satisfied with photos taken in the Auto mode or other camera modes.
For example, in the low-light conditions, you may play with the ISO value and shutter speed to get less noisy photos in Pro mode. The Auto mode in this situation sometimes works well; sometimes not.
Or, if the lighting conditions vary dramatically in different parts of the photo, you can choose the proper ISO value, shutter speed, white balance, and exposure compensation to get a better photo.
Although the Pro camera mode looks complicated, you only need some practice and common sense to master it.
How to access Galaxy S9 camera Pro mode?
Once you open the Galaxy S9 camera app, you can choose the camera modes on the top of the screen as shown above. On Galaxy S8, S7 and S6, you can swipe left to right to access the camera modes page in the camera app. This gesture is being used to switch modes directly on Galaxy S9 and S9+.
If you hold the phone in the landscape orientation, the mode selection location will not change. The text does not rotate either although Galaxy S9 and S9+ even support landscape mode in the home screen.
For example, as shown in the screenshot below, the Pro mode is selected. So, you can start to play with the Pro mode.
If you cannot find the Pro mode in the camera app, very likely, you disable this mode in the camera settings.
How to adjust settings for Galaxy S9 camera Pro mode?
We will explain the Galaxy S9 camera Pro mode settings one by one.
When you adjust the settings, it will take effect immediately. Unlike that in Galaxy S6 or S7, you cannot save the Pro mode settings and reload it later.
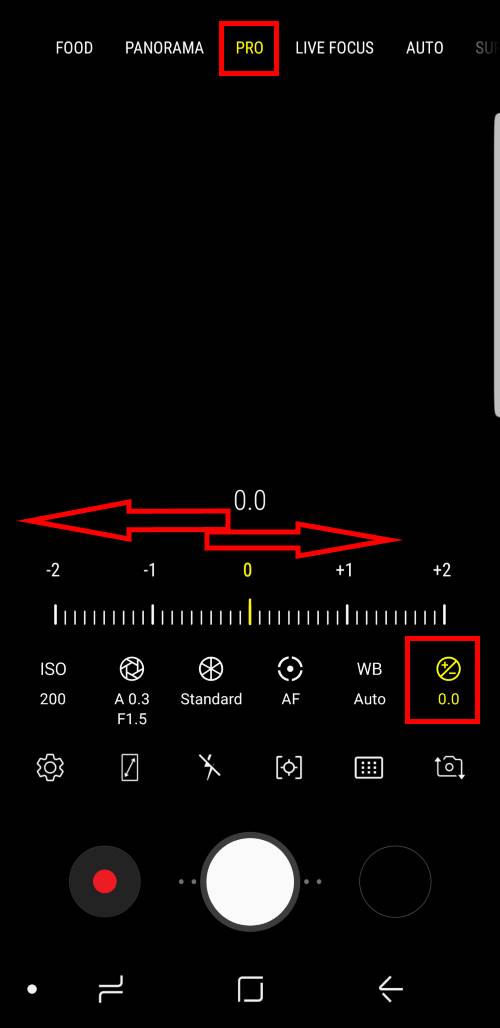
Adjust exposure compensation
Exposure is a measurement of the amount of light per unit area on the photo. Higher exposure means brighter.
By default, the exposure is calculated based on the aperture and shutter speed.
As shown above, you can manually “add” (drag to the right side) or “subtract” (to the left side) certain exposure to or from the photo. This adjustment is known as exposure compensation.
Exposure compensation applies to the whole picture. You cannot add exposure in some areas, and reduce it in other areas (most photo editing software may be able to do it).
Adjust white balance
To our eyes, white is always white. But if you take a photo of a white paper, you will notice the white may look yellowish with incandescent light, and blueish with fluorescent light.
By default, Galaxy S9 camera will try to figure out the lighting conditions including the color temperature.
You can overwrite the calculated color temperature by adjusting the white balance as shown below.
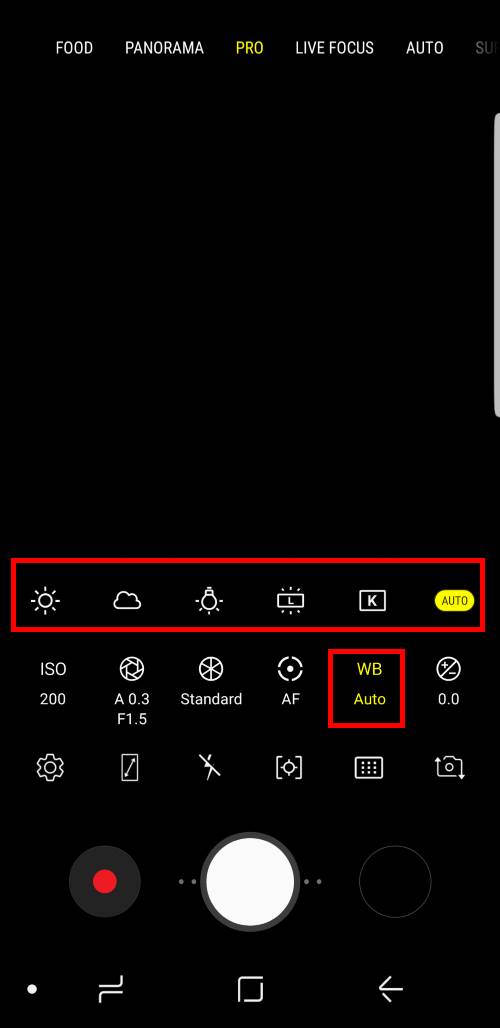
By default, the color temperature is calculated automatically. You can tap the Auto button as shown above to manually adjust it.
You can manually adjust white balance:
- Set the color temperature directly by tapping the K button. You can use the slider to set the color temperature.
- Set the light source as fluorescent@4000K by tapping the fluorescent button.
- Set the light source as incandescent@2800K by tapping the bulb icon.
- Set the light source as cloudy@6500K.
- Set the light source as daylight@5500K.
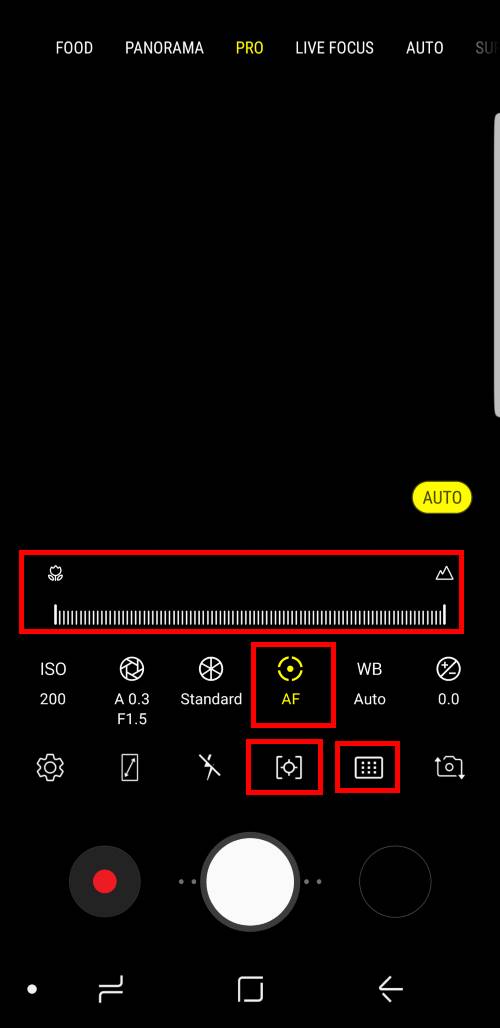
Adjust autofocus(AF) mode
When you take a photo, the camera needs to focus on a certain area or an object. Autofocus lets you point to an object (by default in the middle in the viewfinder) and calculate the proper optical focus (exposure) based on light and depth of field settings.
You can manually set autofocus from macro (the flower) to landscape (mountain) by sliding from either side. The AF icon should change to MF (manual focus). To exit manual focus, you can tap the manual icon (the AUTO icon in the screenshot below turns into Manual icon once in manual focus).
When in autofocus, you can select the metering modes (the icon below AF icon) as:
- Spot. Spot Metering evaluates the lighting conditions around your focus point and ignores other areas. Then it calculates the exposure based on that small area. It is good if you want to take photos for a small object (for example, a bird) and ignores the exposure in the surroundings.
- Centre-weighted. Center-weighted metering evaluates the lighting conditions in the middle of the frame and its surroundings. The center area will have more weighs in the calculated exposure. The corners are usually ignored.
- Matrix. Matrix metering is the most complicated mode. It evaluates the lighting conditions in the whole frame by dividing the frame into various zones. In a nutshell, this metering mode uses all areas in the frame and the focus area is also considered simultaneously.
You can also set the AF-area mode (how the focus point is selected, the icon is below the white balance button) as:
- Centre. Centre AF-area mode is good for a stationary object.
- Multi. Multi AF-area mode is good for slow-moving objects, or when you cannot keep the phone still when taking photos.
Please note, you can use AF/AE lock to set the focus and reference exposure by long tapping the targeted area.
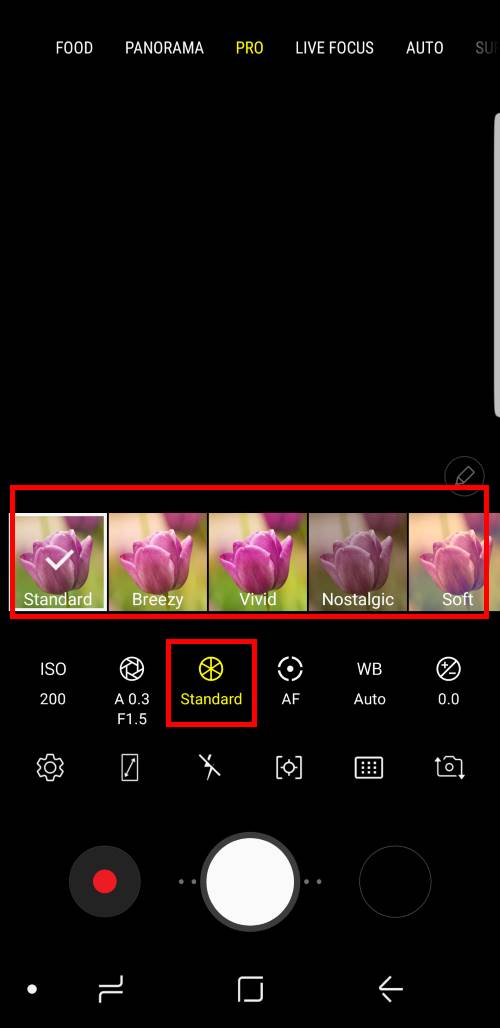
Adjust Galaxy S9 camera filter
As shown below, you can set various camera filters for photos taken in Galaxy S9 camera Pro mode.
By default, you can choose the following Galaxy S9 camera filters:
- Standard. This is the default with no filters applied.
- Breezy.
- Vivid.
- Nostalgic.
- Soft.
- Serene.
- Tone 1. This camera filter is for you to save your own settings. You can customize the color temperature, tint, contrast, saturation, highlight, and shadows.
- Tone 2. You can save a second Galaxy S9 camera filter.
Technically, a filter is a component of a camera effect. So, if you download camera effects or filters from Galaxy Apps, they will appear as camera effects in the Auto mode. They will NOT show up as filters in the Pro mode.
In other words, you can only customize the filter in the Pro mode with Tone 1 and Tone 2 only.
Adjust aperture and shutter speed
Most smartphone cameras have a fixed aperture for the camera sensor. If there are two or more rear cameras (e.g., Moto X4+ has 2 rear cameras), each of them usually has a different aperture.
One of the new features of Galaxy S9 and S9+ is the dual-aperture feature for the main camera.
As explained in this guide, you can adjust the aperture for the main camera in Galaxy S9 camera Pro mode.
The aperture setting and shutter speed setting share one button as shown in the screenshot below.
Once you tap the aperture and shutter speed button, you can adjust:
- Aperture. If you tap F1.5, it will then switch to F2.4. And vice versa.
- Shutter speed. You can slide your finger between 1/24000 and 10s to choose the desired shutter speed. The faster shutter speed (left side) means the shutter closes faster and therefore less light reaches the camera sensor. The slowest shutter speed on Galaxy S9 camera is 10s. If you choose a shutter speed slower than 1/5s, you should NOT hold the phone. In such cases, you should use a tripod. Otherwise, the photo may be blurry. Of course, some experienced users may take photos with special effects by playing the shutter speed (and other settings as well).
If you manually adjust the shutter speed, the Auto button will change to Manual. You can tap the Manual button to let the camera to set the shutter speed.
Current shutter speed and aperture are always shown as part of the aperture and shutter speed button in real-time. For example, in the screenshot below, the current aperture is f/1.5, and shutter speed is 0.3s. If you move the phone, you can see the shutter speed changes (because it is in auto shutter speed mode).
Please note, aperture controls the size of the hole (shutter), and the shutter speed controls the opening time of the shutter.

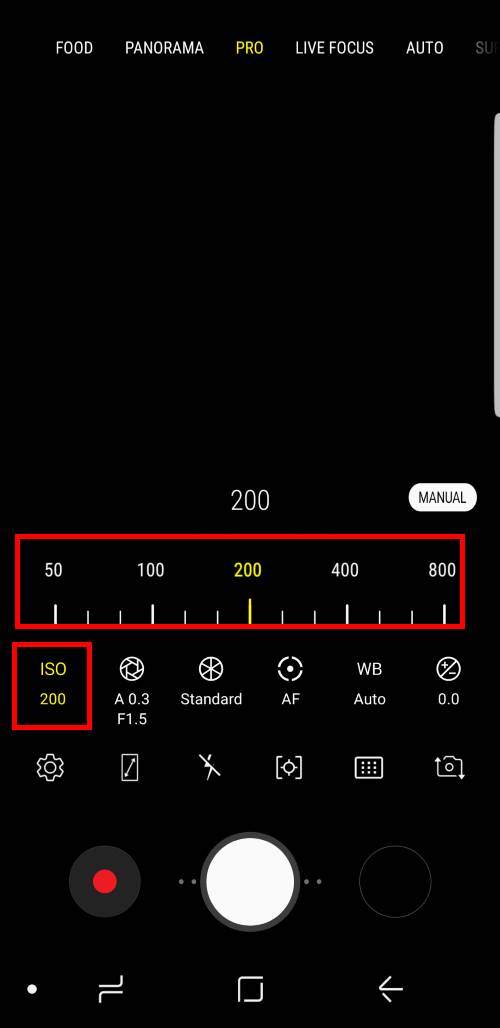
Adjust the ISO value
An ISO value represents the sensitivity of the imaging sensor (or film) to the light. The standardized number guarantees the same overall exposure level on different cameras.
In the past, when the film was used, the ISO value of the film is fixed when it is manufactured. You have to use another roll if you need to change ISO.
ISO value, together with aperture and shutter speed will determine the exposure level. Therefore, in Galaxy S9 camera Pro mode, you cannot manually set exposure compensation if you manually set ISO and shutter speed. In other words, you can only manually adjust up to two of the three: exposure, shutter speed (including aperture), and ISO. This actually applies to all cameras.
For example, if you increase ISO from 100 (with a shutter speed of 1/100s, and without exposure compensation) to 200, you need to increase shutter speed from 1/100s to 1/200s to compensate the exposure.
For a digital camera, ISO values can be easily adjusted.
But you need to understand how ISO values affect the exposure:
- Lower is better. Lower ISO values (lower sensitivity) usually mean less noisy (less grainy) photos.
- But you need to use a high ISO when the lighting condition is not good, or when you need to use a faster shutter speed to capture a moving object.
For Galaxy S9 camera and Galaxy S9+ camera, Samsung limits your selection between 50 and 800 in the Pro mode. In Auto mode, the range is far larger.
How to save Galaxy S9 camera Pro mode photos in the RAW format?
Most professional photographers rely on the RAW format, which allows them to edit the flawed photos or adding special effects.
In short, RAW format image file saves the raw (processed so that data are standardized) image sensor data for the photo, instead of a JPEG file or other image files. Later, you can use some professional photo editing software to modify the sensor data to get a perfect photo.
In Galaxy S9 camera Pro mode, you can save the photo in RAW format as a second copy. The JPEG format photo is always saved.
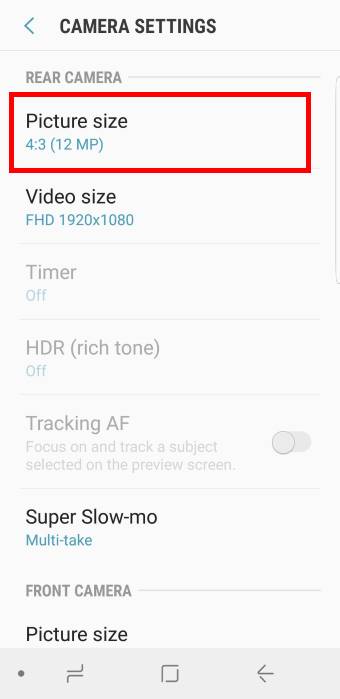
To save an additional copy of Pro mode photos in RAW format, you need to enable it in Galaxy S9 camera settings.
As shown below, in the camera settings, tap Picture size for the rear camera.
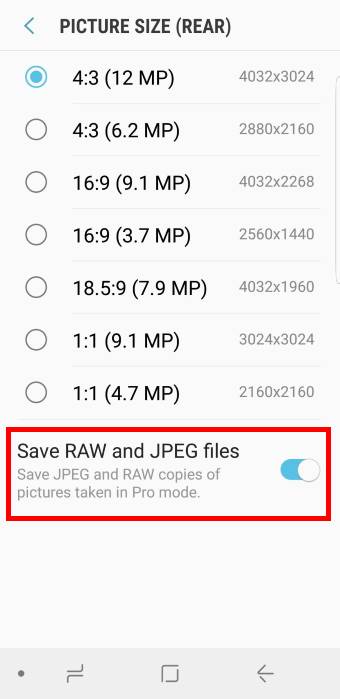
In the picture size page, as shown above, you can find the option of Save RAW and JPEG files.
You can tap the switch to enable it.
Please note, all RAW format image files and the corresponding JPEG files will always be saved in the internal storage even you set SD card as the storage location.
How to add Pro mode to the Galaxy S9 Home screen?
In Galaxy S8 and S8+, you can add each camera mode including Pro mode to the home screen as explained in this guide.
Unfortunately, Samsung removed this feature in Galaxy S9 and S9+. So, you cannot add the camera modes to Galaxy S9 Home screen any more.
Do you know how to adjust settings in Galaxy S9 camera Pro Mode on Galaxy S9 and S9+? Can you take photos with the Pro mode in Galaxy S9 and S9+?
If you have any questions on using Galaxy S9 camera pro mode on Galaxy S9, S9+, S8, S8+, S7, S7 Edge, S6, S6 Edge, Note 9, or Note 8, please let us know them in the comment box below.
The community will help you find the answer.
For the user guide for new features of Samsung Galaxy S9 and S9+, please check Galaxy S9 new features guides page.
For using Galaxy S9 and S9+, please check Galaxy S9 how-to guides page.
For using Galaxy S9 camera, please check Galaxy S9 camera guides page.
For accessories for Galaxy S9 and S9+, please check Galaxy S9 accessories guides page.
For the official Samsung Galaxy S9 and S9+ user guides (in PDF format), please check Galaxy S9 user guides page.
You may also contact us through our Facebook page.
It’s not possible to use the pro mode for videos anymore. It is a great feature that S8+ plus had, but isn’t in S9+.Ffrustrating
Yes, after Android Pie update, there is no dedicated video recording button in the camera app. Therefore, your cannot use Pro Mode for video recirding. Instead “video” is now a camera mode. Apparently, Samsung developers do not use their phones often.
-- Our Facebook page || Galaxy S6 Guides || Galaxy S7 Guides || Android Guides || Galaxy S8 Guides || Galaxy S9 Guides || Google Home Guides || Headphone Guides || Galaxy Note Guides || Fire tablet guide || Moto G Guides || Chromecast Guides || Moto E Guides || Galaxy S10 Guides || Galaxy S20 Guides || Samsung Galaxy S21 Guides || Samsung Galaxy S22 Guides || Samsung Galaxy S23 Guides
after i updated, my S9 doesn’t give me the option for standard, breezy, vivid etc anymore. instead i can adjust colour temperature, tint etc. how do i take it back? can i undo a software update, i don’t think i like this one.
You can find the camera effects button on the top right (portrait orientation).
-- Our Facebook page || Galaxy S6 Guides || Galaxy S7 Guides || Android Guides || Galaxy S8 Guides || Galaxy S9 Guides || Google Home Guides || Headphone Guides || Galaxy Note Guides || Fire tablet guide || Moto G Guides || Chromecast Guides || Moto E Guides || Galaxy S10 Guides || Galaxy S20 Guides || Samsung Galaxy S21 Guides || Samsung Galaxy S22 Guides || Samsung Galaxy S23 Guides
Finding filters in Auto mode is easy. How do you get Tone 1 and Tone 2 in Pro mode?
You should not use camera effects/filters when using the Pro mode.
-- Our Facebook page || Galaxy S6 Guides || Galaxy S7 Guides || Android Guides || Galaxy S8 Guides || Galaxy S9 Guides || Google Home Guides || Headphone Guides || Galaxy Note Guides || Fire tablet guide || Moto G Guides || Chromecast Guides || Moto E Guides || Galaxy S10 Guides || Galaxy S20 Guides || Samsung Galaxy S21 Guides || Samsung Galaxy S22 Guides || Samsung Galaxy S23 Guides
how do i take pictures with iso 1600 on the S9 +? in PRO mode I already had this option, but I can’t enable it anymore. It only reaches ISO 800,
thanks
I think on Galaxy S9, the highest ISO in Pro mode is 800. Samsung increased t to 3200 on S10 and later models.
-- Our Facebook page || Galaxy S6 Guides || Galaxy S7 Guides || Android Guides || Galaxy S8 Guides || Galaxy S9 Guides || Google Home Guides || Headphone Guides || Galaxy Note Guides || Fire tablet guide || Moto G Guides || Chromecast Guides || Moto E Guides || Galaxy S10 Guides || Galaxy S20 Guides || Samsung Galaxy S21 Guides || Samsung Galaxy S22 Guides || Samsung Galaxy S23 Guides
thanks for the answer, i managed to find out what happened. The cell phone was in automatic mode, when I switched to PRO mode it indicated the last ISO used in manual mode. As soon as I started using it it went to ISO 800. Thanks for the answer and congratulations on the website.
Hi there. Love this post. Could you pleass tell me how do i get the VIVID filter on pro mode for samsung camera on the Note10+ and X Fold3. Or point me in the direction of a camera that has it. I really miss the vibrancy that filter has when taking a picture.
Thank you
Brent
First, the Pro mode does not allow any filters/effects. Because you can save the RAW file, you may choose whatever filters in the photo processing apps.
Some filters are available on Android 10 are not available on Android 11 in the Galaxy Store. You have to find a similar filter in photo editing apps.
-- Our Facebook page || Galaxy S6 Guides || Galaxy S7 Guides || Android Guides || Galaxy S8 Guides || Galaxy S9 Guides || Google Home Guides || Headphone Guides || Galaxy Note Guides || Fire tablet guide || Moto G Guides || Chromecast Guides || Moto E Guides || Galaxy S10 Guides || Galaxy S20 Guides || Samsung Galaxy S21 Guides || Samsung Galaxy S22 Guides || Samsung Galaxy S23 Guides