Galaxy S9 camera settings will help you get the desired photos and effectively use the camera in Galaxy S9 and S9+.
This Galaxy S9 camera guide explains the meaning and usage of all entries in Galaxy S9 camera settings.
Why do you need to understand Galaxy S9 camera settings?
Many Galaxy S9 and S9+ owners probably just start the camera app, shoot the photo, then share it.
It works well in most situations owing to the decent Auto mode in Galaxy S9 and S9+ cameras.
But sometimes, you may need to change some Galaxy S9 camera settings, e.g., using the timer, changing the video size to save storage, taking motion photos ……
Galaxy S9 camera settings allow you to customize the camera app so that you can take the desired photos and videos.
In the new Galaxy S9 camera app, the simplified interface means more customizations in Galaxy S9 camera settings.
How to access Galaxy S9 camera settings?
You can start the camera app in Galaxy S9 in different ways as explained in this guide.
- Galaxy S9 camera quick launch.
- The camera app shortcut on Galaxy S9 lock screen.
- The camera app icon in Galaxy S9 home screen.
- The camera app icon in Galaxy S9 apps screen.
- Bixby voice command.
- Google Assistant.
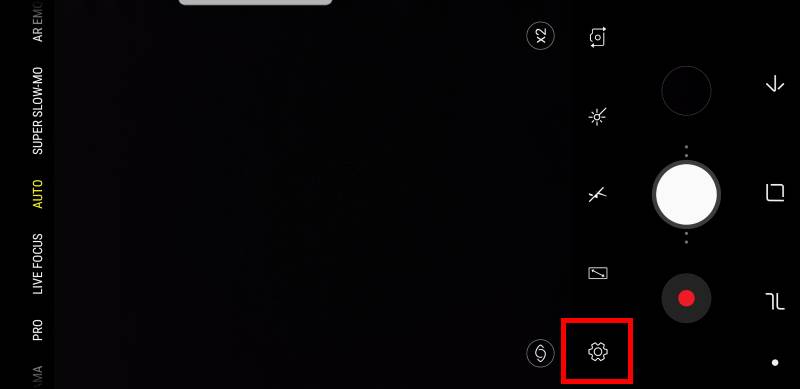
Once you are in Galaxy S9 camera app interface, you can tap the gear icon as shown below to open Galaxy S9 camera settings.
How are Galaxy S9 camera settings organized?
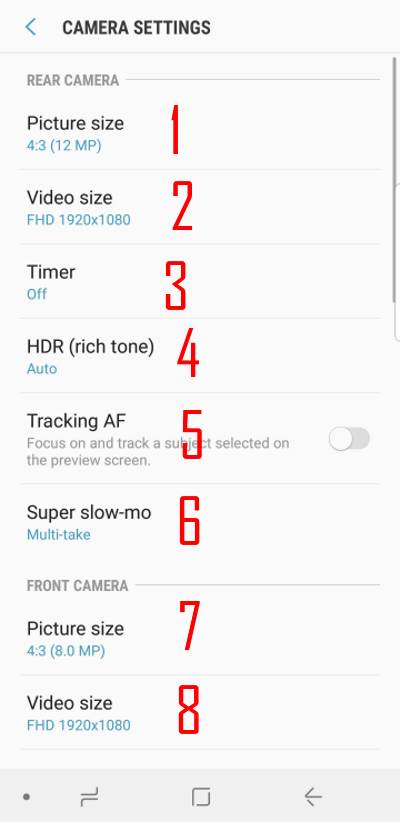
As shown in the following 3 screenshots, Galaxy S9 camera settings are organized into 3 sections/groups.
-
Rear camera (#1-#6)
This section includes settings related to the rear camera only.
For Galaxy S9+, there are two rear cameras. But there are no separate settings for the individual rear camera.
In fact, Galaxy S9 and Galaxy S9+ have the identical camera settings.
-
Front camera (#7-#13)
This section covers the front camera specific settings.
Some of the second level setting pages, e.g., timer and HDR settings, are similar to those of the rear camera.
The purpose of such settings is to keep separate settings for the front and rear cameras.
-
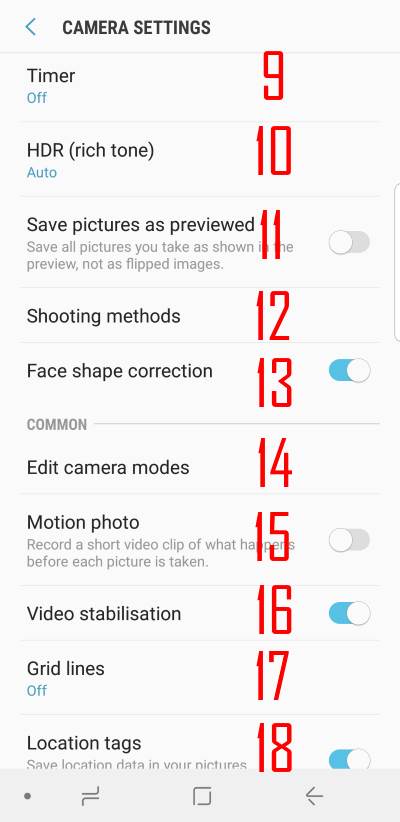
Common (#14-#25)
The settings in this section apply to both the front and rear cameras.
Understand and use Galaxy S9 camera settings
Corresponding to the numbers in the previous 3 screenshots, here are the explanations of Galaxy S9 camera settings.
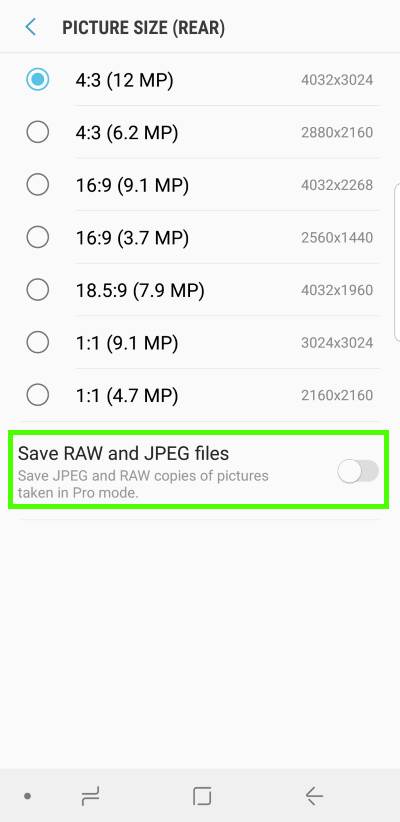
1. Picture size for Galaxy S9/S9+ rear camera
The picture size in Galaxy S9 camera has two aspects:
- the number of pixels (from 3.7MP to 12MP).
- the aspect ratio (4:3, 16:9, 18.5:9 and 1:1) .
More pixels usually mean larger files, and therefore more storage space required. The default picture size for Galaxy S9 and S9+ is 12MP in 4:3 aspect ratio.
For Galaxy S9 and S9+, normally you should not worry about the picture size because of the large 64GB or 256 GB storage. You can also save photos to micro SD card as explained in this guide.
The aspect ratio determines the most suitable use of the photo:
- 4:3 (default) is good for printing.
- 16:9 is good for TV and smartphones.
- 1:1 is good for web designers, or some special usages.
- 18.5:9 is good for narrow phones with a screen of 18:9 or 18.5:9 aspect ratio.
So, the intended usage determines the desired picture size.
Typically, you should use as many pixels as possible.
Picture quality will not degrade if you scale down (from more pixels to fewer pixels) the picture. But if you scale it up, the quality of the new photo will usually be terrible.
If you are using the Pro camera mode, you can save the photos in RAW file format so that you can edit it later with some professional software. Please read this guide on how to use camera Pro mode on Galaxy S9 and S9+.
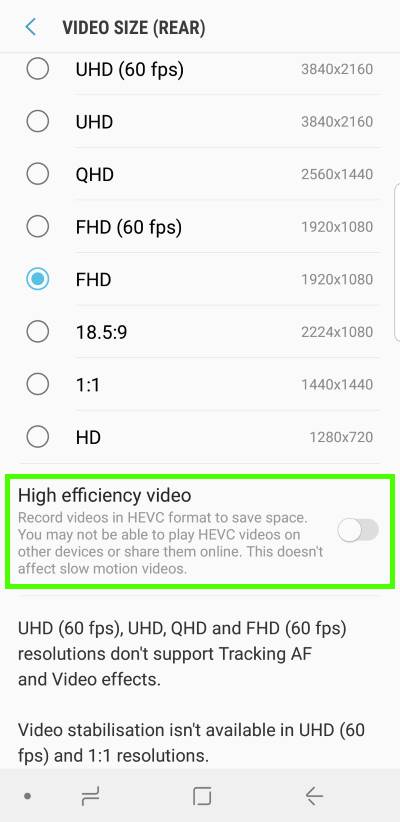
2. Video size for Galaxy S9/S9+ rear camera
When you consider the video size for Galaxy S9/S9+ cameras, as shown above, you need to consider 3 aspects:
- Video size (resolution). You can record up to 4K UHD videos with Galaxy S9 or S9+ rear cameras.
- Aspect ratio. 3 aspect ratios, 16:9, 18.5:9 and 1:1, are supported.
- Frame rate. For normal videos, you can shoot them in 30fps (frames per second) or 60fps. For the slow-motion mode, you can record FHD 1080p at 240fps or HD 720p at 960fps in the super slow-motion mode.
Although Galaxy S9 and S9+ support 4K HDR video playback, you cannot record HDR videos with Galaxy S9 or S9+ cameras.
Please note videos usually take a lot of space.
Galaxy S9 and S9+ may limit the length of the video in certain resolution/frame rates, for example, UHD at 60fps or 720p at 960fps. Such limitations are usually due to hardware restrictions.
3. Galaxy S9 camera timer settings
Samsung removed the timer icon in the camera app since Android Nougat.
In Galaxy S9 and S9+, you have to change camera timer in Galaxy S9 camera settings.
As shown in the screenshot below, by default, the camera timer is off.
You can set the timer to 2, 5 or 10 seconds.
Another option related to Galaxy S9 camera timer is the “Take 3 shots”, which allows you to take 3 pictures in sequence, instead of 1, when you use the timer.

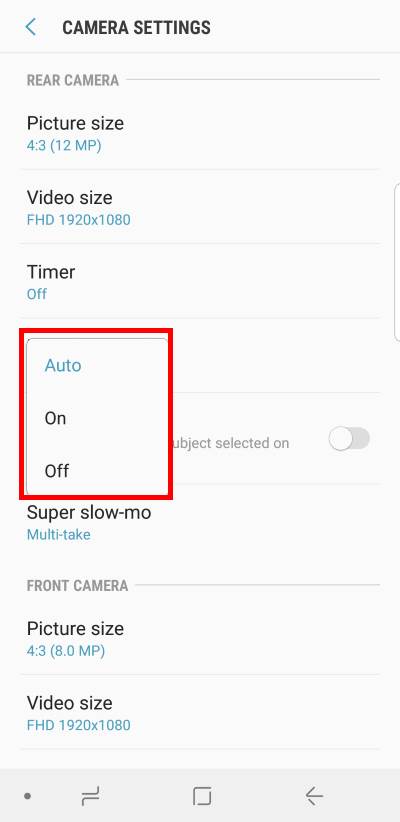
4. Galaxy S9 camera HDR settings
HDR (rich tone) can dramatically improve the photo quality when used.
By default, HDR will be automatically enabled based on lighting conditions and camera modes.
As shown above, you can change the Auto option to On so that HDR will always be used as long as the camera mode supports it.
Seldom, you should turn off HDR in Galaxy S9 camera settings.
5. Galaxy S9 camera tracking AF settings
By default, tracking AF is off in Galaxy S9 and S9+.
You can turn it on or off in Galaxy S9 camera settings.
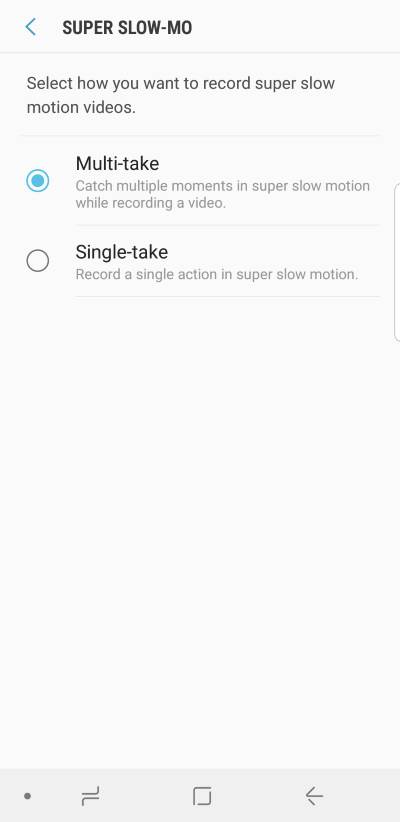
6. Galaxy S9 camera super slow-mo (super slow-motion mode) settings
The super slow-mo mode is one of the prominent new features in Galaxy S9 and S9+.
The resolution of the super slow-mo mode is fixed at HD 720p.
You can choose to take multiple videos or just one after you tap the recording button as shown below.
Please refer to Galaxy S9 camera super slow-motion mode guide on how to use this mode and how to edit, adding music, export and share super slow-motion videos.
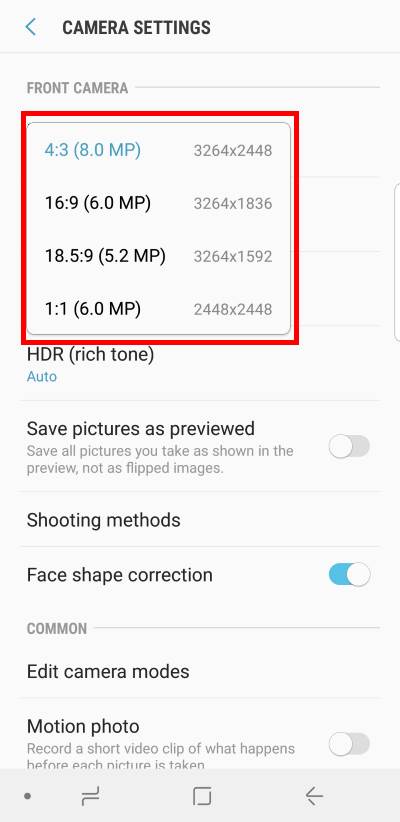
7. Picture size for Galaxy S9/S9+ front camera
As shown above, you have limited options for the picture size of Galaxy S9/S9+ front camera.
There is only one size for one aspect ratio.
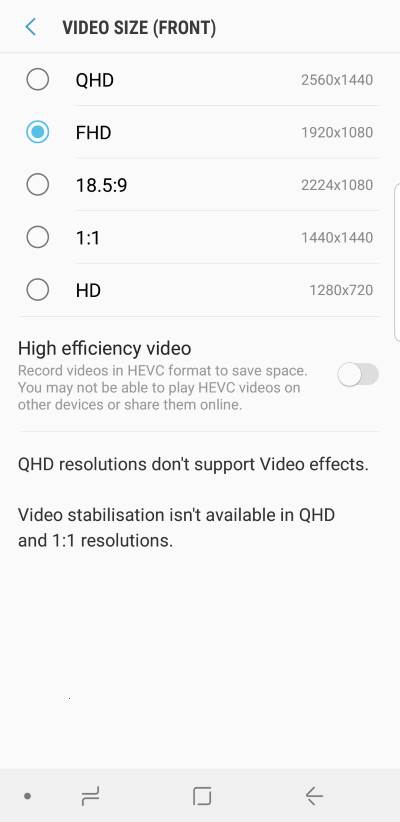
8. Video size for Galaxy S9/S9+ front camera
Galaxy S9 and S9+ front cameras let you record videos up to QHD.
The frame rate is all at 30fps.
9. Galaxy S9 front camera timer settings
The timer settings for the front camera are identical to those for the rear camera (see #3 above.)
10. HDR settings for Galaxy S9/S9+ front camera
The HDR settings for the front camera are identical to those for the rear camera (see #4 above.)
11. Save picture as previewed
By default, Galaxy S9/S9+ front camera saves the “mirrored” photos.
The mirrored photo is NOT what you see on the preview screen. You need some photo editing apps to mirror it if you don't like it.
Galaxy S9 camera settings allow you to turn on “save picture as previewed” to avoid mirrored photos. So, you do not need any apps to edit selfies.
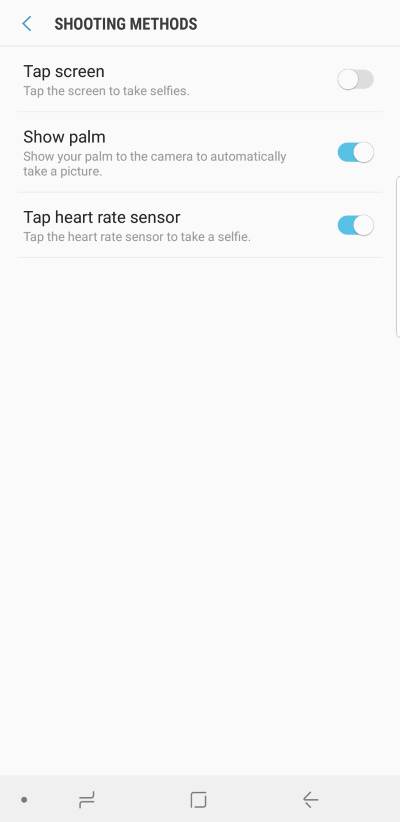
12 Shooting methods settings for Galaxy S9 front camera
When you take selfies, sometimes, it is inconvenient to tap the shutter button.
Galaxy S9 and S9+ allow you to take selfies with the following methods (in addition to tapping the shutter button):
- Tap anywhere on the screen (not just the shutter button) to take a selfie with Galaxy S9/S9+ front camera.
- Show your palm to take a selfie with Galaxy S9/S9+ front camera. You can raise one hand and let the palm face the camera. Once the palm is detected, a photo will be taken automatically.
- Tap heart rate monitor to take a selfie with Galaxy S9/S9+ front camera. Galaxy S9 heart rate monitor is located in the back of the phone and below the LED flash. You may check the layout for Galaxy S9 and S9+ for the location of heart rate monitor.
These 3 methods are for the front camera only.
There are several other shooting methods for Galaxy S9/S9+ camera (both front and rear), for example, floating button, voice commands and volume button.
13. Shape correction settings for Galaxy S9 front camera
When using the front camera in Galaxy S9 or S9+, some beautify effects will be applied automatically.
Face shape correction is one of them.
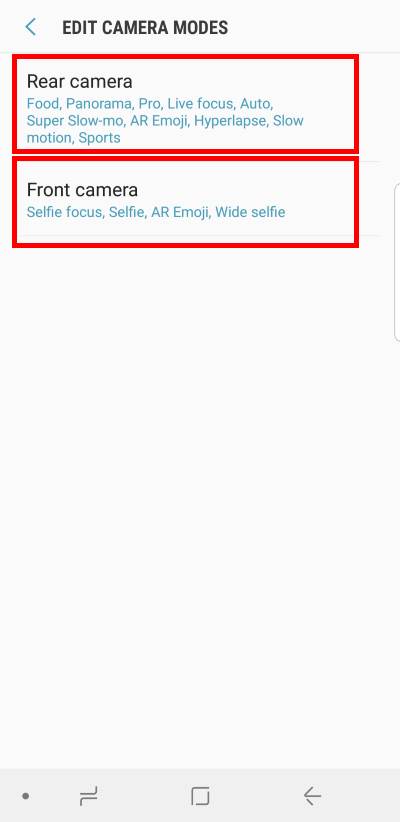
14. Edit camera modes in Galaxy S9 camera settings
In Galaxy S9 camera app, there is no dedicated camera modes panel.
As explained in Galaxy S9 camera app guide, all camera modes are cramped at the top of the screen.
But sometimes, you may want:
- to rearrange the locations of each camera mode;
- to remove some unused camera modes.
In Galaxy S9 camera settings, you can use Edit camera modes as shown below to manage camera modes for the rear camera and front camera respectively.
Please refer to Galaxy S9 camera modes guide for details.
If you want to use the dual aperture feature on Galaxy S9 and S9+, you may check this guide.
15. Galaxy S9 camera motion photo
If you enable motion photo for Galaxy S9/S9+ camera, a short video clip will be recorded before the shutter button is pressed.
So, the motion photo actually is a short video plus a normal photo.
In this case, if you fail to capture the moment perfectly, you may have the video clip which may capture it better.
You can separate the video from the photo if you want.
16. Galaxy S9 camera video stabilization settings
You can enable video stabilization for Galaxy S9 and S9+ cameras to record less shaky videos.
Some video sized may not support video stabilization.
17. Grid lines settings for Galaxy S9 and S9+ cameras
If turned on, the Galaxy S9 camera preview screen will be divided into 3×3 blocks with the grid lines.
It is useful if you want to learn composition for photos.
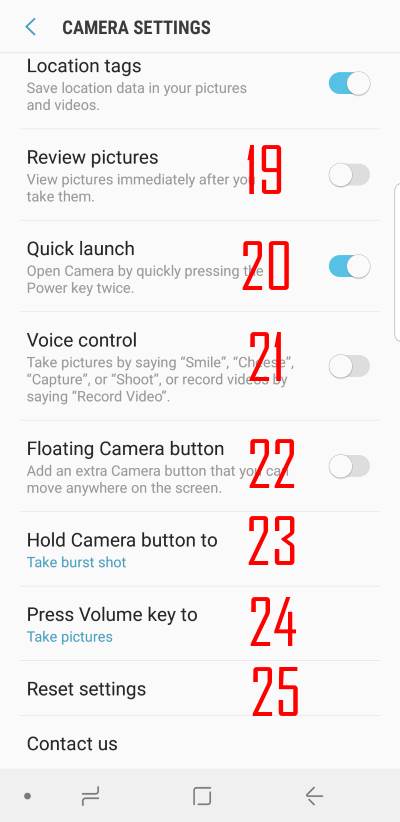
If enabled, the location info will be saved as the metadata of the photo.
When sharing photos, some apps, for example, Google Photos, by default will remove the location tags automatically to protect your privacy.
If you do not want to save the location info, you can just turn off location tag.
19. Review pictures settings for Galaxy S9 and S9+ cameras
If enabled, after taking pictures, you have a few seconds to review the picture before you can take another one.
20. Galaxy S9 camera quick launch
By default, you can quickly launch the camera app in Galaxy S9 and S9+ by quickly pressing the power button twice.
You can turn off this Galaxy S9 camera quick launch feature here.
You may check this guide on other ways to quickly launch Galaxy S9 camera.
21. Voice control settings for Galaxy S9 and S9+ cameras
Galaxy S9/S9+ camera app comes with voice control, which is independent of Bixby Voice and Google Assistant.
You can use voice commands like “smile”, “cheese”, “capture”, “shoot”, “record video” to take photos or record videos without using the shutter button.
Please note, this voice control only works when the camera app is running.
You can add a floating camera button on the preview screen so that you can take photos by tapping it.
The floating camera button can be moved to anywhere in the preview screen.
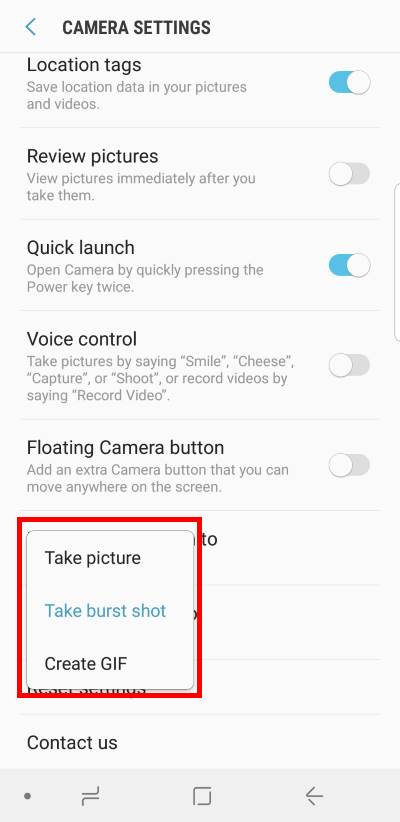
23. Galaxy S9 camera burst mode
By default, when you press and hold (long press) the shutter button, Galaxy S9 camera will take photos in burst mode.
If you do not like this behaviour, you can set long press the shutter button to take photo normally or to create a GIF animation, as shown below.
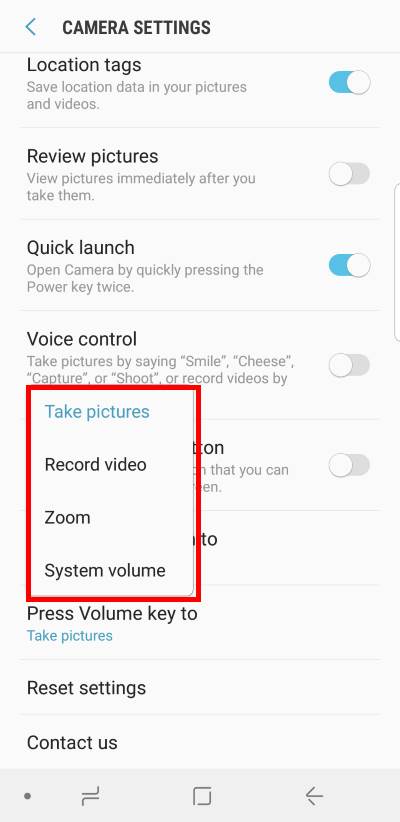
24. Volume key functions in Galaxy S9 camera
You can use volume key in Galaxy S9 camera app as a special key.
By default, in the camera app in Galaxy S9 and S9+, the volume key functions as the shutter button.
In Galaxy S9 camera settings, as shown above, you can set the volume key to:
- Take pictures (default).m
- Record a video.
- Zoom.
- Adjust system volume.
Please note, for the first 2 options, volume up and volume down work identically.
25. Reset Galaxy S9 camera settings
If you mess up anything, you can simply reset the Galaxy S9 camera settings.
It will not affect any of your photos. Only the settings will be reset to factory defaults.
All reset options on Galaxy S9 and S9+ are explained in this guide.
How to save photos to SD card on Galaxy S9 or S9+?
Storage location settings appear only after you insert a micro SD card. Once the SD card is recognized, the camera will try to save most new photos to the SD card by default.
You may check the Galaxy S9 SD card guide on how to set storage locations for photos.
Do you know how to use Galaxy S9 camera settings for Galaxy S9 and S9+? Do you understand Galaxy S9 camera settings?
If you have any questions or encounter any problems on Galaxy S9 camera settings in Galaxy S9 and S9+, or on wiping Galaxy S9 cache partition in Galaxy S9 and S9+, please let us know in the comment box below.
The community will help you find the answer.
For the user guide for new features of Samsung Galaxy S9 and S9+, please check Galaxy S9 new features guides page.
For using Galaxy S9 and S9+, please check Galaxy S9 how-to guides page.
For using Galaxy S9 camera, please check Galaxy S9 camera guides page.
For accessories for Galaxy S9 and S9+, please check Galaxy S9 accessories guides page.
For the official Samsung Galaxy S9 and S9+ user guides (in PDF format), please check Galaxy S9 user guides page.
I am trying to record art painting videos. So I am recording from above using the rear facing camera on my S9. I seem to think I am recording in landscape mode. However when I preview it on my phone it is in portrait mode. it is also in portrait mode when I load the video onto my pc. Is there a way to lock it in landscape mode to take this type of video from this angle?
BTW This phone takes awesome pictures and videos and the voice recording is also amazing!
I don’t think you can lock the video orientation in the recording.
-- Our Facebook page || Galaxy S6 Guides || Galaxy S7 Guides || Android Guides || Galaxy S8 Guides || Galaxy S9 Guides || Google Home Guides || Headphone Guides || Galaxy Note Guides || Fire tablet guide || Moto G Guides || Chromecast Guides || Moto E Guides || Galaxy S10 Guides || Galaxy S20 Guides || Samsung Galaxy S21 Guides || Samsung Galaxy S22 Guides || Samsung Galaxy S23 Guides
Be sure you have rotate enabled and be sure not to state the video until you have the phone Sideways / Horizontal.
I’m trying to record a video using my front facing camera and when I move it seems it follows me make the video Shakey any suggestions on how to fix
You can try to disable video stabilization to see whether it helps.
-- Our Facebook page || Galaxy S6 Guides || Galaxy S7 Guides || Android Guides || Galaxy S8 Guides || Galaxy S9 Guides || Google Home Guides || Headphone Guides || Galaxy Note Guides || Fire tablet guide || Moto G Guides || Chromecast Guides || Moto E Guides || Galaxy S10 Guides || Galaxy S20 Guides || Samsung Galaxy S21 Guides || Samsung Galaxy S22 Guides || Samsung Galaxy S23 Guides
I recorded a crafting tutorial video with my phone secure in a stand. When viewing the video after, I noticed the image randomly jumps a couple inches to the left and up, then jumps back to the original position again. It does this a few times and is really distracting. I will have to redo the entire video! But why is it doing this?? And how do I prevent it in the future!?
It sounds like an autofocus issue. You need to experiment (turn on and off) with the settings for 1). video stabilization and 2).tracking autofocus.
Besides, for crafting or other processes that are not easy to repeat, people usually use at least two cameras. You get different views, and you can use another camera footage in case one of them get problems. Of course, you need some video editing software to compose a new video from multiple recordings.
-- Our Facebook page || Galaxy S6 Guides || Galaxy S7 Guides || Android Guides || Galaxy S8 Guides || Galaxy S9 Guides || Google Home Guides || Headphone Guides || Galaxy Note Guides || Fire tablet guide || Moto G Guides || Chromecast Guides || Moto E Guides || Galaxy S10 Guides || Galaxy S20 Guides || Samsung Galaxy S21 Guides || Samsung Galaxy S22 Guides || Samsung Galaxy S23 Guides
All of my videos are grainy.
What setting do I use ?
1. Are they grainy even when watching on the phone?
2. When recording, in the preview screen, does it look normal?
-- Our Facebook page || Galaxy S6 Guides || Galaxy S7 Guides || Android Guides || Galaxy S8 Guides || Galaxy S9 Guides || Google Home Guides || Headphone Guides || Galaxy Note Guides || Fire tablet guide || Moto G Guides || Chromecast Guides || Moto E Guides || Galaxy S10 Guides || Galaxy S20 Guides || Samsung Galaxy S21 Guides || Samsung Galaxy S22 Guides || Samsung Galaxy S23 Guides