 About Galaxy S10 Guides
 About Galaxy S10 Guides
Galaxy S10 guides @GadgetGuideOnline is an online community for Galaxy S10 owners and by Galaxy S10 owners.
It is an owner-help-owner community for owners of Galaxy S10, Galaxy S10+, and Galaxy S10e. Galaxy S10 5G will also be covered.
Galaxy S10 Guides do NOT cover the following: rooting Galaxy S10, DIY hacking the S10 hardware, flashing the firmware for Galaxy S10…
Galaxy S10 Guide is a free community: all contents are free to read. You are free to ask questions related to Galaxy S10, S10+, S10e, and S10 5G.
How are Galaxy S10 Guides organised?
Detailed how-to guides on using Galaxy S10 or solving problems on Galaxy S10 are the starting point. Many owners can learn to use some features of the Galaxy S10 through these guides. Owners can also share their solutions or recommendations for a similar problem.
Discussions are moderated in the comments section so that meaningful contributions from fellow Galaxy S10 owners will benefit other members of the community.
There are 5 sections in Galaxy S10 Guides.
Galaxy S10 new features guides
This section hosts detailed guides explaining the new features of the Galaxy S10and showing you how to use them.
For example, many owners want to know how to use the in-display fingerprint scanner in Galaxy S10 and S10+.
You can find guides on all these Galaxy S10 new features in this section.
Galaxy S10 how-to guides
Galaxy S10 how-to guides are our flagship guides. They cover almost aspect of using and customising Galaxy S10, S10+, S10e, and Galaxy S10 5G.
If you need help with any features of the Galaxy S10, you may check this section.
The guides in this section usually cover all the detailed steps so that anyone can easily follow them.
Galaxy S10 official user manuals
In this section, you can read and download the official Samsung Galaxy S10 user manuals in your language for your Galaxy S10, S10+, S10e, and S10 5G.
Galaxy S10 camera guides
All Galaxy S10 models have great cameras. There are a few unique camera features in Galaxy S10, S10+, S1oe, and S10 5G as well.
The Galaxy S10 camera guides host many detailed guides showing you step-by-step how to use the Galaxy s10 camera to take nice photos in all conditions.
Galaxy S10 accessories guides
You may need some accessories to improve or protect the expensive Galaxy 10.
This section not only introduces various useful and affordable Galaxy S10 accessories but also shows you how to use these Galaxy S10 accessories.
List of recent Galaxy S10 guides
Here is a list of recent Galaxy S10 guides from Galaxy S10 guides. For a complete list of Galaxy S10 guides, please check the Galaxy S10 Guides section.
End of security update for Galaxy S10, S10+ and S10e
simon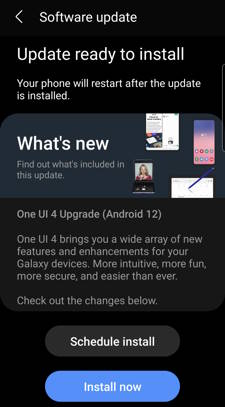
In April 2023, Samsung finally pulled the plug to stop issuing the security update for Galaxy S10, S10+, and S10e.
With 3 major Android (and One UI ) updates for Galaxy S10, S10+, and S10e, Samsung did keep its word on both major OS updates and security updates.
From now on, you will not expect any official new updates (unless it is very, very critical) from Samsung for your Galaxy S10, S10+, and S10e. Very likely, Samsung will also end the security update for Galaxy S10 5G this summer.
This Galaxy S10 guide explains Samsung's promise on the software update for Galaxy S10, S10+, and S10e, the update history for these 3 phones and the key features in each update, and what you should do next.
Samsung keep its word on both OS and security update for Galaxy S10, S10+ and S10e
When Galaxy S10 was released in 2019, Samsung promised 3 major software updates and 4-year security update. Obviously, Samsung kept its word.
Galaxy S10 was released with Android 9 (One UI 1.1) and was updated to Android 10 (One UI 2), Android 11 (One UI 3), and Android 12 (One UI 4) subsequently.
As promised, Galaxy S10, S10+, and S10e stopped at Android 12 and did not receive the Android 13 update (One UI 5) last December.
Now, after 4 years of its initial release, Galaxy S10 marches to the end of life: no more official security updates for Galaxy S10, S10+, and S10e.
Please note the commitment of 4 major OS updates and 5-year security updates applies to Galaxy S21 and later Galaxy devices. For Galaxy S20, Samsung will not release the Android 14 (One UI 6) update, and it will stop at the Android 13 (One UI 5.1) update, as explained here.
Overall, Compared to other Android vendors, Samsung did an excellent job providing Android and security updates for Galaxy S10 and later devices.
The three major updates for Galaxy S10, S10+, and S10e
As mentioned, Galaxy S10 was released with Android 9 (Android Pie) and One UI 1.1. Here is the list of the top 10 new software features of the original Android 9 (One UI 1.1) and three major updates for Galaxy S10, S10+, and S10e: Android 10 (One UI 2), Android 11 (One UI 3), and Android 12 (One UI 4).
| Android Version | One UI version | Top 10 new features |
|---|---|---|
| Android 9 (Pie, original) | 1.1 | 1. Night mode 2. New navigation gestures 3. Scene optimizer for the camera 4. New camera modes (Super Slow-mo, AR Emoji, and Live Focus) 5. Improved Face Unlock and fingerprint recognition 6. Digital Wellbeing 7. Bixby Routines 8. Edge lighting 9. Adaptive battery 10. One-handed mode |
| Android 10 (update 1) | 2.0/2.1 | 1. Dark mode 2. New navigation gestures 3. Improved Face Unlock and fingerprint recognition 4. Live Caption 5. Improved Digital Wellbeing 6. New Focus mode 7. Link to Windows integration 8. New camera modes (Single Take |
The post End of security update for Galaxy S10, S10+ and S10e appeared first on Galaxy S10 Guides.
Top 10 new features in Android 10 update for Galaxy S10
simon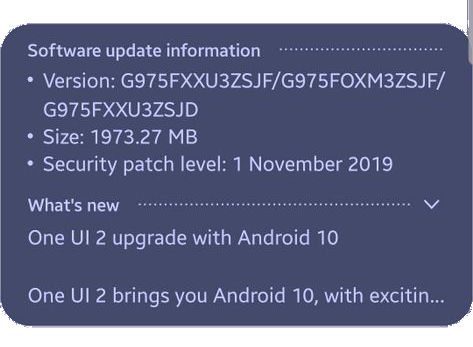 Samsung started to roll out the Android 10 update for Galaxy S10 in December 2019. The update is expected to reach almost all Galaxy S10 (S10, S10+, S10e, and S10 5G) by Q1 2020.
In most regions, the Andriod 10 update should be available by January 2020.
Android 10 update for Galaxy S10 is the first major update for the device. Some Galaxy Note 10 new features were ported to Galaxy S10 in the September 2019 update as explained in this post. But in some regions, this feature update is combined with the Android 10 update.
Of course, Galaxy S10 (all 4 variants) will get the new version of Android (Android 10). In addition to the underhood improvements in performance, security, and privacy, most of the Android 10 features are available in Galaxy S10 now.
This Galaxy S10 guide explains the top 10 new features you should try in the Android 10 update for Galaxy S10: native screen recorder, Android 10 navigation gesture, more info in Device Care, tweaked camera UI, enhanced biometrics, power limit for Wireless PowerShare, improved one-handed mode, OneDrive integration in the Gallery app, dark mode, and One UI 2.0.
Update: after receiving two additional major updates: Android 11 (One UI 3) update and Android 12 (One UI 4) update, Galaxy S10, S10+, and S10e reach to the end of life. Samsung stopped releasing security updates for Galaxy S10, S10+, and S10e from April 2023.
Native screen recorder
In addition to streaming your screen (e.g., play games), screen recording (not just screenshots) is very useful for technical support and sharing procedural info.
Samsung first introduced the native screen recorder in Galaxy Note 10. Now in the Android 10 update for Galaxy S10, all S10 phones (including S10e, S10, S10+, and S10 5G) have this nice feature.
Compared to the screen recorder on Galaxy Note 10, Samsung apparently polished the app a bit in Galaxy S10 so that you get more control.
Android 10 navigation gesture (full-screen gestures)
Google introduced navigation gestures in Android Pie with a Home button and an Overview button. In Android 10, the navigation gestures can be used without any buttons (aka, full-screen gestures).
In the Android 10 update for Galaxy S10, the new Android 10 navigation gestures were added.
Of course, you can still use Samsung's navigation features introduced in Android Pie (Android 9).
If you are not a fan of either of the navigation gesture implantations, you can use the traditional navigation buttons.
Anyway, the Android 10 navigation gesture is just an additional option.
You may check this guide on how to use navigation gestures on Galaxy S10 after the Android 10 update.
More info from Device Care
Device Care now offers more information on most cards.
For example, in the battery usage card, you can get more detailed information about battery usage and estimation.
Tweaked Camera UI
Samsung is still not sure how a good camera UI should be. So, they … Read the rest
The post Top 10 new features in Android 10 update for Galaxy S10 appeared first on Galaxy S10 Guides.
Top 5 new features added in Galaxy S10 September Update
simon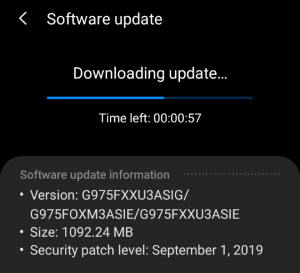 In the September (2019) security patch update for Galaxy S10 (including Galaxy S10, S10+, and S10e), Samsung ported some new features introduced for Galaxy Note 10 to Galaxy S10.
So, you can enjoy these Samsung Galaxy Note 10 exclusive features on Galaxy S10 now.
This Galaxy S10 guide explains the top 5 new features added in Galaxy S10 September update: Samsung DeX for PC, Link to Windows, new camera features (Live Focus Video, AR Doodle, Super steady, Night camera mode for all camera lens), the new video editor, and the dynamic lock screen.
Please note, in most regions, Samsung packed these features with the monthly security update (September). You can check the security patch level in Galaxy S10 Settings — About phone — Software information. You should be able to use these features mentioned if the Android security patch level is September 1, 2019, or later.
Samsung DeX for PC
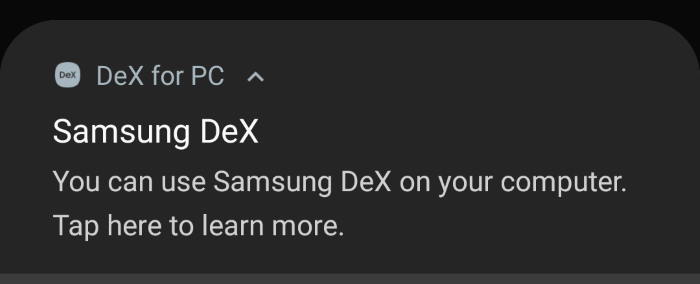
In addition to using a Samsung DeX pad, DeX station, or DeX cable, you can now just use a normal USB cable to launch Samsung DeX on a PC or laptop.
Samsung DeX for PC is one of the most welcomed Galaxy Note 10 features. It allows you to use Samsung DeX mode without carrying any dongles or finding a monitor.
By default, when you connect Galaxy S10 to the PC, the Samsung DeX notification will appear, as shown below.
Of course, to use Samsung DeX for PC with Galaxy S10 or Note 10, you need to install the app on the PC.
You may check this guide on how to use Samsung DeX for PC on Galaxy S10.
Link to Windows
 Link to Windows is a special version of Your Phone Companion app, which allows you to access and manage app notifications, check and reply messages, share recent photos (up to 25) on the PC/laptop.
Previously, you can download and install the app from Play Store.
But Link to Windows offers more than the Your Phone Companion app does, for example:
- Link to Windows offers screen mirroring (through WiFi). You can mirror the phone screen to the PC or laptop. Then use all apps installed on the phone with keyboard and mouse on the PC or laptop.
- You can access Link to Windows with the quick setting buttons.
Please note, Link to Windows on Samsung Galaxy S10 requires Windows 10.
New camera features
Samsung also ported some Galaxy Note 10 camera features into Galaxy S10 in this update.
Live Focus Video
Live focus video allows you to blur out the background when recording a video.
It works just like the live focus mode for photos.
You can find the Live Focus Video mode among the camera modes in the Galaxy S10 camera app.
AR Doodle
AR Doodle lets you record fun videos with handwriting or drawings on faces or other places. The doodles on the face can move with the face. The doodles in the space will be fixed in the same place, even … Read the rest
The post Top 5 new features added in Galaxy S10 September Update appeared first on Galaxy S10 Guides.
How to move apps to the micro SD card to free phone storage on Galaxy S10 ?
simon You can move apps to the micro SD card so that some precious phone (internal) storage can be freed up, although Galaxy S10 does not support adoptable storage.
Some apps may not support using the micro SD card. In this case, you can use developer options to overwrite the manifest and move the app the SD card.
This Galaxy S10 how-to guide explains the steps to move apps to the micro SD card on Galaxy S10, shows you how to make all third-party apps moveable to the SD card, and illustrates how to manage apps installed on the micro SD card.
Please note, as explained in Galaxy S10 specs, Galaxy S10 5G does not have an SD card slot. So, this guide applies to Galaxy S10, S10e, and S10+.
Also, when you use the micro SD card on Galaxy S10, you can only use one SIM card as explained in this guide. If you want to use two SIM cards on Galaxy S10, then you cannot use the micro SD card.
Steps to move apps to the micro SD card on Galaxy S10
You may follow these steps to move apps that support micro SD card to the SD card.
Step 1: Open Galaxy S10 settingsUSB
On Galaxy S10, open Galaxy S10 Settings in one of the following ways:
- Tap Settings icon on Galaxy S10 Home screen, or Apps screen. You may also put the Settings icon in an app folder.
- Tap the gear icon in the quick settings panel or the notifications panel.
- Use edge screen to access Galaxy S10 settings.
Step 2: Access Galaxy S10 Application Manager
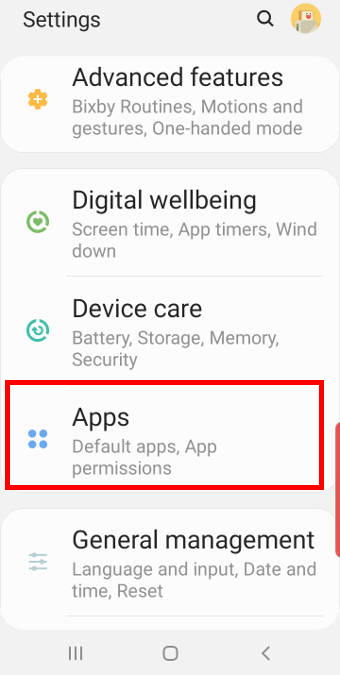
in Galaxy S10 Settings, tap Apps as shown below, to access the Application Manager.
Step 3: Access app details
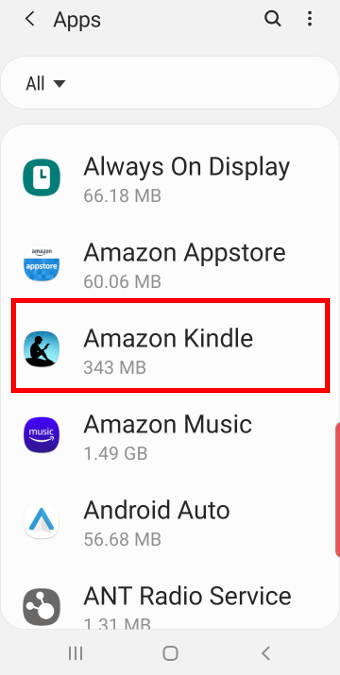
As shown in the screenshot above, in the Apps page (Application Manager), you can find all apps installed on your Galaxy S10.
If you want, you can tap the menu key (3 vertical dots) near the top right to include system apps in the list.
For example, in this tutorial, you want to move Amazon Kindle to the micro SD card.
Tap the app (Amazon Kindle), as shown below, to see the details of this app.
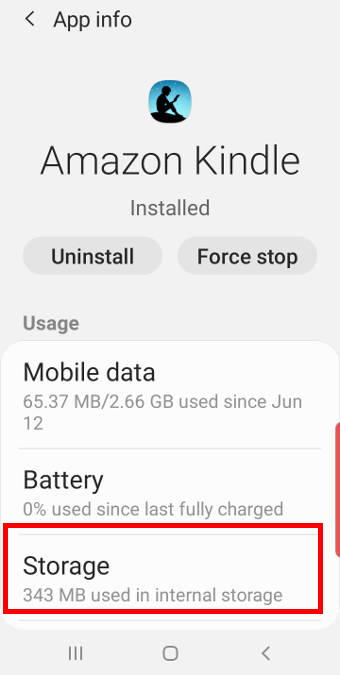
In the App info page (app details), you can uninstall the app, update the app, force stop the app, check and manage resources used by the app.
Of course, you can also check and manage storage usage.
Step 4: Move the apps to the micro SD card
In the App info page, tap Storage as shown below.
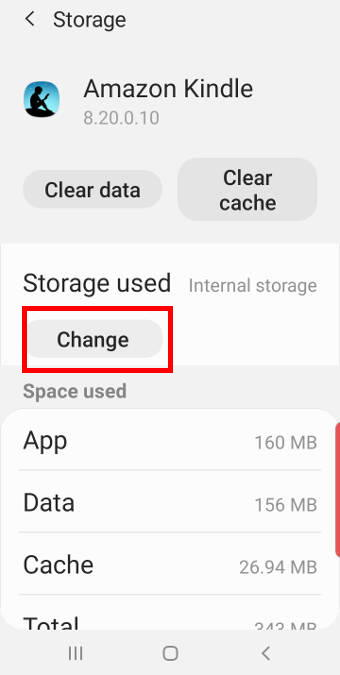
In the storage page, as shown above, you can find the Change button.
This button appears only if:
- You have inserted a micro SD card to Galaxy S10 in the SIM card tray; AND
- The app supports micro SD card usage.
If you cannot see the Change button, it means at least one of the two conditions is not met.
For third-party apps, you can force them to be moveable … Read the rest
The post How to move apps to the micro SD card to free phone storage on Galaxy S10 ? appeared first on Galaxy S10 Guides.
Galaxy S10 wireless charging guide
simon Galaxy S10 wireless charging allows you to charge Galaxy S10 battery without using a cable on the phone.
But some Galaxy S10 owners still have some questions or concerns about using wireless charging on Galaxy S10 and therefore may haven't tried this nice feature yet.
This Galaxy S10 how-to guide first explains the confusing terms of wireless charging, fast wireless charging, and fast wireless charging 2.0, and why they are relevant when you charge Galaxy S10 wirelessly. Then I will show you how to disable fast wireless charging and answer some questions related to wireless charging on Galaxy S10.
What is wireless charging? What is fast wireless charging? and what is fast charging 2.0?
All smartphones support cable charging. Normally, you can connect the phone to the charger (adapter) through a USB cable (or a proprietary cable) to charge the phone.
The other way to charge a phone battery is wireless charging without using any cables on the phone.
Wireless charging used in the smartphone industry now is all inductive charging, which transfers energy from the charging station to the phone through induction coils.
On the charging station (charging stand, charging base), the induction coil inside the station uses the current from the adapter to create an electromagnetic field. The induction coil in the phone, once paired with the coil in the station, takes power from the electromagnetic field and converts it into charging current for the phone battery.
Wireless charging usually is less efficient than cable charging because energy has to be converted twice: current –> electromagnetic field in the charging station, and electromagnetic field –> current on the phone. So, traditionally, the wireless charging speed is slow. The normal wireless charging can only output charging power up to 5W. Galaxy S6 is the first Samsung phone with wireless charging.
To improve the charging speed, Samsung announced fast wireless charging with Galaxy S7. The maximum charging power output is about 7.5W.
With Galaxy S10, Samsung announced fast wireless charging 2.0, which supports up to a 12W output.
As explained in this guide:
Fast wireless charging 2.0 is based on Qi wireless charging standard set by Wireless Power Consortium. The 2.0 was coined by Samsung to differentiate its implementation from previous fast wireless charging.
So, fast wireless charging 2.0, one of the top 10 new features of Galaxy S10, is not a new industry standard.
The major difference among wireless charging, fast wireless charging, and fast wireless charging 2.0 is the charging power (5W vs 7.5W vs 12W). And therefore, they are backwards compatible.
What do you need to use wireless charging for Galaxy S10 battery?
You need 3 components to use wireless charging:
- A phone supports wireless charging.
- A wireless charging station.
- An adapter that supplies power to the charging station.
Whether you are using normal wireless charging, fast wireless charging, or fast wireless charging 2.0, is determined by the lowerest one among the 3 components.
For example, since Galaxy S10 … Read the rest
The post Galaxy S10 wireless charging guide appeared first on Galaxy S10 Guides.
How to use app folders on Galaxy S10 Home screen and Apps screen?
simon You can use app folders on Galaxy S10 Home screen and Apps screen to organize apps and reduce the number of panels (pages).
Although it is not a new feature, many Galaxy S10 owners may be confused about the differences when managing app folders on the Home screen and Apps screen.
This Galaxy S10 how-to guide explains why you need app folders, the limitation of the app folders, how to create, use, and manage app folders on both Galaxy S10 Home screen and Apps screen.
If your Galaxy S10 has been updated to Android 12, you may check this updated guide on how to use app folders on Galaxy phones with Android 12 (One UI 4).
What are app folders on Galaxy S10? Why do you need them?
App folders are simply a folder of app icons. On Galaxy S10 Home screen and Apps screen, each app folder occupies one slot (grid point), like one app icon.
So, using app folders can help you:
- Save screen space. You do not want to scroll 20 home screen panels to find an app.
- Organize apps. You can organize similar apps or apps from one developer into one app folder so that you can locate them very quickly.
In fact, when you unboxed your Galaxy S10, you already found the Samsung folder and the Google folder in Galaxy S10 Apps screen.
Please note, although Galaxy S10 lock screen has two spots (bottom left and right) for two apps, you cannot use app folders there.
Galaxy S10 Edge screen supports app pair, and app folders (which are created in the Edge screen) on the Apps edge.
What are the limitations of app folders?
There are a few limitations when you use app folders on Galaxy S10, including
- Galaxy S10 does not support nested app folders. You are not allowed to put an app folder under another app folder.
- You cannot customize the screen grid for the app folders. In Galaxy S10 Home screen settings, you can customize the screen grid from 4×5 to 4×6 to 5×5 or to 5×6. But the layout of app icons inside the app folder is always 4×4. If you put more than 16 apps in one app folder, a new panel inside the folder will be added automatically.
- On Galaxy S10 App screen, one app icon can appear only in one app folder. All app icons on the Apps screen can only be shown once. When you put an app into an app folder in the Apps screen, this app icon will only appear in the app folder. You cannot find it elsewhere on the Apps screen. Please note, Galaxy S10 Home screen does not have this limitation. In other words, one app icon can appear multiple times, including multiple app folders on the Home screen.
- You can only use app folders on Galaxy S10 Home screen and Apps screen. You cannot use them on the
The post How to use app folders on Galaxy S10 Home screen and Apps screen? appeared first on Galaxy S10 Guides.
How to enable and use Galaxy S10 developer options?
simon Galaxy s10 developer options offer some hidden features for phone enthusiast, not just developers.
By default, the developer options are hidden on all Android phones. You can unhide them on Galaxy S10, S10+, S10e, and S10 5G, then use them.
This Galaxy S10 how-to guide explains what you can do with the Galaxy S10 developer options, shows you how to enable and unhide the developer options, how to disable them after enabling them, and lists the available developer options on Galaxy S10.
What are Galaxy S10 developer options?
Traditionally, Android developers can access some special features to:
- Test their apps.
- Enable USB debugging.
- Use ADB commands.
- Monitor resource usage.
- Limit resource usage.
- Enable some beta features.
Of course, in addition to developers, more and more experienced Android users also enable some features in the developer options.
In recent years, before a new version of Android is officially released, Google released beta or developer versions to developers to help them migrate apps to the new Android versions.
In these developer releases or beta releases, a lot of new features are hidden in the developer options. Google later moves some of them to the official features. Of course, some also stay in the developer options.
When the new version of Android is released, Google usually removes most of the beta features that were not delegated to official features from the developer options and only keeps common tools and features and a few beta features.
Samsung may also add or remove some entries in the developer options on Galaxy phones.
For Galaxy S10 owners, you may also find that the developer options are useful. For example,
- You can enable quick settings developer tiles (e.g., the night mode button in the quick settings panel).
- You can enable USB debugging so that you can access some features from a PC (e.g., taking a lot of screenshots from a PC).
- You can enable Wi-Fi safe mode.
- You can change the default Bluetooth audio codec.
- You can set animation speed or disable animation to make Galaxy 10 “look” faster.
- You can manage and limit the background processes.
- You can allow all apps to use external storage (e.g., SD card).
- You can also force all apps to be compatible with Galaxy S10 multi-window.
In short, the developer options on Galaxy S10 are not only for app developers. They may improve your experience with Galaxy S10 if you know what you want.
How to unhide (enable) developer options on Galaxy S10?
In all Android phones, the developer options are hidden by default. Galaxy S10 is not an exception.
To unhide or enable Galaxy S10 developer options, you may follow these steps:
Step 1: Open Galaxy S10 Settings
You can open/access Galaxy S10 Settings in several different ways including:
- Tap the Settings app icon on Galaxy S10 home screen.
- Tap the Settings app icon on Galaxy S10 Apps screen.
- Tap the Settings (gear) icon on the Galaxy S10 notification panel.
- Tap the Settings (gear) icon on
The post How to enable and use Galaxy S10 developer options? appeared first on Galaxy S10 Guides.
How to hide suggested apps on Galaxy S10? and how to stop Finder uploading your data to Samsung servers?
simon You can hide suggested apps on Galaxy S10 if you do not like this feature in the Samsung Finder. You can also prevent Finder from uploading your data to Samsung servers.
Although the suggested apps may be useful for some users, very often, it is not intelligent enough and therefore some owners feel it is a waste of precious screen space.
This Galaxy S10 how-to guide shows you how to disable the suggested apps in Samsung Finder on Galaxy S10, other Finder options, and how to stop Finder uploading your usage data to Samsung servers.
What is Samsung Finder? And what are the suggested apps on Galaxy S10?
When talking about search, many think about Google.
But on Galaxy phones, Samsung has built its own local search engine for a long time. And they named it Finder in recent devices or S Finder in older devices.
So, Samsung Finder is just a local search app in Galaxy phones. Its strength is finding local files, emails, contacts, call logs, messages, apps, settings, rather than web search.
Finder is everywhere on Galaxy S10. The search icon in the apps screen, quick settings panel, notification panel, edge screen, Recents screen, and settings page is linked to the Finder app.
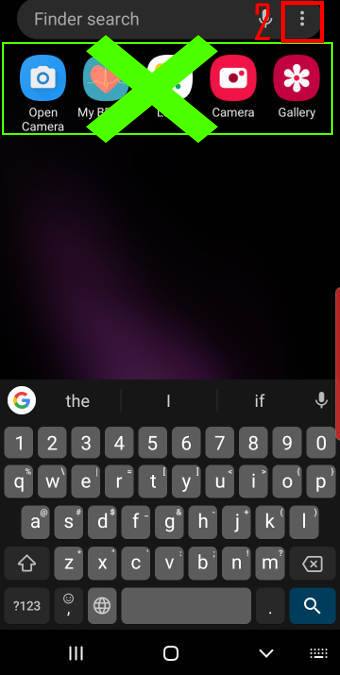
As shown below, by default, on Galaxy S10, there is a row of “suggested” apps below the search bar.
The suggested apps actually update dynamically when you type. It sounds interesting and impressing.
But very often, many owners find it is useless. and want to disable it.
How to hide suggested apps on Galaxy S10?
To hide the suggested apps in the Finder on Galaxy S10, you may follow these steps.
Step 1: Open the Finder
You can tap the search icon in any locations to open the Finder.
For example, as shown in the screenshot below, you can tap the search icon in the quick settings panel to access the Finder.
![]()
You can also tap the Finder app icon in Galaxy S10 Home screen or Apps screen to launch it.
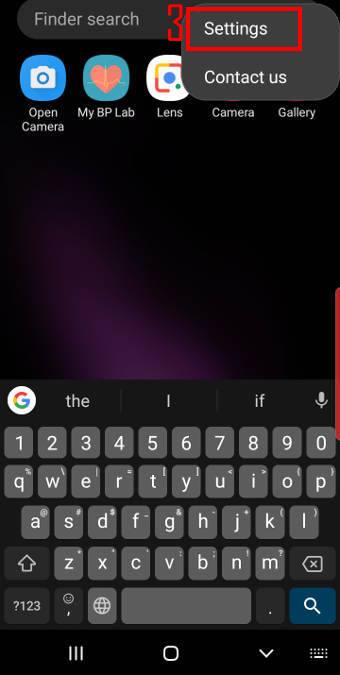
Step 2: Tap the menu icon (3 vertical dots)
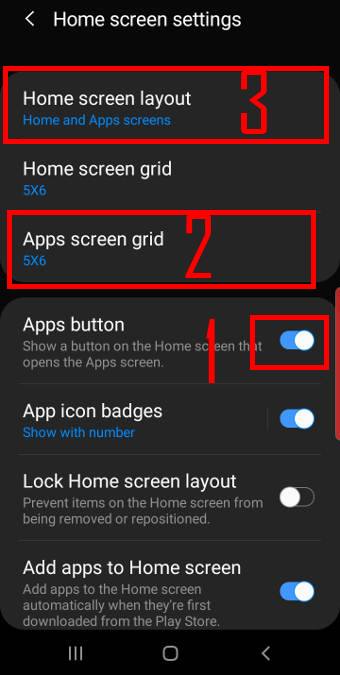
As shown earlier, tap the three vertical dots (marked as 2).
Step 3: Tap Settings in the menu
As shown below, tap Settings (marked as 3) to open Finder settings.

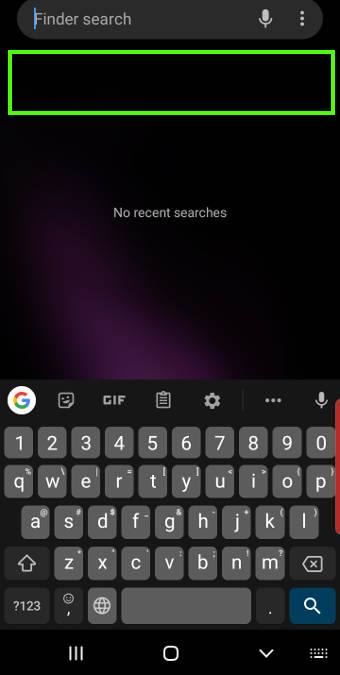
Step 4: Disable suggested apps in the Finder (to hide them)
As shown above, in the Finder settings, you can find the option to enable/disable suggested apps.
You can tap the switch to enable or disable this feature.
After disabling the suggested apps in Finder, you can find more space as shown below.
Other Finder settings on Galaxy S10
In addition to showing or hiding the suggested apps, you can also tweak other Finder settings as shown earlier.
When using Finder, you may consider disabling customization services if you do not want to upload your data to the server.
In Finder settings, tap Customization service to enable/disable the customization.
In a nutshell, if you enable the customization service (this is … Read the rest
The post How to hide suggested apps on Galaxy S10? and how to stop Finder uploading your data to Samsung servers? appeared first on Galaxy S10 Guides.
How to use 5 shooting methods for Galaxy S10 camera?
simon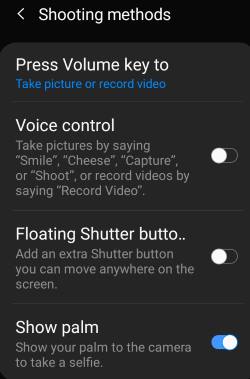 In addition to the shutter button, you can also use other shooting methods for Galaxy S10 camera including the floating shutter button, volume key (button), voice, or show your palm to take photos.
These shooting methods work on all Galaxy S10 phones (S10, S10e, S10+, and S10 5G) when using the default Samsung camera app.
This Galaxy S10 camera guide explains how to enable and use all shooting methods on Galaxy S10.
How to take a photo (or record a video) with Galaxy S10 camera app?
As explained in this guide, in the Galaxy S10 camera app interface, you can:
- Tap the shutter button to take a photo or record a video.
- Hold the shutter button to take burst shots or create GIF. This feature is configurable in Galaxy S10 camera settings.
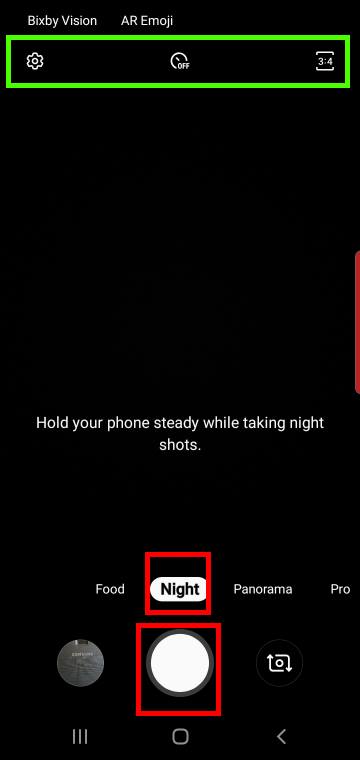
Of course, you can choose different camera modes including the new night mode for different scenarios.
What are the available shooting methods for Galaxy S10 camera?
In addition to the fixed shutter button, Galaxy S10 camera app also offers other shooting methods including:
- Use the volume key.
- Use your voice.
- Use the floating shutter button.
- Show your palm.
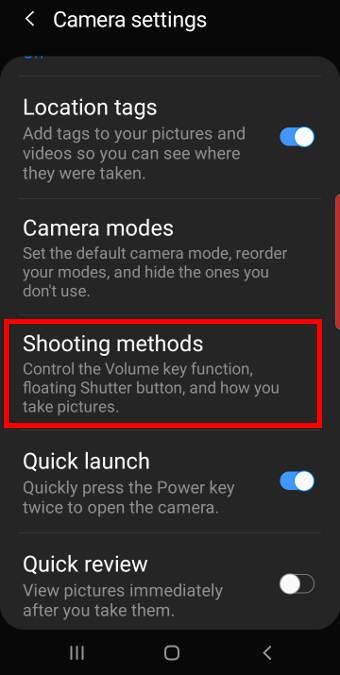
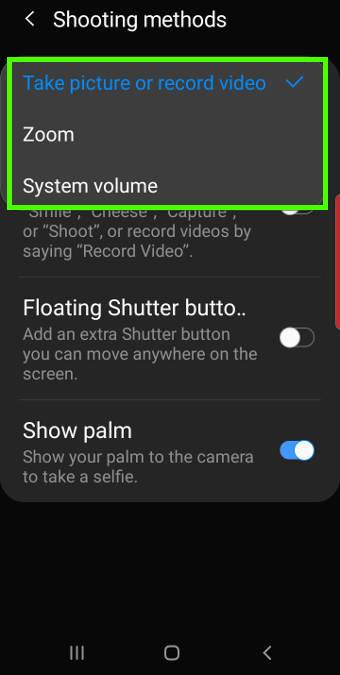
In Galaxy S10 camera settings, as shown in the screenshot below, tap Shooting methods to enable/manage shooting methods for the camera app.

As shown in the screenshot above, you can find the possible 4 additional shooting methods for Galaxy S10 camera.
Voice control, floating shutter button, and show palm are all disabled by default. You need to use the switch to enable the method individually.
Show palm method only works for the front camera (selfies). The other 3 shooting methods work for both the front and rear cameras.
How to use shooting methods for Galaxy S10 camera?
The fixed shutter button is always available in all scenarios.
The other 4 methods must be enabled before you can use them.
Use the power button to take photos on Galaxy S10
By default, in Galaxy S10 camera app, you can press the volume key to take photos.
But you can assign the volume key for other functions.
Tap Press volume key to (marked as 1) in the shooting methods page to get the options as shown below:
- Take picture or record video (default).
- Zoom.
- System volume.
Please note, the camera app does not differ volume up or volume down when you use it to take photos (or record videos).
If you assign the volume key for zoom, then volume down and volume up will correspond to zoom out and zoom in respectively.
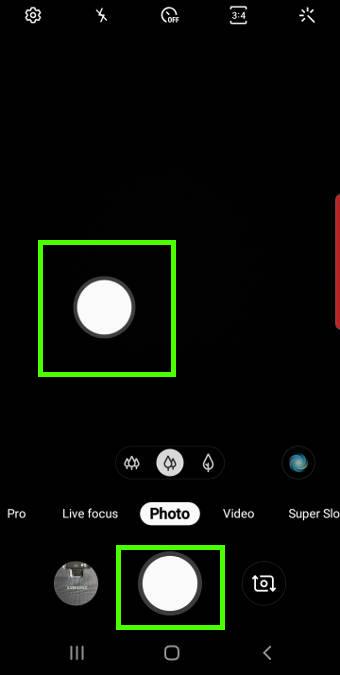
Use the floating shutter button to take photos on Galaxy S10
Once you enable floating shutter button (marked as 3) in the shooting methods, you can then find an additional shutter button as shown above.
You can tap and hold the floating shutter button, then move it to any desired location.
The floating shutter button can be used exactly as the fixed shutter button. It is usually used for selfies, although … Read the rest
The post How to use 5 shooting methods for Galaxy S10 camera? appeared first on Galaxy S10 Guides.
How to use Galaxy S10 night mode?
simon Galaxy S10 night mode allows you to use the dark theme in system-wide to help your eyes and save battery. So, it is sometimes called the dark mode.
On Galaxy S10, Samsung chose to extend the dark theme features in the stock Android Pie to deliver better user experiences with the new One UI.
This Galaxy S10 how-to guide explains the details of the night mode on Galaxy S10 (including Galaxy S10, S10e, S10+, and S10 5G), and shows you how to enable and customize the night mode.
What is Galaxy S10 night mode? Why you may need it?
By default, Android phones tend to use a white background. This usually looks great when you show the screenshot in presentations.
But it is not good for your eyes, especially in the low-light conditions, for example, in a theatre, or in the bedroom.
For the OLED screen like the one in all Galaxy S10 phones, the black (dark) background can save noticeable battery as well.
In Android Pie (Android 9), Google finally introduced the dark theme. But it is half-baked: the setting page still uses a white background even you enable the dark theme, as explained in this guide.
Samsung started to support third-party themes since the Galaxy S6. So, technically, you can get a dark theme for your S6, S7, S8, S9, and S10 with a third-party theme from the Galaxy Store. But the quality of these third-party themes varies sharply.
In Android Pie update, Samsung implemented and enhanced the dark theme feature in the stock Android. And it is named as the night mode.
So, Galaxy S10 night mode is essentially an enhanced (improved) version of the dark theme in Android Pie.
You should not confuse this night mode with the newly added night mode in Galaxy S10 camera app, which is just a camera mode for low-light conditions. The night mode discussed here is a theme (or template) with a dark (black) background.
In the Android 10 update for Galaxy S10, a new dark mode was introduced. In Android 12 update for Galaxy S10, you may use Extra Dim to dim the screen beyond the minimum brightness level.
How to enable and customize the Galaxy S10 night mode?
By default, the night mode is not enabled on Galaxy S10 (S10, S10+, S10e, and S10 5G). You need to enable it by following the steps below if you want to try or use the night mode.
In Galaxy S10 Settings, tap Display as shown in the screenshot below.
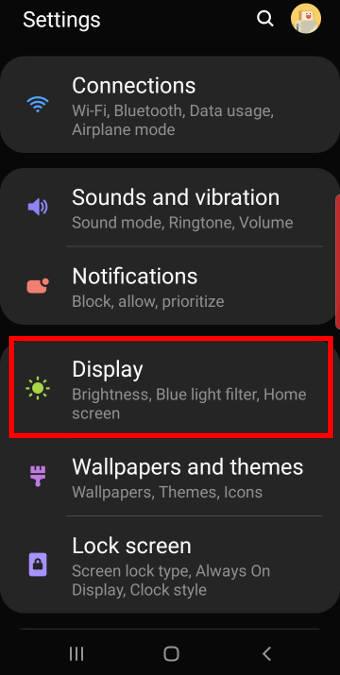
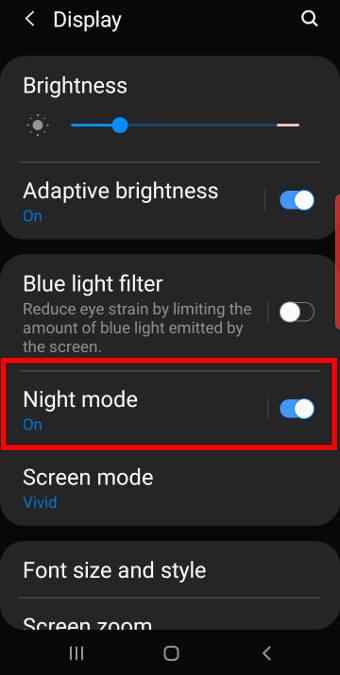
In the Display settings page, as shown above, you can find the Night mode option.
You can tap the switch (or drag it to the right side) to enable the night mode immediately.
Of course, you can tap Nigth mode (not the switch) to open the night mode settings so that you can further customize (schedule) it.
As shown below, you can use the night mode on Galaxy S10 in two ways… Read the rest
The post How to use Galaxy S10 night mode? appeared first on Galaxy S10 Guides.
How to power on, power off, and reboot Galaxy S10 even when the phone hangs?
simon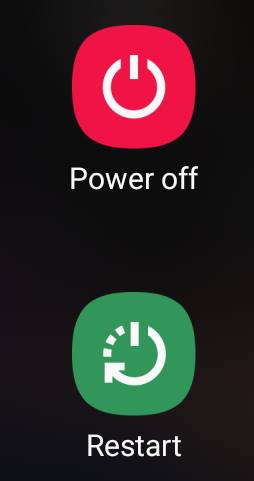 When Galaxy S10 hangs, you can hold the Power button AND the volume down button for more than 7 seconds to reboot the phone forcefully.
There are a few other combinations of keys (buttons) that you may need to know to power off, power on, reboot, reboot into recovery mode, or reboot into download mode on Galaxy S10, S10+, S10e, and S10 5G.
This Galaxy S10 how-to guide explains how to reboot Galaxy S10 when the phone hangs, and other key combinations for powering on, powering off and rebooting Galaxy S10 (including all 4 Galaxy S10 models).
How to reboot Galaxy S10 when the phone hangs?
Although it happens rarely, Galaxy S10 may hang (not responsive), just like other electronic devices or other Android phones.
If this happens to your Galaxy S10, you may also find the phone does not respond to the power button as well.
Up to Galaxy S5, Samsung used a removable battery in their phones and you can remove the battery to force a reboot.
But since Galaxy S6, Samsung has switched to non-removable batteries. And therefore, the battery removing method is not working for Galaxy S10.
So, when Galaxy S10 hangs (even not responsive to the power button), you can hold the Power button and the volume down button (2 buttons), as shown below, for more than 7 seconds to reboot the phone forcefully. You may check the Galaxy S10 layout to locate the buttons.

Technically, holding these two buttons is equivalent to removing (and putting back) the battery.
Using the power button and power button menu on Galaxy S10
Normally, you can press the power button on Galaxy S10 to:
- Power on the phone (when the phone is off).
- Wake up the screen (when the screen is off).
- Turn off the screen and lock the phone. (when the screen is on)
- Take photos in the camera app (if you enable it).
- End a call (if you enable it).
If you quickly press the power button twice, you can launch the camera app. This is called Galaxy S10 camera quick launch.
You can also call out the power button options (power button menu) as shown below by long-press the power button for about 2 seconds.
In Galaxy S10 power button menu, there is no shortcut for the screenshot. This is different from the stock Android Pie. If you need to take screenshots, you may check this guide.
Please note, normally, you need to use the Power off button in the power button menu to power off Galaxy S10.
The Reboot button allows you to reboot Galaxy S10 gracefully. Reboot Galaxy S10 gracefully will not lose any data. But if you reboot Galaxy S10 forcefully, all unsaved data will be lost.
If you hold the power button for more than 5 seconds, Galaxy S10 will reboot.
How to reboot Galaxy S1o into recovery mode?
Occasionally, you need to reboot Galaxy S10 into the recovery mode, for example, to clear … Read the rest
The post How to power on, power off, and reboot Galaxy S10 even when the phone hangs? appeared first on Galaxy S10 Guides.
How to avoid mirrored photos with Galaxy S10 front camera?
simon By default, Galaxy S10 camera app saves front camera photos as in the preview screen, which is mirrored. Very often, you may want to avoid mirrored photos.
Although you can rotate the photo in any photo editors, you can easily change camera settings to avoid mirrored photos.
This Galaxy S10 camera guide explains why you get the mirrored photos, how to stop saving mirrored photos, and how to flip the mirrored photos as normal photos without using any third-party apps.
Why do you get the mirrored photos from Galaxy S10 front camera?
When you take selfies with Galaxy S10 front camera (see Galaxy S10 layout), the preview screen shows you a “mirrored” image for you to check.
Actually, all smartphone front cameras work in this way. This is consistent with what you do with makeups and clothes: you check them with a mirror.
But very often the mirrored photo is not what you want for a selfie photo. You often want to get a “normal”, not mirrored (flipped), photo, as what you get from the rear camera.
Unfortunately, most Android phone manufacturers by default save the mirrored photo for the front camera.
Of course, when saving, most Android phone manufacturers allow you to change the saving option in camera settings to avoid the mirrored photos.
Google Nexus and Pixel phones always avoid the mirrored photo when using the front camera. Actually, on Nexus and Pixel phones, there are no options for you to save a “mirrored” photo, although in the preview screen you get the mirrored image.
So, do not blame the Galaxy S10 front camera if you hate the mirrored selfies.
You should blame Samsung's developers, who set the default as saving the mirrored photos.
Of course, you can change the Galaxy S10 camera settings to stop saving mirrored photos (read on).
For the mirrored photos saved on your phone, you can also easily flip them back to normal photos (read on).
How to avoid the mirrored (flipped) photos from Galaxy S10 front camera?
As mentioned, the mirrored photo issue is due to the default settings. You may follow these steps to stop saving the mirrored photos.
Step 1. Open the Camera app
You can open the camera app from the Galaxy S10 Home screen, or apps screen, or even the lock screen.
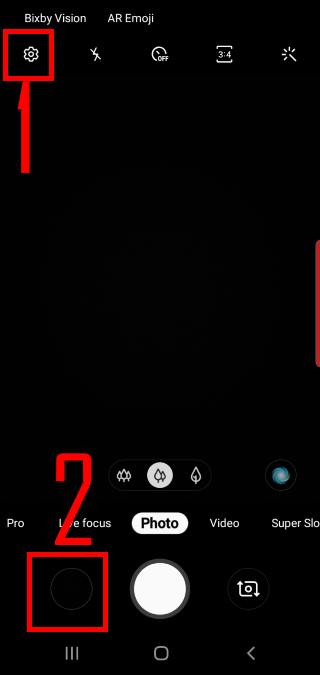
Step 2: Access camera settings
As shown in the screenshot below, tap the Settings icon (marked as 1) to access Galaxy S10 camera settings.
You can find a lot of options related to photo settings. For example, you can also change photo size settings for Galaxy S10 cameras.
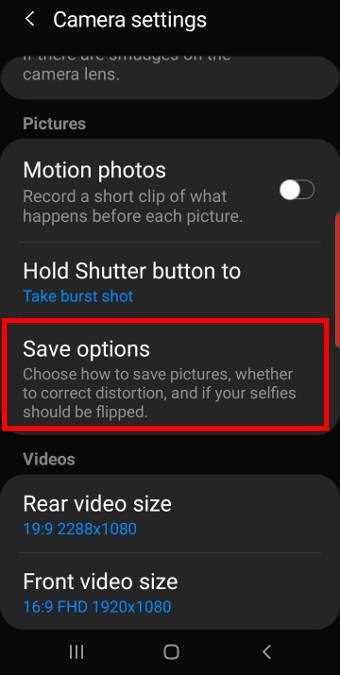
Step 3. Change save options
In the camera settings, tap Save options as shown above.
Step 4. Disable save pictures as previewed
To avoid the mirrored photos, you can disable the Pictures as previewed in the save options.
As shown below, tap Picture as previewed to disable the mirrored photos.
Please note, in old Galaxy phones, the option may be named as “save … Read the rest
The post How to avoid mirrored photos with Galaxy S10 front camera? appeared first on Galaxy S10 Guides.
How to use Galaxy S10 clear view cover (S-View flip cover)?
simonGalaxy S10 clear view cover (aka Galaxy S10 S-View flip cover) is one of the flagship accessories from Samsung for S10, S10e, S10+, and S10 5G.
The unique S-View features make the cover stand out, although some original S View features were removed or redesigned.
This Galaxy S10 accessories guide explains the changes, special features, pros and cons of the Galaxy S10 clear view cover. It also shows you how to customize and use the cover, and how to use the always-on display on the clear view cover.
The S View cover is available for all Galaxy S10 models (S10, S10+, S10e, and S10 5G). The only difference is the cutout and size of the case. In this guide, S10 refers to all of the four S1o models.
What's new in the Galaxy S10 clear view cover (S-View flip cover)?
Samsung always releases some “official” accessories for its Galaxy phones.
Galaxy S10 clear view cover, aka Galaxy S10 S-View flip cover in some regions, is an evolution of the “S View” cover.
But compared to the Galaxy S9 clear view cover and Galaxy S8 clear view cover, there are some changes:
- No kickstand. The kickstand in S-View serials covers for S8, S9, Note 8 and Note 9 was removed in S10.
- Glossy back. The glossy plastic replaces the texture-rich back. It is a fingerprint magnet.
- Some textures “inside” the front panel. The translucent front panel looks similar to that in S9. But if you stare at it at 90 degrees, you may notice there are some textures. Of course, the texture is inside, not outside of the panel.
- Lighter and thinner. Because the kickstand was removed, the cover is lighter and thinner compared to that for S9.
On the software side, there are almost no changes.
What are the special features of the clear view cover (S-View flip cover)?
Galaxy S10 clear view cover shares similar S-View features as in S9 and S8:
- Respond to calls, alarms, and events without flipping the cover.
- Control music on the cover.
- Read important information, including time, date, and battery level on the cover.
- Auto lock and unlock.
- Use faceWidgets on the cover.
Please note, there is no separate S-View window as in Galaxy S7 S-View cover. Since S8, the full front panel is translucent. The actual display is always on the phone screen.
How to apply and remove the Galaxy S10 S View cover?
When you apply the Galaxy S10 clear view cover to Galaxy S10, S10e, S10+, and S10 5G, you should fix the top part first. Then finish the bottom part.
When you want to remove the cover (to take out the phone), you should start from the bottom. Once the bottom part of Galaxy S10 is taken out of the cover, you can easily take the phone out.
Do NOT try to start from the top if you want to remove the cover. You may damage the cover … Read the rest
The post How to use Galaxy S10 clear view cover (S-View flip cover)? appeared first on Galaxy S10 Guides.
How to use Galaxy S10 Apps screen?
simon Galaxy S10 Apps screen organizes all apps installed on the phone so that you can access, use and manage them easily.
This Galaxy S10 how-to guide explains what Galaxy S10 apps screen is, how to access it, how to hide apps button, how to hide the apps screen, and how to customize the apps screen on Galaxy S10.
This guide applies to all Galaxy S10 modes: Galaxy S10, S10e, S10+, and S10 5G.
What is Galaxy S10 Apps screen?
Apps screen is common in all Android phones. Sometimes (and traditionally), it is called App drawer.
Essentially, the Galaxy S10 Apps screen is the warehouse of all apps installed on the phone. The individual app icon on the home screen actually is a shortcut to the corresponding app in the Apps screen.
But Apps screen is different from the Home screen in the following aspects:
- Apps screen can only host apps. You cannot put widgets, apps shortcuts, user files, or photos in the apps screen.
- Apps screen does not support duplicate listings. One app can only appear once in the Apps screen.
- You can hide the apps screen. Surely, you cannot hide the home screen.
The Apps screen shares the same wallpaper with the home screen.
You can also use apps screen in the landscape mode (same as Galaxy S10 Home screen landscape mode).
How to access Galaxy S10 Apps screen?
By default, there are two ways to access Galaxy S10 App drawer:
- Use the touchscreen gesture (swipe up). On the home screen, you can swipe upwards to access the apps screen as shown in the picture below.
- Use the apps button in the favorites tray. You can tap the apps button to open the Apps screen.
By default, you can also use the swipe down gesture to access the apps screen on Galaxy S10. But the swipe down gesture on Galaxy S10 home screen can be assigned to access notifications as explained in this guide (coming soon).
If you do not hide the apps button, you can tap the button as shown below to access the apps screen on Galaxy S10.
Of course, you can hide the apps button and access apps screen only with the touchscreen gesture.
Once in the apps screen, you can then swipe left and right to navigate to different pages.
You can swipe upwards or downwards in the apps screen to return to the home screen. The quick-open notification panel setting does not affect the apps screen.
How to hide apps button in the favorite tray?
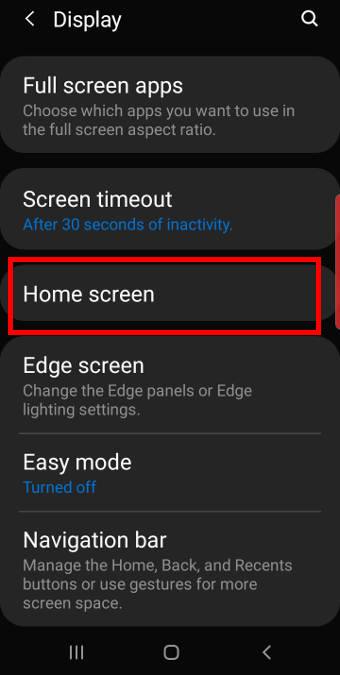
In Galaxy S10 Settings, tap Display.
As shown in the screenshot below, in the display settings, tap Home screen.
On Galaxy S10, the apps screen settings are grouped under home screen settings.
As shown above, you can:
- Show or hide the apps button (marked as 1) using the switch.
- Set the screen grid for the Apps screen (read on).
- Show or hide apps screen (read on )
The post How to use Galaxy S10 Apps screen? appeared first on Galaxy S10 Guides.
How to use Galaxy S10 camera night mode?
simon Samsung added the Galaxy S10 camera night mode for the main camera in the April (2019) firmware update. You can now use the dedicated camera night mode to take better photos in low-light conditions.
Update 1: Galaxy S10 camera night mode is now available for all camera lenses, including the selfie (front-facing) camera(s) following the Galaxy S10 September update.
This Galaxy S10 camera guide explains the details of the Galaxy S10 camera night mode, how to use the night mode, and differences between the night mode and the Auto (Photo) mode.
The camera night mode is available for all Galaxy S10 phones (S10, S10+, S10e, and S10 5G). In this guide, Galaxy S10 refers to all these models.
Please do NOT confuse this camera mode with the dark theme (which is also called night mode).
What is Galaxy S10 camera night mode?
On Galaxy S10 (S10, S10e, S10+, and S10 5G), you may find there was no night mode for the camera when you got the phone.
Samsung removed the night mode from the camera app since Galaxy S6 as explained in this guide.
Although Samsung claimed the Auto mode (Photo mode) is good enough and you do NOT need a dedicated camera night mode, many owners do not agree. They want to get back the dedicated night mode.
On Galaxy S10, Samsung bragged about the Bright Night feature for the S10 rear camera and did not give users a dedicated mode for it. It is supposed to help Galaxy S10 owners take nice photos in low-light conditions automatically. Apparently, the Photo mode often fails to deliver the promise.
So, in the Galaxy S10 firmware update released in April, Samsung finally added a dedicated night mode for the camera. For US versions of Galaxy S10 (all variants), the new camera mode was added with the June security update.
Yes, after 5 years (since Galaxy S5), Samsung finally realized the Auto mode (or the Photo mode) is not sufficient for taking photos in low-light conditions.
Now, on S10 (all variants), you can choose the night camera mode when you need to take photos when the light is not good.
Please note, the new Galaxy S10 camera night mode is available only for the main rear camera (12MP).
Update: if your Galaxy S10 was updated to September (2019) security patch, then the nigh camera mode is available for all camera lenses as explained in this guide. You can even use the camera night mode when taking selfies with the front camera.
How to access and use the camera night mode?
You can access the camera night mode like other camera modes.
On the Galaxy S10 camera app interface, as shown in the screenshot below, the default camera mode is Photo (aka Auto) mode (or the last used camera mode if you enable the option in Galaxy S10 camera settings).
You can swipe left as illustrated to access the new camera night mode.
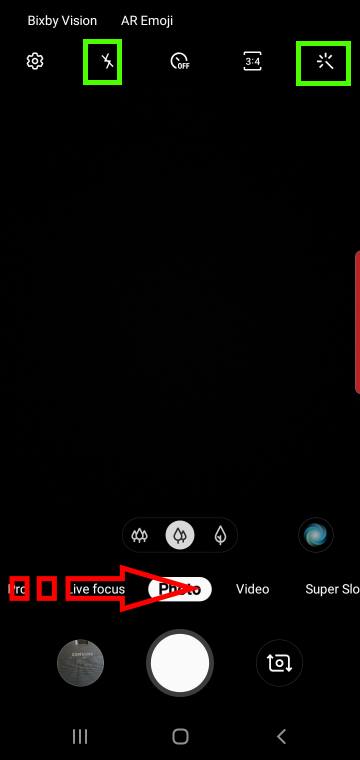
As … Read the rest
The post How to use Galaxy S10 camera night mode? appeared first on Galaxy S10 Guides.
How to use Galaxy S10 edge screen?
simonSamsung Galaxy S10 edge screen allows you to access some features and apps quickly from the curved the display without navigating to the home screen or apps screen.
Since the inception of the curved-screen in Galaxy Note Edge, Samsung tried hard to develop some killing features for the curved screen.
This Galaxy S10 how-to guide explains everything you need to know about Galaxy S10 edge screen.: what is edge screen, how to access and use edge screen, edge lighting, edge panels, and Apps edge.
What is Galaxy S10 edge screen?
Samsung introduced the edge screen feature since Galaxy Note Edge (Note 4 Edge). But edge screen on Galaxy Note Edge is a separate display area to the right side of the main screen.
Since Galaxy S6 Edge, edge screen has been no longer a separate part. It refers to a part of the main screen linked to the curved edges of the display.
So, Galaxy S10 edge screen is not a separate screen. Instead, it is just part of the display close to the curved edges on both sides of Galaxy S10, S10+ and S10 5G as illustrated in Galaxy S10 layout.
Because Samsung started to reduce the curved part of the screen from Galaxy S8, many new Galaxy S8, S9, Note 8, Note 9 and S10 owners may even not realized the curved edges and the special features associated with them.
Galaxy S10 edge screen includes two fundamental features:
- Edge lighting. You can use edge lighting the light up the edges of the screen when notifications arrive.
- Edge panels. You can put frequently used apps and some special tools in the panels so that you can access them quickly.
If you disable both edge lighting and edge panels, Galaxy S10 edge screen will be disabled automatically. This is the only way to disable Galaxy S10 edge screen features.
Galaxy S10 edge screen works on all screens (except AOD)and apps when in portrait mode. You can use it on the home screen, lock screen, apps screen, and when using any apps.
When you use edge screen on the lock screen, some features will not work until the phone is unlocked. This is a security feature, not a bug.
If your home screen or lock screen is in landscape mode, or you are using an app in landscape mode, edge panel handle will disappear automatically. In other words, Galaxy S10 edge screen does NOT work in landscape mode.
How to access the edge screen?
You can access the Galaxy S10 edge screen by dragging the edge panel handle to the center of the screen, as shown below.
The edge panel handle appears on the right side by default. You can customize it so that it can appear on either left or right sides. You can also choose a color for it (read on).
The touchscreen gesture is dragging. But the swipe gesture works as well.
How to customize the Galaxy S10
The post How to use Galaxy S10 edge screen? appeared first on Galaxy S10 Guides.
How to use Galaxy S10 home screen edit mode?
simonGalaxy S10 Home screen edit mode allows you to customize the home screen with themes, widgets, screen panels, wallpapers.
Although some customizations and options can be accessed from Galaxy S10 settings or quick settings, a few features can only be accessed from the Galaxy S10 home screen edit mode.
This Galaxy S10 how-to guide explains when you need to use Galaxy S10 home screen edit mode, what you can do in the edit mode, and how to access and use Galaxy S10 home screen edit mode.
What is Galaxy S10 home screen edit mode?
It is impossible to stuff all customizations and settings into Galaxy S10 Settings. Also, some customizations for Galaxy S10 can be done quickly on the screen with simple gestures.
So, Samsung used the home screen edit mode for you to quickly customize the home screen without navigation through the Settings or other pages.
In a nutshell, the home screen edit mode is a special mode of the home screen. In this mode, you can customize many aspects of the Galaxy S10 Home screen.
And some settings/customizations for Galaxy S10 Home screen can only be done through this mode. For example, assigning a home screen panel as the “Home” of Home screen panels/pages, or remove the Bixby Home from Galaxy S10 Home screen, or adding widgets to the home screen, all can only be done in the Galaxy S10 Home screen edit mode.
Of course, some features in the edit mode can also be accessed from Galaxy S10 Settings (for example, adjust Galaxy S10 home screen settings), or standalone apps/app shortcuts (e.g., use themes and wallpapers).
How to access the Galaxy S10 home screen edit mode?
You can only use touchscreen gestures to access the home screen edit mode.
There are two gestures for you to access the edit mode for the Home screen:
- Tap and hold (long tap) any blank area on the Galaxy S10 Home screen.
- Pinch on the Galaxy S10 home screen.
These are the two only methods to enter the S10 home screen edit mode.
When you use the first gesture (long tap), you need to make sure you are tapping the empty (blank) area except for the status bar and navigation bar.
You can tap anywhere above home screen panel indicator (see below) or tap the back button to exit the edit mode and return to the Home screen.
What are the features of Galaxy S10 home screen edit mode?
As shown in the screenshot below, you can find the following common features and functions in the edit mode of S10 Home screen:
- Assign the panel/page as the home of the Galaxy S10 Home screen. If you keep tapping the Home button, you should return to the “Home” of the home screen. You must have one and only one panel/page as the home of the home screen panels.
- Delete the page. If this is the “home” panel and you delete it, the
The post How to use Galaxy S10 home screen edit mode? appeared first on Galaxy S10 Guides.
How to Use Galaxy S10 Always On Display (AOD)?
simonYou can use Galaxy S10 always-on display (AOD) to check notifications, the time, next alarm, today's schedule, and the weather, and to control music play without waking up the phone.
On Galaxy S10, Samsung added a few new features for the always-on display and the default behavior. So, do NOT assume the AOD on Galaxy S10 is identical to that on older phones like S9.
This Galaxy S10 how-to guide explains the new features of the Galaxy S10 always-on display (AOD), the difference between Galaxy S10 lock screen and AOD screen, how to enable and customize the always-on display screen on Galaxy S10.
Please note, the always-on display is identical among all Galaxy S10 phones. In this guide, Galaxy S10 refers to Galaxy S10e, S10, S10+, and S10 5G,
What is new in Galaxy S10 Always On Display (AOD)?
In all previous Galaxy phones, the always-on display screen will not be turned off automatically unless it is turned on by the scheduler.
So, once you turn on the always-on display on these devices, you have to choose to show the AOD screen all the time when the phone is locked or to show the AOD screen based on your designated period.
On Galaxy S10, Samsung added the show mode for the always-on display screen: tap to show. And this is the default option.
So, after enabling Galaxy S10 always-on display, by default, the AOD screen will NOT show up after you lock the phone unless you tap the screen (once).
The AOD screen will display only about 10 seconds, and then the screen is off.
If you need to show Galaxy S10 AOD screen all the time, you need to change the show mode.
This new show mode is also available on Android Pie update for Galaxy S9, S8, Note 9 and Note 8.
Please note, if you tap Galaxy S10 screen twice when the screen is off, you will wake the screen and get the Galaxy S10 lock screen, instead of the always-on display screen.
Of course, you can disable this feature in Settings —Advanced features —Motions and gestures — Double tap to wake.
Other new features of Galaxy S10 Always on Display include:
- Landscape mode for Galaxy S10 AOD screen.
- Brightness adjustment for the AOD screen.
- Quick settings for AOD.
AOD Quick settings can also be found on Galaxy S9, S8, Note 8 and Note 9 if you updated these phones to Android Pie.
What is the difference between the lock screen and the always-on display screen?
Although Galaxy S10 always-on display screen is part of the Galaxy S10 lock screen and shares the identical FaceWidgets, they serve different purposes.
The major differences between the AOD screen and lock screen include:
- Galaxy S10 lock screen shows up when the phone wakes up and is in the locked state. While Galaxy S10 AOD screen shows up only when the phone is NOT waking up.
- You can use app shortcuts in
The post How to Use Galaxy S10 Always On Display (AOD)? appeared first on Galaxy S10 Guides.
How to use Galaxy S10 wireless PowerShare to charge other devices?
simonYou can use Galaxy S10 wireless PowerShare to charge other devices wirelessly using Galaxy S10's battery.
Galaxy S10 (including Galaxy S10, S10+, S10e, and S10 5G) can be used as a wireless charger to share Galaxy S10 battery with other devices.
This Galaxy S10 new feature guide explains the details of Galaxy S10 wireless PowerShare feature, how to use it to charge other devices, and answers some questions you may have when using the wireless PowerShare.
Update: with Android 10 update, you can now set the battery limit for Wireless PowerShare. Please refer to this guide on how to set the battery limit for Wireless PowerShare.
Please also note, Galaxy S20, Galaxy S21, Galaxy Note 10, and Galaxy Note 20 all support Wireless PowerShare. So this guide also applies to all these phones.
What is Galaxy S10 wireless PowerShare?
Wireless charging is not new. Samsung added it as a standard feature since Galaxy S6.
But using the phone as a wireless charger to share the phone battery with other devices is still new.
Huawei named this feature as wireless reverse charging and introduced it in Mate 20 Pro (in 2018) and P30 Pro. Samsung introduced this feature in Galaxy S10 (all 4 models) and named it as wireless PowerShare.
Galaxy S10 wireless PowerShare lets you share the battery juice of Galaxy S1o with other devices that support Qi wireless charging.
Technically, you can still use Galaxy S10 as usual when you share the battery with other devices.
You can even use wireless PowerShare when you are charging Galaxy S10 battery through a USB cable. For example, you may have only one charger, but you need to charge both the phone and a Galaxy Watch. In this case, you can connect the wall charger to charge the Galaxy S10 battery. At the same time, you can use wireless PowerShare to charge the watch.
In a nutshell, Galaxy S10 wireless PowerShare adds a Qi wireless charger on the back of Galaxy S10. And the charger can use Galaxy S10 battery to charge other devices wirelessly.
Limitations of Galaxy S10 wireless PowerShare
Wireless PowerShare is very convenient, and it works with any devices that support Qi wireless charging.
FYI, most recent mobile devices including iPhone support Qi wireless charging. All Samsung gadgets with wireless charging support Qi wireless.
But wireless PowerShare has some limitations including:
- Charging speed is slow. There is no fast charging. The maximum charging capacity is 5W. The actual charging speed is substantially lower than this. So, Galaxy S10 wireless PowerShare is mainly designed for accessories like Galaxy Buds, Galaxy Watch. It may be a temporal solution of sharing the battery with other phones. If the other phone also has a USB C port, you can charge it faster by directly connecting Galaxy S10 to that phone with a USB-C to USB-C cable.
- You may have to remove the covers or cases for Galaxy
The post How to use Galaxy S10 wireless PowerShare to charge other devices? appeared first on Galaxy S10 Guides.
How to use two SIM cards on Galaxy S10, S10+, S10e, S20, S20+, and S20 Ultra?
simon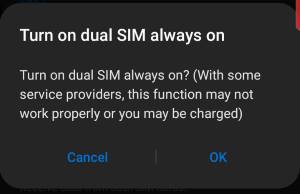 In most regions, you can use two SIM cards on Galaxy S10, S10+, S10e, S20, S20+, and S20 Ultra if you choose not to use a micro SD card.
The dual-SIM version of Galaxy S10 can work in dual-standby mode. The two SIM cards share (time-sharing) one modem and therefore the dual SIM version of Galaxy S10 does not support dual active mode.
This Galaxy S10 how-to guide explains how to use two SIM cards on Galaxy S10, S10+, S10e, S20, S20+, and S20 Ultra, how to enable and use dual SIM always on and how to use SIM card manager to set preferred SIM cards for calls, messages, and mobile data.
Please note, Galaxy S10 5G only supports one SIM card in all regions. So, in this guide, Galaxy S10 refers to Galaxy S10, S10e, and S10+ only.
Galaxy S20, S20+, and S20 Ultra (both 5G and 4G variants) have a dua-SIM version. You can also use two SIM cards on these phones. This guide also applies to these Galaxy S20 phones as well.
Who can use two SIM cards on Galaxy S10, S10+, S10e, S20, S20+, and S20 Ultra?
In most regions of Europe, Asia, Oceania, Africa, the Middle East, and Latin America, Galaxy S10 (except S10 5G) supports two SIM cards (dual SIM version).
You can use two SIM cards concurrently. In some countries, some carriers charge excessively for mobile data if the SIM card can also make calls. Some bundle very limited mobile data with voice plans. In this case, you can use one SIM card for calls, one for mobile data.
Or when travelling, you can use one SIM card issued in your home country and the other one from a local carrier. In this way will not miss important calls and messages without paying excessive roaming voice and data fees.
You can also use one SIM card for work-related communications, and the other for private affairs.
To use two SIM cards on Galaxy S10, you need to have a dual SIM version of Galaxy S10. As mentioned, unless you bought Galaxy S10 in North America, your Galaxy S10 (S10, S10+, and S10e) is very likely the dual SIM version.
How to check whether the Galaxy S10 is a dual SIM version or a single SIM version?
If you are not sure, check the IMEI number in Galaxy S10 Settings —About phone.
As shown in the screenshot below, if there are two IMEI (International Mobile Equipment Identity) numbers, it means it is a dual SIM version of Galaxy S10, and you can use two SIM cards.
Also, if the model number has a suffix of /DS as shown in the screenshot, it also indicates it is a dual SIM version of Galaxy S10.
Of course, on the box of Galaxy S10, the dual SIM version is usually stated as Duos.
The limitations of Galaxy S10 dual SIM capabilities
For dual SIM phones, there are two variants: dual standby, and dual … Read the rest
The post How to use two SIM cards on Galaxy S10, S10+, S10e, S20, S20+, and S20 Ultra? appeared first on Galaxy S10 Guides.
How to use Galaxy S10 virtual bezel to hide the front camera cutout without using any apps?
simonYou can hide the front camera cutout on Galaxy S10, S10+, S105G, and S10e with the Galaxy S10 virtual bezel without using any third-party apps.
Samsung pinched an elongated hole for the front cameras to avoid a notch on the screen. And they proudly announced this trick as infinity “O” display. But some owners do not like this design.
This Galaxy S10 how-to guide explains how to use Galaxy S10 virtual bezel to hide the front camera cutout on Galaxy S10, S10+, S105G, and S10e, and the implications of using Galaxy S10 virtual bezel.
Why some owners do not like the front camera cutout?
Nowadays, all smartphone manufacturers try hard to increase screen size without increasing the overall size of the phone.
So, the size of the bezels decreases over the years. Samsung virtually eliminated the bezels on the sides with curved display since Galaxy S6.
On the bottom, Samsung removed the physical buttons and reduced the size of the bezel to the limit already.
So, on Galaxy S10, they tried to reduce the size of the bezel on the top further.
But there is a hard limit on the top: the front camera, notification LED, iris scanner, proximity, and light sensors all need spaces and cannot be hidden.
And Samsung made 2 stupid mistakes in reducing the size of the top bezel on Galaxy S10 (S10, S10+, S10 5G, and S10e):
- The iris scanner was removed.
- The notification LED was removed.
The hole punch for the front camera actually is not a bad idea, although some owners may prefer the notch design as in other Android phones or iPhones.
But what makes it wrong (or less ideal) is the location of the hole. On all Galaxy S10 phones, the hole is punched on the right side.
First, the hole destroys the symmetry of the front side. The ugly asymmetric look will be magnified when you use an app with a white background.
Second, the curved screen is used on Galaxy S10, S10+, and S10 5G. The hole must keep a certain distance from the curved part. This results in a significantly-reduced area for the status bar. So, Galaxy S10 has to offer the option for you to reduce the number of notification icons on the status bar or even hide/disable the notification icons on the status bar entirely.
Of course, some Galaxy S10 owners like the design.
Anyway, for those owners who cannot live with the look of the front camera cutout, it is easy to hide the front camera cutout without using any apps.
The truth is that Samsung already knew some owners would dislike the hole and therefore offered the Galaxy S10 virtual bezel to hide the front camera cutout.
The price you have to pay to hide the Galaxy S10 front camera cutout is slightly reduced screen size.
How to use Galaxy S10 virtual bezel to hide the front camera cutout?
If you want to hide the front cutout on Galaxy S10, you can … Read the rest
The post How to use Galaxy S10 virtual bezel to hide the front camera cutout without using any apps? appeared first on Galaxy S10 Guides.
How to use Galaxy S10 screen zoom?
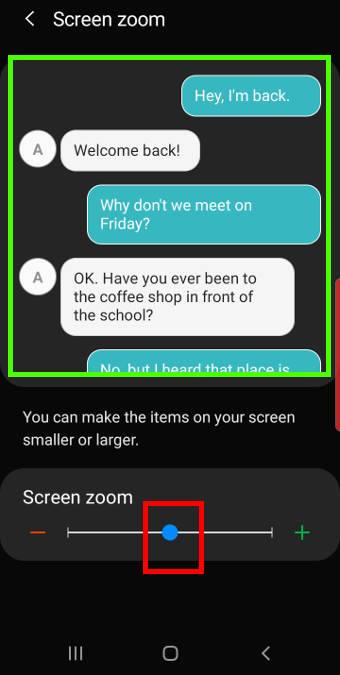
simon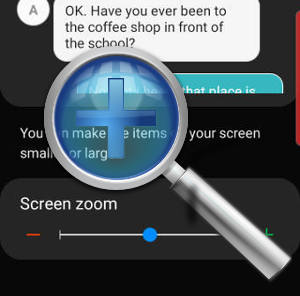 Galaxy S10 screen zoom allows you to scale the text and icons globally including the fixed-size text (e.g., notification text) that is not affected by font size settings.
Although Galaxy S10 screen zoom corresponds to display size in the stock Android, Samsung customized this feature a lot and they work quite differently.
This Galaxy S10 how-to guide explains when you need to adjust the Galaxy S10 screen zoom, and how to adjust it on Galaxy S10, S10e, S10+, and S10 5G.
What is screen zoom?
Google introduced the display size in Android Nougat (Android 7) for users to scale all display elements on the phone.
If you are using Windows PC, the display size in Android is similar to the scale (under display settings) on Windows.
Galaxy S10 screen zoom is based on display size in Android. But Samsung made significant customizations.
Compared to the display size in the stock Android, Galaxy S10 screen zoom works differently in the following aspects:
- The screen zoom does NOT scale the app icons on Galaxy S10 Home screen, Apps screen, and lock screen.
- The screen zoom has 3 levels. While the display size in Pixel phones has 5 levels.
- The zoom levels in Galaxy S10 is quite moderate.
For the text and icons, the screen zoom works on all pages and apps, just like the display size in the stock Android.
Normally, the screen zoom is used together with the font size and style settings to get the desired look on the phone.
When do you need to change Galaxy S10 screen zoom? Why font size setting is not sufficient?
On Android, the size of some texts and display elements is hard-coded or fixed (based on DPI of the display).
For example, many Galaxy S10 owners complained about the small text size of the notifications. They tried to increase the font size. But the text size in the notification panel is not affected by font settings because it is fixed.
So, for such text (and icons), you will need to use the screen zoom to change the size.
In short, for most parts of Galaxy S10, the font settings are respected. But for the fixed-size text and icons, you have to use the screen zoom to adjust the display size.
How to adjust Galaxy S10 screen zoom?
You can change the screen zoom levels on Settings.
As shown in the screenshot below, on Galaxy S10 settings, tap Display to change the display settings for Galaxy S10.
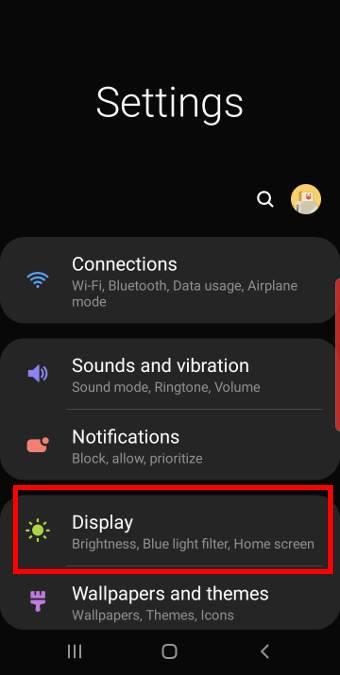
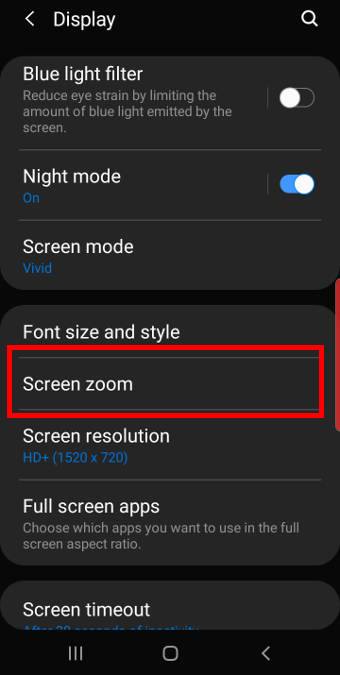
In the Display settings page, as shown above, tap screen zoom.
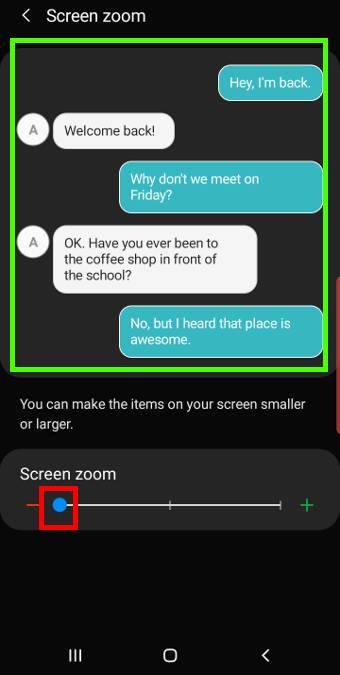
Now in the screen zoom settings page, as shown below, you can find the 3-level slider.
You can drag it left or right to adjust the screen zoom level to small, medium, or large.
On the top part of the page, you can immediately preview the result of the setting. On Galaxy S10, Samsung only lets you preview the result in the Messages app.
As mentioned, the Galaxy S10 offers 3 … Read the rest
The post How to use Galaxy S10 screen zoom? appeared first on Galaxy S10 Guides.
How to use Galaxy S10 home screen landscape mode for Home screen and lock screen?
simonYou can use Galaxy S10 home screen landscape mode for the Home screen and lock screen on Galaxy S10, S10+, S10e, and S10 5G now.
When you hold the phone in the landscape orientation, both Galaxy S10 lock screen and Home screen can rotate so that you can use the landscape mode easily.
This Galaxy S10 how-to guide explains how to control the Galaxy S10 screen rotation, how to enable and use Galaxy S10 home screen landscape mode and Galaxy S10 lock screen landscape mode.
Different ways to control Galaxy S10 screen rotation (orientation)
On Galaxy S9 and S9+, Samsung introduced landscape mode for the home screen as explained in this guide.
Galaxy S10 keeps this feature and therefore you can enable the landscape mode for Galaxy S10 Home screen (including the apps screen)in a similar way.
Even better, Samsung also added the landscape mode for Galaxy S10 lock screen on all Galaxy S10 phones. Currently, this is a Galaxy S10 exclusive feature. So, the landscape mode for the lock screen is only available on Galaxy S10 phones.
On Galaxy S10, you can control the screen rotation in different ways:
- You can turn on Auto-rotate so that the apps can change the orientation automatically when you rotate the phone. When Auto-rotate is on, you can exclude the Galaxy S10 Home screen and Lock screen.
- You can turn off Auto-rotate (portrait mode) so that the rotation toggle appears when you rotate the screen. So, you can change and lock the screen orientation when you want. You may check this guide on how to use the screen orientation toggle here. When Auto-rotate is off, the rotation toggle will NOT appear on Galaxy S10 lock screen regardless of your lock screen rotation settings.
Please note, some apps may ignore the screen rotation settings. For example, Galaxy S10 camera app will not follow your screen rotation settings. When you rotate the screen, the camera app will always follow your rotation regardless of other settings.
How to enable and use the landscape mode for Galaxy S10 Home screen?
To use the Home screen in the landscape mode, you must enable it first.
You can enable the landscape mode for the Home screen in two different locations:
- Galaxy S10 Settings
- Galaxy S10 Quick settings.
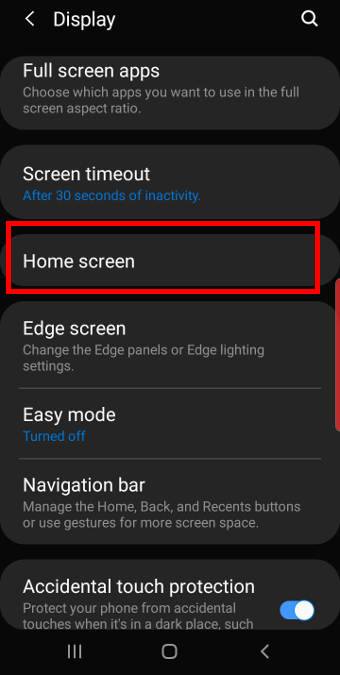
In Galaxy S10 Settings, tap Display. Then, as shown in the screenshot below, on the Display settings page, tap Home screen.
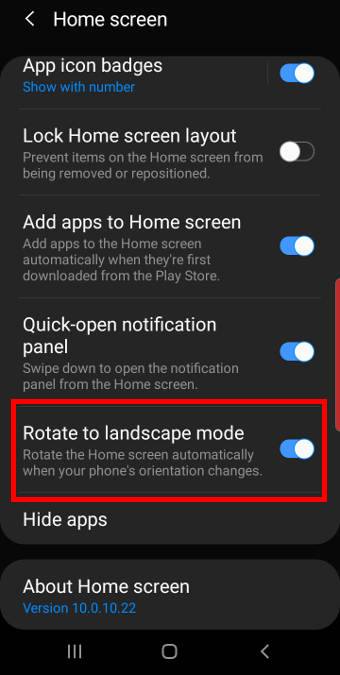
As shown above, in the Home screen settings page, you can enable or disable “Rotate to landscape mode.”
You can also enable or disable Galaxy S10 Home screen landscape mode from Galaxy S10 quick settings.
As shown in the screenshot below, on the Galaxy S10 quick settings panel, tap the text, NOT the button/icon, of Auto Rotate.
If you disabled the auto-rotate, the Auto-rotate text should change to Portrait. In this case, tap the text (not the button) of Portrait.
Please note, the landscape mode for the Home … Read the rest
The post How to use Galaxy S10 home screen landscape mode for Home screen and lock screen? appeared first on Galaxy S10 Guides.
How to use Galaxy S10 Multi Window?
simon Galaxy S10 Multi Window allows you to run two apps side-by-side (split-screen view) or to overlap multiple apps over each other and other apps (pop-up view) to improve your productivity on Galaxy s10, S10e, S10+, and S10 5G.
Samsung changed and removed some multi-window features on Galaxy S10 with the updated Recents screen. Besides, Galaxy S10 Multi Window is significantly from that in the stock Android.
This Galaxy S10 how-to guide explains everything you need to know about Galaxy S10 Multi Window: what is it, the difference between the split-screen view and pop-up view, how to use the split-screen and pop-up views of Galaxy S10 Multi Window.
What is Galaxy S10 Multi Window?
By default, only one Android app can occupy the screen at any time, although Android is based on Linux, which of course supports multitasking on the desktop.
Google first introduced the multi-window (split-screen view) feature in Android Nougat.
But for Samsung Galaxy phones users, Multi Window had been introduced since Galaxy Note II in 2013.
And Samsung continued to polish this feature in each iteration of the Galaxy devices.
Galaxy S10 Multi Window allows you:
- To run two apps side by side (split-screen view).
- To let one or more apps floating over other apps and any screens (pop-up view). The size of the app window can be adjusted and even minimized. The stock Android does not support this even in the latest Android Pie.
Of course, you can use the split-screen view and pop-up view simultaneously.
What are the Multi Window features removed in Galaxy S10?
Unfortunately, Samsung removed some very useful features from Galaxy S10 Multi Window including:
- Converting a normal app window to the pop-up view mode with a gesture. The diagonally swiping gesture is not supported on Galaxy S10. You cannot find the settings in Galaxy S10 settings anymore.
- Directly converting split-screen view to pop-up view. When two apps are in the split-screen view mode, the only multi-window tool in Galaxy S10 is to resize the window. All other tools and options (e.g., app pair creation, Snap Window, swap apps) are removed in Galaxy S10 Multi Window.
- Snap Window.
- Multi Window (split-screen) icon was removed in the thumbnails in the Recents screen. You have to long tap the app icon in the Recents screen to use Galaxy S10 Multi Window feature.
Please note, these features were also removed in the Android Pie update for Galaxy S9 and S8.
If you still need these features, you need to install Samsung's Good Lock app.
What are the differences between the split-screen view and pop-up view?
If you migrated to Galaxy S10 from other Android phones, you probably tried the split-screen view in the stock Android.
The most powerful feature of Galaxy S10 Multi Window is the pop-up view.
Basically, the split-screen mode allows you to run two apps side-by-side (in the long side). You can adjust the percentage of the screen for each app. … Read the rest
The post How to use Galaxy S10 Multi Window? appeared first on Galaxy S10 Guides.
How to set photo size on Galaxy S10, S10e, S10 5G, and S10+?
simon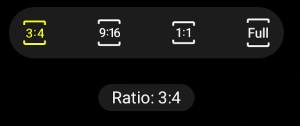 You can adjust the photo size on Galaxy S10, S10e, S10 5G, and S10+ to make sure the photo is good for the intended usages, e.g., to show on a TV screen, or to print on photopapers, or to use it for a design project.
Unfortunately, Samsung removed the option to explicitly set photo size on Galaxy S10, S10e, S10 5G, and S10+. You have to implicitly set photo size through the aspect ratio settings.
This Galaxy S10 camera guide explains the available photo sizes and how to set photo size on Galaxy S10, S10e, S10 5G, and S10+
Why you may want to set or change photo size?
The requirement for a photo to be shared with others on the phone or to be printed on the photobook is surely different.
The size of a photo includes two factors:
- Aspect ratio.
- The number of pixels (resolution).
For the aspect ratio, the Galaxy S10 camera supports the following aspect ratios: 4:3, 16:9, 1:1, and 19:9 (full), as explained in Galaxy S10 camera settings.
The 4:3 aspect ratio is good for printing and for old monitors. The native aspect ratio of the rear camera sensors on all Galaxy S10 phones is close to 4:3.
Therefore, among all aspect ratios, the 4:3 aspect ratio can have the maximum pixels. You can imagine photos with all other aspect ratios are just cropped from the 4:3 one (as illustrated in the picture below).
The 16:9 aspect ratio is ideal for most TV screens and modern monitors. Because of 4:3=16:12, a 16:9 photo crops the 4:3 photo in the height direction and maintains the width.
The 1:1 aspect ratio is mostly used by designers and some social networks. As 1:1=3:3, a 1:1 photo on Galaxy S10 crops the 4:3 photo in the width direction and maintains the height.
The 19:9 (aka full) ratio matches the Galaxy S10 phone screen. All 4 Galaxy S10 models have a screen with an aspect ratio of 19:9. A 19:9 photo on Galaxy S10 also crops the 4:3 photo in the height direction and maintains the width, like the 16:9 one.
The cropping relationship between the 4 aspect ratios is illustrated in the following picture.
Please note, the above discussion is only for the rear cameras on Galaxy S10.
The front camera(s) on Galaxy S10 has a native aspect ratio close to (slightly smaller than) 3:2. This means for aspect ratios larger than 3: 2 (i.e., 19:9 and 16:9), the photos are cropped in the height direction. The photos with an aspect ratio smaller than 3:2 (i.e., 4:3 and 1:1) are cropped in the width direction.
For some unknown reasons, Samsung removed the options to set up the number of pixels for the photos on the Galaxy S10. Once you set the aspect ratio, the size of the photo will be fixed at the maximum number of pixels.
How to set photo size on Galaxy S10, S10e, S10 5G, and S10+?
The post How to set photo size on Galaxy S10, S10e, S10 5G, and S10+? appeared first on Galaxy S10 Guides.
How To Use Galaxy S10 LED View Cover (Galaxy S10 LED Wallet Cover)?
simon Galaxy S10 LED View Cover (aka Galaxy S10 LED Wallet Cover) stores cards in the interior pocket and shows LED notifications on the outside.
You can customize the LED notification icons on the front for individual contacts and apps.
This Galaxy S10 accessories guide explains the unique features of the Galaxy S10 LED View Cover, how to use the Galaxy S10 LED Wallet Cover, how to customize the LED notification icons for individual contacts and apps. A quick review of the Galaxy S10 LED View cover is also included.
Please note, due to differences in dimensions and cutout of Galaxy S10, S10e, and S10+ (see Galaxy S10 specifications), you need to get the Galaxy S10 LED View Cover for your Galaxy S10 model. In this guide, Galaxy S10 refers to S10, S10e, and S10+.
Also, in some regions, Galaxy S10 LED View Cover is named as Galaxy S10 LED Wallet cover. Do not confuse with the Galaxy S10 LED back cover (LED cover) with the LED View (or LED Wallet) cover.
Difference between Galaxy S10 LED cover (back cover) and Galaxy S10 LED View Cover (LED Wallet Cover)
For Galaxy S10, Samsung released two LED covers:
- LED Cover (LED Back cover).
- LED View Cover (LED Wallet cover)
Galaxy S10 LED cover is a back cover; while Galaxy S10 LED View cover is a flip cover.
Besides, the features of these two covers also differ in:
- Unique features. Galaxy S10 LED cover has mood lighting, camera timer, and emoticons for the rear cameras. Galaxy S10 LED Wallet cover does not have any of them.
- Pocket (Wallet). Galaxy S10 LED View cover has a pocket (wallet) in the inside of the front part. Galaxy S10 LED cover does not have the front part and has no pockets.
- Lock and wake up the phone. Galaxy S10 LED Wallet cover can lock the phone (when you close the case) or wake up the phone (when you open the case). Galaxy S10 LED cover does not have this feature.
- Customize LED icons for contacts and apps. Galaxy S10 LED View cover allows you to customize the LED icons for individual contacts and apps. Galaxy S10 LED cover does not allow this. Besides, LED notification icons on the Galaxy S10 LED cover only works with pre-installed apps.
So, these two LED covers are substantially different. Galaxy S10 LED Wallet cover is the evolution of Samsung's traditional LED cover (e.g., Galaxy S9 LED Wallet cover, or Galaxy S8 LED Wallet cover). While Galaxy S10 LED back cover is a new product.
What are the unique features of the LED View Cover (LED Wallet Cover)
Compared to other Galaxy S10 cases and covers, Galaxy S10 LED Wallet cover has the following prominent features:
- LED notifications. You can get LED notifications on the LED View cover for incoming calls, app notifications, alarms, battery status, clock, and music controls. You can customize individual contacts or apps with unique LED
The post How To Use Galaxy S10 LED View Cover (Galaxy S10 LED Wallet Cover)? appeared first on Galaxy S10 Guides.
How to take screenshots on Galaxy S10 without using any apps?
simon You can use at least 5 methods to take screenshots on Galaxy S10 without using any third-party apps.
Some screenshot-taking methods are unique to Galaxy S10 (and other Galaxy phones). Some are universal among all Android phones.
This Galaxy S10 how-to guide explains and shows the 5 different methods to take screenshots on Galaxy S10, S10e, S10+, and S10 5G.
What are the 5 ways to take screenshots on Galaxy S10?
On Galaxy S10 (all 4 Galaxy S10 variations), without using any third-party apps, you can use the following methods to take screenshots:
- Use hardware buttons (volume down + power button).
- Swipe your palm (palm swipe).
- Use the Assistant menu.
- Use Bixby Voice command.
- Use Google Assistant.
Please note, although these are different methods to take screenshots on Galaxy S10, the result is identical except Google Assistant (read on).
Method 1: Use hardware buttons (volume down + power button) to take screenshots
On all Android phones, you can take a screenshot by pressing the holding Power button and Volume down button simultaneously.
This works on Galaxy S10 as well.
As illustrated below, you can simultaneously hold the power button and volume down button to take a screenshot on Galaxy S10. Please check Galaxy S10 layout for the location of physical buttons on S10 (S10e, S10+, and S10 5G).
Once the screenshot is taken, you will hear the click or shutter sound. If the smart capture feature is enabled in Galaxy S10 Settings — Advanced features, you will also see the toolbar on the bottom as well.
In old Samsung phones with a physical Home button, the physical home button was used with the power button to take screenshots. Because since Galaxy S8, Samsung has switched to on-screen (software) home button, you cannot use the Home button (with the Power button) to take screenshots on Galaxy S10.
The critical point of using physical buttons to take screenshots on the Galaxy S10 is to press the two buttons simultaneously.
As a human, we always press one button earlier than the other. It usually is OK to press the power button slightly earlier than pressing the volume down button. The power button accepts both single tap (press) and long tap gesture (for the power button options), and the long tap gesture will be triggered after you hold the button for about 2 seconds. So, as long as you hold the volume down button within 2 seconds (after holding the power button), you should be able to get the screenshot.
If you press the volume down button first, you will get the volume settings immediately because the volume down button only accepts the single press gesture.
After pressing the two buttons,
- If you get the power button option, it means you press the power button too early.
- If you get volume settings, it means you press the volume button too early.
- If the screen is turned off, it means, you release the power button too early.
The post How to take screenshots on Galaxy S10 without using any apps? appeared first on Galaxy S10 Guides.
How to hide Bixby Home from Galaxy S10 Home Screen?
simon If you are not a fan of Bixby Home, or other Bixby features, you can hide the Bixby Home from Galaxy S10 Home screen easily.
On Galaxy S10, Samsung made it hard to disable Bixby Home and other Bixby features. But you can hide the Bixby Home and remap the Bixby key so that the Bixby is less visible on Galaxy S10, S10e, S10+, and S10 5G.
This Galaxy S10 how-to guide explains what Bixby Home is, why some Galaxy S10 owners want to hide it, and how to hide Bixby Home from Galaxy S10 Home screen.
What is the Bixby Home?
Bixby Home is a component of Bixby, Samsung's voice assistant.
By default, Bixby Home shows some relevant info (e.g., schedule, news, and weather) for you. You can manage and customize the various cards in the Bixby Home.
On Galaxy S10 (S10, S10+, S10e, and S10 5G), a dedicated panel (the leftmost panel) in Galaxy S10 home screen is assigned for Bixby Home.
Although some owners may find the Bixby Home is useful, Google Now (Google Assistant) page usually is better (arguably) and gives more relevant info.
Besides, many owners do not like the idea of a dedicated Bixby Home or (Google page) on Galaxy S10.
Therefore, some Galaxy S10 owners want to hide Bixby Home from Galaxy S10 Home screen.
How to hide Bixby Home from Galaxy S10 Home Screen?
As shown in the screenshot below, the two lines on the leftmost of the home screen panel indicator tell you that the Bixby Home is currently shown on the Galaxy S10 Home screen.
After you hide Bixby Home from Galaxy S10 Home Screen, then the indicator should disappear.
On Galaxy S10 Home screen, you can use the pinch gesture as shown below to enter the edit mode of Galaxy S10 home screen.
You can also access the edit mode by tap and hold (long tap) any blank area on the Galaxy S10 home screen.
If you are using any apps, you can always return to the home screen by tapping the Home button (or swiping up from the middle line if you are using Galaxy S10 navigation gestures).
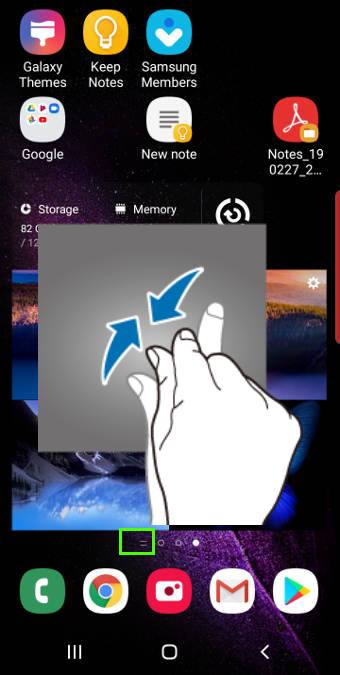
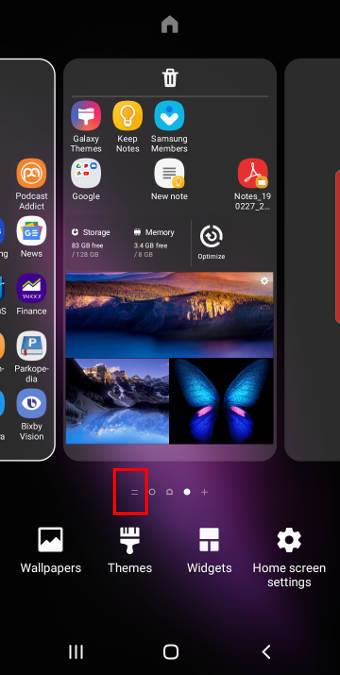
In the Galaxy S10 home screen edit mode, as shown above, you can tap the two-line indicator to navigate to the leftmost panel.
You can also just swipe right to navigate to the same panel.
Please note, the 2-line indicator will always be shown in the edit mode even after you hide the Bixby Home from Galaxy S10 Home screen.
This is not a bug. It allows you to unhide the Bixby Home in the future if you change your mind.
Once in the leftmost panel, you can find the switch for Bixby Home as shown below.
You can tap the switch to turn it off (if it is currently on) or turn it on (if it is currently off).
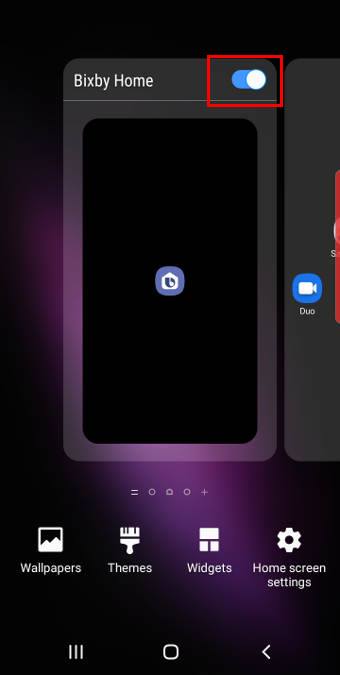
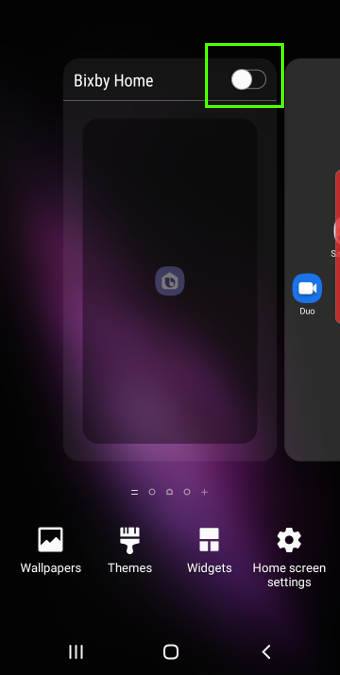
For example, as shown above, the Bixby Home is now hidden on … Read the rest
The post How to hide Bixby Home from Galaxy S10 Home Screen? appeared first on Galaxy S10 Guides.
Understand Galaxy S10 Home Screen
simon![]() You need to understand the contents of the Galaxy S10 home screen to use the phone effectively.
You need to understand the contents of the Galaxy S10 home screen to use the phone effectively.
There are usually up to 11 types of items on Galax S10 Home screen. And they are usually designed and arranged for different functions and purposes.
This Galaxy S10 how-to guide explains what Galaxy S10 Home screen is, the items on the home screen, and how to use the 11 types of items on the home screen.
What is Galaxy S10 Home screen?
In Galaxy S10 (S10, S10+, S10e, or S1o 5G), you will deal with 8 types of screens:
- Lock screen. The lock screen is the first screen you will encounter after starting or wake up the phone. You need to unlock to access private data and apps.
- Home screen. By default, after you unlock Galaxy S10, you will be directed to Galaxy S10 Home screen.
- Apps screen. Traditionally, in Android phones, the apps screen is called app drawer, where you list all installed apps. Typically, only part of the installed apps is added to the home screen. Apps screen usually is considered as part of the Home screen,
- Edge screen (for S10, S10+, and S10 5G only). As explained in Galaxy S10 layout, edge screen actually is a software feature, rather than a dedicated screen. The edge screen requires a curved edge of the display. Therefore, it is not available in Galaxy S10e due to its flat screen.
- Recents (Overview) screen. You can find the list of recently used apps in the Recents screen. You can launch these apps in the split-screen view or pop-up view (multiwindow mode) as explained in this guide.
- Notification panel. You can swipe down from the Galaxy S10 status bar to access the notification panel.
- Quick settings panel. You can use the quick setting buttons to turn on or off some features on Galaxy S10 without opening Galaxy S10 Settings.
- Individual app screen.
Galaxy S10 Home screen is the center of the phone. There is no way to bypass the home screen.
Galaxy S10 is protected by Galaxy S10 lock screen to prevent unauthorized access to your apps and data. Therefore, the Home screen is always behind the lock screen.
You can access the Home screen in different ways:
- After unlocking Galaxy S10, you should get the Galaxy S10 Home screen directly.
- When you are using any apps, you can tap the Home button (or swipe up from the centerline if you are using Galaxy S10 navigation gestures) in the navigation bar to access the Galaxy S10 Home screen directly.
- When you are using any apps, you can keep tapping the Back button in the navigation bar to return to the Home screen eventually. Some apps may require you to tap the back button several times before you get the Home screen. A few apps may ask you to confirm to exit the app. Anyway, the behavior of the back button
The post Understand Galaxy S10 Home Screen appeared first on Galaxy S10 Guides.
How to use Galaxy S10 Settings?
simon![]() You need to use Galaxy S10 Settings to customize Galaxy S10, S10e, S10+, or S10 5G so that the phone works in the way you want.
You need to use Galaxy S10 Settings to customize Galaxy S10, S10e, S10+, or S10 5G so that the phone works in the way you want.
Like other Android phones, Galaxy S10 offers plenty of options for you to customize and tweak the phone to meet the needs and preferences of different owners.
This Galaxy S10 how-to guide shows you how to access and use the Galaxy S10 Settings. It also explains the main entries of the Galaxy S10 settings.
Why do you need to understand and use Galaxy S10 Settings?
When you get Galaxy S10 (S10, S10e, S1o+, or S10 5G), the phone should work immediately after you set up the phone, or migrate to Galaxy S10.
But you may want to change something. For example, you may want to change or customize the Galaxy S10 lock screen. Or you may want to try the new fingerprint scanner.
All these customizations for the phone can be accessed from Galaxy S10 Settings.
However, the options in Galaxy S10 settings are overwhelming. Samsung had to place them into different categories on several levels. The organization for the settings and options changes in each Android version.
So, some seasoned Galaxy phone users may also have problems to find the entry easily.
How to access Galaxy S10 Settings?
Galaxy S10 Settings are packed in the Settings app in Galaxy S10 phones.
You can access Galaxy S10 Settings in at least 5 different ways including:
- Tap the Settings app icon on the Home screen as shown below. If you cannot find the Settings app on Galaxy S10 Home screen, you can add it to the home screen from the Apps screen (app drawer).
- Tap Settings app icon on the Apps screen. You can always find the Settings app in the Apps screen (app drawer). You cannot hide it.
- Tap Settings icon in the notification panel or quick settings panel, as shown below.
- Use Google Assistant voice command. You can use the voice command “OK Google, open Settings app” if you turned on Google Assistant voice commands.
- Use Bixby Voice command. You can also use Bixby voice command (if enabled) “Hi Bixby, open Settings app.”
All the 5 ways to start Galaxy S10 Settings will give you the identical result: bring you to the settings page (read on ).
Galaxy S10 Settings explained
As shown in the screenshot below, Galaxy S10 settings are divided into 19 (3-21) different main functional groups.
Inside each group, there may be some sub-groups at several levels. So, it is hard to explain all entries of the settings.
Corresponding to the numbers in the screenshot above, let's navigate through the first level functional group.
1. Search button for Galaxy S10 Settings
When you are not sure about where to find the settings, you can type a keyword to search the Galaxy S10 settings. All entries at different levels will be included in the search result.
If one or more entries found, you can … Read the rest
The post How to use Galaxy S10 Settings? appeared first on Galaxy S10 Guides.
Galaxy S10 camera settings explained
simon To use the camera effectively (to get the best possible photos) on Galaxy S10, you need to understand Galaxy S10 camera settings and know how to adjust the Galaxy S10 camera settings.
Some of the camera settings on Galaxy S10, S10+, S10e, and S10 5G are intuitive. But some are hidden under other settings/entries.
This Galaxy S10 camera guide explains the Galaxy S10 camera settings and shows you how to use them.
Because the camera app in Galaxy S10, S10e, S10+, and S10 5G are almost identical, this guide applies to all 4 Galaxy S10 models although only Galaxy S10 is normally referred to.
Why do you need to understand the Galaxy S10 camera settings?
Samsung revamped the camera app in Galaxy S10 as part of the brand new One UI for Galaxy phones with Android Pie (Android 9.0).
So, if you just migrated to Galaxy S10 from other Android phones, or from Samsung Galaxy phones with Android Oreo or older versions, you are facing a very different camera app.
Compared to other Samsung Galaxy phones with Android Oreo (Android 8.0), there are many changes in Galaxy S10 camera app as explained in this guide. Some changes are reasonable and make things better. But a few changes may be undesirable.
To fully utilize the features packed in the Galaxy S10 cameras so that you can get the best possible photos, you need to adjust some Galaxy S10 camera settings depending on the situation.
For example, you should enable shape correction for the ultrawide camera to reduce the distortion. But the option is not enabled by default in the camera app.
How to access Galaxy S10 camera settings?
In the Galaxy S10 camera app, you can tap the Settings icon, as shown in the screenshot below, to open Galaxy S10 camera settings.
For the meaning of other buttons in the Galaxy S10 camera app interface and how to use gestures in the camera app, you may check this guide.
Galaxy S10 camera settings explained
After tapping the camera settings icon in Galaxy S10 camera app, you will get the following Galaxy S10 camera settings.
Please note, if you are in a camera mode other then the Auto mode, or the front camera is active, some entries in the camera settings will be greyed out. These grayed out entries are NOT relevant to your current camera mode or camera.
Samsung divided Galaxy S10 camera settings into 4 categories:
- Intelligent features. These features, scene optimizer, shot suggestions, and flaw detection, intend to make your camera smart and therefore help you get the best possible photos automatically if enabled.
- Pictures. This section includes settings for photos including motion photos, the action for holding the shutter button and photo save options.
- Videos. The settings in this section are about videos including rear video size, front video size, advanced recording options, and video stabilization.
- Useful features. Everything else is included in the section of useful features. They include HDR,
The post Galaxy S10 camera settings explained appeared first on Galaxy S10 Guides.
How to use Galaxy S10 quick setting buttons?
simonYou can use Galaxy S10 quick setting buttons to quickly turn on or turn off some features without opening Galaxy S10 Settings, or any apps.
The first a few quick setting buttons are also available in the notification panel, like in other Android phones.
This Galaxy S10 how-to guide explains how Galaxy S10 quick setting buttons may improve your productivity, the two ways to access quick setting buttons, how to use quick setting buttons, and how to manage quick setting buttons on Galaxy S10, S10e, S10+, and S10 5G.
What are the Galaxy S10 quick setting buttons?
Galaxy S10 quick setting buttons allow you to turn on and turn off some frequently used features quickly without opening the Galaxy S10 Settings page.
By default, on the top of the Galaxy S10 notification panel, there is one row of quick setting buttons. They are the first a few of the quick setting buttons.
You can access more quick setting buttons in a dedicated panel.
Since Android Pie, Google removed the dialogue options for quick setting buttons.
So in Galaxy s10, the quick setting buttons are simple to enable or to disable specific features/functions. Of course, if you long tap the button, you will be directed to the corresponding Galaxy S10 Settings page.
In Galaxy S10 quick setting buttons panel, you can also change the display brightness settings.
Samsung may also add new buttons into the quick setting buttons when some new features are added. For example, in Galaxy S10 September 2019 update, the Link to Windows button was added.
How to access Galaxy S10 quick setting buttons?
As mentioned, you can access part (first a few) of quick setting buttons in the Galaxy S10 notification panel.
If you want to access all quick setting buttons, there are two ways to access them:
- Swipe down twice from the status bar (swipe down from the notification panel).
- Swipe down once with two fingers from the status bar.
The result of these two methods are identical: they will bring you to the dedicated Galaxy S10 quick setting buttons page so that you can use all quick setting buttons and manage them.
As illustrated below, you can swipe down from the status bar to open the notification panel.
Then, you can swipe down again to access the quick setting buttons as shown below.
The second method requires you to swipe down from the status bar with two fingers as illustrated below.
When using some apps, the status bar may be hidden. In these cases, you can just swipe down from the top of the screen without seeing the status bar.
How to use Galaxy S10 quick setting buttons?
Quick setting buttons accept two touchscreen gestures:
- Tap (single tap) to turn on or turn off the corresponding feature.
- Tap and hold (long tap) to open the corresponding Galaxy S10 Settings page.
Please note, some buttons do not have a settings page. If you tap and hold (long tap) these buttons, … Read the rest
The post How to use Galaxy S10 quick setting buttons? appeared first on Galaxy S10 Guides.
How to use Galaxy S10 Camera app?
simon Mastering the Galaxy S10 Camera app is essential for taking the best photos with cameras on Galaxy S10, S10e, S10+, and S10 5G.
Samsung significantly changed the Camera app in One UI with Android Pie. So, even for seasoned Samsung Galaxy phone users, there are some new features of the Galaxy S10 Camera app, and of course, there are many removed features.
This Galaxy S10 camera guide explains the new features of the Galaxy S10 Camera app, the components of the camera app interface (UI), and how to use gestures in Galaxy S10 camera app.
Please note that in the Android 10 update for Galaxy S10, S10+, and S10e, the Camera app was updated as well. You may check this guide for a few new features in the camera app.
If your Galaxy S10 has been updated to Android 11 (One UI 3), the camera app interface should look like this.
If your Galaxy S10 has been updated to Android 12 (One UI 4), you should use this guide.
New features of Galaxy S10 Camera app?
Compared to the Camera app in Galaxy S9 (prior to the Android Pie update) and older Galaxy phones, the Galaxy S10 Camera app has some new or changed features, including:
- There is no dedicated video recording button. Video recording is a camera mode. So, you cannot use the Pro mode to record videos anymore.
- The shutter button does not have the zoom function. You cannot drag the shutter button to zoom. You can use the pinch/spread gesture or rear camera selection buttons to zoom in/out.
- Camera modes are located on the bottom (above the shutter button) in the portrait orientation, and the orientation does not change when you hold the phone in landscape orientation.
- AR Emoji is not listed as a camera mode. It has a dedicated button in the Galaxy S10 camera app interface.
- The Bixby Vision and AR Emoji buttons are located on the top of the screen.
- The Galaxy S10 Camera setting button is located on the top (below the Bixby Vision and AR Emoji).
- The Auto camera mode is renamed as Photo mode.
- A new scene optimizer button was added to the preview window.
- For supported camera modes, you can now change the aspect ratio of the photo (and photo size) without navigating to Galaxy S10 camera settings.
- You cannot adjust the resolution of the photo directly. You can only adjust the aspect ratio of the photo. Each aspect ratio has a fixed resolution. You may refer to this guide on how to set photo size on Galaxy S10.
- New Galaxy S10 camera night mode.
Please note that only the official Samsung Camera app can fully utilize the advanced features of Galaxy S10 camera sensors. Third-party camera apps can use the basic features of the sensors.
Components of the Galaxy S10 camera app
Once you launch the camera, by default, you can find the following 14 items … Read the rest
The post How to use Galaxy S10 Camera app? appeared first on Galaxy S10 Guides.
Meaning of Galaxy S10 status icons and notification icons
simon![]() You need to understand the meaning of the Galaxy S10 status icons and notification icons to get some quick information on the system status and health.
You need to understand the meaning of the Galaxy S10 status icons and notification icons to get some quick information on the system status and health.
This Galaxy S10 how-to guide explains the differences between Galaxy S10 status icons and notification icons, how to customize the notifications in the status bar, and the meaning of Galaxy S10 status icons and notification icons in Galaxy S10, S10+, and S10e.
Please note, in some regions or carriers, the status icon on Galaxy S10 may be slightly different.
If you want to customize or disable notification icons in Galaxy S10 status bar, you may check this guide.
What is the difference between Galaxy S10 status icons and notification icons?
Like other Android phones, Galaxy S10 uses the top part of the screen as a status bar to display status icons and notification icons. These icons tell you something about the system or inform you about unread or on-going notifications.
The status bar appears on all screens in Galaxy S10, including Galaxy S10 Home screen, apps screes, lock screen, and all apps.
The icons in the Galaxy S10 status bar are usually classified as notification icons and status icons.
As shown in the screenshot below, the Galaxy S10 notification icons are in the left side of the status bar. The Galaxy S10 status icons are on the right side of the status bar.
Please note, due to camera cutout on Galaxy S10, the status icon are aligned to the left side of the cutout, not to the right edge of the screen. If you use Galaxy S10 virtual bezel to hide the front camera cutout, the status icons will be aligned to the right side.
The differences between Galaxy S10 status icons and notification icons are
- Galaxy S10 status icons are always related to the system; while Galaxy S10 notification icons are usually linked to specific apps (including a few system apps and third-party apps).
- Galaxy S10 status icons are normally shown on the right side of the status bar; while Galaxy S10 notification icons always appear on the left side of the status bar.
- Galaxy S10 status icons are more or less universal in all regions; while Galaxy S10 notification icons depend on individual apps, whose developers can use whatever they want.
- Galaxy S10 status icons normally do not have any corresponding notifications in the notification panel; while Galaxy S10 notification icons usually have one or more corresponding notifications in the notification panel.
- You can customize the number of Galaxy S10 notification icons shown on the Galaxy S10 status bar. But you cannot customize the number of status icons.
Please note, when an app is in the immersive full-screen mode, the status bar will be hidden temporally. You can swipe down from the top of the screen to bring up the Galaxy S10 status bar (and Galaxy S10 navigation bar if you are using Galaxy S10 navigation buttons).
Also, when you are in … Read the rest
The post Meaning of Galaxy S10 status icons and notification icons appeared first on Galaxy S10 Guides.
How to disable or customize the notification icons in the Galaxy S10 status bar?
simon![]() You can disable and customize notification icons in the Galaxy S10 status bar to save space for the status icons.
You can disable and customize notification icons in the Galaxy S10 status bar to save space for the status icons.
This Galaxy S10 how-to guide shows you how to limit the number of notifications icons in the Galaxy S10 status bar to 3, or to disable notification icons in the status bar.
This guide applies to all Galaxy S10 models: Galaxy S10, S10+, S10e, and S10 5G.
Why you may consider to customize or disable notification icons in the Galaxy S10 status bar?
Due to the cutout of front cameras in the screen (see Galaxy S10 layout), the icons in the Galaxy S10 status bar are not aligned to the right edge of the screen. Instead, the status icons are aligned to the left side of the camera cutout (the left side of the O of the infinity O display).
Besides, since Android Pie update for Galaxy S9, Samsung displays the current time on the left side of the status bar like other Android phones.
Therefore, the usable space for the notification icons in the Galaxy S10 status bar is significantly reduced.
For example, as shown below, the default status bar can be very crowded if you show many notification icons. The meaning of the Galaxy S10 status icons and notification icons are compiled on this page.
Therefore, Samsung allows you to customize the number of notification icons shown on the status bar.
You can even disable notification icons in the Galaxy S10 status bar.
How to disable or customize the notification icons in the Galaxy S10 status bar?
If you want to customize the number of Galaxy S10 notification icons in the status bar or to disable notification icons in Galaxy S10 status bar, you can do so in Galaxy S10 Settings.
In the Settings page, tap Notifications, as shown below, to manage Galaxy S10 notifications.
![]()
![]()
In the notification settings page, as shown in the screenshot above, tap Status bar.
Now, in the status bar, you can see all options for customizing notifications icons in the Galaxy S10 status bar.
As shown below, you can choose to show:
- 3 recent notifications. If you have notifications from more than 3 apps, only the notifications icons from the last 3 apps will be shown.
- All notifications.
The option of Shown battery percentage actually let you decide to show or hide the battery level on the right side of the status bar (among status icons, not notification icons).
As shown in the screenshot below, there is one notification icon. If you tap the switch for “Show notification icons” to turn it off it will hide the notification icon from the status bar.
![]()
![]()
As shown in the screenshot above, you can find the notification icon disappears after you disable notification icons in the Galaxy S10 status bar.
Please note, disabling notification icons in the status bar does not affect the notification itself. The corresponding notifications are still in the notification panel. The … Read the rest
The post How to disable or customize the notification icons in the Galaxy S10 status bar? appeared first on Galaxy S10 Guides.
Galaxy S10 SIM card guide
simonYou need to insert a SIM card to Galaxy S10 SIM card tray to use the mobile network (voice, SMS, and mobile data).
In the Galaxy S10 box, a SIM card is not included (although the SIM card tray ejection pin is included). You have to get one from the carrier. Of course, it is not free.
This Galaxy S10 how-to guide explains everything you need to know about Galaxy S10 SIM card: the size of the SIM card used in Galaxy S10, add or change the SIM card for Galaxy S10, check mobile network connections on Galaxy S10, use the SIM card tray for the single-SIM and dual SIM versions of Galaxy S10.
Please note that 5G support is only available on Galaxy S10 5G.
What is the SIM card size for Galaxy S10?
Galaxy S10 (all 4 models, Galaxy S10, S10e, S10+, and Galaxy S10 5G) requires a nano-SIM card, which is the smallest SIM card currently.
Most phone companies now offer 3-in-1 SIM cards, as illustrated below. You can detach the smallest part and use it on Galaxy S10.
After detaching the nano-SIM card, do not throw away plastic parts, which can be used as a SIM card adapter for old devices that may require a micro or even mini-SIM card.
You can use the existing SIM card for Galaxy S10 if you migrated to Galaxy S10 from any of the following phones,
- Samsung Galaxy S6, S7, S8, and S9 and all their variants (e.g., S9+, S8+, S7 edge, S6 edge, and S6 edge+).
- Samsung Galaxy Note 5, Note 7 FE, Note 8, and Note 9.
- Any of Samsung Galaxy A series: Galaxy A3, A5, A7, A8, and A9.
- Galaxy J3 2017 and later, Galaxy J5 2017 and later, Galaxy J7 and later.
- iPhone 5, 6, 7, 8 and X (and all variants).
- Moto X (all generations).
- Moto Z (all generations)
- Moto G5, G6, and G7.
- Moto E4 and E5.
- Pixel and Pixel XL (all generations).
- LG G5, G6, G7 (all variants), V10, V20, V30 and V40.
- Many other phones released after 2016.
If you are not sure whether you can use your existing SIM card on Galaxy S10, please post your phone model in the comments box below. We will try to check it for you.
Due to the size difference, you must use a nano-SIM on Galaxy S10. The SIM card tray was designed for this SIM card size only.
If your old SIM card is a micro SIM card, and your carrier charges you for changing to the nano-SIM, you may trim the old SIM card to a nano-SIM card. It is recommended to do it in the handphone shop. They usually use a specialized clipper, which is more accurate and safer than your scissors.
If your old SIM card is a mini-SIM card, you need to check with the handphone shop. Some old mini-SIM cards have larger metal parts than nano-SIM cards. If this is the case, then you … Read the rest
The post Galaxy S10 SIM card guide appeared first on Galaxy S10 Guides.
How to use and customize Galaxy S10 lock screen?
simonGalaxy S10 lock screen can help you keep your data from prying eyes.
Samsung also allows you to tweak and customize the lock screen to match your personal preferences and needs.
This Galaxy S10 how-to guide explains the components of the Galaxy S10 lock screen, shows you how to customize the lock screen, and addresses some questions you may have with the Galaxy S10 lock screen.
What is the Galaxy S10 lock screen?
When you power on or reboot Galaxy S10, it will stop at Galaxy S10 lock screen until you unlock the phone. This is similar to other Android phones.
You can imagine the Galaxy S10 lock screen is the door of your Galaxy S10 (S10, S10+, S10e, or S1o 5G).
If someone crosses the door, he can then access everything you saved on the phone: your contacts, messages, call log, files, emails, photos, app data, and many more.
For this reason, you should keep the lock screen secured. In other words, you should set up a PIN or password to lock the phone so that all people except you can only access up to the lock screen.
If you leave the phone unattended, or your phone is stolen, a secured lock screen may save your life.
On the other hand, you want to access some info very quickly on Galaxy S10. For example, you may want to pause the music playing without unlocking the phone or peek the notifications.
So, some features were added to Galaxy S10 lock screen to improve your productivity without sacrificing security and privacy.
What are the components of the lock screen?
Typically, there are up to 7 components on the Galaxy S10 lock screen, as shown in the screenshot below.
- Status bar. Due to the cutout of the front camera, notification icons on the right side are not aligned to the right edge of the screen. Please check this guide on the meaning of the status icons and notification icons on Galaxy S10. You may customize and even disable notification icons in Galaxy S10 status bar as explained in this guide.
- Clock and FaceWidgets. You can swipe left and right to switch to other FaceWidgets.
- Contact info.
- Notifications.
- Charging status (when charging Galaxy S10 battery)
- The in-display fingerprint scanner location indicator (for Galaxy S10, S10+, and S1o 5G).
- App shortcuts (up to two).
You can hide some of them including contact info, notifications, and app shortcuts. But others will be always shown.
If you swipe down from the status bar, you will then access the Galaxy S10 quick setting buttons panel. There is no dedicated notification panel in the lock screen.
How to customize Galaxy S10 lock screen wallpaper?
If you want to change the wallpaper for the Galaxy S10 lock screen, you can go to the edit mode for Galaxy S10 Home screen.
On Galaxy S10 Home screen, you can enter the edit mode with either of the two touchscreen … Read the rest
The post How to use and customize Galaxy S10 lock screen? appeared first on Galaxy S10 Guides.
How to use Galaxy S10 navigation buttons and navigation gestures?
simonYou have to use either Galaxy S10 navigation buttons or navigation gestures to navigate through different pages and apps on Galaxy S10, S10+, S10e, and S10 5G.
If you just migrate to Galaxy S10 from a non-Samsung phone or a Samsung phone running Android Oreo or lower versions of Android, you may need to spend some time getting used to Galaxy S10 navigation gestures.
This Galaxy S10 how-to guide shows you how to use and customize the navigation buttons and navigation bar, and how to use the Galaxy S10 navigation gestures.
How to use Galaxy S10 navigation buttons?
By default, Galaxy S10 (including Galaxy S10, S10+, and S10e) uses a navigation bar with 3 navigation buttons: Back, Home. and Recents (overview) on the bottom part of the screen.
Please note Samsung moved to software navigation buttons since Galaxy S8. There are no hardware navigation buttons on Galaxy S10. The 3 hardware buttons (keys) on the Galaxy S10: Power button, Volume (up and down) button, and Bixby button as explained in Galaxy S10 layout.
By default, you will see the following Galaxy S10 navigation buttons in the navigation bar.
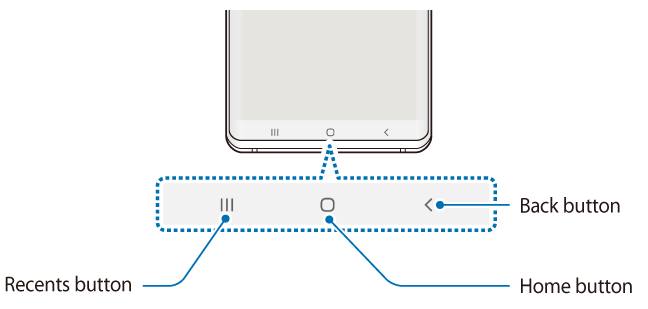
Galaxy S10 navigation buttons (navigation bar)
If you migrated from non-Samsung phones, you may find the button order is different from other phones. In stock Android, the Back button is on the left of the Home button and Recents (Overview) button to the right. Of course, you can change the navigation button order on Galaxy S10 to match other Android phones (read on).
The functions of the 3 Galaxy S10 navigation buttons are similar to those in other Android phones.
Home button
Galaxy S10 Home button accepts three touchscreen gestures: tap, long tap, and swipe to the right side
You can tap the Home button to back to the Galaxy S10 home screen regardless of what you are doing, or what app you are using.
If you are on the Galaxy S10 home screen already, tapping the Home button will bring you to the “home” of the home screen panels.
Please note, unlike the home button on Galaxy S8, S9, Note 8, or Note 9, the Galaxy S10 home button is not pressure-sensitive. On the Galaxy S10 always-on display (AOD), you can tap anywhere to wake the screen if you enable the tap to wake feature.
If you tap and hold (long tap) the Home button, by default, Google Assistant will start.
If you swipe to the right side from the Home button, you will switch to the most recent app (read on in the Galaxy S10 navigation gestures section).
Back button
The behaviour of the Back button actually depends on the app you are using. In other words, the app developer can decide what happens when you tap the Back button when using the app.
For most apps, tapping the Back button brings you back to the previous screen of the app until you exit the app. Remember some apps don't allow you … Read the rest
The post How to use Galaxy S10 navigation buttons and navigation gestures? appeared first on Galaxy S10 Guides.
How to use Galaxy S10 LED cover (Galaxy S10 LED back cover)?
simonSamsung introduced a new back cover for Galaxy S10, S10+ and S10e: Galaxy S10 LED cover (LED back cover).
The LED cover is a back cover with some unique LED features including mood lighting, LED emoticons, Picture cue, and camera timer. The old LED wallet cover is now renamed as Galaxy S10 LED View cover in most regions.
This Galaxy S10 accessories guide explains how to set up and use Galaxy S10 LED cover (LED back cover) on Galaxy S10, S10+, and S10e, the unique features of this cover and a review of this LED cover.
Unique features of Galaxy S10 LED cover (LED back cover)?
Galaxy S10 LED cover is a new type of official accessories. It is a back cover with some unique LED features.
Compared to other back covers, the LED back cover has the following special features:
- Mood lighting. When Galaxy S10 is facing downwards, a light show is presented with the LEDs. You can only enable or disable the show, not customize the show.
- LED notification icons. You will get notification icons on the back when a notification comes. But the LED notification icon only works with some Samsung apps, and you cannot customize the LED icons. Please note, in Galaxy S10 LED View cover, you can customize the LED notification icons.
- Camera timer. If the timer for the rear camera is turned on, the countdown will be shown on both the screen and the cover.
- Emoticons for the rear cameras. When you open the camera app, and the rear cameras are active, a LED icon you chose will be shown on the back cover.
Unlike the fabric-like material used in Galaxy S10 LED view cover, the exterior of the Galaxy S10 LED back cover is glossy plastic. Therefore it is a fingerprint magnet.
The LED cover provides moderate protection for the glass back of the phone. The raised edges on the top and bottom (over the screen) offers marginal protection for the screen, The two side edges of the Galaxy S10 LED back cover for Galaxy S10, and S10+ are lower than the screen due to the curved screen in these two models.
Please note, Galaxy Friends, which is available for Galaxy S20 LED back cover, are not available for Galaxy S10 LED back cover.
How to set up and customize the LED cover (LED back cover)?
Once you snap the LED back cover on to the phone, you will get a notification asking you to set up the cover if you use it the first time.
Actually, Galaxy S10 will automatically add:
- The LED cover app in the Apps screen, as shown below.
- An entry in Settings — Advanced features —Accessories — LED cover.
These two items are identical: both are shortcuts for the Galaxy S10 LED cover settings.
For example, in Galaxy S10 Settings, you can tap Advanced features as shown below.
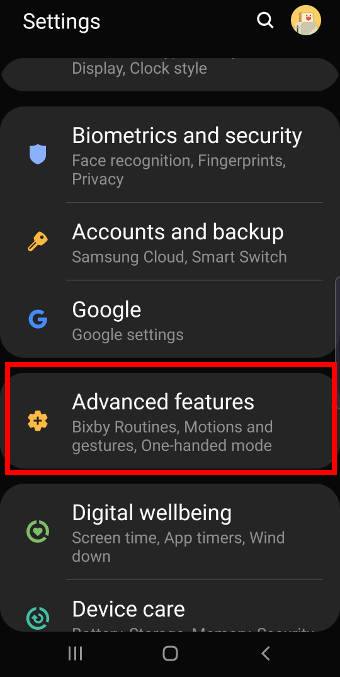
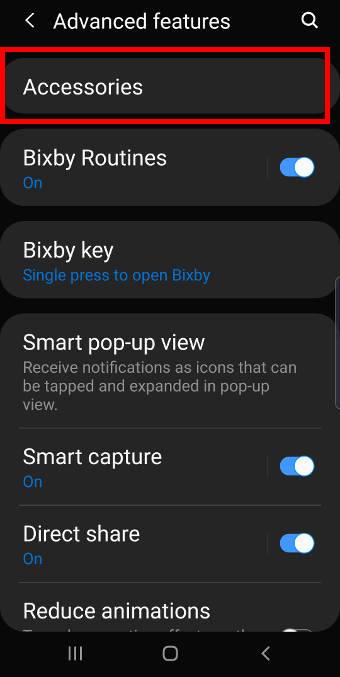
In the Advanced Features page, tap Accessories… Read the rest
The post How to use Galaxy S10 LED cover (Galaxy S10 LED back cover)? appeared first on Galaxy S10 Guides.
How to use the new fingerprint reader to unlock Galaxy S10, Note 10, S20, Note 20, S21, and S22?
simon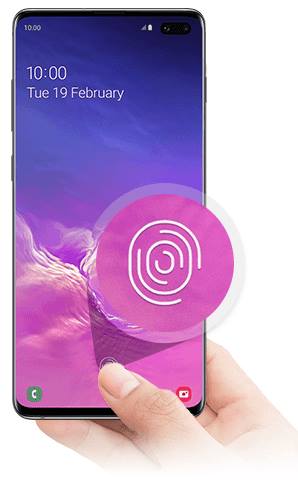 Samsung dramatically changed the fingerprint reader (fingerprint sensor) on Galaxy S10. An in-display ultrasonic fingerprint reader is used in Galaxy S10 and Galaxy S10+.
Galaxy Note 10 and Galaxy S20 also used identical in-display ultrasonic fingerprint reader.
With the removal of the Iris scanner on Galaxy S10, many owners will have to use the fingerprint scanner to quickly unlock Galaxy S10.
This Galaxy S10 how-to guide explains how to register fingerprints and use the fingerprint reader to unlock Galaxy S10, S10+, Note 10, Note 10+, S20, S20+, S20 Ultra, Note 20 Ultra, s21, S21+, S21 Ultra, S22, S22+, and S22 Ultra.
What's new in Galaxy S10 fingerprint reader?
Galaxy S10 (and Galaxy S10+) is the first smartphone with an in-display ultrasonic fingerprint reader, which is one of the most notable new features of Galaxy S10.
Instead of scanning your fingerprint using capacitive or optical methods, an ultrasonic fingerprint sensor uses sonic pulse waves to find out the 3D structure of your fingerprints.
Similar ultrasonic technology has been used in biomedical imaging in hospitals for decades and saved many lives.
Generally speaking, or technically, the ultrasonic fingerprint reader can get the real 3D info of your fingerprints and therefore it could potentially be far more accurate than the traditional capacitive fingerprint reader.
Do not confuse this in-display ultrasonic fingerprint reader with the in-display optical fingerprint ones (as in a few OnePlus and Vivo phones). The optical fingerprint reader is the slowest one. It is even slower than the traditional capacitive fingerprint reader. And the optical one is the least secure because it is essentially a kind of 2D photo recognition.
For Galaxy S10e, a traditional capacitive fingerprint sensor is mounted on the power button as illustrated in Galaxy S10 layout. The position is at least better than the fingerprint on Galaxy S8 (see Galaxy S8 layout) or S9 (see Galaxy S9 layout).
What are the major limitations of the in-display ultrasonic fingerprint reader on Galaxy S10 and S10+?
Although the in-display ultrasonic fingerprint sensor sounds cool and is actually the most secure (accurate) fingerprint reader, there are some inherent limitations of this new sensor on Galaxy S10:
- Many screen protectors will not work nicely with the in-display fingerprint reader. The sonic waves are affected by the air between the screen and screen protector. Therefore the sensor may not function properly even if a small air bubble is trapped by the screen protector.
- You need to know where to press your finger.
- The matching sensitivity is not rocket science. If Samsung set the sensitivity too high, you may have to press several times. If it is set too low, it will not be secure.
So, as explained in the top 10 disappointing and missing features of Galaxy S10, I prefer the fingerprint sensor on Galaxy S10e.
You may check this guide to understand the limitations of using the fingerprint reader to unlock Galaxy S10, S20, S21, and S22.
How to register fingerprints for
The post How to use the new fingerprint reader to unlock Galaxy S10, Note 10, S20, Note 20, S21, and S22? appeared first on Galaxy S10 Guides.
How to use Samsung Smart Switch to migrate to Galaxy S10?
simonYou may migrate to Galaxy S10 easily with the Samsung Smart Switch. Your photos, videos, music, messages, call logs, contacts, files, calendar events, alarms, and apps in the old phone can be transferred to Galaxy S10.
There are many solutions for you to migrate to Galaxy S10. But the simplest way is to use Smart Switch to transfer data between Galaxy S10 and the old phone.
This Galaxy S10 guide explains how to use Samsung Smart Switch to migrate to Galaxy S10.
What is the Samsung Smart Switch?
Samsung Smart Switch is the tool for you to migrate to Samsung devices from other mobile devices including:
- Android
- iOS
- Windows
- BlackBerry
In addition to Smart Switch Mobile, you can also download and install PC/Mac version of Smart Switch.
Smart Switch for PC is normally recommended for users who own one or more Samsung devices. It can back up almost all data on Samsung Galaxy phones to the PC and restore the backup to other Galaxy phones as well.
What can be migrated to Galaxy S10 using Smart Switch?
When using Samsung Smart Switch to migrate to Galaxy S10, the following data can be migrated (depending on OS on the old phone).
- Contacts
- Call log
- Photos
- Music
- Videos
- Calendar events
- Alarms
- SMS
- Documents
- Device settings (for Galaxy phones, most settings including home screen settings can be transferred)
- Apps (Android phones only)
You can review and select items to be transferred before migrating data to Galaxy S10.
How to use Smart switch t0 connect Galaxy S10 to the old device?
When you migrate to Galaxy S10 using Smart Switch, you can choose one of the following 3 ways to connect Galaxy S10 to migrate data
USB connection
You need to use the old phone's USB cable and the USB connector in the Galaxy S10 box.
This is the fastest, easiest, and most reliable way to migrate to Galaxy S10.
Wireless connection
You can also connect Galaxy S10 to the old Android phone using WiFi direct. The data on the old device can then be transferred to Galaxy S10 wirelessly.
For iOS devices, you only need to enable iCloud backup. On Galaxy S10, you can then transfer the iCloud backup to Galaxy S10 through the WiFi connection.
External storage
This connection is usually available for Galaxy phones or other Android phones that support back up to external storage (micro SD card, or USB flash drive).
To migrate data to Galaxy S10, you need to:
- Back up the phone to the external storage
- Remove the storage from the old phone
- Connect the external storage to Galaxy S10
- Start Smart Switch on Galaxy S10
- Migrate all data in the back up to Galaxy S10
The 3 connection methods work similarly: you select what to transfer/migrate, start to transfer, restore to Galaxy S10.
How to use Smart Switch to migrate to Galaxy S10 with a USB cable?
You may follow these steps to migrate to Galaxy S10.
Step 1: Connect Galaxy S10 to the
The post How to use Samsung Smart Switch to migrate to Galaxy S10? appeared first on Galaxy S10 Guides.
How to use Galaxy S10 touchscreen gestures on Galaxy S10, S10+, and S10e?
simon Using Galaxy S10 touchscreen gestures is not an option; it is a requirement if you want to use Galaxy S10, S10+, or S10e.
The good news is that Galaxy S10 touchscreen gestures are similar to those on other smartphones.
This Galaxy S10 how-to guide uses animation to demonstrate how to use seven Galaxy S10 touchscreen gestures. The examples (scenarios) of using these Galaxy S10 touchscreen gestures are also provided.
The touchscreen gestures are identical on Galaxy S10, S10+, S10e, and S10 5G. So, in this guide, Galaxy S10 refers to all four models of Galaxy S10 phones.
What are the seven Galaxy S10 touchscreen gestures?
Unless you attach a keyboard/mouse to Galaxy S10 or use voice commands (e.g., Google Assistant or Bixby Voice), you have to use Galaxy S10 touchscreen gestures to control the screen and interact with the phone in apps.
Galaxy S10 touchscreen gestures refer to how your finger(s) moves on the screen.
The screen (see Galaxy S10 layout) in Galaxy S10 is a touchscreen. When your finger or a capacitive pen touches the screen, it can identify the motion.
The motion pattern can be designed and programmed as a gesture. The system and apps can then perform certain operations as a response to the gesture.
In Galaxy S10, as like in other Android phones, seven touchscreen gestures, tap, double tap, long tap (tap and hold), swipe, drag, pinch, and spread, are fully supported.
Galaxy S10 touchscreen gestures are used by:
- The system. Galaxy S10 may use slightly different touchscreen gestures compared to other phones. For example, the navigation gesture is different from that in stock Android.
- Individual apps. App developers can assign any functions to any gestures inside the app.
Please note S Pen is for Galaxy Note devices. Galaxy S10 screen will NOT respond to S Pen.
Very often, three of the Galaxy S10 touchscreen gestures were also programmed for some hardware buttons (keys). In this case, we usually refer the gestures as press (instead of tap), double press and long press.
Please do not confuse the touchscreen gestures with Galaxy S10 navigation gestures.
Some Samsung cases/covers may also support some gestures. For example, both Galaxy S10 LED View cover (LED wallet) and the Galaxy S10 Clear view (S view) cover support swipe gesture to accept or reject a call.
List of Galaxy S10 touchscreen gestures their usages
We will use animations to illustrate what are the 7 Galaxy S10 touchscreen gestures. The examples of using each gesture are followed.
Smartphone touchscreen gestures usually mimic the behaviours of a mouse on a PC. When you use Samsung Dex with Galaxy S10, the mouse can replace these Galaxy S10 touchscreen gestures.
1. Tap gesture (press)
Tap (single tap) is one of the essential Galaxy S10 touchscreen gestures. You cannot survive without it.
The tap gesture, as shown in the animation below, means you touch somewhere (e..g., a button in an app, an app icon in Galaxy S10 home screen) on the screen … Read the rest
The post How to use Galaxy S10 touchscreen gestures on Galaxy S10, S10+, and S10e? appeared first on Galaxy S10 Guides.
Unbox Galaxy S10: understand Galaxy S10 box contents
simonAfter unboxing Galaxy S10 (S10, S10+, or S10e), you need to understand the Galaxy S10 box contents: what are they? How to use them?
Understanding the items included in the Galaxy S10 box will surely help you use the phone (Galaxy S10, S10+, or S10e) properly and effectively.
This Galaxy S10 how-to guide shows you the package contents of the Galaxy S10 box and explains the usage of the 10 items of Galaxy S10 box contents.
The Galaxy S1o box contents are identical for Galaxy S10, S10+, and S10e, except the phone (and the dimensions of the box). In this page, we will use Galaxy S10 to refer to all these 3 Galaxy S10 phones. You may refer to Galaxy S10 specifications to find the differences among these 3 Galaxy S10 phones.
What are the items of Galaxy S10 box contents?
In different regions, Galaxy S10 distributors may insert some additional promotional items. But the “standard” box contents are standardized by Samsung.
In almost all regions, you can find these 10 common Galaxy S10 box contents as illustrated in the picture below.
- The Galaxy S10 box
- The phone (Galaxy S10, S10+, or S1oe)
- A transparent back cover
- A USB cable (USB-A to USB-C)
- AKG headset (with 3.5mm connector)
- Wall charger (travel adapter)
- USB connector
- SIM card tray ejection pin
- Quick start guide
- A leaflet of “How to transfer contents to Galaxy S10”
If you miss any items in the Galaxy S10 box, you may check with the seller.
How to use items of Galaxy S10 box contents?
Of course, each item in the Galaxy S10 box is for you to use and enjoy the phone.
#1. The Galaxy S10 box
The box should be sealed by Samsung or a local distributor.
The seal is to indicate this is an unopened package. If it is a pre-owned S10, it should be stated clearly in the box.
#2. The Phone (Galaxy S10, S10+, or S10e)
The phone is the main and the most expensive item in the Galaxy S10 box.
In most regions, for Galaxy S10, and S10+, a plastic screen protector has been pasted on the screen already. It is not the normal protective film.
If you plan to use a screen protector on Galaxy S10, or S10+, you need to know that many tempered glass screen protectors do NOT work with the in-display fingerprint sensor (see this page), therefore Samsung applied this plastic screen protector for you before you can find a compatible screen protector. You may check this guide on how to use Galaxy S10 in-display fingerprint scanner to unlock Galaxy S10.
For Galaxy S10e, the fingerprint is mounted on the power button, and therefore all screen protector should work with the phone. This is the reason why Samsung does not give a screen protector for Galaxy S10e.
All new Galaxy S10 phones should have about 50-60% battery. You can charge the battery after finishing the setup, or charge the battery before using the phone.
#3.
The post Unbox Galaxy S10: understand Galaxy S10 box contents appeared first on Galaxy S10 Guides.
How to charge Galaxy S10 battery?
simon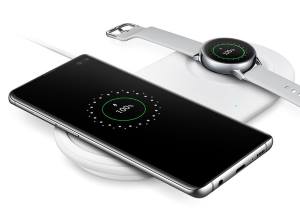
You need to charge Galaxy S10 battery properly to maximize the battery life without sacrificing your usage.
There are many so-called expert recommendations and rules on how to charge Galaxy S10 battery. Some of them are outdated (e.g., you need to drain Galaxy S10 battery completely every few weeks). Some are ridiculously wrong (e.g., you should not charge Galaxy S10 battery to full).
This Galaxy S10 how-to guide explains the proper way to charge Galaxy S10 battery with a wall charger (USB charging) or a wireless charger (wireless charging). Quick charge 2.0 and fast wireless charging 2.0 are also discussed.
How long should I charge Galaxy S10 battery the first time?
The old textbook may tell you that you should charge the new battery for at least 6-8 hours for the first time.
This is outdated. It does not apply to the Galaxy S10 battery.
When you charge Galaxy S10 battery the first time, you just need to charge it to “charged.” Then you can disconnect it from the charger (wall charger or wireless charger) and start to use it.
In fact, when Galaxy S10 left the factory, the battery was charged to about 60%. You can immediately use the phone when you get it. It is unnecessary to charge a new Galaxy S10 for 6 hours.
In some regions, Samsung does not offer a 1-to-1 exchange for hardware defects. You have to check the phone in the store.
Anyway, there are no special requirements when you charge the Galaxy S10 battery the first time.
Please note, there is no notification LED in Galaxy S10 (including S10, S10+, S10e, and S10 5G). As discussed on this page, you have to wake up the screen to check whether the battery is fully charged or not.
What are the two ways to charge the Galaxy S10 battery?
Galaxy S10 supports charging through the USB-C port and the wireless charging coil. You may refer to Galaxy S10 layout to check the location of the USB-C port and wireless charging coils.
So, you can charge Galaxy S10 battery in two ways:
- Through a USB cable (USB charging). Normally, you will use a wall charger. But you can also charge Galaxy S10 battery with a power bank, PC, or another mobile device with USB-C port.
- Wireless charging.
In Galaxy S10 box, a wall charger is included.
The wireless charging pad is not included in Galaxy S10 box. You may have to buy one.
What are fast charging and fast wireless charging for Galaxy S10, S10+, and s10e?
Galaxy S10, S10+, and 10e support quick charge 2.0 when charging through the USB-C port (USB charging). Of course, this requires a wall charger with quick charge support.
In the Galaxy S10 box, you can find the included 15W wall charger, which is a quick charge 2.0 compliant charger.
Samsung named the fast charge technology as adaptive fast charging. As mentioned in the top 10 disappointing and missing features of Galaxy S10… Read the rest
The post How to charge Galaxy S10 battery? appeared first on Galaxy S10 Guides.
Galaxy S10 layout (layout of Galaxy S10, S10 Plus, and S10e)
simon You need to understand the Galaxy S10 layout to properly use your Galaxy S10, S10+, or S10e.
The 4 models of Galaxy S10: S10, S10+ (S10 Plus), S10e, and S10 5G, share similar, but not identical design. The layout of these 4 Galaxy S10 phones is slightly different.
Because S10 5G has not been released yet, this Galaxy S10 guide will explain the layout of Galaxy S10, S10+, and S10e.
Why do you need to know about Galaxy S10 layout?
Galaxy S10 is not a revolutionary product. So, you can find some similarity between the Galaxy S10 layout and Galaxy S9 layout.
But the difference is also obvious.
Exploring the Galaxy S10 layout allows you to:
- Locate the buttons: Power button, Bixby button, and volume buttons.
- Locate the ports including multifunction (USB Type C) port and headphone jack.
- Locate the SIM card tray.
- Locate the antennas.
- Locate the cameras and sensors.
- Locate the wireless charging coil.
- Locate the speaker and microphones.
- Locate the fingerprint sensor.
Anyway, you should spend a few mins on understanding the Galaxy S10 layout. It will pay off immediately when you avoid some mistakes (e.g., piercing the microphone on the top with the SIM card ejection pin) or learn to use some special features or tricks.
The major differences among Galaxy S10 layout, Galaxy S10+ layout, and Galaxy S10e layout
The differences in specifications of Galaxy S10, S10+, and S10e are reflected in the device layout.
Here is the list of major differences among Galaxy S10 layout, Galaxy S10+ layout, and Galaxy S10e layout:
- Size. Galaxy S10+ is the largest and Galaxy S10e is the smallest. Galaxy S10 lies in between.
- The front camera and the hole. Galaxy S10+ has two front-facing cameras. The hole in the infinity O display is elongated and larger than that in the other two siblings. Galaxy S10 and S10e only have one front-facing camera. If you want, you can use Galaxy S10 virtual bezel to hide the front camera cutout as explained in this guide.
- Rear cameras. Both Galaxy s10 and S10+ have 3 rear cameras. Galaxy S10e only gets one.
- Fingerprint scanner. Both Galaxy S10 and S10+ have an in-display fingerprint ultrasonic scanner. The fingerprint scanner in Galaxy S10e is mounted on the power button.
The relative locations of the buttons, sensors, antennas, ports, speaker and microphones, SIM card tray are almost identical.
The layout of Galaxy s10+ (Galaxy S10+ layout)
The front view of Samsung Galaxy S10+ layout is shown below.
In the front, you can find:
-
Touch screen in Galaxy S10+ layout
The touch screen occupies about 90% of the front side of Galaxy S10+.
You can use various Galaxy S10 touchscreen gestures to interact with the phone.
By default, in the bottom part of the screen, Galaxy S10 navigation bar with 3 navigation buttons can be found. Of course, you can also use navigation gestures, instead of navigation buttons.
On the top of the screen, you … Read the rest
The post Galaxy S10 layout (layout of Galaxy S10, S10 Plus, and S10e) appeared first on Galaxy S10 Guides.
Top 10 disappointing or missing features of Galaxy S10
simon Galaxy S10, S10e, S10+, and S10 5G set the standard for the flagship smartphones in 2019. There are many new features and improvements in both hardware and software. But we also noticed some missing features of Galaxy S10.
Galaxy S10 (all 4 models) are far from perfect. There are some missing features in all 4 Galaxy S10 phones. Some features may also be very disappointing.
This post summarizes the top 10 disappointing and missing features of Galaxy S10.
#1. Iris scanner is gone: the most disappointing and missing feature of Galaxy S10
Iris scanner was first introduced in the explosive Galaxy Note 7. Most owners did not get the chance to try it before the phone was recalled, and re-recalled.
In Galaxy S8 (and S8+), the iris scanner works reasonably well. Many Galaxy S8 owners actually used the iris scanner because of the awkward location of the fingerprint scanner.
Obviously, the iris scanner was improved dramatically in Galaxy S9. It is faster than all other unlocking methods including the fingerprint scanner because of the less-ideal location and smaller size of the fingerprint scanner. If you are using a case or cover for Galaxy S9 or S9, it is not easy to reach the fingerprint scanner.
When more and more owners realized and started to enjoy this unlock feature, Samsung removed it from Galaxy S10. You have to use your face (face recognition) or fingerprint reader to unlock Galaxy S10 if you do not want to type the PIN/password.
None of the 4 Galaxy S10 models has the iris scanner.
The reason given by Samsung is the lack of bezel space for the iris scanner.
But if they can punch a hole for the front-facing camera(s), why cannot punch another hole for the iris scanner? Here is the Galaxy S1o layout.
Also, if you do not like the cutout (hole) for the front camera, you can use Galaxy S10 virtual bezel to hide the cutout.
#2. Freely remapping Bixby button (key): The most demanded but missing feature of Galaxy S10:
Bixby is quite good if you compare it to Siri. But if you compare it to Google Assistant, which is shipped with all Android Pie phones, Bixby is far behind.
But Samsung pushed Bixby so hard that a dedicated hardware Bixby key was introduced in Galaxy S8 and S8+, and all subsequent Galaxy phones get the button below the volume keys.
The most annoying part is that you cannot remap the button for other more useful features. e..g. Launching the Galaxy S10 camera app or using it as a camera shutter button, if you have no intention to use Bixby, or have no intention to use the Bixby button.
In Galaxy S8 and S9, you can disable the Bixby key by letting it do nothing when pressed. If you turn off Bixby Voice in Bixby settings, the long press gesture of the Bixby key will also be deactivated and do nothing.
But … Read the rest
The post Top 10 disappointing or missing features of Galaxy S10 appeared first on Galaxy S10 Guides.
Top 10 new features of Galaxy S10
simon As Samsung's flagship smartphones in 2019, Galaxy S10 (include Galaxy S10e, Galaxy S10+, and Galaxy S10 5G) packs the latest technology Samsung has or can access. So, you can expect some exciting new features of the Galaxy S10.
It is impractical to discuss all new features of Galaxy S10 in one post because of the long list of the new features of Galaxy S10. For the hardware specifications, you may check this post. For Galaxy S10 layout, you may check this guide.
In this post, we will explain the top 10 most exciting new features of Galaxy S10 most owners will enjoy: Dynamic AMOLED with HDR 10+, Infinity O display, ultrasonic in-display fingerprint scanner, Bixby Routine, ultrawide camera, wireless PowerShare, Android Pie and One UI, Digital wellbeing, recording 4K UHD video with HDR 10+, and fast wireless charging 2.0.
Of course, Galaxy S10 is far from perfect. There are also some disappointing and missing features of Galaxy S10 as discussed here.
The most exciting new feature of Galaxy S10: Dynamic AMOLED with HDR10+
Samsung flagship phones traditionally have the best display. No other smartphone makers can match Samsung when the display is discussed.
In Galaxy S10, Samsung updates its Super AMOLED to Dynamic AMOLED.
So, All four Galaxy S10 devices (Galaxy s10e, Galaxy S10, Galaxy s10+, and Galaxy S1o 5G) all have a Dynamic AMOLED screen.
This AMOLED is somewhat different (and better) from the screen in Galaxy S9 and other Galaxy phones.
In a nutshell, the Dynamic AMOLED on Galaxy S10 supports:
- Higher brightness (up to 1200 nits peak luminance). You can use the screen even directly under the sunlight.
- Larger dynamic range. From black to white, you can see more “colors”.
- HDR10+. In addition to static dynamic metadata, HDR10+ also supports dynamic metadata. Therefore the brightness boundaries can be set and changed on a frame-by-frame basis. Galaxy S10 (all models) is the only smartphone certified with HDR10+ up to now (February 2019).
- Lower blue light emission. You will feel more comfortable to use the screen in all lighting conditions. Galaxy S10 screen (all models) was certified by TÜV Rheinland.
Dynamic AMOLED is probably the most exciting new features of Galaxy S10. It is available in all four models: Galaxy S10, Galaxy S10e, Galaxy S10+, and Galaxy S10 5G.
The most innovative workaround of Galaxy S10: Infinity O display
All smartphone manufacturers are working hard to reducing the bezels.
But there is a limit because of the front-facing cameras.
So far, to solve this problem, other smartphone manufacturers follow iPhone X: using a notch, which can be quite ugly (subjective).
Samsung finds an innovative workaround for this issue: punch a hole for the front-facing cameras. It looks far better than the notches.
And in Galaxy S10, Samsung calls it infinity O display. All 4 Galaxy s10 models use infinity O display. Galaxy S10+ and Galaxy S10 5G get a bigger (and elongated) “hole”.
If you are not a fan of the punched hole, … Read the rest
The post Top 10 new features of Galaxy S10 appeared first on Galaxy S10 Guides.
Specifications of Samsung Galaxy S10, S10 Plus, S10e, and S10 5G
simon Although software plays a more and more important role in today's smartphones, many potential Galaxy S10 buyers are still eager to know what are the specifications of Samsung Galaxy S10.
Based on early leaks and rumours, the specifications of the Samsung Galaxy S10 are almost certain in most aspects.
This post summarizes the key specifications of Samsung Galaxy S10, S10 Plus, S10e, and S10 5G.
Update: From April 2023, Samsung stopped releasing security updates for Galaxy S10, S10+, and S10e after 3 major OS updates (Android 10/One UI 2 update, Android 11/One UI 3 update, and Android 12/One UI 4 update) and 4-year security updates.
How many models of Galaxy S10 will be?
Almost certain, tThere will be 3 are 4 Galaxy S10 models with slightly different specifications:
- Galaxy S10.
- Galaxy S10+ (Plus).
- Galaxy S10e.
- Galaxy S10 5G (in selected markets only).
Galaxy S10 is targeting mainstream users. S10+ (S1o Plus) is targeting hardware enthusiasts who want to get everything available. Galaxy S10e is targeting buyers who want a smaller phone. All these 3 Galaxy S10 models will be available globally on March 8, 2019.
Galaxy S10 5G is the only 5G capable phone in the market now. It will be available in Q2 2019. Because the 5G network is only available in very limited regions and carriers, Galaxy S10 5G will be available in selected regions. 5G features (e.g., 5G NR, 5G NSA, 5G sub-6, and 5G mmWave) are explained in this guide.
The specifications of Galaxy S10, S10+, S10e, and S10 5G are slightly different.
Of course, Galaxy S10+ will be the most expensive one among the three (the pricing of S10 5G is still not available now). S10e will be the cheapest.
Key features in specifications of Samsung Galaxy S10, S10 Plus, and S10e
Samsung Galaxy 10 is the 1oth generation of Galaxy S series phones. Samsung needs to use this historical device to showcase its leadership in the oversaturated smartphone market.
In addition to the annual upgrade of CPU, there are some interesting and major changes in Galaxy S10 specifications.
The infinity display will be pushed to the limit: the top bezel is not enough for the camera lens and a hole in the display has to be punched. So, Samsung just named it Infinity O display. You may hide the hole (cutout) using a black bar (Galaxy S10 virtual bezel) if you do not like the hole. But this will reduce the usable screen area.
So, instead of a notch, you will see the punched area for the front cameras as shown below.
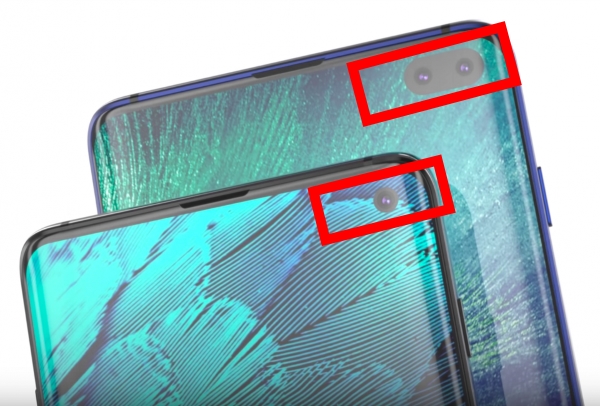
The fingerprint scanner will now be embedded under the screen in Galaxy S10, S10+, and S10 5G. And it uses an ultrasonic 3D scanning technique. There is no button or cutout for the fingerprint scanner. Please check this guide on how to use Galaxy S1o in-display ultrasonic fingerprint reader.
On Galaxy S10e, the fingerprint scanner will be embedded in … Read the rest
The post Specifications of Samsung Galaxy S10, S10 Plus, S10e, and S10 5G appeared first on Galaxy S10 Guides.
About Galaxy S10 Guides
simon Galaxy S10 guides community is part of the GadgetGuideOnline network featuring detailed how-to guides for the latest gadgets.
This post explains what the Galaxy S10 Guides community does and how the Galaxy S9 guides are organized.
What does the Galaxy S10 Guides community do?
Galaxy S10 guides @GadgetGuideOnline is an online community for Galaxy S10 owners and by Galaxy S10 owners.
It is an owner-help-owner community for owners of Galaxy S10, Galaxy S10+, and Galaxy S10e. Galaxy S10 5G will be also covered.
For many Galaxy S10 owners, access to the “official” support can be:
- Inconvenient. There may be very limited Samsung support centers in some regions. You do not want to drive a few hours to the support center, wait a few hours in the queue if you can get the answer or solution through a community like Galaxy S10 Guides here. Also, most support centers only open in office hours when you may have to work.
- Ineffective. In the support centers, the standard procedures have to be followed. Very often, you have to reset the phone and have to wait a long time.
- Costy. If your Galaxy S10 is out of warranty (e.g., you bought it from other regions), the cost of the visit to the support center can be quite expensive.
- Inadequate. In most regions, the support for your Galaxy S10, S10+, S1oe, and S10 5G is limited to hardware and pre-installed apps.
Of course, for hardware related issues, you have to visit the local service center because they have all the tools software to test the hardware.
But for software related issues or feature related questions, you can find the solution or answer without wasting time in the service center.
Galaxy S10 Guides offer many high-quality how-to style guides explaining the features of Galaxy S10, showing you how to use your Galaxy S10, helping you find and use proper accessories for your Galaxy S10.
The comments section in Galaxy S10 guides lets you ask questions or share your solutions.
Galaxy S10 Guides do NOT cover the following: rooting Galaxy S10, DIY hacking the S10 hardware, flashing the firmware for Galaxy S10…
Galaxy S10 Guide is a free community: all contents are free to read. You are free to ask questions related to Galaxy S10, S10+, S10e, and S10 5G.
How are Galaxy S10 Guides organized?
Detailed how-to guides on using Galaxy S10 or solving problems on Galaxy S10 are the starting point. Many owners can learn to use some features of Galaxy S10 through these guides. Owners can also share their solution or recommendations for a similar problem.
Discussions are moderated in the comments section so that meaningful contributions from fellow Galaxy S10 owners will benefit other members in the community.
There are 5 sections in Galaxy S10 Guides.
Galaxy S10 new features guides
This section hosts detailed guides explaining the new features of the Galaxy S10 and showing you how to use them.
For example, many owners want to know how … Read the rest
The post About Galaxy S10 Guides appeared first on Galaxy S10 Guides.
Enjoy your Galaxy S10, S10+, S10e, and S10 5G!