 What are Galaxy S9 guides about?

Galaxy S9 guides is an online community for owners of Galaxy S9 or S9+ to help fellow owners.
You can find detailed how-to guides, reviews, tips and tricks on using and customising Galaxy S9 and S9+.
Galaxy S9 guides community offers various how-to guides to help you use and customise Galaxy S9 and S9+. All Galaxy S9 guides are open to the public.
And of course, it is free.
In addition to guides, tips and reviews, comments are open on all pages. So, everyone can ask questions related to Galaxy S9 or S9+ if they are not addressed in the guides. The community will help them get the answer or solution.
Sections of Galaxy S9 guides
These Galaxy S9 guides are organised into the following five sections:
- Galaxy S9 new features guide. The section covers detailed guides for all new features and functions in Galaxy S9 and S9+.
- Galaxy S9 how-to guides. This section is a collection of high-quality how-to guides on how to efficiently use Samsung Galaxy S9 and S9+,
- Galaxy S9 camera guides. There are many improvements and new features in Galaxy S9 (especially S9+) camera. This section has all the guides you need to use the major features of the Galaxy S9 camera properly.
- Galaxy S9 accessories guides. This section shows you the useful and affordable Galaxy S9 accessories to help you use and improve Galaxy S9 and S9+.
- Galaxy S9 user guides. This section is a collection of the official Samsung Galaxy S9 user guides in various languages. You can read and download the official user guide in PDF format in your local language.
List of Galaxy S9 guides
Here is a list of recent Galaxy S9 and S9+ guides from Galaxy S9 guides. For a complete list of Galaxy S9 how-to guides and Galaxy S9 accessories guides, please check the Galaxy S9 Guides section.
How to use Galaxy S9 safe mode on Galaxy S9 and S9+?
simonYou can use Galaxy S9 safe mode to identify possible causes of some problems or strange behaviours of Galaxy S9 and S9+.
This safe mode is safe for your data, settings and apps. They will not be affected or altered when using the safe mode on Galaxy S9 and S9+.
This Galaxy S9 how-to guide shows you when you may need Galaxy S9 safe mode, two ways to enter the safe mode for Galaxy S9 and S9+, and how to use and exit Galaxy S9 safe mode.
What is Galaxy S9 safe mode? And when do you need Galaxy S9 safe mode?
Like most other Android phones, Galaxy S9 and S9+ have a special Galaxy S9 safe mode letting you troubleshoot possible problems caused by third-party apps.
In Galaxy S9 safe mode, all third-party apps installed by you were temporally disabled so that you can determine whether the problem is caused by such apps.
Your data, settings, and app data are not affected when you reboot Galaxy S9 or S9+ into Galaxy S9 safe mode
Galaxy S9 safe mode can only determine whether some strange behaviours or problems are caused by third-party apps. It is not able to pinpoint the app.
Unlike Galaxy S9 recovery mode which is not part of Android OS, Galaxy S9 safe mode is a special mode of Android OS.
So, under the Galaxy S9 safe mode, you can still make and receive calls, connect to the Internet, use pre-installed apps. The safe mode only prevents you from using apps installed by you.
You need to try Galaxy S9 safe mode before you visit the service centre because technical support in most service centres does not solve issues due to third-party apps. They only diagnose problems in the firmware and pre-installed apps.
Although Galaxy safe mode does not change your data and settings, you may lose some home screen customizations after you exit the safe mode. So, you may still consider to back up Galaxy S9 before rebooting into the safe mode.
How to reboot into Galaxy S9 safe mode?
There are two ways to reboot into Galaxy S9 safe mode:
- Use the power button options if Galaxy S9 or S9+ is currently powered on.
- Use buttons if the phone is powered off.
Method 1: Use power button options to reboot into Galaxy S9 safe mode
If the phone is powered on, you can… Read the rest
The post How to use Galaxy S9 safe mode on Galaxy S9 and S9+? appeared first on Galaxy S9 Guides.
How to back up Galaxy S9 and S9+?
simon You should back up Galaxy S9 or S9+. Period.
The data saved in galaxy S9 or S9+ may be lost for many reasons: hardware failure, inadvertent operation/deletion, malware or virus, loss of the phone…
This Galaxy S9 guide shows you how to back up Galaxy S9 data to the Samsung Cloud, and back up photos on Galaxy S9 or S9+ too Google Drive (through Google Photos).
Why do you need to back up Galaxy S9 and S9+?
If the data (photos, documents, notes and others) in your phone are important, you should back up them.
The storage of the phone including the internal storage and micro SD card, like other modern electric components, may fail at any time.
You do not know when it will fail. It can be tomorrow, or after 10 years.
You may accidentally delete a file or a photo. In Android, by default, there is no undo option, and there is no recycle bin to keep deleted files.
You should never try your luck if the data are important.
The good news is that it is easy and straightforward to back up Galaxy S9 or S9+, and it is free.
What are the available methods to back up Galaxy S9 and S9+ data without using any third-party apps?
In fact, there are at least three free solutions for backing up the data on Galaxy S9 and S9+ without using any third party apps (Google Photos is preinstalled).
- Use Samsung Cloud to back up Galaxy S9 and S9+ fully.
- Use Samsung Cloud to back up (except photos) Galaxy S9/S9+ fully, and Google Photos to back up photos and videos.
- Use Google Drive to back up Galaxy S9 and S9+
Method 1: Use Samsung Cloud to fully back up Galaxy S9 and S9+.
Some owners may be not aware that Samsung offers 15GB (free) for each Samsung account. And you can back up almost everything to Samsung cloud.
If you have multiple Galaxy phones (as old as Galaxy Note 4 and S6), you can access the back up from any of the supported devices with one Samsung account. This means you can migrate old phone data to Galaxy S9 or S9 using Samsung cloud without using Smart Switch.
The only drawback is the storage is limited 15GB per account (NOT per device). In most regions, Samsung does not sell additional storage.… Read the rest
The post How to back up Galaxy S9 and S9+? appeared first on Galaxy S9 Guides.
How to use adapt sound on Galaxy S9 and S9+?
simon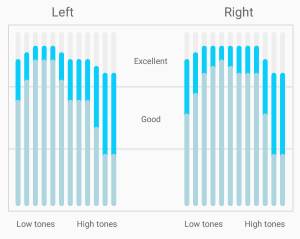 Galaxy S9 adapt sound on Galaxy S9 and S9+ can significantly improve the sound quality of the phone.
The improvement is achieved through a personalized sound profile tailored to your ears. Galaxy S9 adapt sound will conduct a hearing test for both of your ears to create that profile and compensate the frequencies you have problems with accordingly so that you can hear the “real” music and sound
This Galaxy S9 guide explains in detail how the adapt sound on Galaxy S9 and S9+ works, and how to enable, customize and use the Galaxy S9 adapt sound to get the best audio quality on Galaxy S9 and S9+.
Please note, adapt sound on Galaxy S9 and S9+ is almost identical to that on Galaxy S10, S10+, Galaxy S8+, S8, Note 10, Note 10+, Note 9, and Note 8. So, this guide also applies to these and other Samsung phones.
What is adapt sound on Galaxy S9 and S9+? How does adapt sound on Samsung phones works?
Adapt sound on Galaxy S9 and S9+ is NOT new. Samsung first introduced adapt sound in Galaxy S4 in 2013.
In the recent launches of Galaxy devices, Samsung even forgot to mention this audio feature, although Samsung tuned this feature in each generation of Galaxy devices.
But in my opinion, the adapt sound is one of the most useful Samsung features. And adapt sound on Galaxy S9 and S9+ is probably the most underused feature.
You should be very excited once you start to use the adapt sound on Galaxy S9 or other Samsung Galaxy phones: how excellent the music can be! You probably will blame yourself: why I didn't use it before!
In a nutshell, adapt sound on Galaxy S9 creates a personalized sound profile (effects) based on your ear.
Every ear is different. Even your two ears may differ significantly in hearing capabilities. At different ages, our ears also have different listening capabilities at different frequencies.
So, the question is: did you hear the “real” music or sound?
Galaxy S9 conducts a hearing test for your ears to create your hearing profile. Then use this profile to compensate the audio output so that you get the “real” music or sound.
For example, if your left ear has problems to hear sounds at around 15KHz, but your right ear does not have any issues for the same frequency range, then normally, you … Read the rest
The post How to use adapt sound on Galaxy S9 and S9+? appeared first on Galaxy S9 Guides.
How to lock Galaxy S9 home screen layout on Galaxy S9 and S9+ with Android Pie update?
simon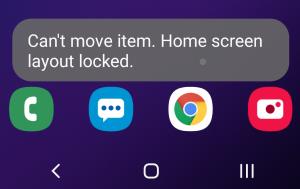 Android Pie update for Galaxy S9 and S9+ allows you to lock Galaxy S9 home screen layout so that you will not lose you customization due to accidental touches.
Although it sounds trivial and can be found in some other Android phones, many Galaxy S9 and S9+ owners will find this is one of the very useful features of Android Pie update for Galaxy S9 and S9+.
This Galaxy S9 Android Pie update guide shows you how to lock Galaxy S9 home screen layout on Galaxy S9 and S9+ with Android Pie update, and what the caveats are if you lock the home screen layout.
Why you may need to lock the home screen layout?
You can customize the Galaxy S9 home screen in many ways. You can use third-party themes, remove Bixby Home from the home screen, change wallpapers, adjust the grid layout, add app folders, pin individual files to the home screen, show photos on Galaxy S9 home screen (using widgets), and manage home screen panels.
Besides, Galaxy S9 and S9+ also support landscape mode of the Galaxy S9 home screen.
But very easily, the customization can be instantly wiped by accidental taps. For example, your kids may delete the widgets from the screen if they get their hands on the screen.
Many Galaxy S9 and S9+ owners want to lock the customization after the initial setup because most owners seldom change the home screen after one or two months.
Now, in the Android Pie update for Galaxy S9 and S9+, you can lock Galaxy S9 home screen layout so that you will not lose your customization so easily.
Of course, it only locks the layout. You cannot add or delete app icons or widgets once you lock Galaxy S9 home screen layout. But you can still use Galaxy S9 home screen edit mode to customize the home screen.
How to lock the Galaxy S9 home screen layout?
As other new features of Android Pie update for Galaxy S9 and S9+, the lock home screen layout feature is not enabled by default.
You need to enable this feature to lock the home screen layout.
In Galaxy s9 Settings, tap Display as shown below.
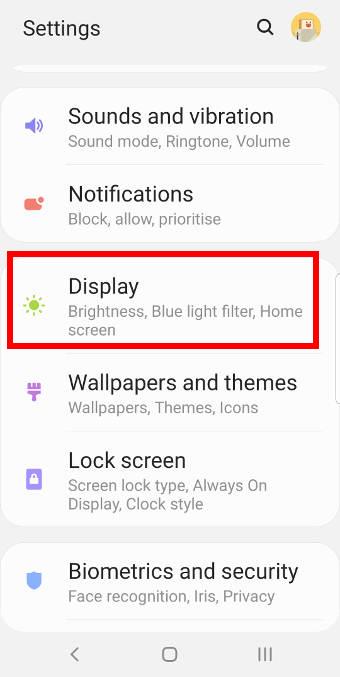
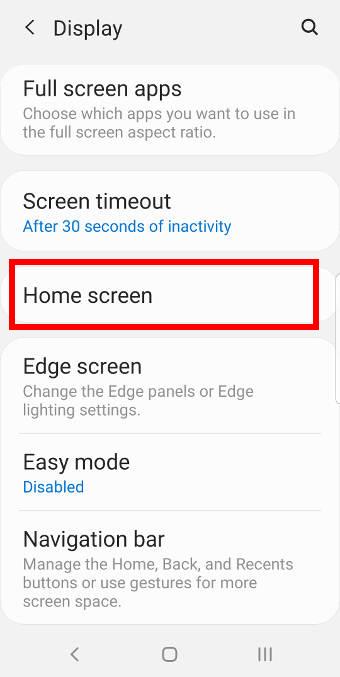
In the display settings page, as shown in the screenshot above, tap Home screen.
In the home screen settings page, you can then find … Read the rest
The post How to lock Galaxy S9 home screen layout on Galaxy S9 and S9+ with Android Pie update? appeared first on Galaxy S9 Guides.
How to use the lift to wake feature on Galaxy S9 and S9+ with Android Pie update?
simon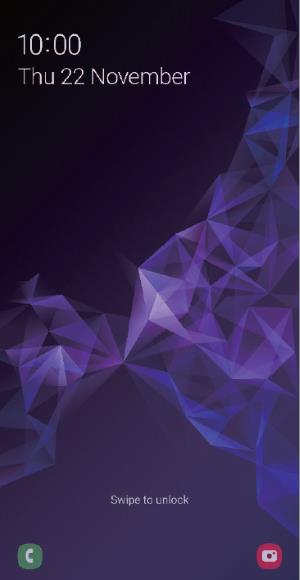 The lift to wake feature on Galaxy S9 and S9+ with Android Pie update lets the phone be ready when you want to use it.
Although it is a minor feature, many Galaxy S9 and S9+ owners like this feature in the Android Pie update for Galaxy S9 and S9+ because it is very practical.
This Galaxy S9 Android Pie update guide explains the details of the lift to wake feature on Galaxy S9 and S9+ with Android Pie update and shows you how to enable and use it on Galaxy S9 and S9+.
What is the lift to wake feature on Galaxy S9 and S9+?
Often, when you pick up the phone, you actually want to use the phone.
Now, in Android Pie update for Galaxy S9 and S9+, Samsung finally added this lift to wake feature. So, when you pick up (lift) the phone, the screen will wake up automatically. You do not need to press any buttons.
Surely, this is extremely useful when you just want to check time or notifications on Galaxy S9 lock screen.
If iris scanner or face recognition was enabled, it may unlock the phone at the same time when the screen wakes up (if you are staring at the screen).
Of course, many other Android manufacturers introduced similar features for some time already. For example, Motorola added the active display in the first-gen of Moto X. Samsung now is now catching up in adding more cool features in the One UI.
Please note, the lift to wake feature on Galaxy S9 and S9+ will not work if you are using the LED cover or the clear view cover when the cover is closed. These two cases are designed to lock the screen when they are closed.
How to enable and use the lift to wake feature on Galaxy S9 and S9+?
By default, the lift to wake feature on Galaxy S9 and S9+ with Android Pie update is disabled after you update the phone.
You need to enable it if you intend to use this feature on Galaxy S9 or S9 Plus.
In Galaxy S9 settings, tap the Advanced features as shown in the screenshot below.

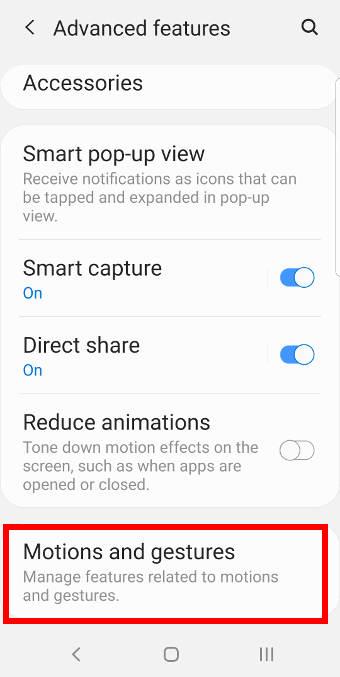
In the advanced features page, tap Motions and gestures as shown above.
Now, in the motions and gestures page, you can find the lift to wake.
As shown below, you can tap the switch on … Read the rest
The post How to use the lift to wake feature on Galaxy S9 and S9+ with Android Pie update? appeared first on Galaxy S9 Guides.
Galaxy S9 Android Pie update guides
simon Android Pie update for Galaxy S9 and S9+ has been rolled out since December 2018.
More and more Galaxy S9 and S9+ owners are enjoying the new features of Android Pie update. Samsung also updated the official user guide with Android Pie update.
Android Pie (Android 9) is a major update for Android. There are many new features in Android Pie.
On top of the standard Android Pie features, Samsung also updated the UI for Galaxy S9 and S9+ to One UI.
So, many Galaxy S9 and S9+ owners sometimes get confused on how to use the new features in Android Pie (Android 9) update for Galaxy S9 and S9+.
A series of guides on new features of Android Pie update for Galaxy S9 and S9+ have been prepared and tested since December 2018.
Now, we are releasing these Android Pie guides for Galaxy S9 and S9+ here.
This is a live post. A new guide is released only after it passes all our testing and verifications. We will update this post once a new guide is released.
Here is the list of released or coming-soon guides on the new features of Android Pie (Android 9) update for Galaxy S9 and S9+.
If you cannot find the Android Pie guides you need, or if you have any questions on Android Pie features on Galaxy S9 and S9+, please let us know them in the comment box.
We will try to release the guide earlier, and the community will help you get the answer or solution.
1. Top 9 new features of Android Pie update for Galaxy S9 and S9+
As the first major update of Galaxy S9 and S9+, Android Pie (Android 9) update brings not only Android Pie features to Galaxy S9 and S9+ but also a totally new UI (One UI).
This Galaxy S9 Android Pie update guide explains the top 9 most useful new features of Android Pie update for Galaxy S9 and S9+ including One UI, night mode, lift to wake, floating keyboard, lock home screen layout, lockdown mode, new camera app, navigation gestures, and adaptive battery
Read on …
2. The official Galaxy S9 and S9+ user guides with Android Pie update for Galaxy S9 and S9+
You can read online or download the official user manuals for Galaxy S9 and S9 Plus with Android Pie update in your local language for your … Read the rest
The post Galaxy S9 Android Pie update guides appeared first on Galaxy S9 Guides.
Official Samsung Galaxy S9 user guides
simon The official Samsung Galaxy S9 user guides for Galaxy S9 and S9+ are the best reference book if you want to get more from your Galaxy S9 or S9+.
Update: Android Pie update for Galaxy S9 and S9+ is out. You may check this page for the updated user manuals for Galaxy S9 and S9+ with Android Pie update, and this page for how-to guides on new features of Android Pie update for Galaxy S9 and S9 Plus.
All official Samsung Galaxy S9 user guides for Galaxy S9 and S9+ are in PDF format. You can download to your phone or PC. Then you can read on the device, or print it out.
You can download the PDF reader app on your Galaxy S9 or S9+ if you are not happy with the default PDF reader.
Why may you need official Samsung Galaxy S9 user guides?
Galaxy S9 and S9+, like other flagship phones, are probably as powerful as your PC.
There are so many functions and features in Galaxy S9 and Galaxy S9+. They can also perform so many tasks.
It is hard for a Galaxy S9 or S9+ owner to know all of the features.
And it is also not necessary.
But sometimes, you may need some special features, or you need help to use some specific features of Galaxy S9 or S9+.
The official Samsung Galaxy S9 user guides can be your lifesaver.
You can quickly get the hint or answer from the Galaxy S9 user guide.
Of course, these official Samsung Galaxy S9 user guides compliment to our Galaxy S9 how-to guides.
Our Galaxy S9 guides target individual features and functions; while the official Galaxy S9 user guides give you an overview of the features and functions of Galaxy S9 and S9+.
Please note, Galaxy S9 and S9+ share the same user manual. All user manuals listed on this page applies to both Galaxy S9 and S9+.
List of official Samsung Galaxy S9 user guides?
We organize these official Samsung Galaxy S9 user guides in different languages.
Usually, you can find the local language version of Galaxy S9 user guides. Such a local language version Galaxy S9 user manual usually matches your Galaxy S9 or S9+.
If you cannot find the language you want, you may:
- Try the English version of Galaxy S9 user guide (#1), which is for the international market.
- Post your request
The post Official Samsung Galaxy S9 user guides appeared first on Galaxy S9 Guides.
How to use two SIM cards on Galaxy S9, S10, and S20?
simonYou can use two SIM cards on Galaxy S9, S9+, S10, S10+, S10e, S10 Lite, S20, S20+, and S20 Ultra, if your phone is the dual-SIM version of Galaxy S9/S10/S20.
However, the dual-SIM version of Galaxy S9 and S9+ is dual standby only, not dual active. Therefore, you may encounter some limitations when you use two SIM cards in the Galaxy S9 and S9+.
This Galaxy S9 guide answers all questions you may have on using two SIM cards on Galaxy S9 and S9+.
As the dual SIM features in Galaxy phones are similar, this guide applies to the dual SIM version of Galaxy S10 (all models) and the dual SIM version of Galaxy S20 (all models).
Is your Galaxy S9/S9+ capable of using two SIM cards?
Only the dual-SIM version Galaxy S9/S9+ can use two SIM cards. Don't waste time or money to use two SIM cards if you got a single SIM version of Galaxy S9 or S9+.
If you bought your Galaxy S9 or S9+ in the US, very likely, it is a single SIM phone only. You cannot use two SIM cards on these phones sold in the US (through carriers and official distributors).
In most international markets, your Galaxy S9 or S9+ is very likely a dual-SIM version. And therefore, you may use up to two SIM cards on the phone.
You should always check with the seller on whether you can use two SIM cards on the phone you want to buy.
You can also check the Galaxy S9 box to see whether the Galaxy S9 or S9+ is dual SIM or single SIM version.
In most regions, the dual-SIM capability is usually marked as “duos” on the left side of the official Galaxy S9 box as shown below.

What are the limitations of using two SIM cards on Galaxy S9 and S9+?
The dual-SIM Galaxy S9 and S9+ are dual standby only, not dual active. This means both SIM cards are reachable when in the standby mode.
When you are talking through one SIM card, the other SIM card, by default, will be unreachable unless you enable dual SIM always on.
For the explanation of the differences between dual standby and dual active dual SIM phones, you may check this guide.
The limitations of using two SIM cards on Galaxy S9 and S9+ include:
- When you are talking
The post How to use two SIM cards on Galaxy S9, S10, and S20? appeared first on Galaxy S9 Guides.
How to use and customize Galaxy S9 lock screen?
simon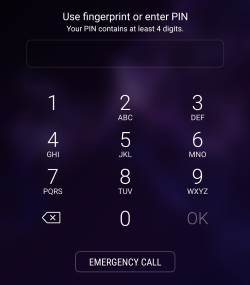 Galaxy S9 lock screen not only keeps your data safe but also offers some useful features and information to improve your productivity.
This Galaxy S9 how-to guide shows you how to set up, use and customise the lock screen of Galaxy S9 and S9+.
Please note although Galaxy S9 supports landscape mode in Galaxy S9 Home screen, Galaxy S9 lock screen is always in portrait mode.
What is Galaxy S9 lock screen?
Galaxy S9 lock screen likes a door to Galaxy S9 and S9+. You need this door to protect your data and info saved on the phone.
But Galaxy S9 lock screen is also an information centre for you so that you can get some essential info without unlocking the phone or opening any apps.
The information provided through Galaxy S9 lock screen varies depending on your customisation. By default, you can get at least the following info in Galaxy 9 lock screen:
- Time and date (clock).
- Carrier info.
- Media player controller.
- Your schedule.
- Notifications.
- Next alarm.
In addition, Galaxy S9 lock screen allows you to:
- Change a few settings (not related to data or privacy) of Galaxy S9 and S9+ through quick setting buttons, for example, turn on/off the blue light filter.
- Add up to 2 app shortcuts to lock screen.
- Use Galaxy S9 camera without unlocking the phone.
- Make emergency calls.
Of course, to protect your data in Galaxy S9 or S9+, most of the settings can only be changed after you unlock the phone.
How to set up Galaxy S9 lock screen security?
By default, when you set up Galaxy S9 or S9+, it will ask you to set up the lock screen security.
If you skip that step, the default lock screen security, swipe, will be used.
Of course, you can change Galaxy S9 lock screen security at any time.
And you should NOT set Galaxy S9 lock screen security to swipe or none.
If you use either of the options, your data in Galaxy S9 or S9+ are at risk. Anyone, including thieves, can access your phone without restrictions. They can impersonate you.
To change Galaxy S9 lock screen security, you may follow these steps.
Step 1: Access Galaxy S9 Settings
There are a couple of ways to access Galaxy S9 settings, for example
- Using the Settings app icon in Galaxy S9 Home screen.
- Using the Settings app icon
The post How to use and customize Galaxy S9 lock screen? appeared first on Galaxy S9 Guides.
Meaning of Galaxy S9 status icons and notification icons in Samsung Galaxy S9 and S9+
simonUnderstanding the meaning of Galaxy S9 status icons and notification icons in Samsung Galaxy S9 and S9+ will help you to use the phone efficiently.
You can get quick system info and new notifications by checking Galaxy S9 status icons and notification icons in the status bar.
This Galaxy S9 guide explains the differences between Galaxy S9 status icons and notification icons, and the meaning of these icons in the status bar in Galaxy S9 and S9+.
What is the difference between Galaxy S9 status icons and notification icons?
Android uses the top of the screen as the status bar, where Galaxy S9 status icons and notification icons are shown. It applies to Galaxy S9 Home screen, lock screen and all apps.
The following screenshot is an example of the Galaxy S9 status bar with notification icons on the left and status icons on the right. When you use Galaxy S9 home screen landscape mode or any apps in landscape mode, the status bar is also in the top of the screen.
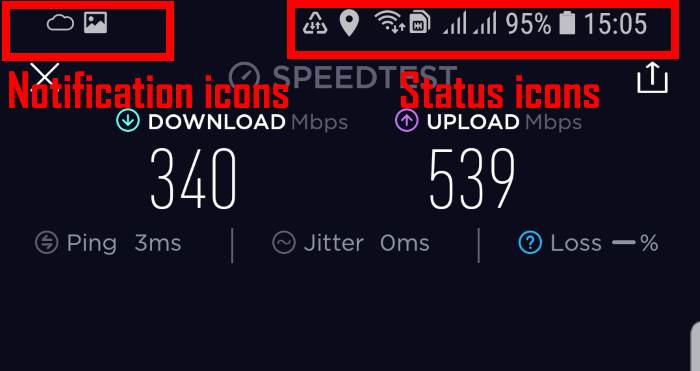
Galaxy S9 status icons and notification icons give you quick info about the system status (e.g., mobile network signal strength) and notifications from apps or the system.
When an app is in the immersive full-screen mode, the status bar will be hidden temporally. In this case, you can swipe down from the top of the screen to bring up Galaxy S9 status bar (and Galaxy S9 navigation bar as well)
The differences between Galaxy S9 status icons and notification icons include:
- Galaxy S9 status icons are always related to the system; while Galaxy S9 notification icons are always linked to specific apps (including a few system apps and third-party apps).
- Galaxy S9 status icons are normally shown on the right side of the status bar; while Galaxy S9 notification icons always appear on the left side of the status bar.
- Galaxy S9 status icons are more or less universal in all regions; while Galaxy S9 notification icons depend on individual apps, whose developers can use whatever they want.
Typically, when you see an icon on the left side of the status bar in Galaxy S9 or S9+, there are usually at least one or more corresponding notifications in Galaxy S9 notification panel.
But if you see a Galaxy S9 status icon, there is seldom a corresponding notification.
Meaning of Galaxy S9 status icons
The post Meaning of Galaxy S9 status icons and notification icons in Samsung Galaxy S9 and S9+ appeared first on Galaxy S9 Guides.
Top 10 new features of Samsung Galaxy S9 and Galaxy S9+
simon Samsung announced Galaxy S9 and Galaxy S9+, the 9th generation of Galaxy S phones, on February 25, 2018, in Barcelona, Spain, immediately ahead of MWC 2018. You may want to know the new features of Samsung Galaxy S9.
As in previous Galaxy S phones, Samsung staffed some new features of Samsung Galaxy S9 and Galaxy S9+ to lure new customers and keep existing customers.
This post details the top 10 new features of Galaxy S9 and S9+ to help you decide whether Galaxy S9 or S9+ is the right phone for you.
#1. Android Oreo
Android Oreo is the latest Android OS.
Samsung packed Galaxy S9 and S9+ with Android Oreo 8.0 out of the box.
You can enjoy many new features and improvements of Android 8.0 in Galaxy S9 and S9+, although Samsung tweaks a lot of the stock Android.
For Galaxy S9 notification dots (notification number badge, app icon badges) on Galaxy S9 and S9+, you may check this guide.
#2. Dual-aperture in the main camera: one of the most welcomed new features of Samsung Galaxy S9
Samsung tried to direct your attention to one of the best new features in Galaxy S9 and S9+: the camera.
And the most prominent features of the Galaxy S9 camera is dual-aperture.
In Auto mode, the Galaxy S9 and S9+ main camera can switch between two apertures of f/2.4 (under normal lighting conditions) and f/1.5 (in low-light conditions) automatically.
In Pro mode, you can set the two apertures manually. Unfortunately, you cannot set anything in between.
Essentially, the dual-aperture camera makes it easier to capture good photos in low-light conditions.
Galaxy S9 and S9+ are the only smartphones in the market with such a feature.
You may check this guide on how to use the two apertures in Galaxy S9 and S9+.
#3. Intelligent scan
Iris scanner and face recognition is not new in Galaxy phones. You can enable either of them to unlock the phone in your Galaxy S8, S8+ or Note 8.
Both methods work well in contrast conditions: iris scanner does not work well under the sun ( or under intense light), and face recognition refuses to work in darkness.
In Galaxy S8 and Note 8, these two methods are mutually exclusive: you can only enable one of them.
As another one of the top new features of Galaxy S9 and S9+, these two methods … Read the rest
The post Top 10 new features of Samsung Galaxy S9 and Galaxy S9+ appeared first on Galaxy S9 Guides.
How to use Samsung DeX Station for Galaxy S9, S9+, S8, S8+, Note 8 and Note 9?
simon Samsung DeX Station works with all Samsung DeX-enabled devices: Galaxy S9, S9+, S8, S8+, Note 8 and Note 9. You can instantly convert your phone as an Android PC (or a Linux PC if you enable Linux on DeX beta) with a DeX Station.
Although Samsung DeX Pad, Dex Station and DeX cable (for Note 9 and Tab S4) share identical DeX features, the design of these DeX accessories is substantially different. You may check this guide on using Samsung DeX Pad, and this guide (coming soon) on using Samsung DeX cable on Galaxy Note 9. For the comparison of Samsung DeX Station vs Samsung DeX Pad vs Samsung DeX cable, please check this guide.
This Galaxy S9 accessories guide explains everything you need to know about Samsung DeX Station: contents in the package (box), the layout of the DeX Station, step-by-step guide on using the DeX Station. Frequently asked questions on Ethernet port, display resolution, charging and covers are also covered.
What is Samsung DeX Station?
Samsung DeX Station, as shown above, is the first DeX accessory required by Samsung DeX. It was announced together with Galaxy S8 and S8+ in 2017.
Although it was announced as a companion to Galaxy S8/S8+, Samsung DeX Station works with all DeX-enabled devices: Galaxy S8, S8+, S9, S9+, Note 8, Note 9 and Tab S4.
The design of the Samsung DeX Pad is similar to Samsung's fast wireless charging stand. You need to push the top part so that it stands up to support the phone.
You may check this guide on the differences among three Samsung DeX accessories: Samsung DeX Station vs Samsung DeX Pad vs Samsung DeX Cable.
What is included in the Samsung DeX Station package?
In the Samsung DeX Station package, there are only two (maybe one if you find the quick start guide is useless) useful items:
- Samsung DeX Station (aka multimedia dock).
- Quick start guide in multiple languages.
Nothing else. No cables. No power adapters.
So, you need to prepare the following items to use Samsung DeX Station:
- A Samsung fast wall charger (adaptive wall charger). The wall charger included in your Galaxy S9, S9+, S8, S8+, Note 8 and Note 9 is sufficient.
- An HDMI cable.
- (optional) A USB (or wireless) mouse/keyboard. You can use the phone screen as the trackpad. But unlike Samsung DeX Pad,
The post How to use Samsung DeX Station for Galaxy S9, S9+, S8, S8+, Note 8 and Note 9? appeared first on Galaxy S9 Guides.
How to use micro SD card on Galaxy S9 and S9+?
simon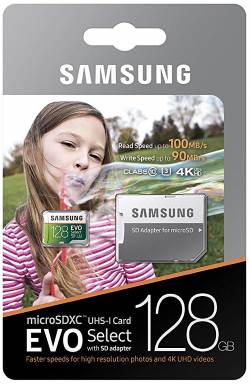 Galaxy S9 and S9+, together with other Galaxy S devices (except Galaxy S6, S6 edge and S6 edge+), support SD card. You can use a micro SD card on Galaxy S9 or S9+ to expand phone storage.
In addition to media files and documents, you can move some apps to the SD card on Galaxy S9 or S9 to free up some internal storage space.
This Galaxy S9 guide explains how to use SIM card on single SIM or dual-SIM versions of Galaxy S9 and S9+, how to move apps to SD card, how to manage SD card with the device maintenance utility, how to encrypt and decrypt SD card on Galaxy S9, and how to save photos to SD card or phone storage for Galaxy S9 camera.
For using a USB flash drive on Galaxy S9 or S9+, please check this guide.
How to insert micro SD card on Galaxy S9 and S9+?
There are two major variants (versions) of Galaxy S9 and S9+: single SIM version, and the dual-SIM version, depending on the market.
Both of these two variants of Galaxy S9 (and S9+) supports the micro SD card to expand the phone storage.
For the single SIM version of Galaxy S9, it is simple. The SIM card tray, as shown below, has two slots: slot 1 for the SIM card, and the slot 2 for the micro SD card.
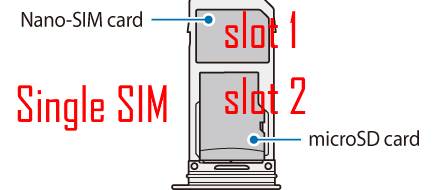
But for the dual-SIM version of Galaxy S9 (and S9+), it is a bit complicated.
The SIM card tray, as shown below, also has only two slots. You can only fit a SIM card in the slot 1. The slot 2 can hold a SIM card OR a micro SD card, but not both simultaneously.
As explained in this guide:
- If you want to use two SIM cards on Galaxy S9 or S9+, then you cannot use the micro SD card.
- If you want to use a micro SD card, then you cannot use two SIM cards. You can only use one SIM card.
When you place the micro SD card on the SIM card tray, you need to make sure it is secured. The metal contact part should face downwards, same as the SIM card as explained in this guide.
What are the limitations of using micro SD card on Galaxy S9 and S9+?
Although a micro SD card can expand the storage … Read the rest
The post How to use micro SD card on Galaxy S9 and S9+? appeared first on Galaxy S9 Guides.
How to use quick setting buttons on Galaxy S9 and S9+?
simonThe most efficient way to change settings of Galaxy S9 and S9+ is to use Galaxy S9 quick setting button.
This Galaxy S9 guide explains everything you need to know about the quick setting buttons on Galaxy S9 and S9+: what are Galaxy S9 quick setting buttons? How to access them, how to use them, and how to customize them.
Update: after you update Galaxy S9 or S9+ to Android Pie, you can use the night mode to set the background color of quick settings panel to dark. You can also use the quick setting button to switch between using the new Android Pie navigation gestures and using the traditional navigation bar/buttons.
What are quick setting buttons on Galaxy S9 and S9+?
Like other Android phones, Galaxy S9 and S9+ have quick settings buttons on the top of notifications in Galaxy S9 notification panel.
The quick setting buttons allow you to instantly turn on or turn off some features quickly without entering the complicated settings page.
For example, you can turn on or turn off mobile data or Bluetooth using Galaxy S9 quick setting buttons on Galaxy S9 and S9+.
Since Android Nougat, stock Android also shows quick settings bar (the first a few quick setting buttons) in the notification panel, in addition to the full list of quick setting buttons.
But Samsung added the quick settings bar in Galaxy phones a long time back.
Anyway, quick setting buttons on Galaxy S9 and S9+ were designed to help you use the phone easily and efficiently.
The first 6 Galaxy S9 quick setting buttons (sometimes, it is referred to as quick settings bar) are shown above notifications in the notification panel as shown in this guide.
You can expand the list to show all quick settings buttons in Galaxy S9 notification panel.
How to access quick setting buttons on Galaxy S9 and S9+?
There are two methods to access all quick setting buttons on Galaxy S9 and S9+.
Method 1: Swipe down from Galaxy S9 notification panel (or swipe down twice from the status bar)
In Galaxy S9 notification panel, you can swipe down, as shown below, to expand the quick setting buttons so that all buttons are shown.
When you are not in the notification panel, you can swipe down from the status bar twice to access the same Galaxy S9 quick setting buttons … Read the rest
The post How to use quick setting buttons on Galaxy S9 and S9+? appeared first on Galaxy S9 Guides.
How to use Galaxy S9 Home screen edit mode to customize Galaxy S9 Home screen?
simon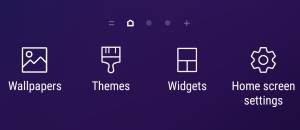 You can customize the look and feel of Galaxy S9 Home screen after entering Galaxy S9 Home screen edit mode.
The default Galaxy S9 Home screen may be OK for most users. But if you want, you can customize almost everything of Galaxy S9 Home screen without leaving the home screen.
You just need to switch to Galaxy S9 Home screen edit mode.
This Galaxy S9 how-to guide explains to you the features in Galaxy S9 home screen edit mode and how to enter the edit mode from Galaxy S9 Home screen.
What is Galaxy S9 Home screen edit mode?
By default, the Galaxy S9 Home screen is in the “presentation” mode. What you see on the screen, and some behaviours, are the result of home screen settings.
If you want to change anything on the home screen, then you need to leave the normal mode and enter the particular edit mode of Galaxy S9 Home screen.
Galaxy S9 Home screen edit mode allows you to customize the home screen of Galaxy S9 and S9+ without leaving the home screen.
Some customization can be done through Galaxy S9 Settings. But some customization can only be done through Galaxy S9 Home screen edit mode.
In short, Galaxy S9 Home screen edit mode allows you:
- To change the wallpapers for Galaxy S9 home screen and Galaxy S9 lock screen.
- To add widgets to Galaxy S9 Home screen. For example, you can show photos on Galaxy S9 Home screen as a full-screen widget.
- To use a new Galaxy S9 theme for Galaxy S9 or S9+.
- To align app icons in the home screen.
- To assign home panel for Galaxy S9 Home screen.
- To add or delete a panel in Galaxy S9 home screen.
- To re-arrange panels in Galaxy S9 Home screen.
- To set grids for Galaxy S9 home screen and apps screen.
- To enable or disable number badge (app icon badges) on the home screen.
- To hide/unhide Bixby Home on Galaxy S9 Home screen.
- To customize other Galaxy S9 Home screen settings.
You will need the edit mode of Galaxy S9 Home screen if you want to customize the home screen of Galaxy S9 or S9+ quickly.
How to enter Galaxy S9 Home screen edit mode?
To enter Galaxy S9 Home screen edit mode, you can simply tap and hold (aka long tap) any blank area on Galaxy S9 … Read the rest
The post How to use Galaxy S9 Home screen edit mode to customize Galaxy S9 Home screen? appeared first on Galaxy S9 Guides.
Samsung Galaxy S9 LED wallet cover guide
simon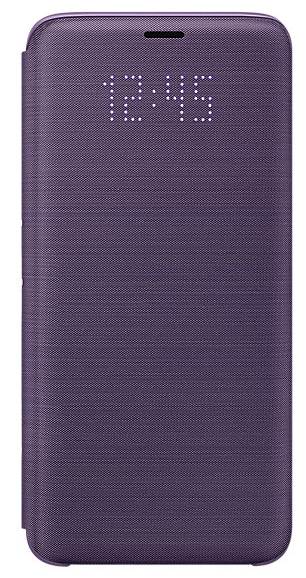 Samsung Galaxy S9 LED wallet cover is one of the official accessories for Galaxy S9 and S9+.
In addition to protecting your Galaxy S9 and S9+, Samsung Galaxy S9 LED wallet cover offers a few unique features to make it fun and effective to use your Galaxy S9 and S9+.
This Galaxy S9 accessories guide shows you everything you need to know about the Samsung Galaxy S9 LED wallet cover: unique features, how does the cover work, pros, and cons of the cover, how to customize and use the cover.
Update: Added a new section of How to solve Samsung Galaxy S9 LED wallet cover problems after Android Pie update? If you get any issues with the LED cover after you update Galaxy S9 or S9+ to Android Pie, you may check this section. It solves two possible problems:
- The LED wallet cover is not recognized by the phone.
- Notifications are not shown on the LED cover.
For other new features in Galaxy S9 Android Pie update, for example, new navigation gestures, lockdown mode, night mode, screen orientation lock (rotation toggle), new Recents screen, lock Galaxy S9 Home screen layout, floating keyboard, remap the Bixby butt, Bixby quick commands, updated camera app, lift to wake, tap to show (display mode) for Galaxy S9 always-on display (AOD) screen, are discussed here.
What are the unique features of Samsung Galaxy S9 LED wallet cover?
The official Galaxy S9 accessories were designed to enhance some features or improve the user experiences of Galaxy S9 and S9+.
Unlike the Galaxy S9 clear view cover, Galaxy S9 LED wallet cover does not have a translucent front. It is opaque.
So, Galaxy S9 LED cover uses LED dots on the cover to display icons for calls and notifications on the front cover.
The unique features of Samsung Galaxy S9 LED wallet cover includes:
- LED icons for incoming calls, notifications, alarms, battery status, clock, and music controls. You can assign different LED icons for different contacts and different apps so that you can know who is calling or where is the notification from without opening the cover.
- LED with colors. You can assign border colors to the LED icons for Galaxy S9 LED cover. In previous generations of LED cover, there is no border color option.
- Powered by the phone battery through the NFC connection
The post Samsung Galaxy S9 LED wallet cover guide appeared first on Galaxy S9 Guides.
How to update Galaxy S9 or S9 Plus to Android Pie (Android 9)?
simon As in January 2019, you can update Galaxy S9 or S9 Plus to Android Pie (Android 9) in most regions.
Of course, for carrier-locked phones, Android update always arrives slower than unlocked ones.
This Galaxy S9 Android Pie update guide explains why and how to update Galaxy S9 or S9+ to Android Pie, and answers some questions you may have on Android Pie update for Galaxy S9 and S9+.
Should I update Galaxy S9 or S9 Plus to Android Pie (Android 9)?
The short answer is yes, for most owners.
Once the update is available, you should update Galaxy S9 or S9 Plus to Android Pie for the following reasons:
- Security. All future monthly security update/patch will be based on Android Pie. Samsung will not release Galaxy S9 and S9+ security patches for Android Oreo after Android Pie update is released in your region.
- Performance. Android Pie address not only some security but also performance issues. Especially, Android Pie has improved a lot in battery management to extend the battery life (screen-on time, SOT) for Galaxy S9 and S9+. Of course, Android Pie cannot increase the battery capacity, or make the CPU run faster. But it does make the power consumption and CPU usage more efficient.
- New Android Pie features. Besides the underhood improvements, Android Pie brought many useful new features for most users as explained in this page. For example, you can use the lockdown mode to temporally disable biometric unlock and smart lock. Or you can use the magnifier when selecting text.
- New One UI features. Samsung changed the Samsung Experiences to One UI (FYI, it has nothing to do with Android One) in the Android Pie update. In addition to the visual (UI)changes, there are many functional updates as well. For example, you can try the navigation gestures on Galaxy S9 or S9+ (which is different from the navigation gestures in stock Android Pie). The night mode in Galaxy S9 and S9+ works better than the stock Android Pie dark theme (+night mode).
Of course, you cannot expect “stock” Android Pie in the Android Pie update for Galaxy S9 and S9+. As an Android manufacturer, Samsung has to customize the OS to differentiate itself from other manufacturers.
For a very small portion of owners of Galaxy S9 and S9+, you may have to withhold a while if:
- You are using
The post How to update Galaxy S9 or S9 Plus to Android Pie (Android 9)? appeared first on Galaxy S9 Guides.
How to use Samsung DeX with Galaxy S9 and S9+ and other Samsung phones?
simon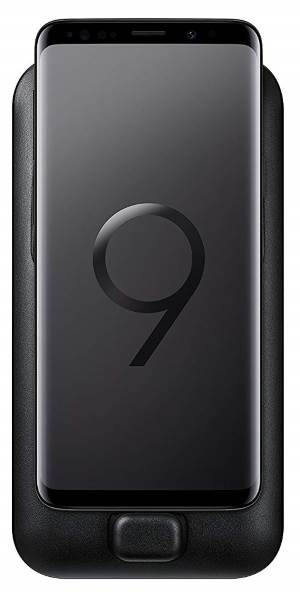 Samsung DeX lets you turn your Galaxy S9, S9+, S10, S10+ S8, S8+, Note 8, Note 9, and Note 10 into a PC with a big screen, a full-size keyboard, and a mouse.
For Galaxy S8, S8+, S9, S9+ and Note 8, a Samsung DeX station or Dex Pad is needed to use the DeX mode. For Galaxy Note 9 and S10, a USB-C to HDMI cable is sufficient.
This Samsung DeX guide explains the details of the Samsung DeX, shows you how to use Samsung DeX, answers questions you may have on it.
This guide applies to Samsung Galaxy S10, Galaxy S10+, Galaxy S9, Galaxy S9+, Galaxy S8, Galaxy S8+, Galaxy Note 8, Galaxy Note 9, and Galaxy Note 10, although most of the screenshots were taken from Galaxy S9.
Galaxy Note 10 added the DeX for PC. You can use the DeX screen on your PC or laptop with a USB cable. This feature is currently only available on Galaxy Note 10 and Galaxy Note 10+. Please check this guide on how to use DeX for PC.
We will update this page once DeX for PC is enabled on other Samsung devices.
Update 1: Samsung DeX for PC is now also available on Galaxy S10 (including S10+, and S10e) after the September update as explained on this page.
What is Samsung DeX? What do you need to use Samsung DeX?
For Galaxy S and Galaxy Note phones, it is always easy to connect to external monitor or TVs using a micro USB MHL adapter (for Galaxy S or Note devices prior to Galaxy Note 7 with a micro USB port), or a USB C to HDMI cable (for Galaxy S or Note devices with a USB type C port like Galaxy S8, Galaxy S8+, Galaxy Note 8, Galaxy S9, Galaxy S9+ and Galaxy Note 9).
In addition to MHL support, Samsung also incorporated Micracast support in most in these devices. In recent versions of Galaxy S and Note devices, the Miracast support is limited to Samsung's implementation only.
So, for Galaxy S9 and S9+, you can use at least the following three methods to mirror the phone screen to a TV or external monitor:
- Use a USB-C to HDMI cable (like the official Samsung USBC to HDMI cable).
- Use Miracast to cast the screen to a Samsung TV or monitor through WiFi direct. It may not
The post How to use Samsung DeX with Galaxy S9 and S9+ and other Samsung phones? appeared first on Galaxy S9 Guides.
How to use and customize Galaxy S9 navigation bar and navigation buttons?
simonSimilar to Galaxy S8, Galaxy S9 features software navigation buttons. And Samsung allows you to hide and customize the Galaxy S9 navigation bar and navigation buttons in Galaxy S9 and S9+.
You can also use the software home button even when the screen is off.
This Galaxy S9 guide shows you how to hide and unhide Galaxy S9 navigation bar, customize the background colour of Galaxy S9 navigation bar, customize the Galaxy S9 navigation button layout, and how to use Galaxy S9 Home button when the screen is off.
Update: after updating Galaxy S9 or S9 Plus to Android Pie, you will get the new navigation gestures. You can choose to use the navigation bar with navigation buttons (Home, Back, and Recents) or use the new navigation gesture. But you will not be able to hide the navigation bar if you choose to use the navigation bar/buttons. If you want to use these features and other navigation button customizations, you can use the NavStar app to customize the Galaxy S9 navigation bar and navigation buttons.
Please check this guide for the details about the navigation gestures on Galaxy S9 and S9+ with Android Pie update.
How to lock Galaxy S9 navigation bar?
By default, when you get the new Galaxy S9 or S9+, the navigation bar is shown, but not locked.
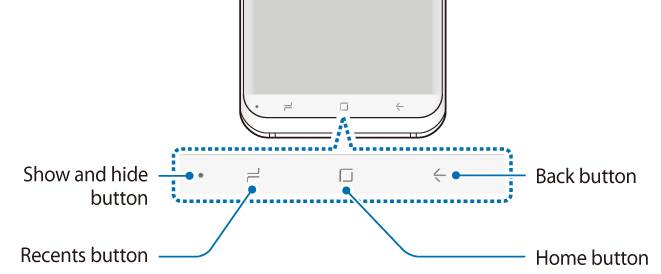
The dot (official name: show and hide button) on the left side of the Galaxy S9 navigation bar indicates you can hide the status bar if you want.
Sometimes, you may not want to use the feature of hiding and unhiding the navigation bar, i.e., you may want to lock Galaxy S9 navigation bar.
Please note, when using an app in the split screen view, the Recents button changes to the multiwindow button. You may refer to this guide on how to use apps in Multi Window mode on Galaxy S9 and S9+.
To lock the Galaxy S9 navigation bar, you may go to Galaxy S9 Setting, tap Display as shown below.
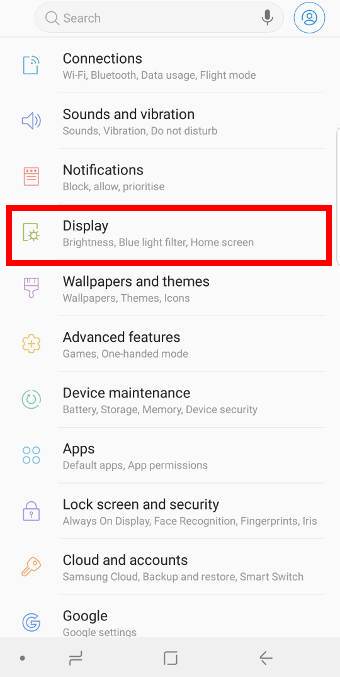
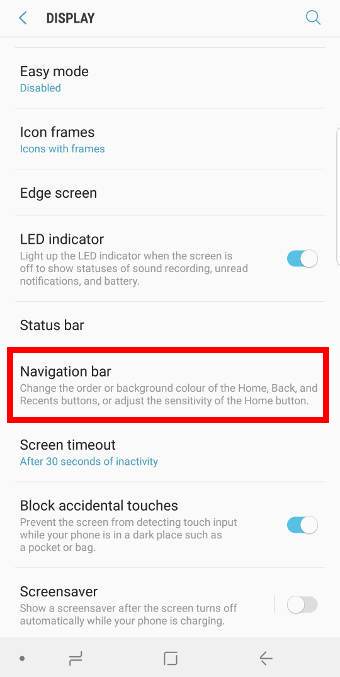
Then in the Display settings page, tap the Navigation bar as shown above.
In the Navigation bar settings page, tap the Show and hide button (marked as 1 in the screenshot below).
After you hide the button, then you lock the navigation bar in Galaxy S9 and S9+.
If you want to hide Galaxy S9 navigation bar, then you need to enable … Read the rest
The post How to use and customize Galaxy S9 navigation bar and navigation buttons? appeared first on Galaxy S9 Guides.
How to use Galaxy S9 edge screen on Galaxy S9 and S9+?
simon Galaxy S9 edge screen on Galaxy S9 and S9+ is one of the productivity features associated with the curved screen.
Although the edge screen on Galaxy S9 and S9+ is not a new feature, many Galaxy S9 and S9+ owners still know little about using edge screen to improve their experiences with the phone.
This Galaxy S9 guide explains the details of Galaxy S9 edge screen, and how to use and customize edge screen on Galaxy S9 and S9+.
Since Galaxy S8, the edge screen features are unified on Galaxy S and Note devices. So this guide also applies to edge screen on Galaxy S8, S8+, Galaxy Note 8 and Galaxy Note 9.
What is Galaxy S9 edge screen? The history of the edge screen on Samsung Phones
Galaxy S9 edge screen can be traced back to Galaxy Note Edge (Note 4 Edge), on which Samsung introduced a separate physical screen on the right edge of the standard screen in 2014.
But the reception of a dedicated edge screen was not as warm as expected. So, Samsung introduced the new “shared” edge screen in Galaxy S6 edge and S6 edge+. The edge screen was further polished in Galaxy S7 edge. Since Galaxy S8, Samsung has used curved screens on all flagship phones (Galaxy Note and Galaxy S series),
Galaxy S9 edge screen is a more or less matured feature in both Galaxy S9 and S9+.
There is no dedicated edge screen. Instead, you can trigger some useful features in the (curved) edge part of the main screen.
Edge screen on Galaxy S9 and S9+ is actually a productivity and software feature. It allows you to quickly access some features like opening apps, access tasks or contact your favourite friends.
Although the edge screen is conceptualized with the curved screen, only edge lighting utilizes the curved display. Other Galaxy S9 edge screen features (edge panels) do not rely on the curved edges of the infinity display and therefore can be easily implemented on a flat screen,
By default, edge screen on Galaxy S9 and S9+ was enabled when you got the phone.
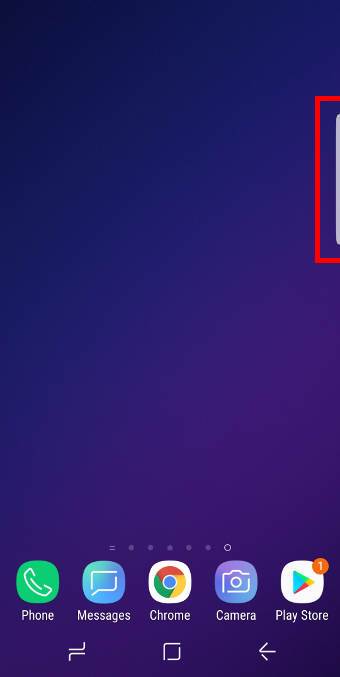
In the right edge of the screen, as shown below, you can find edge screen handle.
Swipe to the left side to access Galaxy S9 edge screen features.
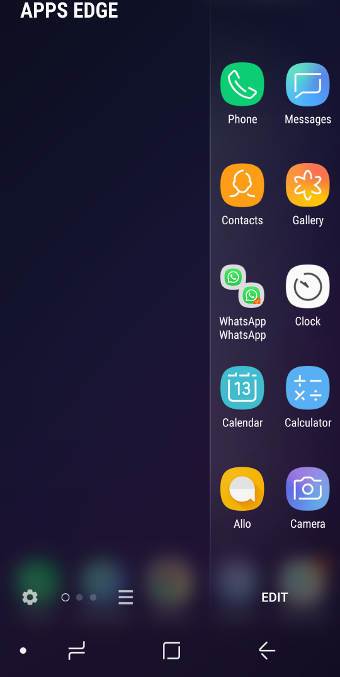
For example, you may open apps edge to quickly start a favourite app you added to … Read the rest
The post How to use Galaxy S9 edge screen on Galaxy S9 and S9+? appeared first on Galaxy S9 Guides.
How to use the new navigation gestures in Android Pie update for Galaxy S9 and S9+?
simon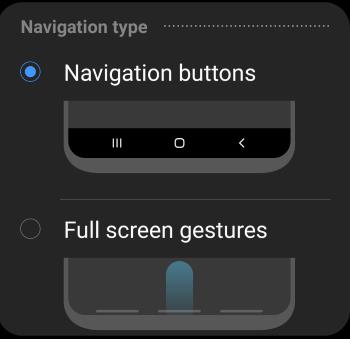 In Android update for Galaxy S9 and S9+, Samsung did not implement the stock Android Pie navigation gestures. Instead, they added their own new navigation gestures as one of the new features in the One UI.
Some owners may get confused on the new navigation gestures in Android Pie update for Galaxy S9 and S9+, especially those who tried the navigation gestures in the stock Android Pie.
This Galaxy S9 Android Pie update guide explains the details of the new navigation gestures in Android Pie update for Galaxy S9 and S9+, the difference between the Android Pie navigation gestures and the full-screen navigation gestures in Android Pie update for Galaxy S9 and S9+, and show you how to enable and use them.
What are the new navigation gestures in Android Pie update for Galaxy S9 and S9+?
In Android Pie (Android 9), Google introduced a set of gestures for the home buttons, Android Pie navigation gestures, to help users to navigate and switch apps very quickly.
Essentially, in stock Android Pie, if the navigation gestures are enabled, the Recents/Overview button will be removed. The back button appears only if it is needed. This creates a very clean UI with one Home button as explained in this page.
Of course, Samsung thought they have a better solution.
In the Android Pie update for Galaxy S9 and S9+, Samsung chooses to collapse the 3 navigation buttons into 3 lines on the bottom of the screen. You then just swipe up from these 3 lines to replace the function of pressing the buttons.
So, you will find the new navigation gestures in Android Pie update for Galaxy S9 and S9+ are substantially different from the Android Pie navigation gestures.
The major differences between Android Pie navigation gestures and the new navigation gestures in Android Pie update for Galaxy S9 and S9+ include:
- In the stock Android Pie, all navigation gestures are based on the home button. In Android Pie update for Galaxy S9 and S9+, there are 3 lines for the gestures.
- In the stock Android Pie, you have 5 touch screen gestures for the home button: press (tap), long press (long tap), swipe upwards, slow swipe upwards (or double swipe upwards), swipe to the right, swipe to the right and hold. But in Galaxy S9 and S9+, swipe upwards is the only
The post How to use the new navigation gestures in Android Pie update for Galaxy S9 and S9+? appeared first on Galaxy S9 Guides.
How to use Bixby quick commands on Galaxy S9, S9+, S8, S8+, Note 8, and Note 9 with the Android Pie update?
simon Bixby quick commands allow you to use your own phrases to execute a set of commands (tasks) defined by you. No other voice assistant systems have this feature yet.
You can execute Bixby quick commands using voice, or just tap an icon on the home screen without using your voice.
This Galaxy S9 Android Pie update explains everything you need to know about Bixby quick commands and shows you how to create, modify and use Bixby quick commands on Galaxy S9 and S9+.
The Bixby quick commands feature are also available on all Galaxy phones with Android Pie update. So, this guide also applies to Galaxy S8, S8+, Note 8, Note 9, and S10 (all 4 S10 models).
What are Bixby quick commands on Galaxy S9, S9+, S8, S8+, Note 8, and Note 9 with the Android Pie update?
In a nutshell, a Bixby quick command lets you encapsulate multiple commands in one simple phrase you choose. Once created, you can use the simple phrase (which becomes one of your Bixby quick commands) to execute all commands encapsulated in sequence (as you defined).
You can also make a long command shorter with a Bixby quick command.
In fact, this is NOT a new feature in Android Pie update. The feature is available before the Android Pie update. But it was buried deep in My Bixby. So, many Bixby users are not aware of the feature.
In the Android Pie update for Galaxy phones, in addition to allowing you to remap the Bixby button, Samsung made the Bixby quick commands feature more prominent and improved it significantly.
For example, after the February update, you can even add any of the Bixby quick commands to the Home screen and use it without using your voice. You can use it just like using an app.
Another improvement of the Bixby quick commands feature in the Android Pie update is that some examples were added. You can add them to your Bixby quick commands directly, or modify them as a template to create your own quick commands.
How to create, modify, and manage your Bixby quick commands on Galaxy S9, S9+, S8, S8+, Note 8, and Note 9 with the Android Pie update?
Bixby quick commands are tied to your Samsung account. By default, there are no quick commands in your account.
So, you have to create your quick commands … Read the rest
The post How to use Bixby quick commands on Galaxy S9, S9+, S8, S8+, Note 8, and Note 9 with the Android Pie update? appeared first on Galaxy S9 Guides.
How to use quick-open notification panel on Galaxy S9 and S9+ to check notifications?
simon You can use quick-open notification panel to access Galaxy S9 notification panel by swiping downwards on the home screen.
Quick-open notification panel adds an additional way to check notification panel on Galaxy S9 and S9+ quickly when you are on Galaxy S9 Home screen.
This Galaxy S9 guide explains to you what quick-open notification panel is, how to enable or disable it and its limitations.
Because quick-open notification panel is part of the Samsung Experience 9.0, it works identically on all Samsung Galaxy phones with Android Oreo update. Therefore this guide applies to not only Galaxy S9 and S9+, but also Galaxy S8, S8+, and Galaxy Note 8.
What is quick-open notification panel on Galaxy S9 and S9+?
As explained in this guide, you can access Galaxy S9 notification panel by swiping downwards from the status bar (or the top of the screen if status bar is hidden).
This method works in all situations. You can use it when you are on Galaxy S9 home screen or when you are using any apps.
Quick-open notification panel on Galaxy S9 and S9+, if enabled, allows you to access the same notification panel by swiping downwards on Galaxy S9 home screen.
By default, swiping upwards and downwards on Galaxy S9 home screen was assigned to switching to Galaxy S9 apps screen (if you didn't hide Galaxy S9 apps screen).
So, after you enable quick-open notification panel on Galaxy S9 and S9+, you can only swipe upwards to switch to Galaxy S9 apps screen.
Please note quick-open notification panel is included in the Samsung Experience 9.0. In addition to Galaxy S9 and S9+, you can use this feature on other Samsung Galaxy phones with Android Oreo update: Galaxy S8 and S8+, Galaxy Note 8, Galaxy S7 and S7 Edge.
How to enable quick-open notification panel on Galaxy S9 and S9+?
By default, the feature of quick-open notification panel on Galaxy S9 and S9+ is disabled.
To enable quick-open notification panel on Galaxy S9 and S9+, you may follow these steps.
Step 1: Enter edit mode for Galaxy S9 Home screen
On Galaxy S9 Home screen, tap and hold (long tap) any blank area to enter the edit mode for Galaxy S9 home screen.
Step 2: Access home screen settings
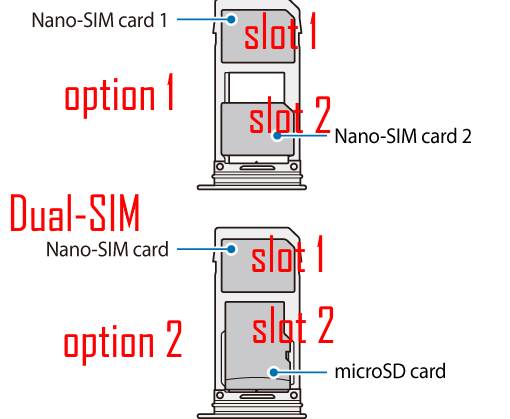
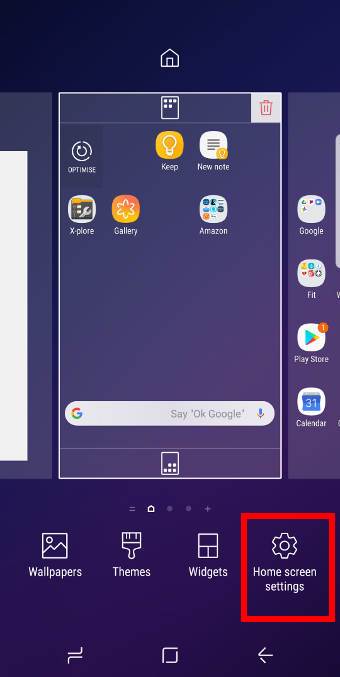
In the edit mode, tap Home screen settings as shown below.
The alternative … Read the rest
The post How to use quick-open notification panel on Galaxy S9 and S9+ to check notifications? appeared first on Galaxy S9 Guides.
How to use super slow motion mode (super Slow-mo) on Galaxy S9 and S9+?
simon Galaxy S9 super slow-motion mode (super Slow-mo) is a new camera feature on Galaxy S9 and S9+. You can take slow-motion videos at 960fps with this camera mode.
This Galaxy S9 guide explains what you can do (and cannot do) with Galaxy S9 super slow motion mode, how to use the super slow-motion mode, how to edit super slow-motion videos, how to add music to the video, and how to share super slow-motion videos with others as videos or GIF animations.
Samsung ported this camera mode to Galaxy S8 and S8+ in Android Oreo update. You can find the super slow-motion mode (super slow-mo) on Galaxy S8, S8+, S9, S9+, Note 8, Note 9, Galaxy S10, Galaxy S10+, Galaxy Note 10, Galaxy Note 10+ and s few other Galaxy phones with Android Oreo. So this guide applies to all these phones with the super slow-motion mode, although screenshots in this guide were taken from a Galaxy S9+.
What is Galaxy S9 super slow-motion mode (super Slow-mo) on Galaxy S9 and S9+?
The normal slow-motion mode in most smartphones today can record videos at about 60fps (frames per second). Some high-end phones, like Pixel 2, iPhone X may record slow motion at 240fps. Galaxy S9 and S9+ allow you to record a video in 960fps with the super slow-motion mode.
Galaxy S9 and S9+ is not the first smartphone with 960fps slow-motion mode. Sony offered this feature in Xperia XZ Premium in 2017. But the phone did not sell well in most markets.
In Galaxy S9 and S9+, you have the traditional slow-motion mode (60fps), and this special super slow-motion mode (super slow-mo).
Compared to standard slow-motion mode, Galaxy S9 super slow-motion mode has the following limitations:
- The video resolution is limited to 720p (1280*720). The standard slow-motion on Galaxy S9 or S9+ has a resolution of Full HD 1080p (1920*1080).
- The length of one super slow-motion event is limited to 0.2 seconds (high quality) or 0.4 seconds (standard quality).
- In the multi-take mode, you can include up to 20 slow-motion events in one video.
- Super slow-motion mode usually requires more light to get a decent video.
- If you want to share the video, you need to export the video first because other phones may have problems to play the video directly.
- The videos are always saved in the internal storage even you use an SD card on the
The post How to use super slow motion mode (super Slow-mo) on Galaxy S9 and S9+? appeared first on Galaxy S9 Guides.
How to disable Bixby button in Galaxy S9 and S9+?
simon Some Galaxy S9 and S9 owners are not excited about Samsung Bixby and the dedicated button. They may want to disable Bixby button in Galaxy S9 and S9+.
You can easily disable Bixby button in Galaxy S9 and S9+ if you frequently pressed the button inadvertently, or if you do not want to use Bixby.
Update: After updating Galaxy S9 or S9+ to Android Pie, you cannot disable the Bixby button. Instead, you can remap the Bixby button to any third-party apps or any Bixby quick commands.
This Galaxy S9 guide explains the functions of Bixby button in Galaxy S9 and S9+, and shows you how to disable Bixby button in Galaxy S9 and S9+.
What is Bixby button? Why may you want to disable Bixby button in Galaxy S9 and S9+?
Since Galaxy S8 (and S8+), Samsung added a dedicated button for Bixby with the hope of boosting the usage of Samsung's AI assistant.
As shown in Galaxy S9 and S9+ layout, Bixby button is located on the left side of the phone below the volume keys.
By default,
- If you press the Bixby button on Galaxy S9 or S9+, the phone will open Bixby Home.
- If you long press (press and hold) the Bixby button, the phone will open Bixby Voice.
Samsung does not allow you to map the Bixby button on Galaxy S9 and S9+ to any other apps. It can only be used for Samsung Bixby unless you root the phone and mess up a few system settings.
Although Samsung Bixby has been dramatically improved since the initial release with Galaxy S8, in many aspects, it is still not comparable to Google Assistant, which can be enabled in Galaxy S9 or S9 by long tapping (tap and hold) the Home button. Some Galaxy S9 and S9+ owners may not want to use Samsung's Bixby at all. They are happy with Google Assistant.
Some other owners may do not use either Google Assistant or Bixby. But they may press the Bixby button accidentally when they want to press the volume button or the power button.
Even some Bixby users may not want to use the Bixby Home, which comes out when you press the Bixby button. You can use other Bixby features without the button.
So, there are sizeable Galaxy S9 and S9+ owners who may want to disable … Read the rest
The post How to disable Bixby button in Galaxy S9 and S9+? appeared first on Galaxy S9 Guides.
Understanding and use Galaxy S9 camera settings
simonGalaxy S9 camera settings will help you get the desired photos and effectively use the camera in Galaxy S9 and S9+.
This Galaxy S9 camera guide explains the meaning and usage of all entries in Galaxy S9 camera settings.
Why do you need to understand Galaxy S9 camera settings?
Many Galaxy S9 and S9+ owners probably just start the camera app, shoot the photo, then share it.
It works well in most situations owing to the decent Auto mode in Galaxy S9 and S9+ cameras.
But sometimes, you may need to change some Galaxy S9 camera settings, e.g., using the timer, changing the video size to save storage, taking motion photos ……
Galaxy S9 camera settings allow you to customize the camera app so that you can take the desired photos and videos.
In the new Galaxy S9 camera app, the simplified interface means more customizations in Galaxy S9 camera settings.
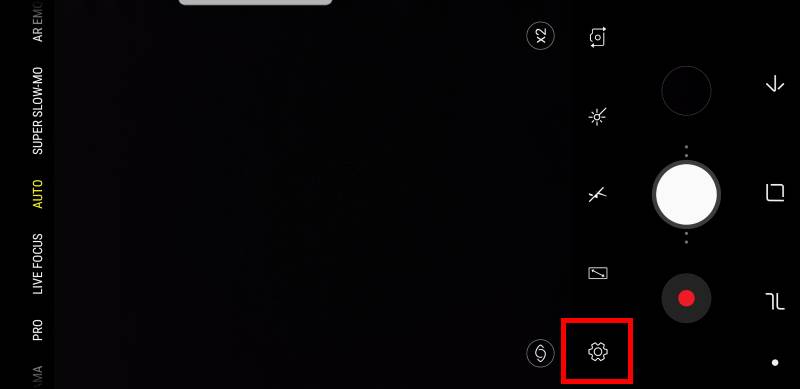
How to access Galaxy S9 camera settings?
You can start the camera app in Galaxy S9 in different ways as explained in this guide.
- Galaxy S9 camera quick launch.
- The camera app shortcut on Galaxy S9 lock screen.
- The camera app icon in Galaxy S9 home screen.
- The camera app icon in Galaxy S9 apps screen.
- Bixby voice command.
- Google Assistant.
Once you are in Galaxy S9 camera app interface, you can tap the gear icon as shown below to open Galaxy S9 camera settings.
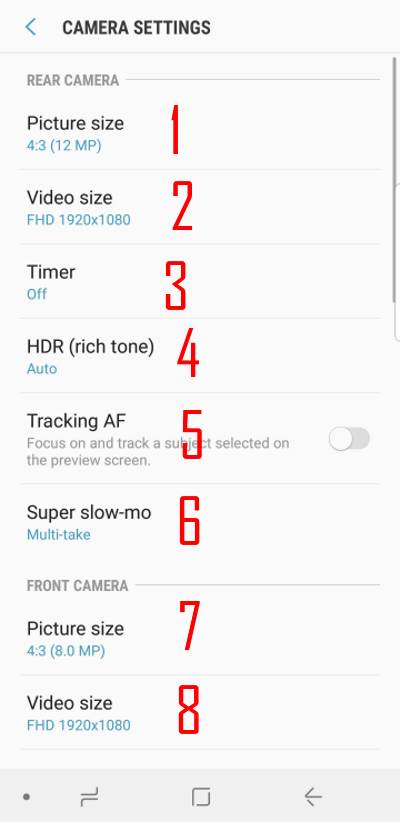
How are Galaxy S9 camera settings organized?
As shown in the following 3 screenshots, Galaxy S9 camera settings are organized into 3 sections/groups.
-
Rear camera (#1-#6)
This section includes settings related to the rear camera only.
For Galaxy S9+, there are two rear cameras. But there are no separate settings for the individual rear camera.
In fact, Galaxy S9 and Galaxy S9+ have the identical camera settings.
-
Front camera (#7-#13)
This section covers the front camera specific settings.
Some of the second level setting pages, e.g., timer and HDR settings, are similar to those of the rear camera.
The purpose of such settings is to keep separate settings for the front and rear cameras.
-
Common (#14-#25)
The settings in this section apply to both the front and rear cameras.
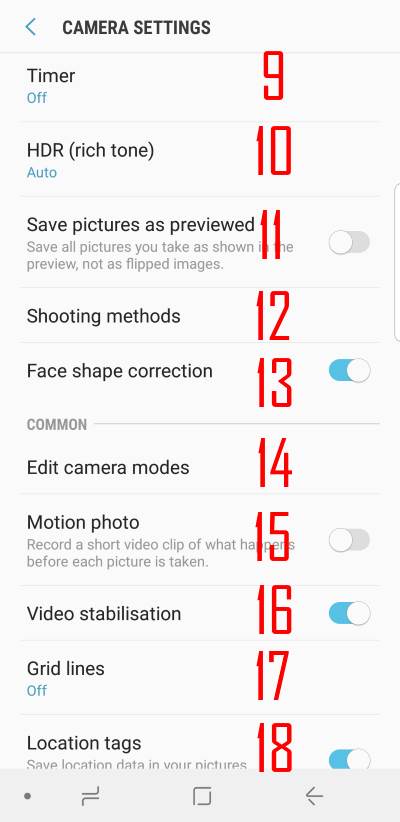
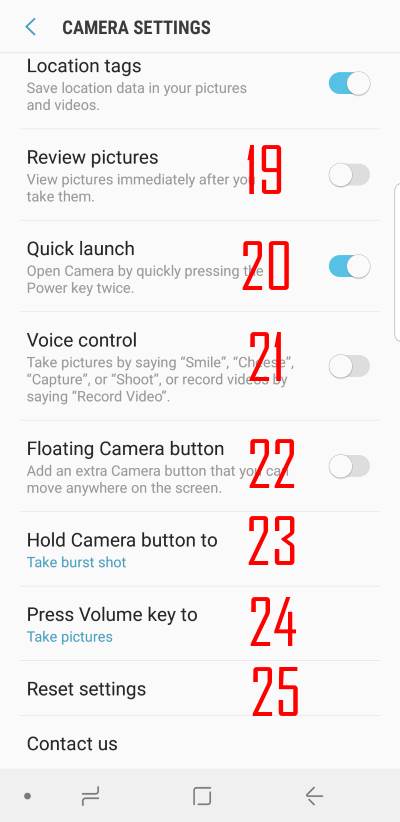
Understand and use Galaxy S9 camera settings
Corresponding to the numbers in the previous 3 screenshots, here are the explanations of Galaxy S9 camera settings.
1.
The post Understanding and use Galaxy S9 camera settings appeared first on Galaxy S9 Guides.
How to manage Galaxy S9 Home screen panels on Galaxy S9 and S9+?
simon Like other Android phones, Galaxy S9 and S9+ use some Galaxy S9 home screen panels to host apps, app shortcuts, app folders and widgets.
You can add, delete, move, and re-arrange Galaxy S9 home screen panels based on your needs. You can also assign one panel as the home panel for Galaxy S9 Home screen.
This Galaxy S9 guide shows you how to work with and manage Galaxy S9 home screen panels.
What are the Galaxy S9 Home screen panels?
Galaxy S9 Home screen, by default, has at least two pages with Bixby Home (you may hide it) on the leftmost and a “home” page, which you access by tap the Home button.
These pages are usually referred to as Galaxy S9 Home screen panels.
As you may know, you can use more Galaxy S9 Home screen panels to accommodate more app icons, app folders, widgets, app shortcuts and file shortcuts on Galaxy S9 Home screen.
You can also show photos on Galaxy S9 home screen as explained in this guide.
Besides, if you hide apps screen on Galaxy S9 and S9+, more panes will be added automatically so that all apps are added to the Home screen.
How to assign a panel as the home panel for Galaxy S9 Home screen?
Among Galaxy S9 Home screen panels, one and only one panel is always the “home” panel for Galaxy S9 Home screen. When you tap the home button once or twice, you will be directed to this specific panel.
For example, you open an app from one of the home screen panels. If you tap the home button once, you will be brought back to the panel you started the app.
If you tap the home button again, the system should bring you back to the home panel.
By default, the panel next to Bixby Home is assigned as the home panel for Galaxy S9 Home screen.
Of course, you can change the home panel and assign any of the Galaxy S9 home screen panels as the home panel.
To assign a new home panel for Galaxy S9 Home screen, you may follow these steps.
Step 1: Enter Edit mode of Galaxy S9 Home screen
You can tap and hold (long tap) any blank area in Galaxy S9 Home screen to enter the edit mode for Galaxy S9 Home screen… Read the rest
The post How to manage Galaxy S9 Home screen panels on Galaxy S9 and S9+? appeared first on Galaxy S9 Guides.
How to hide Galaxy S9 apps screen and how to hide Galaxy Apps button?
simon Galaxy S9 and S9+ allow you to hide Galaxy S9 apps screen so that you can use all apps in the home screen if you do not want to use two screens: home screen and apps screen.
If you use Galaxy S9 apps screen, you can hide the apps screen button (apps button) so that you can just swipe up on Galaxy S9 Home screen to access Apps screen.
This Galaxy S9 how-to guide explains to you how to hide/unhide Galaxy S9 apps screen and how to hide/unhide Galaxy S9 apps screen button.
How to hide Galaxy S9 apps screen on Galaxy S9 and S9+?
If you want to use all apps in one central location, you may want to hide Galaxy S9 apps screen.
After you hide Galaxy S9 apps screen, you can then access all apps in Galaxy S9 Home screen. It is not necessary to manually add apps to the home screen.
To hide Galaxy S9 apps screen, you may follow these steps.
Step 1: Enter Galaxy S9 Home screen edit mode
You can tap and hold (long tap) any blank area in Galaxy S9 Home screen to enter the edit mode for Galaxy S9 Home screen.
You can also pinch on Galaxy S9 Home screen to enter the edit mode.
Step 2: Access Home screen settings
In the edit mode, tap Home screen settings as shown below.
The home screen settings page should be shown up.
Alternatively, you can access the same home screen settings page through Galaxy S9 Settings: Settings — Display —Home screen.
Step 3: Choose to unhide or hide Galaxy S9 apps screen
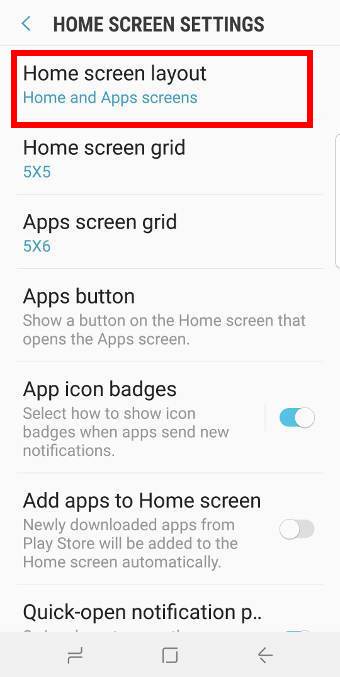
In Galaxy S9 Home screen settings page, as shown in the screenshot above, tap Home screen layout.
In Home screen layout page, you can find two options:
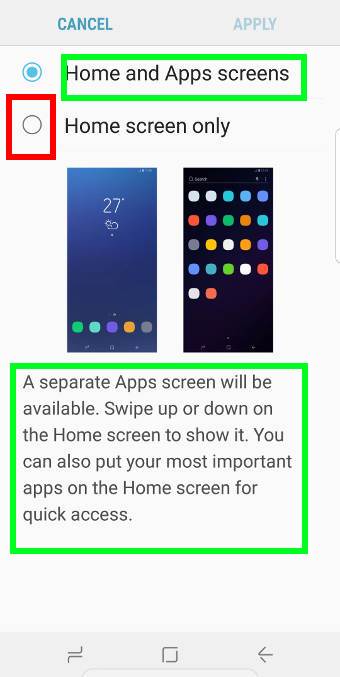
- Home and Apps screen.
- Home screens only.
Option 1 is the default. It means you have both Galaxy S9 Home screen and Apps screen. In other words, the apps screen is not hidden.
Option 2 will let you hide Galaxy S9 apps screen. All apps will be added to the home screen automatically.
So, you can use these two options to hide or unhide Galaxy S9 Apps screen.
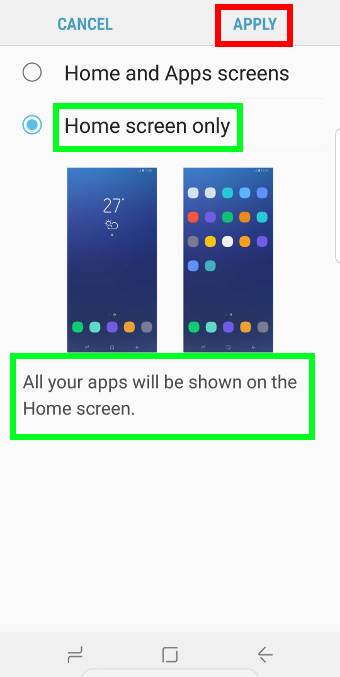
Step 4: Apply the settings
After you change the settings (either hide the apps screen or unhide the apps screen), you need to tap Apply as shown above to … Read the rest
The post How to hide Galaxy S9 apps screen and how to hide Galaxy Apps button? appeared first on Galaxy S9 Guides.
Unbox Galaxy S9: understand package contents in Galaxy S9 box and S9+ box
simon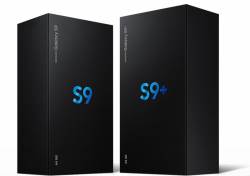 After unboxing Galaxy S9 or S9+, you need to understand the package contents in your Galaxy S9 box or S9+ box so that you can properly use them when needed.
The package contents in Galaxy S9 box, and in Galaxy S9+ box are identical except the phone.
Also, the Galaxy S9 package contents may slightly vary in different regions.
This Galaxy S9 guide shows you the contents of Galaxy S9 box and Galaxy S9+ box. It also explains how to use these items in the Galaxy S9 box.
What are the Galaxy S9 package contents in Galaxy S9 box and S9+ box?
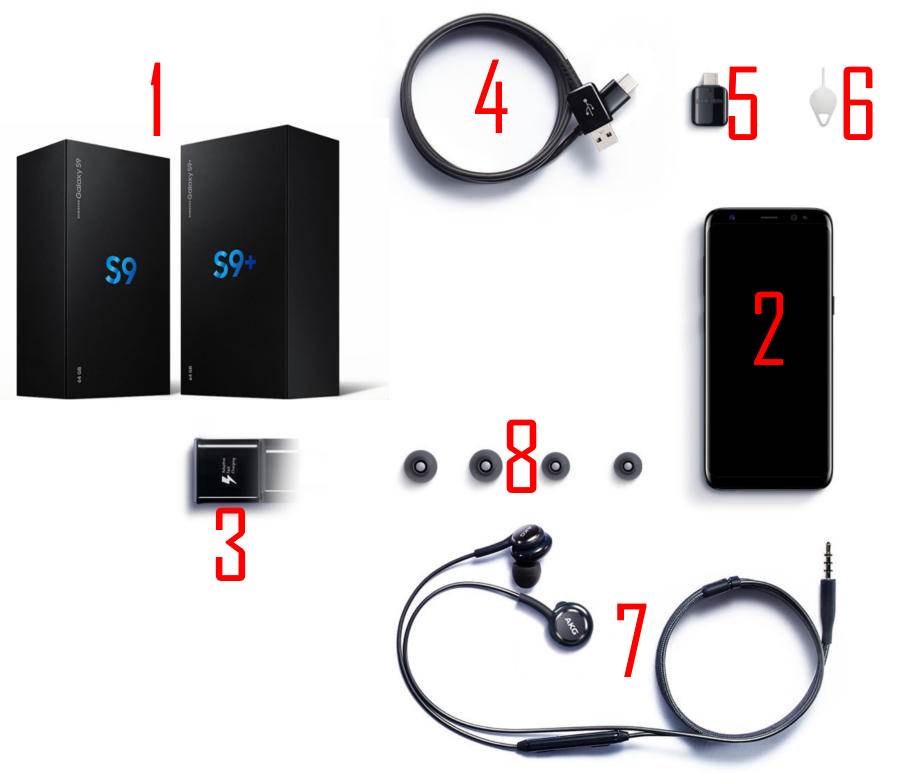
You can find Galaxy S9 package contents in Galaxy S9 box and S9+ box as shown in the picture below.
They include (corresponding to the numbers marked in the picture):
- The sealed box.
- The phone.
- Wall charger (adaptive charger, aka fast charger).
- USB cable (USB-A to USB-C).
- USB connector.
- SIM card ejection pin.
- AKG earphone.
- Additional earbud cups (large and small).
There is also a getting-started booklet (leaflet) together with a safety manual (not shown in the picture below).
In some regions, printed stickers with IMEI number and serial number may also be included in the box.
For the official Galaxy S9 user manual, you may check and download it in your language in the official Samsung Galaxy S9 user guides page.
You can also get the online version of the user manual from Settings – User manual. This service may be unavailable in some regions.
How to use the items included in Galaxy S9 package contents?
Galaxy S9 box (or Galaxy S9+ box)
Everything is in the box.
Some vendors in some regions may offer additional free accessories. But they should be not in the box.
You need to check and make sure the seal is not broken.
Galaxy S9 phone or S9+ phone
The phone should have some protective plastic films on all sides. You should remove them before using the phone.
In almost all regions, the camera lenses are also covered by the plastic film, which must be removed before you take any photos.
In some regions, Samsung does not offer a 1-to-1 exchange if the new phone has any problems. They only offer repair services under warranty.
If this is the case in your region, you should power on the phone to test it before leaving the counter.
The … Read the rest
The post Unbox Galaxy S9: understand package contents in Galaxy S9 box and S9+ box appeared first on Galaxy S9 Guides.
How to charge Galaxy S9 battery?
simon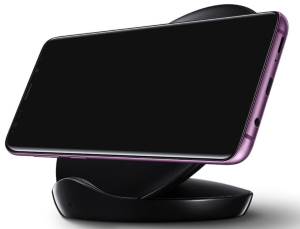 After unboxing Galaxy S9 or S9+, you may want to charge Galaxy S9 battery so that you can start to set it up and use it.
When Samsung Galaxy S9 and S9+ left the factory, the battery is charged to about 50% of the capacity, which is sufficient for you to inspect the phone on the counter.
Because the only difference between Galaxy S9 battery and Galaxy S9+ battery is the size (capacity), charging Galaxy S9 battery is identical to that for Galaxy S9+. Therefore, we use Galaxy S9 to refer to both Galaxy S9 and S9+.
Two ways to charge Galaxy S9 battery
You can charge the Galaxy S9 battery in two ways:
- Using a USB cable (USB charging).
- Using a wireless charging pad (wireless charging).
All Android phones now support USB charging. The charging port in most Android phones has been shifting from micro USB to USB-C.
Both Galaxy S9 and S9+ have a USB-C port for charging and data transfer (e.g., back up Galaxy S9/S9+).
In your Galaxy S9 box, you can find the wall charger and the USB cable to charge Galaxy S9 battery.
Galaxy S9 and S9+ also support wireless charging. Samsung has added the wireless charging to Galaxy phones since Galaxy S6.
You can put Galaxy S9 or S9+ on a wireless charging pad to charge the phone.
Besides, you can also charge Galaxy S9 or S9+ when using Samsung DeX. In this situation, the adaptive wall charger is connected to a Samsung DeX Station or a Samsung DeX Pad. Galaxy S9 or S9+ is connected to the USB-C connector of the DeX Station or DeX pad.
What is fast charging for Galaxy S9 and S9+?
A normal USB wall charger has a rated output current ranging from 500mA (0.5A/5V, 2.5W) to 2000mA (2A/5V, 10W).
When using such USB wall chargers to charge Galaxy S9 and S9+, the charging voltage does not change. It is fixed at 5V. And Galaxy S9 and S9+ battery can take up to 2A current for this type of wall charger.
In addition to “normal” USB charging, Galaxy S9 and S9 also support fast charging when an adaptive wall charger (aka fast charger) is connected.
An adaptive wall charger can communicate with Galaxy S9 and S9+. Galaxy S9 and S9+ can then choose two charging modes:
- Fast charging
The post How to charge Galaxy S9 battery? appeared first on Galaxy S9 Guides.
How to use Galaxy S9 home screen landscape mode?
simonSamsung added the Galaxy S9 home screen landscape mode in Galaxy S9 and S9+.
You can change Galaxy S9 home screen to landscape orientation when you hold Galaxy S9 and S9+ horizontally. Of course, this also applies to Galaxy S9 apps screen (app drawer), which essentially is a special home screen.
This Galaxy S9 guide explains what Galaxy S9 home screen landscape mode is, how to enable and disable Galaxy S9 home screen landscape mode, and how to use Galaxy S9 home screen landscape mode.
Update: in Android Pie update for Galaxy S9 and S9+, you can use the rotation toggle button to quickly change and lock screen orientation, including the home screen. You may check this guide on using the rotation toggle to change and lock the Galaxy S9 screen orientation.
In addition, you can also lock the layout of Galaxy S9 home screen in Android Pie update as explained in this guide.
What is Galaxy S9 home screen landscape mode?
By default, the home screen (and apps screen) was always in portrait mode on most Android phones even if you hold the phone horizontally, and if you turn on auto-rotate.
So, it is hard to use the home screen in landscape mode, and you may have to hold the phone in portrait orientation to use the home screen and apps screen.
Please do not confuse this limitation in home screen with the auto-rotate.
Most apps including system apps like Settings support landscape mode for a long time. When you turn on auto-rotate, you can use most apps in the landscape orientation.
In Android tablet, since Android Honeycomb 3.0, the home screen landscape mode has been supported.
However, on the phone, the home screen landscape mode is still new.
The larger screen aspect ratio beyond 16:9 in many recent flagship Android phones exacerbates the implementation of landscape mode for the home screen. The screen simply looks too narrow for the icons.
Anyway, Samsung now offers the option to use Galaxy S9 home screen landscape mode in Galaxy S9 and S9+.
This means the Galaxy S9 home screen can automatically rotate to landscape mode when you hold the phone in landscape position.
Undoubtedly, the app icons and widgets in Galaxy S9 home screen will be re-organised in landscape mode. Simple rotation is not enough due to insufficient height in the landscape mode.
In a nutshell, Galaxy … Read the rest
The post How to use Galaxy S9 home screen landscape mode? appeared first on Galaxy S9 Guides.
How to use the updated camera app in Android Pie update for Galaxy S9 and S9 Plus?
simon Like it or not, you need to learn to use the updated camera app in the Android Pie update for Galaxy S9 and S9+ if you want to take lovely photos.
Although some Galaxy S9 and S9+ owners may prefer the old camera app, the updated camera app in Android Pie update for Galaxy S9 and S9 does introduce some new features (mostly ported from Galaxy Note 9).
This Galaxy S9 Android Pire update guide explains the new features of the updated camera app in Android Pie update for Galaxy S9 and S9+ and how to use the new camera app.
Android 10 update is also available for Galaxy S9. You may check the new features in the Android 10 update. The Camera app was also updated to One UI 2.5, similar to that for Galaxy S20.
The new user interface of the updated camera app in Android Pie update for Samsung phones
After you update Galaxy S9 or S9+ to Android Pie, you will first see the new app icon for the camera app.
Once you start the camera app (all the 6 methods to launch camera app on Galaxy S9 and S9+ still work.), you may be surprised by the updated camera app in Android Pie update for Galaxy S9 and S9+.
As shown in the screenshot below, you can find it is substantially different from the original camera app in the following aspects:
- Camera modes are now placed on the bottom (above the shutter button) in the portrait orientation.
- Camera setting buttons (options for the camera mode being used) are now placed in the top (below the Bixby vision and AR Emoji).
- Bixby vision button is moved to the top of the screen.
- AR Emoji is not listed among camera modes. It is now placed on the top of the screen.
- Auto mode is renamed as Photo mode.
- The shutter button does not have the zoom function. You cannot drag the shutter button to zoom. You have a new way to zoom (read on).
- New scene optimizer button was added (read on).
- Buttons for camera selection (for Galaxy S9+ rear cameras), were updated. You can also use it to zoom in/out (read on).
- For supported camera modes, you can now change the aspect ratio of the photo (and photo size) without navigating to Galaxy s9 camera settings. In the screenshot below, the 4:3 button
The post How to use the updated camera app in Android Pie update for Galaxy S9 and S9 Plus? appeared first on Galaxy S9 Guides.
Galaxy S9 SIM card guide
simonIn almost all regions, you still need a physic SIM card in Galaxy S9 0r S9+ to make calls or use mobile data connections.
Galaxy S9 SIM card guide will help you understand everything about using a SIM card in Galaxy S9 and S9+
The guide will cover the correct size of Galaxy S9 SIM card, how to use the two slots in Galaxy SIM card tray, insert or change SIM card for Galaxy S9 and S9+, change mobile network settings in Galaxy S9 and S9+, and check mobile network connection and signal strength in Galaxy S9 and S9+.
Some questions related to using Galaxy SIM card are also answered.
What is the correct size of Galaxy S9 SIM card?
Galaxy S9 and Galaxy S9 and S9+ use nano-SIM cards, which is the smallest SIM card you can get from your phone company.
So, if you migrated to Galaxy S9 or S9+ from any of the following phones, you can use the existing SIM card for Galaxy S9 and S9+:
- Samsung Galaxy S6, S7 and S8 and all their variants (e.g., S8+, S7 edge, S6 edge and S6 edge+).
- Samsung Galaxy Note 5 and Note 8.
- Any of Samsung Galaxy A series: Galaxy A3, A5, A7, A8 and A9.
- Galaxy J3 2017 and later, Galaxy J5 2017 and later, Galaxy J7 and later.
- iPhone 5, 6, 7, 8 and X (and all variants).
- Moto X (all generations).
- Pixel and Pixel XL (all generations).
- LG G5, G6 (all variants), V10, V20 and V30.
- many others phones released after 2016
If you are not sure whether your existing SIM card can be used in Galaxy S9 and S9+, please post your question in the comments box below.
We will check it for you.
You MUST use the correct size of Galaxy S9 SIM card because the slot in the Galaxy S9 SIM card tray can only hold nano-SIM cards.
In theory, there are four possible sizes of SIM cards:
- Full-sizeSIM (1FF). Full-size SIM is “giant” in size: 85.60 mm × 53.98 mm × 0.76 mm. No Android phones used it.
- Mini-SIM (2FF). Mini-SIM usually is now often referred as “big” or “normal” or “standard” SIM card in some countries. Most carriers and phone manufacturers phased out mini-SIM a few years ago. Very few Android phones in the market now use this big SIM card.
- Micro-SIM
The post Galaxy S9 SIM card guide appeared first on Galaxy S9 Guides.
5 ways to take screenshots on Galaxy S9 and S9+ without using any apps
simonThere are at least 5 methods to take screenshots on Galaxy S9 and S9+ without using any apps: hardware buttons (power+volume down), palm swipe, the assistant menu, Bixby voice command and Google Assistant.
This Galaxy S9 how-to guide explains to you how to use them and how to use scroll capture to take screenshots on Galaxy S9 and S9+
Why do you need to take screenshots on Galaxy S9 and S9+?
Sometimes, you may need to keep a record of a conversation, to share a webpage, to show some locations on Google maps to others, or to record some transactions when you are using the Galaxy S9 or S9+.
A screenshot is the easiest and the most effective way to keep info and pieces of evidence. The image saved can be read on almost any devices.
Although you can edit them after you take screenshots on Galaxy S9 and S9+, most people give more trust in screenshots than the text you typed.
Sometimes, if you want to report a problem of an app, or request technical services, you may be asked to take some screenshots so that the technical staffs can understand the problem quickly.
How to take screenshots on Galaxy S9 and S9+ without using any apps (and without using your PC)?
There are at least 5 ways to take screenshots on Galaxy S9 and S9+ without using any apps:
- Using hardware buttons (volume down + power button).
- Palm swipe.
- Using the Assistant menu.
- Using Bixby voice command.
- Using Google Assistant.
This guide will show you the details of these 5 methods in the following sections individually.
Method 1: use hardware buttons to take screenshots on Galaxy S9 and S9+
You can take a screenshot on Galaxy S9 and S9+ by pressing the holding Power button and Volume down button simultaneously, as illustrated below. You should hear a click /shutter sound once screenshot is taken.
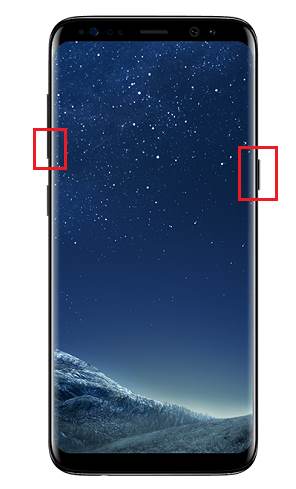
This method works on almost all Android phones.
In old Samsung phones with a physical Home button, the physical home button was used with the power button to take screenshots. But this does NOT work on Galaxy S9 and S9+ because the Home button on S9 and S9+ is considered as a software-based button.
The key point of using physical buttons to take screenshots is to press the two buttons simultaneously.
As a human, we always press one button earlier than … Read the rest
The post 5 ways to take screenshots on Galaxy S9 and S9+ without using any apps appeared first on Galaxy S9 Guides.
Top 9 new features of Android Pie update for Galaxy S9 and S9+
simon If your Galaxy S9 or S9+ was updated to Android Pie, you should enjoy many new features of Android Pie update for Galaxy S9 and S9+
As the first major update of Galaxy S9 and S9+, Android Pie (Android 9) update brings not only Android Pie features to Galaxy S9 and S9+ but also a totally new UI (One UI). Some Galaxy S9 and S9+ owners may be overwhelmed by so many new features of Android Pie update for Galaxy S9 and S9+.
If you haven't updated your Galaxy S9 or S9 to Android Pie (Android 9), you may follow this guide to check whether the update is available in your region.
If you want to download the official user manuals for Galaxy S9 and S9+ with Android Pie update, please check this page.
This Galaxy S9 Android Pie update guide explains the top 9 most useful new features of Android Pie update for Galaxy S9 and S9+: One UI, night mode, lift to wake, floating keyboard, lock home screen layout, lockdown mode, new camera app, navigation gestures, and adaptive battery.
# 1. One UI: the most eye-catching new features of Android Pie update for Galaxy S9 and S9+
In the Android Pie update, Samsung debuted the new UI: One UI, to replace the old Samsung Experience.
Do not confuse one UI with Android One. They are totally unrelated.
The One UI was designed to make the phone look beautiful and help the owner focus on what really matters.
In addition to a new set of app icons for Samsung apps (phone, camera, contact, messages, gallery, My files, calendar, smart switch, clock), the default font and the use of white space deliver a fresh look.
The new full-screen navigation gestures were also added and they are even different from the stock Android Pie navigation gestures.
You can also use the rotation toggle button in the navigation bar to change and lock screen orientation on-the-fly very easily.
#2. Night mode: the most wanted new features of Android Pie update for Galaxy S9 and S9+ for night owls
Many Galaxy S9 and S9+ owners complained about the white color scheme. It is painful to use the white theme in low-light conditions.
Although you can change the Galaxy S9 home screen theme to a dark one, some Samsung apps may not follow the theme.
Blue light filter may … Read the rest
The post Top 9 new features of Android Pie update for Galaxy S9 and S9+ appeared first on Galaxy S9 Guides.
How to reset Galaxy S9 and S9+? What is Galaxy S9 factory data reset?
simon You may have to reset Galaxy S9 or S9+ when the phone does not work as expected.
There are 3 levels of resetting for Galaxy S9 and S9+: reset network settings, reset Galaxy S9 settings (system settings) and factory data reset (FDR) Galaxy S9 or S9+.
This Galaxy S9 guide shows you how to use these three levels of resetting for your Galaxy S9 and S9+, and explains what you should do before trying to factory data reset Galaxy S9 or S9+.
What are the three levels of resetting for Galaxy S9 and S9+?
When you consider resetting Galaxy S9 or S9+, there are three levels of resetting:
- Reset network settings.
- Reset Galaxy S9 settings.
- Factory data reset (FDR).
Factory data reset (FDR, level 3) would erase everything on Galaxy S9 or S9+. You will get a “new ” phone to start with. You must back up all data on Galaxy S9 or S9+ before trying the factory data reset.
But remember, factory data reset will NOT roll back system updates.
Reset Galaxy S9 settings (level 2) removes the system settings added/customized by you, but it does not erase your files and third-party app data.
Reset network settings (level 1) only remove network (mobile, WiFi, Bluetooth) settings. Other settings and user files are untouched. You may use this resetting level when your phone has problems to connect to connect WiFi or mobile networks.
What should you do BEFORE trying Galaxy S9 factory data reset?
If you have to factory data reset Galaxy S9 or S9+, you must be aware that all data and settings will be erased. All apps installed by you will be removed as well.
And there is no undo option.
Before you factory data reset (FDR) for Galaxy S9 or S9+, you should try to finish the following 3 tasks.
- Back up, back up and back up your Galaxy S9 or S9+.
All your data, documents, photos, other media files and apps will be erased.
So, it is important to back up your Galaxy S9 or S9+. You can use the Samsung Cloud and Google Photos to back up Galaxy S9 or S9+ to the cloud.
If you prefer backing up to your PC, you can install Smart Switch on the PC. Then you can back up everything to your PC.
Factory data reset will not erase files on the SD card. But app data … Read the rest
The post How to reset Galaxy S9 and S9+? What is Galaxy S9 factory data reset? appeared first on Galaxy S9 Guides.
How to use the new Recents screen in Android Pie update for Galaxy S9 and S9 Plus?
simon Samsung revamped the Recents screen in Android Pie update for Galaxy S9 and S9+ to align some features with the stock Android Pie.
However, the difference between the overview screen in the stock Android Pie and the Recents screen in Galaxy S9 and Galaxy S9+ with Android Pie update is significant.
This Galaxy S9 Android Pie update guide explains the new features in the Recents screen in Android Pie update for Galaxy S9 and S9 Plus, how to use the new Recents screen gestures, how to dismiss individual app, and disable suggested apps in the Recents screen.
What's new in the Recents screen in Android Pie update for Galaxy S9 and S9 Plus?
In the Samsung Galaxy phones, the Recents screen is usually called Overview screen in the stock Android. Correspondingly the overview button in the stock Android is Samsung's Recents button.
Basically, the Recents (overview) screen lists all recently used apps. You can quickly re-open them, or open them in the multiwindow mode (both in the split-screen and pop-up views).
Android Pie (Android 9) revamped the Overview screen to stack the list horizontally (instead f vertically as in previous versions of Android) to work better with the new Android Pie navigation gestures.
In Android Pie update for Galaxy S9 and S9+, Samsung adopted its own full-screen navigation gestures and own Overview screen design.
Compared to Galaxy S9 and S9+ with Android Oreo, Android Pie update for Galaxy S9 and S9+ made has a different Recents screen:
- As in the stock Android Pie, the Recents screen stacks apps horizontally.
- A row of suggested apps is added by default on the Overview screen. Of course, you can disable the suggested apps on the Recents screen (read on).
- Some multiwindow features were removed. For example, you cannot find the snap window feature on Galaxy S9 and S9+ with Android Pie update.
- You have to use the gesture (swipe up) to close an app. In S9 or S9+ with Oreo, you can swipe left/right, or use the close button to close individual apps.
- You have to use the app icon to launch the app in a split-screen view or pop-up view.
- There is no list view of apps. You have to use the thumbnail view.
Please note, compared to the Overview screen in the stock Android Pie, the Recents screen in Android Pie update for … Read the rest
The post How to use the new Recents screen in Android Pie update for Galaxy S9 and S9 Plus? appeared first on Galaxy S9 Guides.
How to use Galaxy S9 camera app?
simon As explained in the new features of Galaxy S9 and S9+, the camera in both phones was significantly improved with an updated Galaxy S9 camera app.
Samsung revamped the user interface of Galaxy S9 camera app to make it more user-friendly (arguably) with different ways to access Galaxy S9 camera modes and effects. This new Galaxy S9 camera app interface is different from that in Galaxy S8.
This Galaxy S9 camera guide explains the items in Galaxy S9 camera app user interface (UI) and how to use them.
This guide is based on Galaxy S9 with Android 8 (Oreo). You may check this guide on the Android 9 (Pie) update for Galaxy S9, and this guide for Android 1o update for Galaxy S9 and S10. So, if you are on Android 10, your camera app should look like this.
How to access Galaxy S9 camera app?
There are at least 6 different ways to access Galaxy S9 camera app in Galaxy S9 and S9+:
- Galaxy S9 camera quick launch;
- App icon in Galaxy S9 lock screen;
- App icon in Galaxy S9 Home screen;
- App icon in Galaxy S9 Apps screen;
- Bixby voice command;
- Google Assistant voice command.
You can also access the camera app from Galaxy S9 edge screen.
Although the identical Galaxy S9 camera app will be used, there are some restrictions if you access the camera without unlocking Galaxy S9 or S9+.
How to use Galaxy S9 camera app?
By default, when you start the Galaxy S9 camera, the Auto mode is activated, as shown below.
In Auto mode, in addition to the navigation bar at the bottom, you can find at least 11 items, as marked in the screenshot:
- Shutter button.
- Video recording button.
- Shortcut to Gallery app.
- Galaxy S9 camera modes.
- Switch between two rear cameras (Galaxy S9+ only).
- Bixby vision.
- Galaxy S9 camera settings.
- Full-screen view.
- Turn on/off the flash.
- Galaxy S9 camera effects.
- Switch between front and rear cameras.
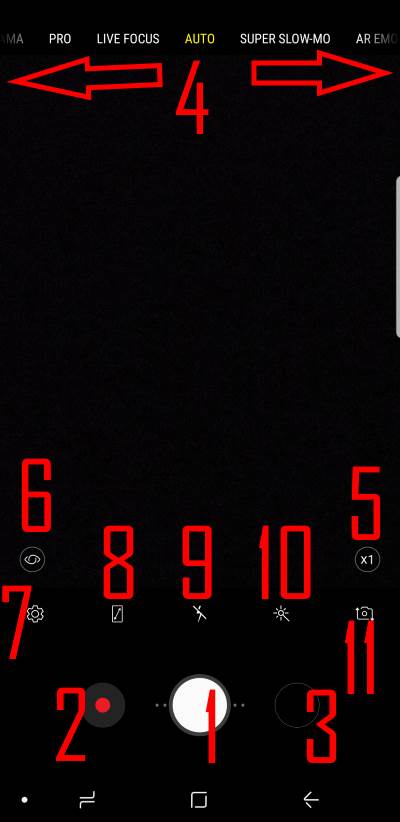
1. Galaxy S9 camera spp Shutter button
You can press this shutter button to take photos immediately.
If you tap and hold (long tap) the shutter button, the camera will take photos in burst mode.
Photos taken in Galaxy S9 burst mode will always be saved in the internal storage even if you set the photo location in the micro SD card.
2. Video
The post How to use Galaxy S9 camera app? appeared first on Galaxy S9 Guides.
How to use a USB flash drive on Galaxy S9 and S9+?
simon A USB flash drive is often the most convenient tool to quickly share files between Galaxy S9, Galaxy S8, Galaxy S10, Galaxy S20 and other devices.
So, in addition to using a micro SD card, you can further expand Galaxy S9 and other Galaxy phones storage with a USB storage.
This Galaxy S9 guide explains when you need to use a USB flash drive, the limitations of using USB storage on Galaxy S9 and other Galaxy phones, how to use and manage USB storage on Galaxy S9 and S9+.
Since Galaxy S8, Samsung has moved to USB-C port on all Galaxy S and Galaxy Note phones. So, this guide applies to all Galaxy phones with USB-C port, including Galaxy S8, Galaxy S9, Galaxy S10, Galaxy S20, Galaxy Note 8, Galaxy Note 9, Galaxy Note 10, and Galaxy Note 20.
In this guide, we use SanDisk Ultra Dual Drive in some examples. You may get a detailed guide on how to use SanDisk Ultra Dual Drive here.
When do you need to use external USB storage on Galaxy S9 and S9+?
Although you can expand Galaxy S9/S9+ storage with a micro SD card as explained in this guide, sometimes you may find you have to use a USB flash drive or using a flash drive is more convenient than other tools/methods.
For example, if you use two SIM cards on Galaxy S9 or S9+, you then cannot use the micro SD card because slot 2 in the SIM card tray was used by the SIM card already.
Or if you want to share some large videos on your phone with others and you do not want to hand over the phone to that person, you can then directly transfer files from Galaxy S9 to a USB flash drive, or even an external USB drive.
Or when you want to transfer some large files between Galaxy S9 and the PC/notebook without using the USB cable, then a USB flash drive probably is the fastest solution.
Some Galaxy S9 owners also use a USB flash drive to save offline videos and music files. They can use the drive on multiple devices without making copies on each device.
What are the limitations of using a USB flash drive on Galaxy S9 and S9+?
Although a USB flash drive is a plug-and-play (PnP) device, sometimes you may find the USB flash … Read the rest
The post How to use a USB flash drive on Galaxy S9 and S9+? appeared first on Galaxy S9 Guides.
Official user manuals for Galaxy S9 and S9 Plus with Android Pie update
simon In this page, you can find the updated official user manuals for Galaxy S9 and S9 Plus with Android update in your local language.
Android Pie (Android 9) update for Galaxy S9 and S9+ brought lots of new features. You may check this post for the top 9 new features in Android Pie update for Galaxy S9 and S9+.
Detailed how-to guides for new features of Android Pie update for Galaxy S9 and S9 plus can be found here. You can also post your questions on Android Pie update for Galaxy S9 and S9 plus in this page.
If your Galaxy S9 or S9+ is still running Android Oreo (Android 8), you can find the official user manuals here.
If you cannot find the official user manuals for Galaxy S9 and S9 Plus with Android Pie update in your language, please let us know in the comment box below. We will try to add them as early as possible.
#1. Official user manual for Galaxy S9 and S9 Plus with Android Pie update in the English language (UK) for the international versions of Galaxy S9 and Galaxy S9+ (Android Pie 9, UK English, SM-G960F/DS, and SM-G965F/DS; Europe, Latin America, Middle East, Africa, and Asia)
 The official user manual for Galaxy S9 and S9 Plus with Android Pie update in English language (UK) is for Samsung Galaxy S9, and Samsung Galaxy S9+ sold to in international market including Europe, Latin America, Middle East, Africa and Asia with Android Pie (Android 9) update. The corresponding model number is SM-G960F, SM-G960F/DS, SM-G965F, and SM-G965F/DS.
If you cannot find the Galaxy S9 user guide in your language for your Galaxy S9 or Galaxy S9+, you may try this one.
#2. Official user manual for Galaxy S9 and S9 Plus with Android Pie update in the French language (le français) (Android Pie 9, French language (le français), SM-G960F/DS and SM-G965F/DS, France)
 The official user manual for Galaxy S9 and S9 Plus with Android Pie update in the French language (le français) is for Samsung Galaxy S9, and Samsung Galaxy S9+ sold to … Read the rest
The post Official user manuals for Galaxy S9 and S9 Plus with Android Pie update appeared first on Galaxy S9 Guides.
How to use Galaxy S9 always-on display (AOD) on Galaxy S9 and S9+?
simon Galaxy S9 always-on display (AOD) is an extension of the lock screen. You can choose to display some useful info after the lock screen times out.
Update: a new section explaining the changes of Galaxy S9 always-on display (AOD) in Android Pie update for Galaxy S9 and S9+ was added. The new display mode (tap to show) was added.
This Galaxy S9 how-to guide explains everything you need to know about Galaxy S9 always-on display (AOD) on Galaxy S9 and S9+: how to turn on/off the AOD, how to use and customize Galaxy S9 AOD screen, how to customize clock style for AOD screen, how to pin photos to Galaxy S9 AD screen, and how to use AOD themes.
What is Galaxy S9 always-on display (AOD) on Galaxy S9 and S9+?
Traditionally, the phone screen will be turned off after you lock the screen, or if the screen times out.
But more and more smartphone owners use the phone to check time. Some Android phone manufacturers came out the idea of the always-on display (AOD), which shows selected info after the screen times out.
Samsung first introduced the always-on display on Galaxy S7 and S7 Edge. Galaxy S9 always-on display (AOD) offers an evolutionary update for this feature.
Besides the clock, notification icons, music control, next calendar event and next alarm can also be shown on the Galaxy S9 AOD screen.
Compared to Galaxy S9 lock screen, Galaxy S9 always-on display (AOD) on Galaxy S9 and S9+ does NOT offer the following features:
- App shortcuts in the bottom.
- Notification preview.
- Quick setting buttons.
You can consider Galaxy S9 always-on display (AOD) is a slimmed-down version or an extension of the lock screen.
How to turn on/turn off Galaxy S9 always-on display (AOD) on Galaxy S9 and S9+?
By default, in some regions, Galaxy S9 always-on display (AOD) is turned off on Galaxy S9 and S9+. In other markets, it is on.
Anyway, you can easily turn on or turn off Galaxy S9 always-on display (AOD) whenever you want.
And there are at least 3 different methods to turn on and turn off AOD on Galaxy S9 and S9+.
Method 1: Use quick setting buttons to turn on/turn off Galaxy S9 always-on display (AOD) on Galaxy S9 and S9+
By default, Always-on display button is included in Galaxy S9 quick setting buttons as shown in the … Read the rest
The post How to use Galaxy S9 always-on display (AOD) on Galaxy S9 and S9+? appeared first on Galaxy S9 Guides.
How to use Samsung DeX Pad for Galaxy S9, S9+, S8, S8+, Note 8 and Note 9?
simon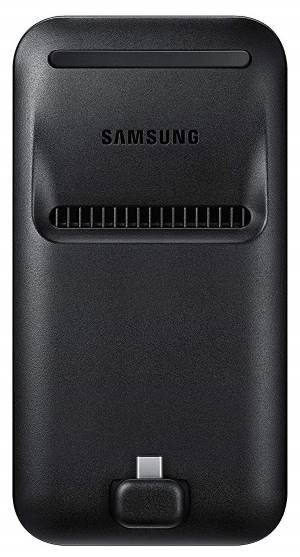 Samsung DeX Pad lets you instantly transform Galaxy S9, S9+, S8, S8+, Note 8 and Note 9 into an Android PC.
Compared to Samsung DeX Station, Samsung DeX Pad has an improved design and offers generous accessories in the box. For a detailed comparison of the Samsung DeX Pad, DeX Station and DeX Cable, please check this guide.
This Galaxy S9 accessories guide shows you the contents in the Samsung DeX Pad box, the layout of the DeX Pad, and how to use Samsung DeX Pad.
What is Samsung DeX Pad?
Samsung DeX Pad, announced together with Galaxy S9 and S9+, is the 2nd generation of Samsung DeX dock accessories. But it is NOT a replacement of Samsung DeX Station. Rather it is a compliment to the DeX Station.
DeX Pad features a smaller footprint than its predecessor (DeX Station). And one of the significant changes is your phone can lay down on the DeX Pad. So, it is very easy to use the phone screen as a touchpad.
Samsung DeX Pad works with all DeX-enabled devices: Galaxy S9, S9+, S8, S8+, Note 8, Note 9 and Tab S4. It also offers identical Samsung DeX features as the DeX Station and DeX cable.
For the detailed comparison of three current DeX accessories DeX Pad vs DeX Station vs DeX cable, please check this page.
What is included in the Samsung DeX Pad package?
Samsung DeX Pad package includes the essentials you need to use Samsung DeX.
You can find the following items in the package:
- One Samsung DeX Pad.
- One HDMI cable.
- One USB cable. The USB-A to USB-C cable is for you to connect the power adapter/wall charger to the DeX Pad. It can also be used for data transfer between your phone and a PC (e..g, for backing up Galaxy S9). The cable itself is similar to the USB cable included in Galaxy S9 box.
- One USB power adapter/wall charger. In most regions, the included wall charger is identical to that in your Galaxy S9 box. Of course, you can use this power adapter to charge Galaxy S9 battery.
- One quick start guide in multiple languages.
Basically, you just need a monitor to try Samsung DeX immediately. Remember Samsung DeX Station package does not include the cables and power adapter as explained in … Read the rest
The post How to use Samsung DeX Pad for Galaxy S9, S9+, S8, S8+, Note 8 and Note 9? appeared first on Galaxy S9 Guides.
How to show photos on Galaxy S9 Home screen?
simon Many Galaxy S9 or S9+ owners want to show photos on Galaxy S9 Home screen so that they can easily see the slideshow of their loved photos without opening the Gallery or other photo apps.
Samsung made it easy to pin photos to the always-on display as explained in this guide. But showing photos on Galaxy S9 Home screen does not work out of the box.
Although there are many solutions for you to show photos on Galaxy S9 Home screen, using Samsung's picture frame widget probably is the easiest way to show photos on Galaxy S9 and S9+ home screen.
This Galaxy S9 guide shows you how to show photos on Galaxy S9 home screen using the picture frame widget provided by Samsung. You can also tweak the slideshow by including or excluding photos, adjusting slideshow timing, the layout of photos, and how the photos fill the spots.
The picture frame widget was available in Galaxy phones with Android Marshmallow 6.0 or earlier. Samsung removed it in Android Nougat firmware and offered it as an optional feature in Galaxy Apps.
So, this guide applies to most Samsung Galaxy phones. For Galaxy S9 and S9+, you need to install the widget from Galaxy Apps.
You may follow the steps to install the widget and show photos on Galaxy S9 Home screen. These steps als0 are applicable for Galaxy S8, S8+, S7, S7 Edge, Note 9, Note 8 and Note 5. If you have an older Samsung phone, very likely, you can skip step 1 (as the widget was part of the old Gallery app).
On Galaxy phones (e.g., Galaxy S10, S20, S21, S22, and S23, Note 10, and Note 20) with Android 12 (One UI 4), Android 13 (One UI 5), or Android 14 (One UI 6), the Picture Frame widget was replaced with Gallery Widget. Please check this guide on using the new Gallery Widget to show photos, albums, and stories on the Home screen. You can even use stackable widgets to stack multiple copies of the Gallery Widget to display different sets of photos concurrently.
Step 1: Install Picture Frame from Samsung Galaxy Apps
Galaxy Apps is preinstalled on Galaxy S9 and S9+. You cannot remove it.
Samsung now puts many optional features on Galaxy Apps.
In Galaxy S9 or S9+, tap the Galaxy Apps icon in the home screen or … Read the rest
The post How to show photos on Galaxy S9 Home screen? appeared first on Galaxy S9 Guides.
Galaxy S9 accessories guides
simon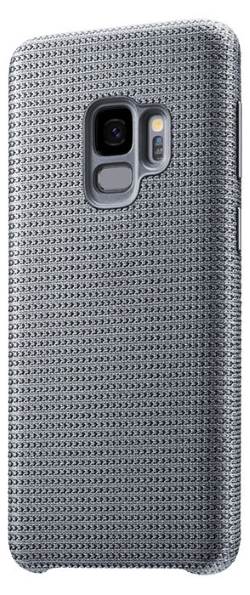 You need to consider a few Galaxy S9 accessories once (or even before) you get the phone.
Proper Galaxy S9 accessories can add considerable value to your investment in Galaxy S9 or S9+.
But there are so many accessories for Galaxy S9 and S9+ in the market. You may wonder which Galaxy S9 accessories can match your needs.
Galaxy S9 accessories guides will help you make wise decisions based on your needs and budget.
Why Galaxy S9 accessories guides?
When you try to get accessories for Galaxy S9 or S9+, you will find you have too many options.
Some Galaxy S9 and S9+ owners are overwhelmed by the choices.
For example, when you look for a case or cover for Galaxy S9 or S9+, you can find hundreds, maybe even thousands if you consider colour variations, of Galaxy S9 cases in Amazon online store.
Then, how to choose a case for your Galaxy S9 or S9+?
When you search for a wall charger or wireless charging pad for Galaxy S9 or S9+, you also have about 100 options. Which one can meet your needs within your budget?
You can find answers to such questions in Galaxy S9 accessories guides.
Simply put, Galaxy S9 accessories guides check and compare some noteworthy Galaxy S9 accessories, then recommend you the most suitable option based your needs.
About Galaxy S9 accessories guides
Covering all accessories for Galaxy S9 and S9+ is impossible. Therefore, Galaxy S9 accessories guides focus on:
- Galaxy S9 cases and covers
- Galaxy S9 wall chargers
- Galaxy S9 wireless charging pad
- Galaxy S9 camera modules
- Galaxy S9 screen protectors
- Micro SD card for Galaxy S9 and s9+
- Ethernet adapter for Galaxy S9 and s9+
- USB storage for Galaxy S9 and s9+
- Headphones and earbuds for Galaxy S9 and S9+
- Selfie stick for Galaxy S9 and S9+
- Galaxy S9 Bluetooth keyboard guide
- USB-C cable guide
- and others
We will try to give unbiased reviews and recommendations for accessories we tested. You will then be able to make well-informed decisions.
List of Galaxy S9 accessories guides
New guides on Galaxy S9 accessories will regularly be added.
So, if you do not find the accessories guide you need, you may check this page later.
At the same time, you can also post your questions or problems with accessories for Galaxy S9 and S9+. We will try to help you find the answers.
We may also … Read the rest
The post Galaxy S9 accessories guides appeared first on Galaxy S9 Guides.
Understand and use Galaxy S9 notification number badge (notification dots, app icon badge)
simonIf you upgraded your old Galaxy phone to Galaxy S9 or S9+, you might be frustrated with the new Galaxy S9 notification number badge (notification dots, aka Galaxy S9 app icon badges).
Galaxy S9 notification number badge (notification dots) simply does not work like the old number badge with which you are familiar.
This Galaxy S9 guide explains the differences between Galaxy S9 notification number badge (notification dots) and the old number badge and shows you how to customize Galaxy S9 notification number badge (notification dots).
What is Galaxy S9 notification number badge (notification dots)?
When you get a notification in Galaxy S9 notification panel, by default, you will find a number badge on the top right corner of the corresponding app icon in Galaxy S9 Home screen and Apps screen.
For example, as shown below, when you have 3 notifications for the Internet app (browser app), you will find the number (3) in the top right of the browser app icon.
![]()
This number badge is usually referred to as Galaxy S9 notification number badge. In old Galaxy phones, there has been a number badge which looks similar to Galaxy S9 notification number badge.
Because Galaxy S9 notification number badge corresponds to notification dots in stock Android, the notification number badge was sometimes referred as Galaxy S9 notification dots.
If you think the new Galaxy S9 notification number badge (notification dots) is just a beautified version of the old number badge, you are then totally wrong.
What are the differences between Galaxy S9 notification number badge (notification dots) and the old number badge?
Although they look similar, Galaxy S9 notification number badge and the old number badge are two entirely different things.
The major differences include:
- Galaxy S9 notification number badge is actually the notification dots introduced in Android Oreo. The old number badge in Samsung's phones is Samsung's proprietary implementation in TouchWiz (now Samsung Experience).
- Galaxy S9 notification number badge directly links to notifications in Galaxy S9 notification panel. The old number badge is not linked to the notification panel.
- Galaxy S9 notification number badge works for all apps. The old number badge only works with selected apps, usually Samsung apps and a few pre-installed apps.
- Galaxy S9 notification number badge only counts notifications, nothing else. The old number badge may count both notifications and unread messages depending on apps.
- For Galaxy S9
The post Understand and use Galaxy S9 notification number badge (notification dots, app icon badge) appeared first on Galaxy S9 Guides.
How to use Samsung Galaxy S9 clear view standing cover (S-view cover)?
simon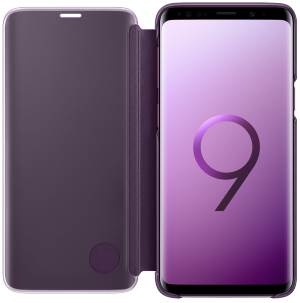 Samsung Galaxy S9 clear view standing cover, aka Galaxy S9 S-View cover in some regions, is one of the official Samsung Galaxy S9 accessories for Galaxy S9 and S9+.
The Galaxy S9 clear view standing cover is available in almost all regions, and available for both Galaxy S9 and S9+. You need to make sure you get the correct one.
This Galaxy S9 accessories guide explains main features of Galaxy S9 clear view standing cover, pros and cons of Galaxy S9 clear view cover, how to use it, and how to customise it.
What is Samsung Galaxy S9 clear view standing cover (aka Galaxy S9 S View cover)?
Galaxy S9 clear view standing cover has been a successor for S View covers since Galaxy S8.
The whole front cover of the Galaxy S9 clear view standing cover is translucent. You can consider the whole front cover is a big S View window as in Galaxy S7 S View cover.
You can control some features of the Galaxy S9 and S9+ through this translucent front cover. You can pick up or reject phone calls without opening the cover. You can also control the music with the cover closed. Dissminig or snoozing an alarm is also available directly from the cover
The double-layer back part of the clear view cover offers decent protection for the phone and the camera modules as shown below.
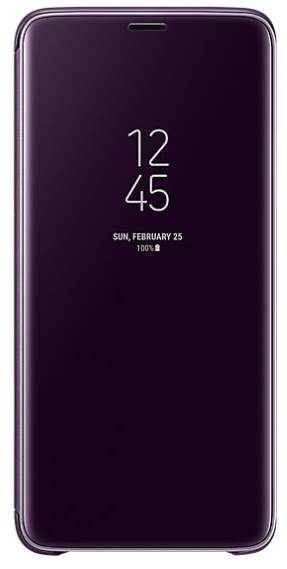
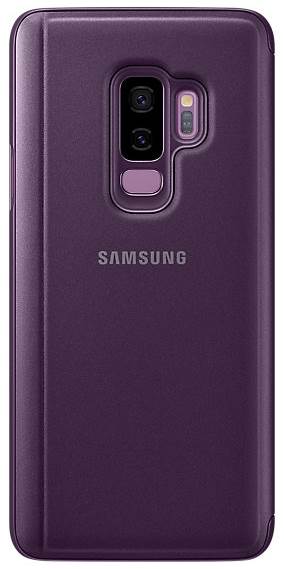
You can fold the back cover (actually separate the two layers) of the Galaxy S9 clear view standing cover to make a stand for Galaxy S9 and S9+ in landscape orientation. There is only one viewing angle in the standing mode as shown below.
This viewing angle is good for watching videos or having a hands-free video call.
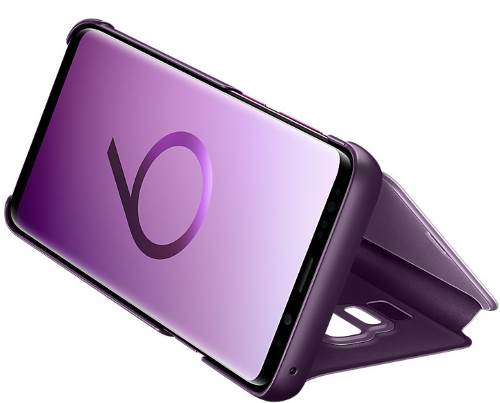
Galaxy S9 clear view standing cover is:
- an updated (with an enlarged S View window) S View cover for Galaxy S9 and S9+;
- an all-in-one cover with a back cover, a front cover and a stand for Galaxy S9 and ;
- a smart cover allowing you to control some functions and features of Galaxy S9 and S9+.
Due to the size difference of Galaxy S9 and S9+, the clear view standing cover for Galaxy S9 and Galaxy S9+ is NOT interchangeable.
If you have a Galaxy S9, you should get the Galaxy S9 clear view standing cover. If you have a Galaxy S9+, you should get Galaxy … Read the rest
The post How to use Samsung Galaxy S9 clear view standing cover (S-view cover)? appeared first on Galaxy S9 Guides.
How to use the night mode on Galaxy S9 and S9+ with Android Pie update?
simon In Android Pie update for Galaxy S9 and S9+, you can use the night mode on Galaxy S9 and S9+ to get the dark (black) theme at any time (not only in the night).
The night mode on Galaxy S9 and S9+ with Android Pie update is the combination of the dark theme and night mode. In the stock Android Pie, the settings of dark theme and night mode are independent of each other.
This Galaxy S9 Android Pie update guide explains the details of the night mode on Galaxy S9 and S9+ with Android Pie update, and how to use the night mode so that you can enjoy the phone in all situations.
What is the night mode on Galaxy S9 and S9+ with Android Pie update?
In Android Nougat update, Samsung introduced the blue light filter to tint the screen so that you can use the screen comfortably for a long time (e.g., for reading), or in a dimmed environment.
Many owners also hate the default white theme, which looks great in the showroom. For day-to-day use, many owners preferred a dark theme.
Of course, you can use third-party themes to customize the Galaxy S9 home screen and Samsung apps. But most of the dark themes in the Galaxy Apps (theme store) are poorly designed.
In Android Pie, Google introduced a dark theme. But it does not apply to Settings or to most Google apps.
Besides, Android Pie also introduced the night mode in developer options. But it is independent of the theme settings if dark them is used already. You may refer to this guide on how to use the dark theme and night mode in stock Android Pie.
In the Android Pie update for Galaxy S9 and S9+, Samsung added the night mode as an alternative to the default light theme.
The night mode on Galaxy S9 and S9+ with Android Pie update lets you:
- Set the display to the dark (black) theme.
- Apply the dark theme to Galaxy S9 Home screen, Apps screen, Settings, quick settings, notifications panel, power button options, Bixby home, most Samsung apps include Phone, Messages, Contacts, Camera, Gallery, Clock, Calendar, Calculator, Samsung Notes, Email, My Files, Internet, Bixby, Finder.
- Instantly turn on/off night mode in quick settings.
- Instantly change the night mode settings in the developer options as “always-on”
The post How to use the night mode on Galaxy S9 and S9+ with Android Pie update? appeared first on Galaxy S9 Guides.
How to use Galaxy S9 themes to customize the look and feel of Galaxy S9 and S9+?
simon Galaxy S9 themes allow you to customise many aspects of the UI in Galaxy S9 and S9+. It is no longer necessary to customise the colour scheme, wallpaper, icons or always-on display (AOD) screen individually.
You can find many excellent free Galaxy S9 themes in Samsung themes to meet your needs.
This Galaxy S9 guide explains everything you need to know about Galaxy S9 themes: What are they? How to get them? How to access them in Samsung themes? How to install and use them? How to manage or delete Galaxy S9 themes.
What are Galaxy S9 themes?
Galaxy S9 themes are “skins” for your Galaxy S9 and S9+.
You can use Galaxy S9 themes to customise the user interface of Galaxy S9 or S9+. The customisation usually includes:
- Colour scheme for the UI. The default white scheme in Galaxy S9 and S9 UI can be annoying when you are using the phone in darkness.
- Wallpapers for Galaxy S9 Home screen (including Galaxy S9 Apps screen), Galaxy S9 edge screen, and Galaxu S9 lock screen.
- App icon pack for pre-installed Samsung apps to replace the stock icon.
- Font, style and background settings for Settings, Phone, Messages, Internet, Contacts, Clock, My Files and a few (about 30 to 40) other Samsung system apps.
- Galaxy S9 always on display (AOD) themes.
Please note, Galaxy S9 themes work with the default launcher. If you are using a third-party launcher, Galaxy S9 themes unlikely will work as expected.
Besides, themes for other Galaxy phones (e.g., Galaxy S8/S8+) will NOT work on Galaxy S9/S9+.
Where to get Galaxy S9 themes?
As a security measure, you should get new themes for Galaxy S9 and S9+ ONLY from Samsung's Theme store, which is embedded in Galaxy Apps.
You probably should never get any themes from other sources.
How to access Galaxy S9 themes?
You can access Galaxy S9 themes from Galaxy S9 Home screen edit mode.
In Galaxy S9 home screen, you can enter the edit mode by:
- Pinch gesture.
- Long tap (tap and hold) on any blank area.
Once in the edit mode of the Galaxy S9 Home screen, as shown below, tap Themes to access Galaxy S9 themes.
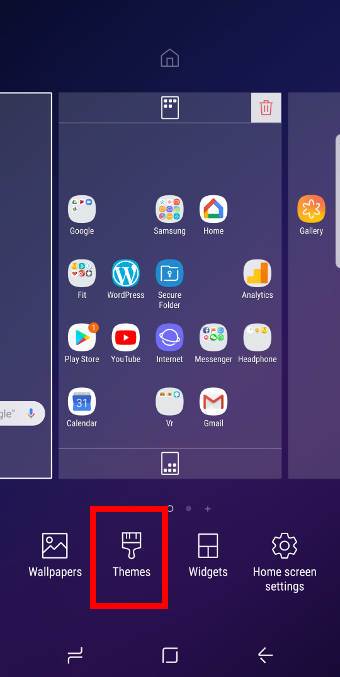
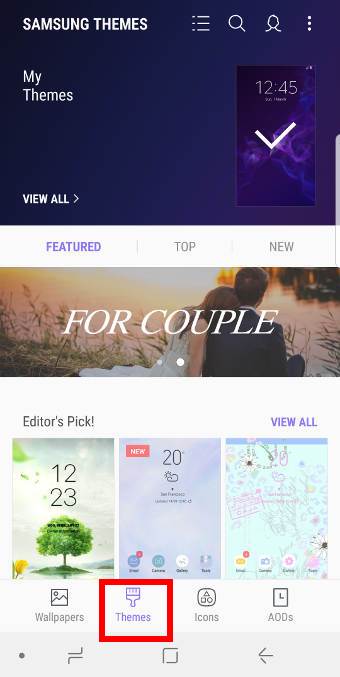
In Galaxy S9 themes page, as shown in the screenshot above, tap Themes to enter themes tab.
Besides, you will get the notification about Galaxy S9 themes in the notification panel when … Read the rest
The post How to use Galaxy S9 themes to customize the look and feel of Galaxy S9 and S9+? appeared first on Galaxy S9 Guides.
How to use the lockdown mode on Galaxy S9 and S9+ with Android Pie update?
simon You can use Android Pie lockdown mode on Galaxy S9 and S9+ with Android Pie (Android 9) update to temporally disable biometric unlock and smart lock. PIN or password will be required to unlock the phones.
The lockdown mode is a standard security feature in Android Pie (Android 9). Luckily, Samsung did not mess up this feature in the One UI.
This Galaxy S9 Android Pie update guide explains everything you need to know about the lockdown mode on Galaxy S9 and S9+ with Android Pie update and shows you how to use it.
You may also check this updated guide on using lockdown mode on Galaxy S9, S10, S20, S21, and S22.
What is the lockdown mode on Galaxy S9 and S9+ with Android Pie update?
If enabled, Galaxy S9 and S9+ offer many ways to unlock the phone.
In addition to PIN/password/pattern, you can also unlock Galaxy S9 and S9+ using:
- Fingerprints.
- Iris.
- Face.
- Trusted devices, trusted places, trusted faces, and matched voices through the smart lock.
All these additional unlock methods are provided for your convenience. Many Galaxy S9 and S9+ owners enjoy these fast unlock methods.
However, in some special situations, for example, someone attempts to force you to unlock the phone to get your data, you may try to disable these unlock methods temporally (and quickly), then type the wrong password/PIN a few times so that you have to wait longer and longer to try again.
When the lockdown mode is enabled, notifications will not be shown on the Galaxy S9 lock screen.
The lockdown mode is one of the new features in Android Pie. Samsung kept the stock feature and did not mess it up this time in the Android update for Galaxy S9 and S9+, unlike what they did to the navigation gestures.
How to enable the lockdown mode on Galaxy S9 and S9+ with Android Pie update?
By default, the lockdown mode on Galaxy S9 and S9+ with Android Pie update is not enabled.
You need to enable it in the power button options (power menu) before you can use it.
As shown in the screenshot below, tap Lock screen in Galaxy S9 Settings.
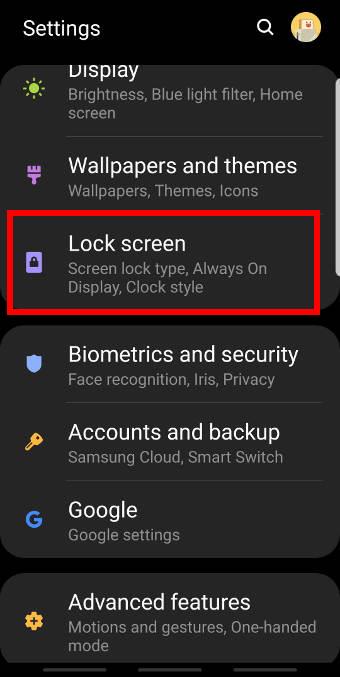
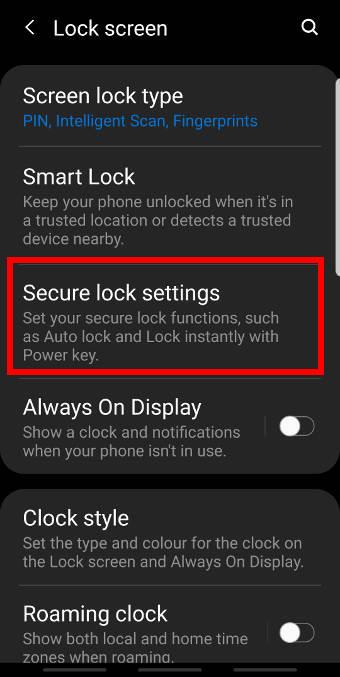
As shown above, in the lock screen settings page, tap Secure lock settings.
In the secure lock settings, as shown below, you can find the Show lockdown option.… Read the rest
The post How to use the lockdown mode on Galaxy S9 and S9+ with Android Pie update? appeared first on Galaxy S9 Guides.
How to use Galaxy S9 notification panel on Galaxy S9 and S9+?
simonGalaxy S9 notification panel allows you to check, snooze, dismiss and manage all notifications on Galaxy S9 and S9+.
Without Android Oreo preloaded, Galaxy S9 and S9+ come with some new Android Oreo notification features like notification channels and notification snooze.
This Galaxy S9 guide explains to you what Galaxy S9 notification panel is, how to access it, the layout of the notification panel and how to use notification panel in Galaxy S9 and S9+.
What is Galaxy S9 notification panel?
Like other Android phones, Galaxy S9 notification panel is an integrated part of Galaxy S9 and S9+.
There is no way to avoid it. You can access Galaxy S9 notification panel regardless what you are doing on the phone.
Galaxy S9 notification panel is a centralized location for all app notifications in Galaxy S9 and S9+. In other words, all apps “post” or push their notifications to the notification panel.
Apps can send or push notifications even when you do not use the app in the foreground.
In short, Galaxy S9 notification panel is a special panel for you to check, dismiss, snooze and manage all notifications in Galaxy S9 and S9+.
How to access Galaxy S9 notification panel?
You can swipe down from the status bar to access Galaxy S9 notification panel, as illustrated below.
If the status bar is hidden (e.g., when you are in full-screen mode), you can just swipe down from the top of the screen.
You can access Galaxy S9 notification panel even when the screen is locked. Of course, in Galaxy S9 lock screen settings, you can choose how notifications are shown.
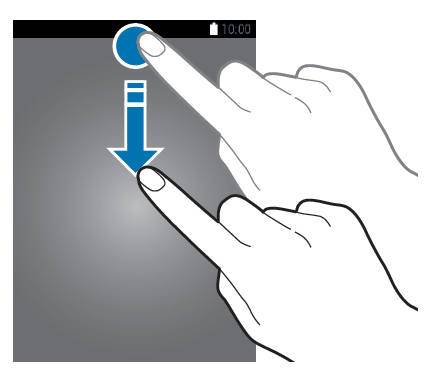
In Galaxy S9 and S9+, there is another way to access Galaxy S9 notification panel quickly on Galaxy S9 Home screen. The feature was named as quick-open notification panel.
You can swipe down on Galaxy S9 Home screen to access Galaxy S9 notification panel. This method, however, is turned off by default. You need to enable it.
In fact, by default, when you swipe up or swipe down in Galaxy S9 Home screen, you will access Galaxy S9 Apps screen.
To use the swipe down gesture for Galaxy S9 notification panel, you need to enable it Galaxy S9 Settings.
As shown below, in Galaxy S9 settings, tap Display.
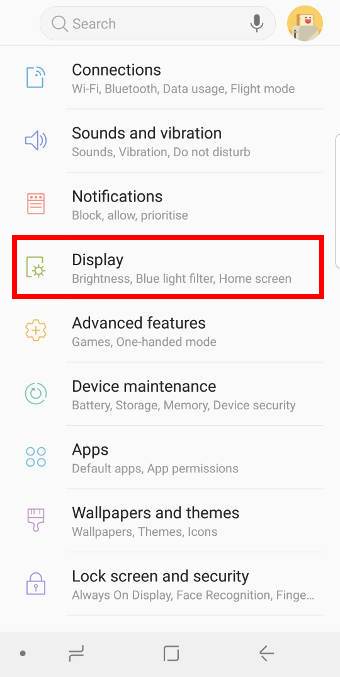
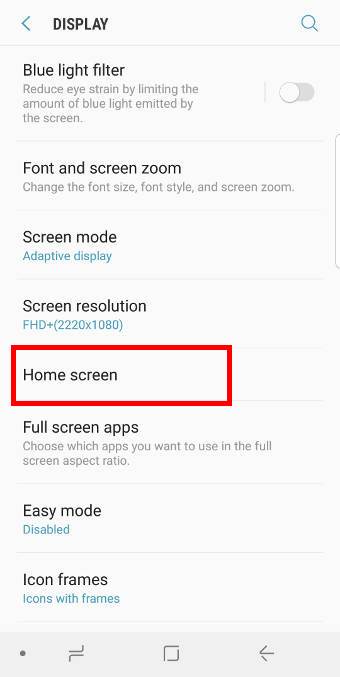
In the Display page, tap Home screen, as shown in the screenshot above.
In Home screen … Read the rest
The post How to use Galaxy S9 notification panel on Galaxy S9 and S9+? appeared first on Galaxy S9 Guides.
6 ways to start Galaxy S9 camera app in Galaxy S9 and S9+
simonGalaxy S9 and S9+ feature some significantly new camera features such as the dual-aperture lens, and super slow motion mode. As the first step of trying the new camera in Galaxy S9 and S9+, you need to start Galaxy S9 camera app first.
In addition to tapping the camera app icon, you can have several other ways to start Galaxy S9 camera app in S9 and S9+.
This Galaxy S9 camera guide shows you the six ways to open Galaxy S9 camera app in your Samsung Galaxy S9 and S9+.
#1. Use Galaxy S9 camera quick launch to start Galaxy S9 camera app
The fastest way to launch Galaxy S9 camera app is to use Galaxy S9 camera quick launch feature, which is enabled by default.
You can quickly press the power button twice to start Galaxy S9 camera app immediately. Samsung named this as Galaxy S9 camera quick launch.
The good thing about Galaxy S9 camera quick launch is that it works at any times: when the screen is on or off, or when you are using any apps, or when the screen is locked or unlocked.
When you use the Galaxy S9 camera quick launch first time, it will remind you of this feature as shown below.
You can then keep it on or turn it off if you want.
If you want, you can enable or disable Galaxy S9 camera quick launch in Galaxy S9 camera settings.
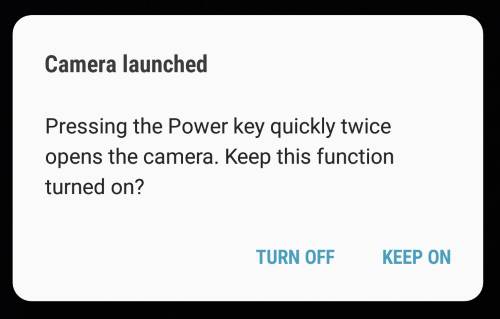
#2. Use camera app shortcut on Galaxy S9 lock screen to start Galaxy S9 camera app.
By default, in Galaxy S9 lock screen as shown below, there are two app shortcuts on the left and right sides of the bottom.
One is the phone app for you to make emergency calls without unlocking the phone. And the other is the camera app as shown below.
Of course, you can use other apps to replace them in Settings — Lock screen and security — App shortcuts.
You can tap the camera app icon to open Galaxy S9 camera app without unlocking the screen.
If you launch Galaxy S9 camera app without unlocking the screen, you can only access photos taken in this session. You cannot access any other photos or pictures saved in the phone before the screen was locked.
This is a security feature, not a bug. For example, if someone gets your phone, he/she … Read the rest
The post 6 ways to start Galaxy S9 camera app in Galaxy S9 and S9+ appeared first on Galaxy S9 Guides.
Samsung DeX Station vs Samsung DeX Pad vs Samsung DeX cable
simon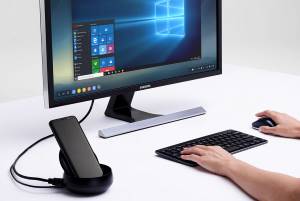 Samsung DeX is one of the best productivity features offered in Galaxy S9, S9+, S8, S8+, Note 8 and Note 9. You need either a Samsung DeX Station, or a Samsung DeX Pad, or a Samsung DexX cable to enjoy this feature.
But these 3 accessories may work differently in the supported devices. Please check this guide on how to use Samsung DeX Station and this guide on how to use Samsung DeX Pad.
This Galaxy S9 accessories guide explains the difference among the Samsung DeX accessories: Samsung DeX Station vs Samsung DeX Pad vs Samsung DeX cable, to help you get the correct DeX accessories for your phone.
What are the available Samsung DeX accessories needed to use Samsung DeX?
To use Samsung DeX, you need one of the following official accessories:
Samsung DeX Station was released in 2017 for Galaxy S8 and S8+. So, in addition to Galaxy S8 and S8+, Samsung DeX station works with all later devices: Galaxy S9, S9+ Note 8 and Note 9.
Samsung DeX Pad was released in 2018 for Galaxy S9 and S9+. So, it officially supports Galaxy S9, S9+ and Note 9. But in Android Oreo update, Galaxy S8, S8+ and Note 8 can also use Samsung DeX Pad to enjoy Samsung DeX. So, Samsung DeX Pad supports similar devices as Samsung DeX Station unless you haven't updated your S8 (or S8+ or Note 8) to Android Oreo.
Samsung DeX cable was released in 2018 for Galaxy Note 9. Currently, it only supports Galaxy Note 9 (and Tab S4) in DeX mode. For Galaxy S8, S8+, S9, S9+ and Note 8, the cable is identical to other normal USB-C to HDMI cable: you can only use it for screen mirroring without a Chromecast (or Miracast device).
Which phones support Samsung DeX?
As mentioned, currently, you can use Samsung DeX in the following devices:
- Galaxy S8
- Galaxy S8+
- Galaxy Note 8
- Galaxy S9
- Galaxy S9+
- Galaxy Note 9
- Galaxy Tab S4
To use Samsung DeX Pad, Galaxy S8, S8+, and Note 8 must upgrade to Android Oreo. DeX Station does not have this requirement.
Samsung DeX Station vs Samsung DeX Pad: what are the differences?
If your Galaxy S8, S8+ or Note 8 are still using Android Nougat, then Samsung DeX … Read the rest
The post Samsung DeX Station vs Samsung DeX Pad vs Samsung DeX cable appeared first on Galaxy S9 Guides.
How to remove Bixby Home from Galaxy S9 Home screen?
simonIn the leftmost of Galaxy S9 Home screen, Samsung reserved it for the Bixby Home. But Many Galaxy S9 and S9+ owners are not impressed with Bixby. They want to remove Bixby Home from Galaxy S9 Home screen.
By removing Bixby Home from Galaxy S9 Home screen, you would at least get a cleaner Galaxy S9 Home screen.
This Galaxy S9 guide explains how to remove Bixby Home from Galaxy S9 Home screen, and how to access Bixby Home when it is removed.
Why may you want to remove Bixby Home from Galaxy S9 Home screen?
Bixby Home is supposed to show you the most relevant info for you when you open it. The info is pulled from both your data (e.g., calendar) and news feed based (e.g., Linkedin).
Such an informational page can be very useful when you are busy. You can just glimpse the Bixby Home to get informed quickly.
By default, there are at least two quick ways to access Bixby Home:
- Navigating to the leftmost panel of Galaxy S9 home screen.
- Pressing Bixby button once.
It is obvious that method 2 is faster and more intuitive to access Bixby Home, and therefore method 1 is redundant. You may want to remove Bixby Home from Galaxy S9 Home screen to clean up Galaxy S9 home screen.
In addition, some Galaxy S9 and S9+ owners are not fans of Samsung's Bixby. Google Assistant, which is available on almost all Android phones now, in most cases can be a better job.
They may feel it is annoyed when they accidentally access the Bixby Home when they want to access the home panel of Galaxy S9 home screen.
Although it is almost impossible to disable Bixby in Galaxy S9 and S9+, it is easy to remove Bixby Home from Galaxy S9 Home screen.
You can also easily disable Bixby button in Galaxy S9 and S9+.
How to remove Bixby Home from Galaxy S9 Home screen?
As shown below, in Galaxy S9 and S9+, the leftmost panel in Galaxy S9 Home screen is reserved for Bixby Home.
The double-line icon (marked in the red rectangle) in the panel indicator (indicating panel you are in currently) suggests Bixby Home is active.

To remove Bixby Home from Galaxy S9 Home screen, you may follow these steps.
Step 1: Tap and hold (long tap) any empty space in Galaxy S9 Home
The post How to remove Bixby Home from Galaxy S9 Home screen? appeared first on Galaxy S9 Guides.
How to use the floating keyboard on Galaxy S9 and S9+ with Android Pie update?
simon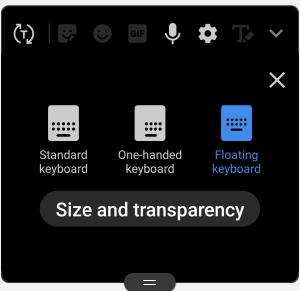 In Android Pie update for Galaxy S9 and S9+, Samsung keyboard can be in the floating mode, and therefore, you can put the keyboard anywhere on the screen and use the keyboard on Galaxy S9 and S9+ flexibly.
The floating keyboard on Galaxy S9 and S9+ with Android Pie update works on all apps, once enabled.
This Galaxy S9 Android Pie update guide explains how to enable, use, and customize the floating keyboard on Galaxy S9 and S9+ with Android Pie update.
Please note, the Writing Assistant on Samsung Keyboard requires the Android 12 update, which Galaxy S9 will not get. You have to use the third-party keyboard if you need the grammar check (in addition to the spelling check).
What is the new resizeable keyboard on Galaxy S9 and S9+ with Android Pie update?
By default, the Samsung keyboard or keypad is fixed on the bottom of the Galaxy S9 or S9+ regardless of the orientation (portrait or landscape) of the phone, just like in other Android phones. The screen area occupied by the keyboard will not be used by the app.
This means the keyboard may waste a lot of screen space for the app.
When you hold the phone is the landscape mode (FYI, Galaxy S9 Home screen supports landscape mode as well), the keyboard will have to stretch a lot and waste even more screen space. So, the screen size is not fully utilized.
The problem has been exacerbated in the last few years because the aspect ratio of smartphones has become larger and larger.
Of course, the solution already exists on some Samsung tablets: using a freely resizable keyboard.
Now, in Android update for Galaxy S9 and S9+, Samsung brought the resizeable (free form) to Galaxy S9 and S9+ so that you can type easier.
The floating keyboard allows you:
- To let the keyboard poping over any apps when using it. Therefore you will get more usable screen space when using the keyboard.
- To put keyboard anywhere you want.
- To relocate the keyboard when you typing.
- To resize the keyboard (subject to minimum and maximum size).
- To switch back to standard mode (fixed mode) at any time.
- To switch back to the one-handed keyboard,
Basically, if you feel the keyboard affects your usage of any apps, you should try the floating keyboard after updating Galaxy S9 … Read the rest
The post How to use the floating keyboard on Galaxy S9 and S9+ with Android Pie update? appeared first on Galaxy S9 Guides.
How to use dual aperture to manually switch Galaxy S9 camera aperture in Pro mode?
simon Dual aperture, which allows the system to choose the suitable Galaxy S9 camera aperture depending on lighting conditions, is one of the significant improvements in Galaxy S9 (and S9+) camera compared to previous Galaxy phones.
However, in most camera modes, choosing Galaxy S9 camera aperture will be done automatically, and therefore you cannot manually select one of the two apertures.
The Pro mode is an exception, which allows you to manually choose Galaxy S9 camera aperture.
This Galaxy S9 camera guide explains dual aperture feature in Galaxy S9 and shows you how to manually choose Galaxy S9 camera aperture in the Pro mode.
What does dual aperture mean for Galaxy S9 camera aperture?
In photography, aperture, which controls how collimated the admitted rays are, is one of the three legs of the exposure triangle.
Photographers use the combinations of aperture, ISO and shutter speed to get desired photos for various scenarios.
In most digital cameras or more expensive DSLRs, you usually have a certain level of control of the aperture.
But in smartphones, due to the compact size, the aperture of the camera lens is usually fixed. Therefore, the camera app can control exposure through ISO and shutter speed.
Samsung introduced the dual aperture in the real camera od Galaxy S9 and S9+ so that the system can adjust the aperture based on lighting conditions.
Galaxy S9 and S9+ camera only supports two discrete apertures f/1.5 and f/2.4. The system cannot set an aperture between these two values.
Typically, when ambient is very dark (in the night), the system will set the aperture to f/1.5. This allows more light to pass through the lens to get brighter photos.
When the ambient is very bright (e.g., under the sun), the aperture will be set at f/2.4. The photo will generally look more crispy than using f/1.5
How to use dual aperture to switch Galaxy S9 camera aperture manually?
Although dual aperture is a good feature for the rear camera, Samsung does not want you to mess up Galaxy S9 camera aperture. Therefore, aperture switching was programmed as an automatic Galaxy S9 camera feature.
In other words, it does not allow you to manually switch the Galaxy S9 camera aperture in most Galaxy S9 camera modes.
The only exception is the Pro mode, which allows you to control almost all aspects of the camera settings manually.
Please note, Pro mode is … Read the rest
The post How to use dual aperture to manually switch Galaxy S9 camera aperture in Pro mode? appeared first on Galaxy S9 Guides.
How to use Multi Window on Galaxy S9 and S9+?
simon![]() Galaxy S9 Multi Window allows you to use two or more apps simultaneously on Samsung Galaxy S9 or S9+ to improve your productivity.
Galaxy S9 Multi Window allows you to use two or more apps simultaneously on Samsung Galaxy S9 or S9+ to improve your productivity.
This Galaxy S9 guide explains what Multi Window can do for you, how to use split-screen view, how to use the pop-up view, and how to use the snap window on Galaxy S9 and S9+.
Update: a new section of Changes of Multi-Window in Android Pie update for Galaxy S9 and S9+ was added. In Android Pie update for Galaxy S9 and S9+, many Multi Window features were removed. Please check this section and Android Pie update guide for details. You may also check this guide for using the Multi Window on Galaxy S9 and S8 with Android Pie.
As Multi Window is available in many other Galaxy phones, this guide also applies to many other Samsung Galaxy phones and tablets including Galaxy S8, S8+, Note 8 and Note 9.
What is Multi Window on Galaxy S9 and S9+?
Multi Window on Galaxy S9 and S9+ allows you to use two apps side-by-side in the split-screen view, or simultaneously use two or more apps in the pop-up view.
For example, you may want to browse the info of a product in the Amazon app and share some key info with your friends in the Messages app.
Or you may want to get some numbers from a spreadsheet in Google Sheets for an email.
Without the Multi Window, you will have to switch between apps several times.
If you are familiar with Multi Window on Galaxy S9 and S9+, you can greatly improve your productivity, and therefore get a better ROI of your Galaxy S9 or S9+.
Samsung introduced Multi Window many years in Galaxy Note 2 in 2012, which is 4 years earlier than the stock multiwindow feature introduced in Android Nougat.
Over the years, Samsung has improved and polished the multiwindow feature and made it one of the best features in Galaxy phones.
Basically, if you need to switch apps a few times for a task, you very likely will benefit from the Multi Window feature once you get used to it.
What are the two Multi Window modes on Galaxy S9 and S9+?
There are two screen modes of Multi Window on Galaxy S9 and S9+:
- Split-screen view.
- Pop-up view.
In the split-screen view, two apps share the whole … Read the rest
The post How to use Multi Window on Galaxy S9 and S9+? appeared first on Galaxy S9 Guides.
How to remap Bixby button on Galaxy S9 and S9+ after updating to Android Pie?
simon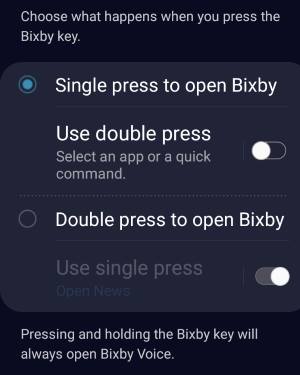 After the February update of Bixby (version 2.1.04.18), you can now remap Bixby button to an app or a Bixby quick command.
This Galaxy S9 Android Pie update guide explains the new features of Bixby in Android Pie update, and how to remap the Bixby button to other apps or a quick command.
New gestures for the Bixby button on Galaxy S9 and S9+ after updating to Android Pie
Traditionally, the Bixby button in Galaxy S9, S9+, S8, S8+, Note 8, and Note 9 only supports one gesture: press.
You can choose to press to open Bixby (Bixby Home), or do nothing (this essentially disables the Bixby button). Of course, you cannot remap the press gesture to anything else, or disable Bixby in your phone.
In Android Pie update for Galaxy S19, S9+, Note 9, Note 8, S8, and S8+, Bixby was updated to a new version with new gestures for the Bixby button. Now, the Bixby button supports 3 gestures:
- Single press.
- Double press.
- Long press.
The long press is reserved for Bixby Voice command. You cannot change it. When you long press the Bixby button, you can continue with voice commands immediately.
The single press OR the double press MUST be assigned to Bixby Voice page. For example, if you assign the single press to Bixby Voice, then you can customize (remap) the double press to something else.
Please note, Bixby Voice page, which is different from Bixby Home, is new in Galaxy S9 Android Pie update. Bixby Home still exists in Galaxy S9 Home screen, and you can still hide it if you want.
Major changes of Bixby in Android Pie update for Galaxy S9, S9+, S8, S8+, Note 8, and Note 9
In Android Pie update for Galaxy S9, S9+, S8, S8+, Note 8, and Note 9, Bixby Service, Bixby Voice, and Bixby Vision, were bumped to version 2.1.x, and Bixby Home to version 3.x.
The major changes of Bixby in the Android Pie update include:
- New gestures for the Bixby button. Remapping the Bixby button to third-party apps was added in February update of Bixby.
- New Bixby quick commands.
- New Bixby Vision integration in the new camera app.
- New Bixby Voice page (showing tips, features, and suggestions for Bixby Voice, and accessing Bixby Voice settings).
You can update Bixby in Galaxy Store.
How to remap Bixby button on
The post How to remap Bixby button on Galaxy S9 and S9+ after updating to Android Pie? appeared first on Galaxy S9 Guides.
How to pin files to Galaxy S9 Home screen (add file shortcuts to Galaxy S9 Home screen)?
simon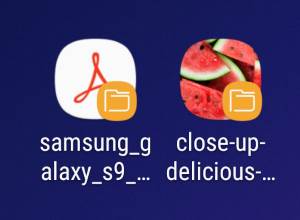 You can pin files to Galaxy S9 Home screen so that you can open them directly by tapping them without fiddling through apps. For example, you can add a PDF file to the home screen and open it without opening the file explorer or storage manager.
After you add files to Galaxy S9 home screen (to be precise, you are actually adding file shortcuts to the home screen), you can use them just like using apps and widgets: open, relocate, delete them.
A file pinned on the home screen always occupies one spot (icon). This is different from adding and showing photos on Galaxy S9 Home screen as a widget, which is resizable.
This Galaxy S9 guide shows you how to pin files to Galaxy S9 Home screen, manage files added to the home screen, and how to add files to task edge in the edge screen.
When you may want to pin files to Galaxy S9 Home screen (add files to the home screen)?
Many owners who use Galaxy S9 or S9+ as a productivity tool often need to open or edit some files repeatedly.
By default, this means you have to open a file explorer (e.g., My files), navigate to the folder, find the file, tap on it to let the default app to open it.
But if you pin the file on Galaxy S9 home screen (i.e. add a shortcut of the file to Galaxy S9 Home screen), then you can tap the shortcut on the home screen to open it straight away.
If you want to show photos on Galaxy S9 Home screen, you may check this guide.
When you pin a file to the home screen, you actually add a shortcut of the file to the home screen. The file is still in the original folder and is NOT moved. If you delete the icon in the home screen, the corresponding file will NOT be removed. But if you update the file, the file in the original folder will be updated.
Technically, the shortcut (the pinned file) in Galaxy S9 home screen is a symbolic (soft) link to the original file, not a copy of the file.
How to pin files to Galaxy S9 Home screen?
There are many third-party apps that allow you to add file shortcuts to Galaxy S9 Home screen. But you do not install any of them.
The pre-installed … Read the rest
The post How to pin files to Galaxy S9 Home screen (add file shortcuts to Galaxy S9 Home screen)? appeared first on Galaxy S9 Guides.
About Galaxy S9 Guides
simon What is Galaxy S9 guides community?
Galaxy S9 guides is an online community for owners of Galaxy S9 or S9+ to help fellow owners.
If you have any questions on or encounter any problems with Samsung Galaxy S9 and S9+, you can get answers and solutions quickly from the community.
Galaxy S9 guides community is not affiliated with Samsung in any means. It is simply an owner-help-owner community.
If you need any “official” technical support or need to contact Samsung for warranty or sales related issues, please approach the local distributor or local Samsung office directly.
We are not able to relay any messages to Samsung.
What does Galaxy S9 guides community offer?
Galaxy S9 guides community offers various how-to guides to help you use Galaxy S9 and S9+.
These Galaxy S9 guides are organized into the following five sections:
- Galaxy S9 new features guide. The section covers detailed guides for all new features and functions in Galaxy S9 and S9+.
- Galaxy S9 how-to guides. This section is a collection of high-quality how-to guides on how to efficiently use Samsung Galaxy S9 and S9+,
- Galaxy S9 camera guides. There are many improvements and new features in Galaxy S9 (especially S9+) camera. This section has all the guides you need to use major features of Galaxy S9 camera properly.
- Galaxy S9 accessories guides. This section shows you the useful and affordable Galaxy S9 accessories to help you use and improve Galaxy S9 and S9+.
- Galaxy S9 user guides. This section is a collection of the official Samsung Galaxy S9 user guides in various languages. You can read and download the official user guide in PDF format in your local language.
Besides, comments are open on all pages. So, everyone can ask questions if they are not addressed in the guides, The community will and help them get the answer or solution.
In a nutshell, Galaxy S9 guides community offers a platform for all owners of Galaxy S9 and S9+ to discuss and share the usage and experiences of the phone.
How can you contribute to the Galaxy S9 guides community?
There is no join button in Galaxy S9 guides. There are no signup forms either.
All Galaxy S9 guides are open to the public.
And of course, it is free.
We do not collect any of your personal info. You can post your Galaxy S9 … Read the rest
The post About Galaxy S9 Guides appeared first on Galaxy S9 Guides.
How to use Galaxy S9 touchscreen gestures?
simon You have to use some Galaxy S9 touchscreen gestures if you want Galaxy S9 or S9+ to do anything for you.
Although most Galaxy S9 touchscreen gestures work on all other Android phones, you may not be aware of some gestures that help you use Galaxy S9 and S9+ effectively.
This Galaxy S9 how-to guide illustrates the 7 Galaxy S9 touchscreen gestures with animations, explains the features of these gestures and gives examples of using these gestures.
What are Galaxy S9 touchscreen gestures?
As Galaxy S9 and S9+ do not have a physical keyboard or other input devices, you have to interact with the phone either through the touchscreen or voice (e.g., Bixby or Google Assistant).
In addition to the on-screen keyboard or keypad, Galaxy S9 and S9+ also accept some touchscreen gestures.
When your finger(s) or other capacitive pens (please note S Pen on Galaxy Note devices does NOT work with Galaxy S9 or S9+ screen) move on the screen, Galaxy S9 and S9 can recognize certain patterns and therefore responds accordingly.
These moving patterns are usually referred to as Galaxy S9 touchscreen gestures.
So, understanding and correctly using Galaxy S9 touchscreen gestures are essential if you want to use the phone efficiently.
Similar to other Android phones, there is nothing special in Galaxy S9 touchscreen gestures. These gestures can be used in almost all other Android phones.
Although most of Galaxy S9 touchscreen gestures are used on the screen, some can also be used on the physical buttons. e.g., the power button accepts press, double press and long press gestures.
List of Galaxy S9 touchscreen gestures in Galaxy S9 and S9+
You can use the following 7 Galaxy S9 touchscreen gestures on Galaxy S9 and S9+ for various operations.
1. Tap gesture (press)
Tap is one of the most used Galaxy S9 touchscreen gestures.
As shown in the animation below, you need to tap an icon or a specific area to activate something, for example, to start an app, or to open a menu item.
The tap gesture actually mimics “click” of a mouse (e.g., when using Samsung DeX with Galaxy S9 or S9+).
Of course, the action or response of the tap gesture depends on what was tapped, or where you tapped.
Some example of using tap gesture includes:
- You can open an app by tapping an app icon in Galaxy S9 home screen or
The post How to use Galaxy S9 touchscreen gestures? appeared first on Galaxy S9 Guides.
Understand and Use Galaxy S9 Home screen
simon![]() You can not bypass or hide Galaxy S9 Home screen on your Galaxy S9 or S9+. You have to use the home screen unless you power off the phone.
You can not bypass or hide Galaxy S9 Home screen on your Galaxy S9 or S9+. You have to use the home screen unless you power off the phone.
Although it is not complicated, many Galaxy S9 and S9+ owners are not fully aware of all functions and features of Galaxy S9 Home screen.
This Galaxy S9 guide explains the meaning and usage of all components you may find in the Home screen of Galaxy S9 and S9+. The differences between apps screen and home screen were also detailed.
What is Galaxy S9 Home screen?
Like all other Android phones, Galaxy S9 home screen, by default, is the first screen after you unlock Galaxy S9 or Galaxy S9+.
You can start apps, access notifications, check the phone status, use widgets, open edge screen in Galaxy S9 Home screen, which is the centre (home) of your Galaxy S9 and S9+.
Generally speaking, in Galaxy S9 and S9+, you have 4 types of pages:
- Lock screen. You need to unlock the phone before you can use Galaxy S9 ort S9+. Always-on display screen usually is considered as a special lock screen overlayed over Galaxy S9 lock screen.
- Home screen. The centre or starting screen of Galaxy S9 and S9+. It is the home of select apps and widgets.
- Apps screen. Galaxy S9 apps screen is a special home screen. It is an app drawer for all apps on Galaxy S9 and S9+.
- Individual apps.
Besides, edge screen on Galaxy S9 and S9+ is enabled by default. You may check this guide on how to use Galaxy S9 edge screen.
You will have to use Galaxy S9 Home screen if you use Galaxy S9 or S9+. There are no alternatives. You cannot bypass it.
How to access Galaxy S9 Home screen?
Galaxy S9 and S9+ are protected by Galaxy S9 lock screen to prevent unauthorized access to your apps and data. Galaxy S9 home screen is always “behind” the lock screen.
In other words, you can access Galaxy S9 Home screen only after you unlock the phone.
You can access Galaxy S9 Home screen in many ways:
- After unlocking Galaxy S9 or S9+, you should get Galaxy S9 home screen directly.
- When you are using any apps, tap the Home button in Galaxy S9 navigation bar to access the Home screen directly.
- When you are using any
The post Understand and Use Galaxy S9 Home screen appeared first on Galaxy S9 Guides.
How to use Galaxy S9 camera Pro Mode on Galaxy S9 and S9+?
simon Galaxy S9 camera Pro mode gives you full control of your shootings: ISO, aperture, shutter speed, autofocus mode, filters, white balance, and exposure. If you properly use the Galaxy S9 camera Pro mode, you may get far better pictures than using the Auto mode (default).
But for many users without photographic backgrounds, sometimes, it is overwhelming to adjust the settings for Galaxy S9 camera Pro mode to get the desired photos.
This Galaxy S9 camera guide explains the what Galaxy S9 camera Pro mode is, when you may need it, and all settings for Galaxy S9 camera Pro mode.
Please note, Galaxy S8, S8+, Note 8 and Note 9 have a similar Pro mode to that on Galaxy S9 and S9+. So, this guide also applies to the Pro mode in these Samsung phones.
What's Galaxy S9 camera Pro mode? When do you need it?
In the old days, smartphone cameras are usually inferior to many middle-range (sometimes, even entry-level) point-and-shoot cameras. And it is impossible to compare them to DSLRs.
But in recent years, with the advances in camera sensor technology and software, more and more high-end smartphones can replace middle-range point-and-shoot cameras. Some Android phone vendors started to offer some photographic features that used to be exclusive in DSLR cameras
Since Galaxy S6, Samsung has included the Pro mode in many of its phones. But the quality of photos taken in the Pro mode depends on the phone hardware and software.
With Galaxy S9 camera Pro mode, some users now can easily get many far better photos than in the Auto mode.
Galaxy S9 camera Pro mode allows you:
- Adjust the ISO value
- Adjust the aperture to use the dual apertures as explained in this guide.
- Adjust the shutter speed.
- Adjust the autofocus mode.
- Choose camera filters.
- Adjust the white balance.
- Adjust exposure compensation.
- Save photos in RAW format.
You may want to try the Pro mode whenever you are not satisfied with photos taken in the Auto mode or other camera modes.
For example, in the low-light conditions, you may play with the ISO value and shutter speed to get less noisy photos in Pro mode. The Auto mode in this situation sometimes works well; sometimes not.
Or, if the lighting conditions vary dramatically in different parts of the photo, you can choose the proper ISO value, shutter speed, white balance, … Read the rest
The post How to use Galaxy S9 camera Pro Mode on Galaxy S9 and S9+? appeared first on Galaxy S9 Guides.
How to use app pair on Galaxy S9 and S9+?
simon App pair on Galaxy S9 and S9+ allows you to launch and use two apps as a pair in the split-screen view of the Multi Window mode.
Samsung first introduced app pair on Galaxy Note 8 on 2017. It was then available for all newer Galaxy phones including Galaxy S9, S9+ and Note 9. App pair was also backported to Galaxy S8 and S8+ in the Android Oreo update.
This Galaxy S9 guide explains how app pair works on Galaxy S9 and shows you the two methods of creating app pairs. The guide also shows you how to manage app pairs and how to use app pair together with dual messengers.
As mentioned, the app pair is not an exclusive feature of Galaxy S9 or S9+. Instead, it is a standard Multi Window feature on Samsung phones with Android Oreo. So, this guide applies to other Samsung Galaxy phones including Galaxy Note 8, S8, S8+ and Note 9 as well.
What is app pair on Galaxy S9 and S9+?
As explained in the Galaxy S9 Multi Window guide, you can use two apps in the split screen view simultaneously.
You may need to use a certain pair of apps often. App pair is to address this demand: you create a pair so that the two apps are launched in the split screen view directly.
Of course, this is faster than the old workflow: entering Multi Window mode, then selecting apps.
Even better, you can use app pair in Galaxy S9 edge screen to launch the two apps without navigating to the home screen.
Essentially, app pair on Galaxy S9 is a shortcut to the split-screen view of two apps. You can put the shortcut on Galaxy S9 home screen or edge screen.
If you are using the dual messenger feature to run two copies of messenger apps (e.g., WhatsApp), you can put these two copies of the messenger app in the app pair so that you can check messages in two accounts simultaneously.
Two ways to create an app pair on Galaxy S9 and S9+?
There are at least two methods to create an app pair on Galaxy S9 or S9+:
- Converting the current split-screen view to an app pair;
- Manually creating an app pair in the apps edge of Galaxy S9 edge screen settings.
Method 1: Converting current split-screen view to an app pair
When … Read the rest
The post How to use app pair on Galaxy S9 and S9+? appeared first on Galaxy S9 Guides.
Contact Us
simon Galaxy S9 Guides welcome your involvement and feedback

As an owner-help-owner community, Galaxy S9 Guides need your feedback and suggestions.
The community is ready to find solutions for your problems related to Galaxy S9 and S9+.
Meanwhile, you may have the knowledge or experiences to answer some questions other Galaxy S9 or S9+ owners may have.
Galaxy S9 Guides is a platform facilitating such communications, discussion and helping each other.
If you have any questions on Galaxy S9 and S9+, or if you encounter any problems when using Galaxy S9 and S9+, you may check the high-quality how-to guides released on the website.
These Galaxy S9 guides are organized into five sections:
- Galaxy S9 new features guide.
- Galaxy S9 how-to guides.
- Galaxy S9 camera guides.
- Galaxy S9 accessories guides.
- Galaxy S9 user guides.
You may find the answer from the guides or the comments.
You can also post your questions in the comments, or share your solution in the comments.
How to reach Galaxy S9 Guides community?
The fastest and most efficient way to reach the Galaxy S9 guides community is through comments in relevant posts and pages.
All pages are open for comments.
And anonymous comments are allowed if you do not want to reveal any of your personal info.
You can post your questions, or answer any questions posted by others.
You can also share your tips and tricks for using Galaxy S9 and S9+.
If you need to attach screenshots related to your questions, you can then post them on our Facebook page.
Of course, you can also share your thoughts and solutions on our Facebook page.
You may also reach us through our YouTube channel and Google+ page. But both of them may be not as active as the Facebook page.
Last, but not least, you can contact us through email using the contact form below.
Please note, we can only reply to Gmail (Google Mail) accounts. If you provide other email accounts, the messages will be ignored because our emails cannot be delivered to your email.
Also, replying email usually takes lower priority compared to answering comments and Facebook pages.
Enjoy your Samsung Galaxy S9 and Galaxy S9+.… Read the rest
The post Contact Us appeared first on Galaxy S9 Guides.
Galaxy S9 How-to Guides
simon How will Galaxy S9 How-to Guides help you?
Samsung Galaxy S9 and S9+ are so powerful that nobody can master all of the functions and features. Galaxy S9 how-to guides can be your lifesaver.
No matter you are a seasoned or a new user of Samsung Galaxy phones, you may find these Galaxy S9 how-to guides can save you a lot of time and help you use the phone more effectively.
Some of the guides will directly address questions or problems you may encounter when using Samsung Galaxy S9 or S9+.
For example, what should you do when the S9 or S9+ hangs? Or how to use the new camera modes in S9+? Or how to customize the performance mode of Galaxy S9 and S9+?
Some of the Galaxy S9 how-to guides will help you explore some useful Galaxy S9 and S9+ features that you are not aware of, and therefore you can get more from your Galaxy S9 and S9+.
For example, how to use the secure folder in Galaxy S9 and S9+? How to use the pop-up view multiwindow in Galaxy S9 and S9+? How to use face recognition in Galaxy S9 and S9+?
Anyway, you will find these Galaxy S9 guides not only solve the problems you encountered but also help you explore some useful features you never used before.
List of Galaxy S9 How-to Guides
New Galaxy S9 guides are released once we finish the extensive testing on various devices.
So, this page is a live page with new guides added frequently.
If you cannot find the guide you want, you can post your questions or requests in the comment box below.
We will try to find a solution for you in the comments.
Also, we will try to release any relevant guides earlier so that more Galaxy S9 and S9+ owners can benefit from these guides.
Your involvement in this community is critical for all our fellow owners of Samsung Galaxy S9 and S9+.
Here is the list of released or coming-soon Galaxy S9 how-to guides.
1. How to transfer and migrate data to Galaxy S9 and S9+?
Samsung smart switch allows you to transfer and migrate data to Galaxy S9 and S9+ from iPhones or Android phones through a USB cable, or wireless connection, or cloud storage.
This Galaxy S9 guide explains to you how to transfer and migrate data to Galaxy S9 and … Read the rest
The post Galaxy S9 How-to Guides appeared first on Galaxy S9 Guides.
Galaxy S9 layout (and layout of Galaxy S9+)
simonTo effectively use your new phone, you need to know and understand the Galaxy S9 layout and Galaxy S9+ layout.
Sometimes, common sense works; sometimes it may not.
This Galaxy S9 how-to guide explains the layout of Galaxy S9 and S9+, the difference between the Galaxy S9 layout and Galaxy S9+ layout, and the meaning of essential parts in the layouts of Galaxy S9 and S9+.
Why do you need to know Galaxy S9 layout and Galaxy S9+ layout?
Although Galaxy S9 and S9+ are not a revolutionary product, the layout of Galaxy S9 and S9+ is substantially different from Android phones from other Android manufacturers.
Even compared to Galaxy S8 and S8+ layout, there are a few changes in the Galaxy S9 layout and Galaxy S9+ layout.
You need to know and understand Galaxy S9 layout when you want to know the functions of all buttons in Galaxy S9 and S9+.
The Galaxy S9 and S9+ layout can also help you find the locations of some parts. For example, a few Galaxy S9 and S9+ owners accidentally inserted the SIM card ejection pin into the top microphone hole. They may spoil the microphone. Had they known the layout of Galaxy S9 and S9+, they wouldn't have made this mistake.
Besides, it is also beneficial to know the location of antennas and wireless charging coils when using some Galaxy S9 accessories.
Anyway, before using your Galaxy S9 or Galaxy S9+, you should spend a few minutes to learn and understand the layout of S9 and S9+ even if you are a seasoned Samsung phone user.
The difference between Galaxy S9 layout and Galaxy S9+ layout
Unlike Galaxy S8 and S8+, which differ only in size, Galaxy S9 and S9+ have a few considerable differences in the hardware configuration.
Due to dual rear camera configuration in Galaxy S9+, the back of Galaxy S9+ layout is different from that of Galaxy S9.
The second rear camera is the only difference between Galaxy S9 layout and Galaxy S9+ layout.
Galaxy S9 and S9+ layout: front view
The front view of Galaxy S9 layout is illustrated in the picture below. The front view of Galaxy S9+ is identical except the screen size.
As shown below, you can find in the front of Galaxy S9 and S9+:
- touchscreen;
- edge screens;
- front camera;
- LED indicator;
- top speaker (earpiece);
- proximity/light sensor;
- iris recognition camera;
The post Galaxy S9 layout (and layout of Galaxy S9+) appeared first on Galaxy S9 Guides.
How to use the rotation toggle to change and lock screen orientation in Android Pie update for Galaxy S9 and S9 Plus?
simon After updating Galaxy S9 or S9+ to Android Pie, you can use the new rotation toggle to change screen orientation on-the-fly when auto-rotate is turned off. You can even lock the screen orientation to landscape mode with this toggle (aka orientation lock).
Many Galaxy S9 and S9+ owners find this feature extremely useful once they realize the functions of the small rotation toggle icon.
This Galaxy S9 Android Pie update guide explains the functions of the rotation toggle, and how to use it to change and lock the screen orientation on Galaxy S9 and S9+ with Android Pie update.
What is the rotation toggle in Android Pie update for Galaxy S9 and S9+?
Most smartphone owners hate the auto-rotate. It often rotates the screen when you are not intended to do so.
So, most smartphone owners disable the auto-rotate and use the portrait mode.
However, occasionally, you may want to switch to landscape mode temporally for some apps. For example, you may want to show others the photos or videos shot in the landscape mode.
In this case, without the rotation toggle, you have to go to quick settings (this is the fastest router prior to Android Pie ), tap the auto-rotate button, rotate the phone, then show the photos. Once you finish it, you need to disable auto-rotate in the quick settings.
In the stock Android Pie, Google added the rotation toggle (orientation lock) to solve this issue. The toggle will appear (and animates) in the navigator bar once the phone detects the orientation is different from the “locked” one. You can tap the toggle to change the orientation. Of course, you can ignore the toggle (and do not change the orientation).
Samsung customized this feature a bit in Android Pie update for Galaxy S9 and S9+. The rotation toggle animates only twice in Galaxy S9 and S9+, then disappear if you do not tap it.
It is unclear why Samsung decided not to show the toggle all the time.
How does the orientation lock work?
The rotation toggle (orientation lock) in Android Pie update for Galaxy S9 and S9+ works only when auto-rotate is off (it is obvious).
So, you will see the rotation toggle in the navigation bar (if you are using the new navigation gestures, the toggle will appear in a simialr location.) only when:
- Auto-rotate is disabled.
- The phone detects that you
The post How to use the rotation toggle to change and lock screen orientation in Android Pie update for Galaxy S9 and S9 Plus? appeared first on Galaxy S9 Guides.
How to use smart switch to transfer and migrate data to Galaxy S9 or S9+?
simon You can transfer and migrate data to Galaxy S9 and S9+ from iPhones or Android phones through a USB cable, or wireless connection, or cloud storage.
For many Galaxy S9 and S9+ owners, Galaxy S9 or S+ is not your first smartphone. You were very likely using an iPhone or an Android phone before getting Galaxy S9 or S9+.
This Galaxy S9 guide explains to you how to transfer and migrate data to Galaxy S9 and S9+ if you were using 1). an iPhone; or 2). a Samsung Galaxy phone, or 3). other Android phones.
What can be migrated to Galaxy S9 and S9+? What cannot be?
Contacts, messages, call logs, photos, videos, music files, documents and stock calendar data in your old phone can be easily transferred and migrated to Galaxy S9 and S9+.
If you want to migrate data to Galaxy S9 from an iPhone, of course, apps cannot be transferred. There is no one-to-one match in Google play store and Apple's App Store. Some app developers only release apps in App Store. Some may only release them in the Google Play store.
If you want to migrate data to Galaxy S9 from a Samsung Galaxy phone, then you can transfer and migrate almost all data. Apps from Galaxy apps and side-loaded apps can be transferred as well. Phone settings including WiFi, wallpaper, home screen settings, and some system settings, will be migrated. The only data that cannot be transferred or migrated are some game progress data and login credentials (unless you use the Samsung Pass). Your email settings in the stock email app can also be migrated. But you need to re-enter the password for each account.
If you transfer and migrate data to Galaxy S9 or Note 9 from other Android phones, some phone settings will not be copied. Some side-loaded apps may also be ignored.
Transfer and migrate data to Galaxy S9, S9+ or Note 9 from an iPhone
If you want to migrate from iPhone to Galaxy S9, you need to have iOS 5 or higher on your iPhone.
The simplest way to migrate iPhone data to Galaxy S9 is through iCloud. You back up everything you need to transfer in your iPhone to iCloud.
In your iPhone, go to Settings – YOURNAME – iCloud – iCloud Backup (for iOS 10.2 or later) or Settings – iCloud – Backup (for older iOS) … Read the rest
The post How to use smart switch to transfer and migrate data to Galaxy S9 or S9+? appeared first on Galaxy S9 Guides.
Galaxy S9 new features Guides
simon As a 2018 flagship smartphone, Samsung Galaxy S9 and S9+ introduced some new features and improvement in multiple aspects.
Even some long-time Galaxy phone users may get confused on or fail to understand some cool new features.
These Galaxy S9 new features guide will help you master the new features in Galaxy S9 and S9+ so that you can get the maximum value from the phone.
What do Galaxy S9 new features Guides cover?
Galaxy S9 new features guides section covers only the new features in Galaxy SS9 and S9+, compared to Galaxy S8 and S8+.
For other detailed Galaxy S9 guides on how to use Galaxy S9 and S9, please check Galaxy S9 how-to guides page.
If you need help on using the cameras in Galaxy S9 and S9+, you may check the Galaxy S9 camera guides.
If you need some recommendations or reviews for accessories for Galaxy S9 and S9+, you may check Galaxy S9 accessories guides page.
Besides, you can download the official Samsung Galaxy S9 user guides in your local language in Galaxy S9 user guides page.
List of Galaxy S9 new features Guides
New guides for Galaxy S9 new features will be released here once we finish the testing.
So, the guides in this page will be updated regularly.
If you cannot find the guides you need, or if you have any questions on the new features of Galaxy S9 and S9+, you can let us know in the comments below.
The community will help you find the answer or the solution.
Here is the list of released and coming-soon (to-be-released) Galaxy S9 new features guides.
1. How to use Galaxy S9 AR emoji?
2. How to use intelligent scan to unlock Galaxy S9 and S9+?
3. How to use Galaxy S9 dual-aperture camera?
Dual aperture, which allows the system to choose the suitable Galaxy S9 camera aperture depending on lighting conditions, is one of the significant improvements in Galaxy S9 (and S9+) camera compared to previous Galaxy phones.
This Galaxy S9 camera guide explains dual aperture feature in Galaxy S9 and shows you how to manually choose Galaxy S9 camera aperture in the Pro mode.
Read on …
4. How to use super slow motion mode (super Slow-mo) on Galaxy S9 and S9+?
Galaxy S9 super slow motion mode (super Slow-mo) is a new camera feature on Galaxy S9 and … Read the rest
The post Galaxy S9 new features Guides appeared first on Galaxy S9 Guides.
How to use Do Not Disturb on Galaxy S9 and S9+?
simon You can use Galaxy S9 Do Not Disturb (DND) to keep you undisturbed by any apps.
You can also allow selected apps or specific contacts to reach you when the Do Not Disturb on Galaxy S9 or S9+ is activated.
This Galaxy S9 guide shows you how to turn on/off and schedule Galaxy S9 Do Not Disturb (DND) and how to manage exceptions for the DND on Galaxy S9 and S9+. App rules and Do Not Disturb access were also discussed.
What is Do Not Disturb on Galaxy S9 and S9+?
In some situations, you may want not to get disturbed by the phone. Do Not Disturb on Galaxy S9 or S9+ was designed to help you escape from annoying notifications and sounds.
With DND on Galaxy S9 or S9+, you can silence the phone during a scheduled period, or at any time you need it. You can also allow certain apps or certain contacts to bypass the Galaxy S9 Do Not Disturb settings.
Google introduced Do Not Disturb (DND) in Android Marshmallow (Android 6.0). It is an extension of Downtime introduced in Android Lollipop (Android 5.0).
As usual, Samsung tweaked the Do Not Disturb on Galaxy S9 and S9+. Therefore, the Do Not Disturb on Galaxy S9 and S9+ may not work as in stock Android, or other Android phones.
How to enable and disable Do Not Disturb on Galaxy S9 and S9+?
By default, Galaxy S9 Do Not Disturb (DnD) is off. You need to enable it if you want to use it.
There are a couple of ways to turn on and turn off Do Not Disturb on Galaxy S9 and S9+. Here let's try two of them.
Method 1: Use quick setting buttons
In quick setting buttons, you can find the Do Not Disturb button as shown in the screenshot below.
You may check this guide on how to use Galaxy S9 quick setting buttons.
Tap the button to enable (if currently off) or disable (if currently on) Galaxy S9 Do Not Disturb.
If you tap and hold (long tap) the button, you will get the settings page for Do Not Disturb.
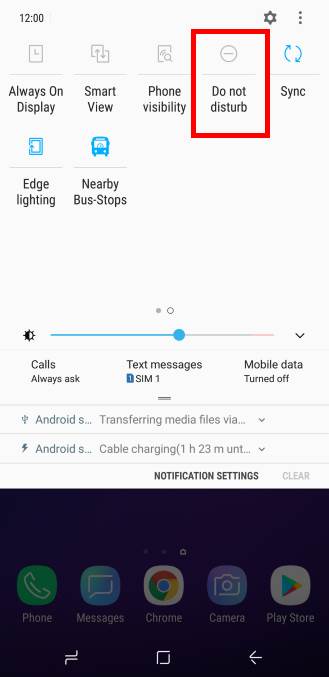
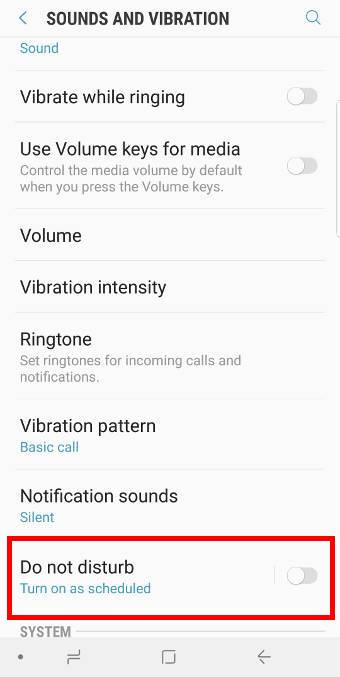
Method 2: Use Galaxy S9 Settings
The traditional (not so efficient) way to turn on DND on Galaxy S9 is through Settings — Sounds and Vibration.
As shown above, in the sounds and vibration page, you can use the switch to turn … Read the rest
The post How to use Do Not Disturb on Galaxy S9 and S9+? appeared first on Galaxy S9 Guides.
How to use Galaxy S9 Apps screen on Galaxy S9 and S9+?
simon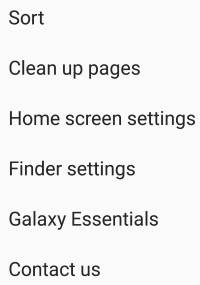 Galaxy S9 Apps screen is an integral part of Galaxy S9 and S9+. Unless you hide the apps screen, you have to work with it.
Although Galaxy S9 apps screen is just a special version home screen, there are some major differences between Galaxy S9 Home screen and Apps screen.
This Galaxy S9 guide explains what Galaxy S9 apps screen is, how to access it, how to use it and how to manage apps and app folders on it.
What is Galaxy S9 Apps screen?
Galaxy S9 Apps screen is the placeholder for all apps installed on your phone. All other Android phones also have a similar apps screen.
Sometimes, apps screen is referred to as the app drawer. In the old versions of Android, widgets were normally hosted in the apps screen as well.
Galaxy S9 Apps screen actually is a special version of Galaxy S9 Home screen.
You can find apps, hide apps, sort apps, manage apps in Galaxy S9 apps screen.
By default, all apps will be listed in the apps screen unless you hide them.
How to access Galaxy S9 Apps screen?
By default, there are a couple of different ways to access Galaxy S9 Apps screen. These include:
- Use the apps screen button (apps button) in the favourite apps tray of Galaxy S9 Home screen, if you did not hide apps screen button on Galaxy S9 or S9+.
- Swipe upwards on Galaxy S9 Home screen.
- Swipe downwards on Galaxy S9 Home screen, if you did not enable quick-open notification panel.
Of course, if you hide the Galaxy S9 Apps screen, then you are working with Galaxy S9 Home screen only, and the apps screen will not be explicitly available.
How to use Galaxy S9 Apps screen interface?
On Galaxy S9 apps screen, if you tap on any app icons, the app will start. This is similar to that on the home screen.
If you tap and hold (long tap) an app icon without moving your fingers, you will get the context menu as shown in the following two screenshots.
For all apps, there are at least 3 options in the context menu:
- Select items. You can then continue to select more app icons in the selection mode. You can use the selected apps to create an app folder. Or you can uninstall them in batch.
- Add to home
The post How to use Galaxy S9 Apps screen on Galaxy S9 and S9+? appeared first on Galaxy S9 Guides.
How to use Galaxy S9 dual messenger to run two accounts of messenger apps simultaneously on Galaxy S9 and S9+?
simon Galaxy S9 dual messenger makes it possible to have two accounts of the supported messenger apps (e.g., WhatsApp, Facebook Messenger, WeChat, Telegram, Viber…) and Facebook accounts in Galaxy S9 and S9+.
You can use these two messenger accounts simultaneously on Galaxy S9 or S9+.
Galaxy S9 dual messenger works on all Galaxy S9 and S9+ phones. It does NOT require the dual-SIM version of Galaxy S9 or S9+.
Dual messenger was first introduced in Galaxy S8. You can use the identical dual messenger feature on Galaxy S8, S8+, S9, S9+, Note 8 and Note 9.
This guide shows you how to use Galaxy S9 dual messenger to enable two accounts of messenger apps on Galaxy S9 and S9+. It also shows you how to disable individual messenger apps on Galaxy S9 dual messenger.
Why may you need to have two accounts of WhatsApp and other messenger apps in Galaxy S9 and S9+?
Many Galaxy S9 or S9+ owners may have different social profiles when they are in office, and when they are at home.
You may never want to mess up your personal WhatsApp or Facebook account with the account for work.
Some owners may want to show themselves differently in social media to buddies and to parents or teachers or supervisors.
Many Android apps support multiple profiles. For example, you can add multiple Google accounts to Galaxy S9. In Google+, you can quickly switch to different profiles.
But some apps limit one account on one device.
WhatsApp has been notoriously enforcing this policy since day 1. Facebook also requires you to sign out if you want to switch the account on the same phone.
But with more and more Galaxy S9 and S9+ owners use two SIM cards on the phone, there is a genuine need for running two messenger accounts concurrently on the phone.
Anyway, two or more WhatsApp (and other messenger apps) accounts can make your life easier by separating different aspects of your daily life.
How does Galaxy S9 dual messenger work?
Samsung initially tried to solve the work-life separation issue with the secure folder, which is a Knox-based container (like a small virtual machine, but not full Knox), in Galaxy S7 and S7 edge.
Secure folder works well in creating two spaces in one phone. But most owners do not use this feature because it is not so convenient. You … Read the rest
The post How to use Galaxy S9 dual messenger to run two accounts of messenger apps simultaneously on Galaxy S9 and S9+? appeared first on Galaxy S9 Guides.
How to reboot Galaxy S9 and S9+ if Galaxy S9 hangs?
simon You may already know to use the power button to power on, power off and reboot Galaxy S9 or S9+.
But occasionally, the power button may be not working as expected. You may have to use button (key) combinations to power off, power on or restart Galaxy S9 or S9+.
This Galaxy S9 guide explains how to reboot, power on and power off Galaxy S9 and S9+ in both normal situations and abnormal situations (e.g. when Galaxy S9 or S9+ hangs.).
Please note, in this guide, we do not differ reboot and restart. They are used interchangeably.
Why do you need to reboot Galaxy S9 or S9+ periodically?
You may know you have to reboot Galaxy S9 when you update the phone (for example, updating Galaxy S9 or S9+ to Android Pie). In this case, some system files being used have to be replaced. Therefore, you need to “stop” the system, then restart the system with the updated files.
For apps, normally, it is not necessary to reboot Galaxy S9 if you update them. Apps in Android are running in its own container. The system can destroy the container and then reload the app with updated apps on Galaxy S9 or S9+. Therefore rebooting Galaxy S9 or S9+ is generally not required for updating apps on the phone.
But some tech guys may tell you to reboot Galaxy S9 or S9+ periodically (from once a month to once a week, NOT daily) to make the phone more responsive.
This is actually a valid suggestion.
When you reboot Galaxy S9 or S9+, all app leftovers (some apps sometimes may fail to clean up their own files after you close them) and ghost processes will be cleaned.
How to automatically reboot Galaxy S9 or S9+?
Samsung added the feature of “auto restart” feature in Galaxy S9 and S9+.
You can enable auto restart on Galaxy S9 and S9+ in Settings — General management — Reset— Auto Restart.
As shown in the screenshots below, you can enable auto restart so that Galaxy S9 or S9+ will be rebooted automatically within one hour of the specified time.
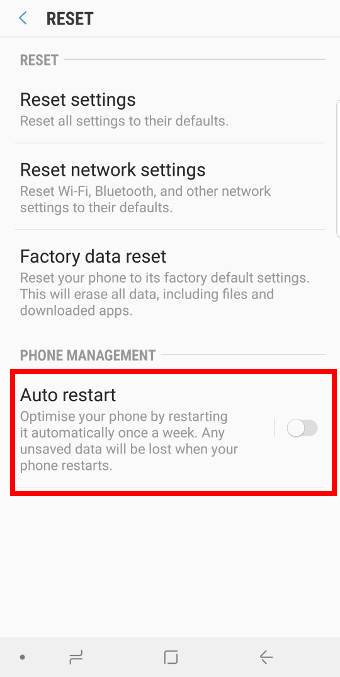
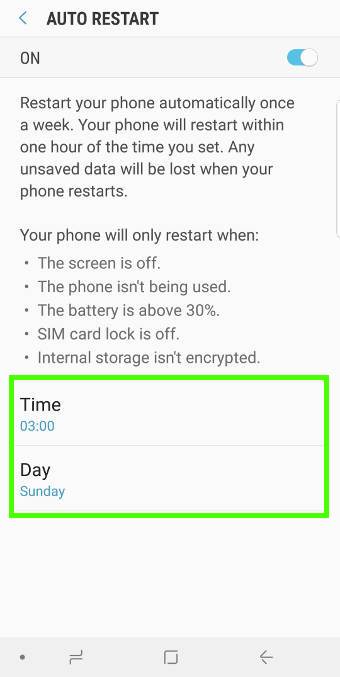
You can only set the schedule as once a week only. Frequently restarting/rebooting Galaxy S9 and S9+ will not be helpful.
How to power off and reboot Galaxy S9 and S9+ with the power button options?
The safest way to power off or reboot … Read the rest
The post How to reboot Galaxy S9 and S9+ if Galaxy S9 hangs? appeared first on Galaxy S9 Guides.
How to use wireless printing on Galaxy S9 and S9+?
simon Wireless printing has been a native feature of Android for a long time. Galaxy S9 and S9+, of course, support it.
This means if you want to print any documents or photos saved on Galaxy S9 or S9+, you can directly print then from the phone, instead of copying them to a PC to print.
Most printer manufacturers have released their own apps for their printers. These apps usually also provide wireless printing features, in addition to other features.
This Galaxy S9 guide shows you how to set up and use wireless printing with the Android build-in printing feature, as well as with the vendor's app.
You can use the same wireless printing feature on other phones including Galaxy S20, Galaxy S20+, Galaxy S2o Ultra, Galaxy S10, Galaxy S10+, Galaxy S10e, Galaxy Note 10, and Galaxy Note 10+.
What do you need to use wireless printing on Galaxy S9 and S9+?
To use wireless printing on Galaxy S9 or S9+, you need:
- A wireless printer. If your printer can only use the USB connection to the PC, you have to use Google Cloud print, we will discuss it in other guides.
- A WiFi network which can be used by the printer and your phone (Galaxy S9 and S9+). Ethernet also works.
- A plugin for your printer. Almost all major printer vendors released the Android plugin in Google Play store. This guide will show you how to get it.
In this guide, we assume your Galaxy S9 or S9+ is connected to the same wireless router as the wireless printer. If not, you have to use Google cloud print, which is covered here (coming soon).
Steps of setting up wireless printing on Galaxy S9 and S9+
To print wirelessly from Galaxy S9 or S9+ to your printer, you need to install the print service for the brand of the printer you are using.
Wireless printing services (the plugin) on Android are provided by individual manufacturers. They are similar to the printer drivers on the PC. But on Android, typically, you only need to have one driver from (for) one vendor, instead of one for each printer. For example, if you have two different HP printers (both support wireless printing), you only need to install HP printer plugin once.
Step 1: Check print services installed
On Galaxy S9 Settings—Connections, tap More connection settings… Read the rest
The post How to use wireless printing on Galaxy S9 and S9+? appeared first on Galaxy S9 Guides.
Galaxy S9 camera guides
simon Samsung Galaxy S9 and S9+ set up new standards for the 2018 flagship smartphone camera.
The dual aperture rear camera and the 960 fps (frames per second) super slow-motion mode are two of the prominent unique features of Galaxy S9 camera and
As in previous generations of Galaxy phones, Samsung included a bunch of new camera features for Galaxy S9 camera (and Galaxy S9+ camera). The camera app was also updated.
These Samsung Galaxy S9 camera guides will help you understand and effectively use the camera in Galaxy S9 and S9+.
About Samsung Galaxy S9 camera guides
As an online owner-help-owner community, Galaxy S9 guides release many high-quality how-to guides to help you properly use Galaxy S9 and S9+.
Galaxy S9 camera guides section covers all aspects of using the camera in Galaxy S9 and Galaxy S9+.
You can find other Galaxy S9 guides in these sections:
- Galaxy S9 new features guide. You can find the detailed explanation and how-to guides for all new features and functions in Galaxy S9 and S9+.
- Galaxy S9 how-to guides. You can find many high-quality how-to guides on how to effectively use Samsung Galaxy S9 and S9+,
- Galaxy S9 accessories guides. You can find introductions, reviews, how-to guides for some useful Galaxy S9 accessories to improve Galaxy S9 and S9+.
- Galaxy S9 user guides. You can download the official Samsung Galaxy S9 user guides in various languages.
In short, Galaxy S9 camera guides section only includes guides related to using the camera in Galaxy S9 and S9+.
List of Samsung Galaxy S9 camera guides
We added Galaxy S9 camera guides after we test them in our phones under different conditions (to make sure the guides works on your phone as well).
So, this Galaxy S9 camera guides list is regularly updated.
You can always check back again if you do not find the Galaxy S9 camera guides you want.
If you have any questions about Galaxy S9 camera or encounter any problems when using the camera in Galaxy S9 and S9+, you can also post your questions and problems in the comments box below.
The community will help you find the answer or solutions.
Here is the list of published or coming-soon Galscuy S9 camera guides.
1. How to use the updated camera app in Galaxy S9 and galaxy S9+?
This Galaxy S9 camera guide explains the items in … Read the rest
The post Galaxy S9 camera guides appeared first on Galaxy S9 Guides.
How to reboot into Galaxy S9 recovery mode and to clear Galaxy S9 cache partition on Galaxy S9 and S9+?
simonYou can use Galaxy S9 recovery mode to flash new ROMs, clear Galaxy S9 cache partition, and to check recovery logs.
Although Galaxy S9 recovery mode was designed for some advanced users, you may need some of the features, especially clearing the cache partition to fix some problems after a major update.
This Galaxy S9 guide explains to you the functions of Galaxy S9 recovery mode, the way to reboot Galaxy S9 or S9+ into recovery mode, usage of the recovery mode, and methods of clearing Galaxy S9 cache partition.
What is Galaxy S9 recovery mode?
All Android phones have a special mode: recovery mode, which allows you to fix any Android problems and perform some actions (for example, patch the system) to the Android system without loading Android OS.
In the phone storage layout, there is a special partition for recovery. This partition is protected from Android OS and other partitions.
Galaxy S9 is not an exception.
If you think you never used Galaxy S9 recovery mode, you are very likely wrong.
When you install updates (including monthly security updates) for Galaxy S9 and S9+, you may notice the phone will reboot twice automatically.
During this updating process, Galaxy S9 or S9+ would reboot into Galaxy S9 recovery mode first to apply the update, then reboot into Android OS so that you can use Galaxy S9 and S9+.
Of course, Galaxy S9 recovery mode offers more functions including:
- To apply Android OS update
- To reset (factory data reset) Galaxy S9 or S9+.
- To wipe/clear Galaxy S9 cache partition.
- To boot into bootloader (download mode).
- To flash official or third-party ROMs for Galaxy S9 and S9+.
- To mount /system partition manually.
- To check recovery logs.
- To run a graphics test.
Although Galaxy S9 recovery mode is seldom used for most Galaxy S9 and S9+ owners, you may need to reboot into Galaxy S9 recovery mode to fix some problem with your S9 or S9+.
In fact, most Galaxy S9 and S9+ owners reboot the phone into Galaxy S9 recovery mode to clear the cache partition to fix some issues after a major Android update.
You should not confuse Galaxy S9 recovery mode with Galaxy S9 safe mode, which is a special mode of Android OS.
How to reboot into Galaxy S9 recovery mode?
The key combination to reboot into Galaxy S9 recovery mode is Bixby button+ … Read the rest
The post How to reboot into Galaxy S9 recovery mode and to clear Galaxy S9 cache partition on Galaxy S9 and S9+? appeared first on Galaxy S9 Guides.
Enjoy your Galaxy S9 and S9+!