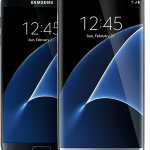
 Samsung Galaxy S7 and Galaxy S7 edge were the most popular Android phone in 2016.
Galaxy S7 Guides will help you use your Galaxy S7 or S7 edge for all tasks.
Galaxy S7 guides are organised in the following sections.
Official Galaxy S7 User Guide (PDF)
You can find the official Galaxy S7 user guide (user manual) in different languages for Galaxy S7 and Galaxy S7 edge.
Galaxy S7 How-to guides
The detailed step-by-step Galaxy S7 guides will show you how to use certain features of Galaxy S7 or change/customise certain configurations on your Galaxy S7.
Galaxy S7 online manual
Galaxy S7 online manual section hosts Galaxy S7 guides for new Galaxy S7 owners. This section covers commonly used Galaxy S7 features and shows you how to use them.
Galaxy S7 camera guide
Galaxy S7 has the best smartphone camera you can get in 2016. Samsung Galaxy S7 camera guide will show you how to use the Galaxy S7 camera. Some tips and tricks of the Galaxy S7 camera are also covered.
Galaxy S7 buyer guide
Is Samsung Galaxy S7 a suitable phone for you? Which size of Galaxy S7 is for you? Do you need a Galaxy S7 case?
The Galaxy S7 buyer guide will help you decide whether Galaxy S7 is a suitable phone for you. We also introduce you to some affordable Samsung Galaxy S7 accessories in the Galaxy S7 buyer guide.
List of recent Galaxy S7 guides
Here is the list of the most recent Galaxy S7 guides. The complete list of Galaxy S7 guides can be found in Galaxy S7 Guide.
How to turn on and turn off Galaxy S7 and Galaxy S7 edge when phone hangs?
simon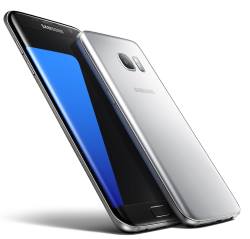
Update: Android Nougat update for Galaxy S7 and S7 edge will prevent you from powering the phone before you unlock the phone. You can bypass this restriction by power off Galaxy S7 and S7 edge without unlocking the phone.
Who doesn’t know how to turn on or turn off Galaxy S7?
When you get a new phone, the first thing you will do is probably power it on (i.e. turn on).
Galaxy S7 (or Galaxy S7 edge) is not an exception. In most regions, Samsung does not offer 1-to-1 exchange. You have to check the phone before leaving the counter; otherwise, any problems will probably be handled through service centers.
Any kids can turn on Galaxy S7 or turn off Galaxy S7 because the power button is there.
But if Galaxy S7 does not respond to holding power button, or any buttons in Galaxy S7 or S7 edge, what can you do?
Remember, the battery in Galaxy S7 (and S7 edge) is non-removable for users. You cannot pull out the battery and insert it again.
This guide will try to show you how to turn on Galaxy S7 and turn off Galaxy S7 in all situations, including when the phone does not respond to any buttons.
How to reboot or turn off Galaxy S7 and Galaxy S7 edge if phone is not responding to power button?
When Samsung first changed design slimmed down TouchWiz for Galaxy S6 (and Galaxy S6), there are some reports that the phone is not responsive for no reason. You may read comments in this page to get a better idea on the issue in Galaxy S6 and Galaxy S6 edge.
Through incremental improvements in Galaxy Note 5, the reported cases of non-responsive Galaxy S7 have significantly decreased.
But occasionally, some Galaxy S7 and Galaxy S7 edge owners still encountered the similar issue: Galaxy S7 is not responsive to touch screen gestures and pressing of any buttons.
The issue can be caused by some apps you installed. But most of the time, it is caused by bugs in firmware bugs or TouchWiz.
Anyway, finding out the cause of the problem is out of the scope of this post.
When Galaxy S7 is not responsive to any touchscreen gesture or any buttons (i.e, Galaxy S7 hangs), the first thing you can try is to hold power button for more than 7 seconds. In most cases, your Galaxy S7 should reboot (i.e.,… Read the rest
The post How to turn on and turn off Galaxy S7 and Galaxy S7 edge when phone hangs? appeared first on Galaxy S7 Guides.
Switch to Galaxy S7: how to migrate old phone data to Galaxy S7 and Galaxy S7 edge with Smart Switch?
simonIf you just switch to Galaxy S7 and are trying to migrate old phone data to Galaxy S7 or S7 edge, this guide will show you the best way to migrate your data.
You probably even do not need to install any apps or tools when you switch to Galaxy S7 and S7 edge.
The tool we are going to use to help you switch to Galaxy S7 is called Smart Switch, free software offered by Samsung.
What is Smart Switch for me to switch to Galaxy S7?
Smart Switch is Samsung’s killer tool for you to migrate old phone data to Galaxy S7 and Galaxy S7 edge. It will help you migrate to Galaxy S7 and Galaxy S7 edge.
There are 2 different Smart Switch software packages:
- Samsung Smart Switch Mobile App. The Smart Switch mobile app allows you to migrate data from your old device (Android, iOS, BlackBerry) to Galaxy S7 directly (from mobile to mobile).
- Samsung Smart Switch for PC/Mac. The Smart Switch for PC/Mac allows you to backup phone (Galaxy phones only) data to the PC/Mac, and to restore backup data (not limited to Galaxy phones) to Galaxy S7.
When you switch to Galaxy S7, Smart Switch mobile app can migrate old phone data to Galaxy S7 in 2 different ways:
- Wireless transfer through WiFi Direct. If your old phone is 1). an Android phone with Android ICS 4.o or later, or 2). an iPhone with iCloud backup, you can use this method. You need install Smart Switch app on the old Android phone.
- Wired transfer through USB cable. If you old phone is 1). a Galaxy phone with Android Jelly Bean 4.3 or later, or 2). an iPhone with iOS 5 or later, or 3). a BlackBerry with BlackBerry 7 OS or earlier, you can migrate the phone data from old device to Galaxy S7 with the USB connector in your Galaxy S7 box and the USB cable.
Why I cannot install Smart Switch on Galaxy S7 and Galaxy S7 edge?
Smart Switch was pre-installed and enabled in Galaxy S7 and Galaxy S7 edge already. You don’t need to install Smart Switch on Galaxy S7.
But you cannot find Smart Switch app on Galaxy S7 or Galaxy S7 edge.
Then, how to launch and use Smart Switch on Galaxy S7 and Galaxy S7 edge to switch to Galaxy S7?
Samsung puts Smart Switch in Settings— Backup and reset –-Open Smart Switch as shown below. … Read the rest
The post Switch to Galaxy S7: how to migrate old phone data to Galaxy S7 and Galaxy S7 edge with Smart Switch? appeared first on Galaxy S7 Guides.
How to use direct dial, direct message and contact shortcuts in Galaxy S7 and Galaxy S7 edge?
simonWhat are direct dial, direct message and contact shortcuts in Galaxy S7 and Galaxy S7 edge?
Normally, when you want to call someone from your Galaxy S7 or S7 edge, you have to start the phone app or contacts app, find the contact, then dial.
Similarly, when you want to text someone, you have to start the messaging app, find the contact, compose the message, then send it from your Galaxy S7 or S7 edge.
But you may not know, you can use direct dial, direct message and contact shortcuts in Galaxy S7 and Galaxy S7 edge to speed up the process.
Direct dial allows you to dial someone by tapping one icon on the Galaxy S7 home screen. It is not necessary to start the dialer app, or to find the contact.
Direct message allows you to direct text someone without fiddling around the messaging apps or finding the contact.
Contact shortcuts allow you to open the contact from Galaxy S7 home screen. You can then choose to text, dial, or other actions from the home screen.
Anyway, direct dial, direct message and contact shortcuts can save you tremendous time if you need call some contacts or text some contacts frequently.
Please note, although this guide shows you how to use direct dial, direct message and contact shortcuts in Galaxy S7 and S7 edge, these features are available in all Android devices. It is a native feature of Android (of all versions).
The only difference among different Android vendors, and different versions of Android, is the way to add widgets for direct dial, direct message and contact shortcuts to home screen.
How to add direct dial, direct message and contact shortcuts to Galaxy S7 home screen?
As mentioned, direct dial, direct message and contact shortcuts are all widgets of the Contacts app in Galaxy S7 and S7 edge.
So, to add direct dial, direct message and contact shortcuts to Galaxy S7 home screen, you can just add them as normal widgets as explained in this guide.
Step 1: Switch to edit mode of Galxy S7 home screen
You can switch to edit mode of Galaxy S7 home screen with one of the following two methods:
- Pinch (to zoom in) in Galaxy S7 home screen (any home screen panels).
- Tap and hold (aka long tap) any blank area in Galaxy S7 home screen (any panels).
Once in edit mode as shown below, tap Widgets.… Read the rest
The post How to use direct dial, direct message and contact shortcuts in Galaxy S7 and Galaxy S7 edge? appeared first on Galaxy S7 Guides.
Samsung Galaxy S7 apps screen
simonDifference between Samsung Galaxy S7 apps screen and home screen
Galaxy S7 apps screen, aka Galaxy S7 app drawer, is a special page that displays icons of all apps installed on your Galaxy S7 or Galaxy S7 edge.
Galaxy S7 home screen is the entrance for all phone features. Normally, selected apps and widgets are placed in home screen for quick access.
You can imagine the role of Galaxy S7 home screen and Galaxy S7 apps screen in this way: Galaxy S7 home screen is the storefront for Galaxy S7 and S7 edge, and Samsung Galaxy S7 apps screen is the warehouse of apps you have on Galaxy S7 or S7 edge.
For new Android users, especially, iPhone users (because iPhone does not have apps screen), it can be very confusing: why do you need two places to hold apps?
If there is no Galaxy S7 apps screen, then you have to put all apps on the home screen. This may be inconvenient fro some owners:
- most users you actually want to put frequently used apps and widgets in the home screen.
- if all apps are placed in the home screen, you cannot remove it. Otherwise, it is hard to track all apps installed although you can manage them in the application manager.
- if all apps are placed in the home screen, you cannot have more than one copy of the app icons in the home screen. For example, you may want to put Gmail app in two or more different app folders.
Anyway, up to know, no Android vendors try to remove apps screen, simply because it exists for its reasons. It is also a symbolic feature of Android OS.
How to use Galaxy S7 apps screen?
You can access Galaxy S7 apps screen by tapping the apps icon (9 dots) in favorite tray in Galaxy S7 home screen.
Once in Galaxy S7 apps screen, you can find these items (as shown below) in the apps screen:
- icons for apps. These corresponds to individual apps installed. You can launch the app by tapping it just like in home screen. Tap and hold the app icon to add the app to the home screen.
- app folders. You can group apps into app folders in Galaxy S7 app screen.
- search button (1). Tap Search button to search apps.
- sort button (2). You can tap sort (A-Z) button to re-arrange apps in alphabetical order in the apps screen.
The post Samsung Galaxy S7 apps screen appeared first on Galaxy S7 Guides.
Manage Galaxy S7 camera modes
simonWhy you need manage Galaxy S7 camera modes?
In addition, you can download and install 6 additional Galaxy S7 camera modes for other scenarios.
This means you may end up with more than 20 Galaxy S7 camera modes on the phone. You may find it is not easy to find the camera modes when you want to use them.
One way to solve this problem is to add Galaxy S7 camera mode shortcuts to home screen so that you can launch camera app in the specific camera mode directly from Galaxy S7 Home screen.
Another way to solve the issue is to manage the items in Galaxy S7 camera modes page.
For example, you can relocate Galaxy S7 camera modes so that the most frequently used camera modes are in the top 10 spots. Normally, you can access these 10 camera modes without scrolling.
You can also uninstall some downloaded camera modes if you no longer use them.
Anyway, when auto mode is not sufficient for you, it is time to consider to manage Galaxy S7 camera modes so that you can use them more efficiently.
How to manage Galaxy S7 camera modes?
To manage Galaxy S7 camera modes in your Galaxy S7 and Galaxy S7 edge, you may follow the following steps.
Step 1: Start Galaxy S7 Camera app
You can use any of these 4 methods to launch camera app on Galaxy S7 and S7 edge.
Step 2: Enter Galaxy S7 camera mode page
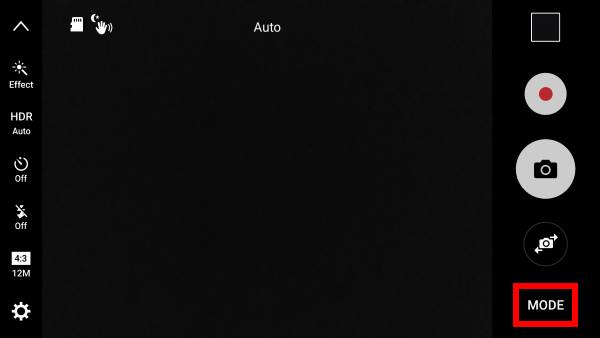
In Galaxy S7 camera preview screen, tap MODE as shown below.

Step 3: Enter edit mode of Galaxy S7 camera modes
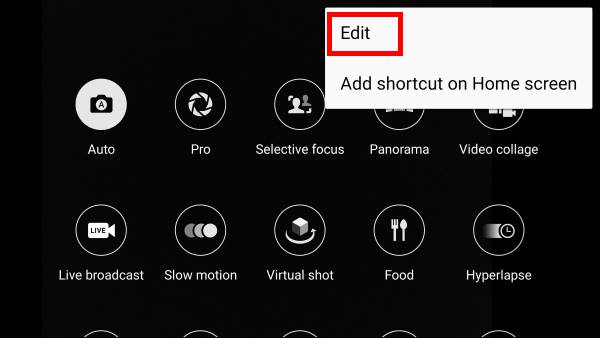
In Galaxy S7 camera mode page, tap MORE as shown above.
Tap EDIT as shown below to enter the edit mode for Galaxy S7 camera modes.
In Edit mode, you can relocate the icon locations of all camera modes in Galaxy S7 and S7 edge.
You can also uninstall the Galaxy S7 camera modes that are downloaded (as shown in this guide).
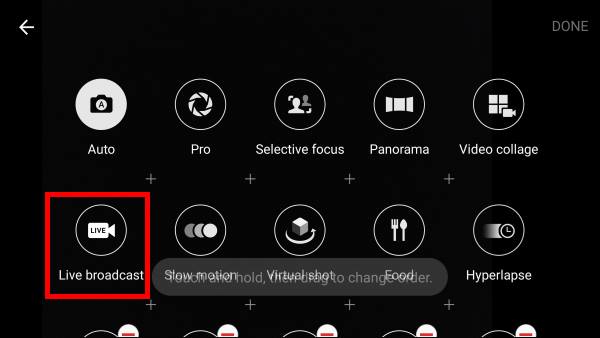
Step 4: Manage Galaxy S7 camera modes
In edit mode, you can re-arrange spots for the icons.
Usually, you may want to put the frequently used camera modes in the top 10 spots so that you can access them without scrolling.
To move and relocate a Galaxy S7 camera mode, you can tap and hold the icon. … Read the rest
The post Manage Galaxy S7 camera modes appeared first on Galaxy S7 Guides.
How to use volume key to take photos in Galaxy S7 camera app?
simonVolume key is not just for volume control
You may not know you can use volume key to take photos in Galaxy S7 camera app.
This can be very useful in occasions when you are using one hand to take photos.
And you can use volume key to take photos for both front and rear cameras in Galaxy S7 and Galaxy S7 edge.
So, for front camera, in addition to the 5 shooting methods discussed in this guide, you can use volume key as the 6th shooting method.
For rear camera, you already know that you can use shutter button, or use voice control to take photos. Volume key is the 3rd shooting method for the rear camera in Galaxy S7 and Galaxy S7 edge.
In Galaxy S7 and Galaxy S7 edge, in addition to controlling volume, volume key have many other functions in various apps, for example,
- Messages app: you can adjust text size using volume up and volume down keys.
- Camera app: you can use volume key to take photos or zoom in/out or recording videos.
Anyway, volume key is not just for volume controls in Galaxy S7 and S7 edge. Many apps may use volume keys for special functions.
This guide shows you how to use volume key to take photos in Galaxy S7 and Galaxy S7 edge.
How to disable/enable volume key for taking photos
By default, in Galaxy S7 camera app, you can press volume key to take photos without any settings. Volume down and volume up keys work identically for taking photos.
However, if you do not want to use volume key to take photos, or if you want to configure volume key for other functions in Galaxy S7 camera app, you may follow these steps.
Step 1: Start Camera app
You can use one of the following ways to start Camera app in Galaxy S7 and S7 edge:
- use Galaxy S7 camera quick launch (double tap Home button);
- tap camera app icon in Galaxy S7 home screen;
- tap camera app icon in apps screen;
- use Galaxy S7 camera mode shortcuts;
- use apps edge or tasks edge from edge screen (for Galaxy S7 edge only).
Step 2: Enter camera settings
In Galaxy S7 camera app preview screen, tap Settings button (gear icon) as shown below to enter camera settings.
In Camera settings page, as shown below, tap Volume keys function.… Read the rest
The post How to use volume key to take photos in Galaxy S7 camera app? appeared first on Galaxy S7 Guides.
Use Galaxy S7 camera preview screen
simonAs mentioned in this guide, you can launch Galaxy S7 camera app in different ways, including quick launch. But the Galaxy S7 camera preview screen you get is identical.
Understanding Galaxy S7 camera app interface (preview screen) can help you use the camera properly and effectively.
As shown in the screenshot below, in Galaxy S7 camera preview screen, there are several items.
Updated: Galaxy S7 camera app was updated in Android Nougat for Galaxy S7 and Galaxy S7 edge. The camera preview screen is different from the screenshot below. Please check Use Galaxy S7 camera app with Android Nougat update in S7 and S7 edge if your Galaxy S7 or S7 edge is running Android Nougat.
1. Camera settings icon
Tap this icon in Galaxy S7 camera preview screen to enter camera settings page.
Please note, Galaxy S7 camera settings page for front camera and for rear camera are different.
If you need change settings for front camera, you need switch to front camera first, then tap camera settings icon.
2. Photo size
You can set photo size in the preview screen without entering Galaxy S7 camera settings page.
Actually, this is the only place to set photo size in Galaxy S7 and Galaxy S7 edge. Samsung removed photo seize settings from Galaxy S7 camera settings page.
Tap the icon to set picture size.
3. Flash on/off
You can tap the icon to turn on or off the LED flash for the rear camera.
For front camera on Galaxy S7 or S7 edge, you can also turn on flash. If the flash is turned on for Galaxy S7 front camera, the screen will light up when tapping shutter button.
4. Timer
You can turn on/off timer for Galaxy S7 camera (both rear and front).
You can set the timer as 2 or 5 or 10 seconds.
If the timer is on, you then have the option to take 3 photos instead of 1.
5. HDR
Tap this icon to turn on or turn off HDR (high-dynamic-range) for Galaxy S7 camera.
6. Camera effects (filter)
You can apply camera effects while taking photos.
The photos shown in the Galaxy S7 camera preview screen will be the final photo (with camera effects applied).
You can tap this icon to select, download and manage Galaxy S7 camera effects.
Please check this guide on using Galaxy S7 camera effects.
7. Hide or show icons from Galaxy S7 camera preview screen
Tap this icon to hide ions in left side as shown below.… Read the rest
The post Use Galaxy S7 camera preview screen appeared first on Galaxy S7 Guides.
How to use flash for Galaxy S7 front camera?
simonYou can use flash for Galaxy S7 front camera
As explained in Galaxy S7 layout, there is a LED flash for the rear camera (main camera) in Galaxy S7 and Galaxy S7 edge.
But many owners of Galaxy S7 and Galaxy S7 edge may not be aware of that they can also use flash for Galaxy S7 front camera when taking selfies.
Of course, there is no LED flash in the front of Galaxy S7 or Galaxy S7 edge.
So, how to use flash for Galaxy S7 front camera?
Galaxy S7 and Galaxy S7 edge can use the screen as flash so that your face will get better lighting conditions.
Because you are usually close to the screen when taking selfie, the additional light offered by the screen usually is sufficient for selfies even you are in total darkness.
Using screen as flash is not a new feature in Android phones. There are even some third-party apps (e.g., this one)for this.
But for Samsung phones, this is new. And it works surprisingly well.
How to use flash for Galaxy S7 front camera?
Just like for rear camera, you can set to use flash for Galaxy S7 front camera as the following 3 modes:
- Off. This will not use flash for Galaxy S7 front camera when taking selfies.
- Auto. Flash will be used only if the lighting conditions are not good. If this mode is used, you will see the flash icon if flash will be used as shown below.
- On. Flash will be always used regardless of the light conditions.
When flash is used for Galaxy S7 front camera, the screen will light up as white for 1-2 seconds and photos will be taken during this period.
Please note, when burst mode is used, flash will not work. This is true for rear camera as well.
But you can use flash for Galaxy S7 front camera together will any of the 5 shooting methods for Galaxy S7 front camera and using volume keys to take photos.
Do you know how to enable and use flash for Galaxy S7 front camera when taking selfies in Galaxy S7 and Galaxy S7 edge?
If you have any questions or encounter any problems to enable and use flash for Galaxy S7 front camera when taking selfies in Galaxy S7 and Galaxy S7 edge, please let us know your questions or problems in the comment box below.… Read the rest
The post How to use flash for Galaxy S7 front camera? appeared first on Galaxy S7 Guides.
How to set Galaxy S7 camera picture size and video size on Galaxy S7 and Galaxy S7 edge?
simonWhen you may consider to set Galaxy S7 camera picture size and video size?
Most Galaxy S7 owners and Galaxy S7 edge owners may just use the default settings for picture size (resolution) and video size.
But you may consider to set Galaxy S7 camera picture size and video size:
- when the storage is a consideration.
- when you need specific aspect ratio for the photo or videos.
Both Galaxy S7 and Galaxy S7 edge support micro SD card up to 200GB. It seems this gives you “enough” storage for your photos and videos.
But for dual SIM versions of Galaxy S7 and S7 edge, if you use two SIM cards, there will be no slot for micro SD card as explained in this page. This means you only have 32GB storage (actually less than 25GB are usable) if you use the dual SIM feature. You probably have to be mindful on the storage and consider to reduce Galaxy S7 camera picture size and video size whenever possible.
In some cases, you may want photo or video with 16:9 or 1:1 aspect ratio, not the default 4:3.
So, in these scenarios, the default settings can not meed your needs and you have to set Galaxy S7 camera picture size and video size.
But before we jump to set Galaxy S7 camera picture size and video size, we should know what are the “good enough” size for photos and videos based on your needs.
What are the “good enough” Galaxy S7 camera picture size and video size?
For Galaxy S7 camera picture size and video size, you need consider two parameters:
- Aspect ratio. Galaxy S7 camera offers 3 aspect ratio: 4:3 (default), 16:9 and 1:1 for both photos and videos.
- Resolution. The resolution depends on whether front camera or rear camera is used.
For aspect ratio, you may consider:
- 16:9 if the photo or video are mainly viewed in PCs and TVs, or shared through online services like YouTube.
- 4:3 if you may print photos on standardized photo papers.
- 4:3 if the video will be mainly viewed in very old TVs, or shared through MMS or email.
- 1:1 if you will use it for design.
For the resolution of photo, you may consider
- 12M (4032*3024, 4:3) if you plan to print the photo in 8R or larger photo papers,
- 6.2M (2880*2160, 4:3) if you plan to print the photo in a 4R or smaller photo paper
- 9.1M (4032*2268, 16:9) if you mainly view photos on PC or TV or share them on social networks.
The post How to set Galaxy S7 camera picture size and video size on Galaxy S7 and Galaxy S7 edge? appeared first on Galaxy S7 Guides.
Galaxy S7 performance mode in Android Nougat update for Galaxy S7 and Galaxy S7 edge
simonAndroid Nougat update for Galaxy S7 and Galaxy S7 edge introduced Galaxy S7 performance mode optimized for different usage scenarios: gaming, entertaining, and high performance.
What is Galaxy S7 performance mode in Android Nougat update for Galaxy S7 and Galaxy S7 edge?
Different owners may use Galaxy S7 or S7 edge very differently. Even one owner may use the phone differently during different periods.
Such different usages may have different requirements for hardware and software optimization to get the best user experience.
One-size-fits-all type configuration is almost impossible to deliver the best user experience, even Galaxy S7 and Galaxy S7 edge have top-notch hardware specs.
Samsung tried to address this issue with Galaxy S7 performance mode in Android Nougat update for Galaxy S7 and Galaxy S7 edge.
Each Galaxy S7 performance mode is designed for a specific usage scenario: gaming, entertaining, high performance,
By default, after applying Nougat udpate, Galaxy S7 and Galaxy S& edge will enter “optimized” mode, which is optimized for normal daily usage.
For example, the optimized mode set the screen resolution to full HD 1080p, instead of the WQHD 1440p. Of course, you can change Galaxy S7 screen resolution and change screen zoom level.
If you need to use Galaxy S7 or Galaxy S7 edge for gaming, watching videos, or for maximum performance, you can then change and customize Galaxy S7 performance mode.
What are the 3 Galaxy S7 performance modes in Android Nougat update for Galaxy S7 and Galaxy S7 edge?
In addition to the default optimized mode, Galaxy S7 and S7 edge offer 3 additional pre-defined performance modes in Android Nougat update for Galaxy S7 and Galaxy S7 edge.
Of course, you can further customize any of these 3 Galaxy S7 performance modes.
1. Game mode
Game mode is optimized for gaming experiences.
By default, when you choose game mode for Galaxy S7 performance mode, the screen brightness will increase by 10% automatically, screen resolution will be adjusted to full HD 1080p, game tools and game launcher will be activated instantly.
As mentioned, you can also customize the default profile. For example, set default screen resolution in game mode as WQHD 1440p.
2. Entertainment mode
Entertainment mode is optimized for watching videos and listening music.
When this Galaxy S7 performance mode is enabled, by default, the screen resolution will be adjusted to WQHD, video enhancer will be turned on. UHQ upscaler for music and video will also be turned on automatically.… Read the rest
The post Galaxy S7 performance mode in Android Nougat update for Galaxy S7 and Galaxy S7 edge appeared first on Galaxy S7 Guides.
How to download and install additional Galaxy S7 camera modes?
simonWhen you need install additional Galaxy S7 camera modes?
As explained in Galaxy S7 camera modes guide page, there are 10 pre-installed camera modes for the rear camera, and 5 for the front camera.
Although these 15 pre-installed camera modes probably are sufficient for most owners of Galaxy S7 or Galaxy S7 edge, some owners may still want to install additional Galaxy S7 camera modes to take some special photos.
Currently, Samsung released the following 6 additional Galaxy S7 camera modes free of charge:
- Beauty face.
- Sports shot.
- Animated GIF.
- Dual camera.
- Rear-cam selfie.
- Surround shot.
You can download and install additional Galaxy S7 camera modes from camera app in Galaxy S7 or S7 edge.
Please note, the APK files for these additional Galaxy S7 camera modes are different from those for the same camera mode in Galaxy S6 or Note 5.
You should download the correct APK files through your Galaxy S7 camera app, and not to use the old APK files.
How to download and install additional Galaxy S7 camera modes?
To download and install additional Galaxy S7 camera modes, you may follow these steps.
Step 1: Launch Camera app on Galaxy S7 or Galaxy S7 edge
To launch camera app on Galaxy S7 and S7 edge, you can use any of the 4 methods, including quick launch detailed in this guide.
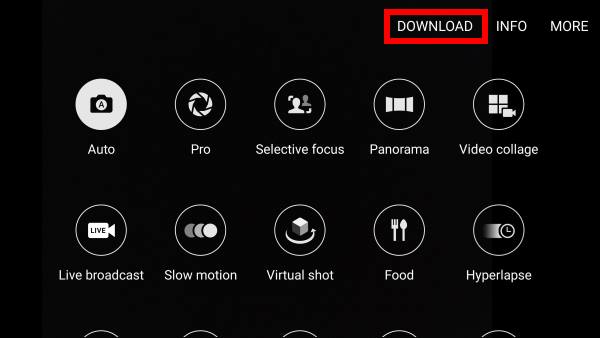
Step 2: Enter Galaxy S7 camera mode page
In Galaxy S7 camera preview screen, tap MODE as shown below.
In Galaxy S7 camera mode page, tap Download as shown below.

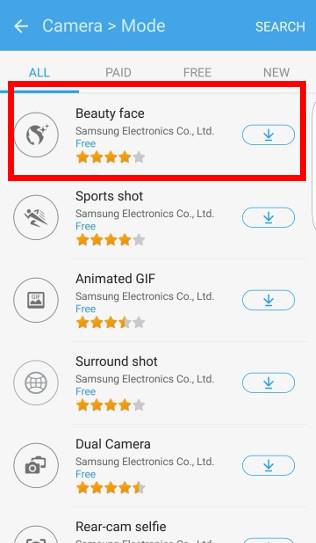
Step 3: Download and install additional Galaxy S7 camera modes
Now, you are directed to a hidden page in Galaxy Apps.
In different regions, this page may be slightly duifferent.
The list of available additional Galaxy S7 camera modes can be found.
Currently, all (6 in total) these additional Galaxy S7 camera modes are from Samsung. And all are free.
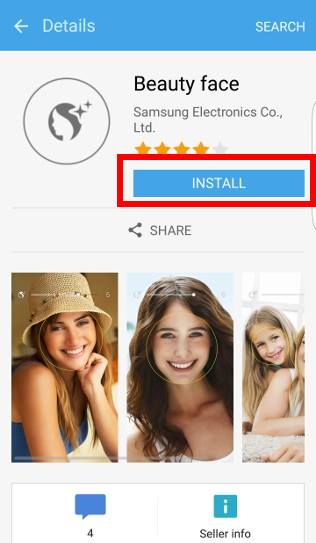
For example, you want to install Beauty face mode for your Galaxy S7 or Galaxy S7 edge.
Tap Beauty face as shown below.
In the Beauty face details page, you can find the screenshots and short description of this camera mode.
Tap INSTALL as shown below.
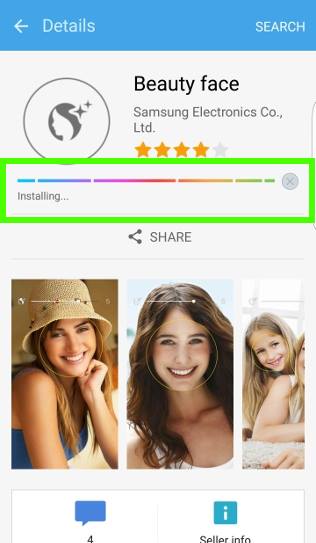
After accepting the permissions, the beauty face mode are installed to your Galaxy S7 or Galaxy S7 edge.
A progress bar as shown below flashes before the installing is finished.
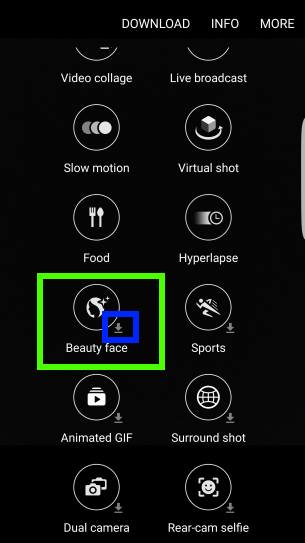
Step 4: Check the additional Galaxy S7 camera modes
Once the installation is finished, you can install other additional camera modes if you want
In Galaxy S7 camera modes page, as shown above, now you can find the newly installed camera modes.… Read the rest
The post How to download and install additional Galaxy S7 camera modes? appeared first on Galaxy S7 Guides.
How to use edge screen on Galaxy S7 edge?
simonEdge screen on Galaxy S7 edge is the unique feature that differs Samsung Galaxy S7 edge from normal Samsung Galaxy S7. It allows you to access your favourite apps, tasks, contacts, and more from various edge panels.
Compared to Galaxy S6 edge and Galaxy S6 edge+, Galaxy S7 edge offers a polished edge screen. It can be very useful even for ordinary users.
Please note, Edge screen on Galaxy S7 edge is a software feature. The curved screen is not a requirement for such a feature. Technically, any Android vendors can implement similar features on any Android phones.
But Samsung only implemented edge screen feature in edge variants of the phones.
Please note, Galaxy S8, Galaxy S8+, Galaxy Note 8, Galaxy S9, Galaxy S9+, and Galaxy Note 9 all have similar edge screen features. So this guide applies to all Galaxy S phones and Galaxy Note phones newer than Galaxy S7. For Galaxy S9 and S9+, you may check this guide.
How to access edge screen on Galaxy S7 edge?
You can access edge screen on Galaxy S7 edge no matter the screen is on or off.
But the edge screen features you can access when the screen is off are different from those when the screen is on.
When the screen of Galaxy S7 edge is off
When the screen is off, you can only view edge feeds including notifications in the edge screen on Galaxy S7 edge.
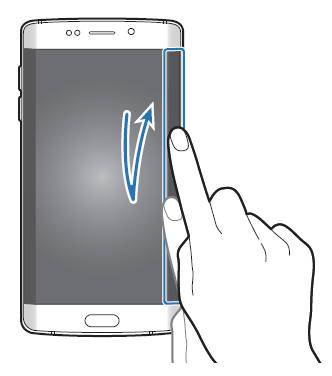
When the screen is off (no matter Galaxy S7 always-on display is on or off), you can quickly swipe your finger along the edge screen in one direction, and then back in the opposite direction.
In other words, you can swipe “V” or “^” in the edge of the screen to wake up edge screen on Galaxy S7 edge as shown below.
When the screen of Galaxy S7 edge is on
When the screen of Galaxy S7 edge is on, you can find the edge handle as shown in Galaxy S7 home screen.
If the edge panel handle is not visible, you can go to Settings — Edge screen — Edge panels, and then tap the switch to activate edge panel handle.
To access edge screen on Galaxy S7 edge when the screen is on, you can drag the edge panel handle towards the centre of the screen. Then, swipe to the left or right to switch between the Edge panels as shown below.… Read the rest
The post How to use edge screen on Galaxy S7 edge? appeared first on Galaxy S7 Guides.
How to use Galaxy S7 multi window new features in Android Nougat udpate for Galaxy S7 and Galaxy S7 edge?
simonMulti window feature was greatly improved in Android Nougat update for Galaxy S7, Galaxy S7 edge, Galaxy S6, Galaxy S6 edge, Galaxy S6 edge+ and Galaxy Note 5.
This page explains how to use Galaxy S7 multi window new features in Android Nougat udpate. If your phone is still running Android Marshmallow (Android 6.0), please check this guide.
Although Galaxy S7 and Galaxy S7 edge are mentioned in the page, this guide applies to all other Samsung phones with Android Nougat update including Galaxy S6, Galaxy S6 edge, Galaxy S6 edge+, Galaxy Note 5.
What are Galaxy S7 multi window new features in Android Nougat udpate for Galaxy S7 and Galaxy S7 edge?
Google finally introduced multi window feature in Android Nougat.
Up to Android Nougat 7.1, only split-screen type multi window feature is available. There is no pop-up view yet.
But for many Samsung Galaxy phone users, multi window has been available since Galaxy Note II in 2012.
In the Android Nougat udpate, Samsung continued to improve this useful feature. The major Galaxy S7 multi window new features in Android Nougat udpate for Galaxy S7 and Galaxy S7 edge include:
- You can use more than 2 apps concurrently. You can run as many apps concurrently in pop-up view as you want.
- Split-screen view action was added to convert current app into split view multi window mode.
- You can launch pop up view directly from Recent tab. In addition to using the pop-up view gesture to convert app to pop-up view mode, you can launch an app in pop-up view directly from Recent tab.
- You can share contents directly between 2 windows (2 apps).
- Status icon for multi window mode is added when you minimize the multi window apps.
For some basic and old features of multi window, you may check this guide.
How to enable Galaxy S7 multi window pop-up view gesture and split screen view action gesture?
As mentioned in this guide, Galaxy S7 multi window has two modes: split screen view (2 apps running side by side) and pop-up view (apps running in front of other apps).
In previous versions, you can use pop-up view gesture to convert an app in normal mode to pop-up view multi window mode.
In Android Nougat update for Galaxy S7 and Galaxy S7 edge, a new split screen view action gesture was added to allow you to convert an app in normal mode to split screen view multi window mode.… Read the rest
The post How to use Galaxy S7 multi window new features in Android Nougat udpate for Galaxy S7 and Galaxy S7 edge? appeared first on Galaxy S7 Guides.
How to use Galaxy S7 always-on display?
simon
Update 2, added section: new features for Galaxy S7 always-on display. Recently updated Galaxy S7 always-on display now allows you to enable always on display on S View Window when a S View cover is snapped on Galaxy S7 or Galaxy S7 edge. Clock face now is renamed as layout with more clock faces.
Update 1, added section: Limitations of Galaxy S7 always-on display.
One of the best features in Galaxy S7 and Galaxy S7 edge is the always-on display.
This post tries to explain to you what Galaxy S7 always-on display (AOD) is and how to configure and use Galaxy S7 always-on display in Samsung Galaxy S7 and Galaxy S7 edge.
Please note Galaxy S7 always-on display is available in both Galaxy S7 and Galaxy S7 edge. In the post, I will just refer them as Galaxy S7.
What is Galaxy S7 always-on display (AOD)?
Very often, we check our smartphones just for time or for notifications. In this situations, we may have no intention to unlock the phone and use it.
But to check time or notification on Galaxy S7 lock screen, we must wake up (turn on) the display by pressing power button or home button (see this page for Galaxy Sy7 layout of buttons).
Now, Galaxy S7 always-on display, if enabled, can display clock, notifications and a image all the time except when Galaxy S7 is in your pocket.
It is a cool feature for some Galaxy S7 owners.
The super AMOLED display in Galaxy S7 does not drain battery significantly if you choose black background.
The Galaxy S7 always-on display is different from Galaxy S7 lock screen. Galaxy S7 always-on display will disappear automatically when you wake up the screen.
In other words, you get the lock screen when you wake up the phone. Galaxy S7 always-on display is activated only after screen is timed out and phone is locked.
When will you need Galaxy S7 always-on display?
In many situations, you may find Galaxy S7 always-on display is useful, for example,
- During a meeting, you can just glimpse on Galaxy S7 screen to know the time, the missed calls, the incoming messages…
- In your office or cubicle, you can easily check time and notifications when your hands are not free.
- In kitchen, your hands are busy with other things.
- In the bed, when you want to check time.
Anyway, although Galaxy S7 always-on display looks like another gimmick, it actually is very useful for some Galaxy S7 and Galaxy S7 edge owners.… Read the rest
The post How to use Galaxy S7 always-on display? appeared first on Galaxy S7 Guides.
How to wipe cache partition on Galaxy S7 and Galaxy S7 edge?
simonWhy (and when) you want to wipe cache partition on Galaxy S7 and Galaxy S7 edge?
Cache partition is a special and separated region in the storage where Android saves frequently accessed data and app (including system apps) components in a special format.
The main purpose of cache partition in Android is to make the system “faster” by serving data and files in a special format from a specific location.
But occasionally, cache partition may becomes a problem in performance or system stability and you may want to wipe cache partition on Galaxy S7 or S7 edge.
For example, you may consider to wipe cache partition on Galaxy S7 and Galaxy S7 edge:
- after a major system update. Although the update agent will wipe cache partition on Galaxy S7 and Galaxy S7 edge during the update and rebuild the partition, some problems may occur when migrating data and apps thereafter.
- when Galaxy S7 and S7 edge suddenly becomes very slow. If the internal storage is sufficient and reboot the phone does not solve the issue, often, it is time to clear cache partition.
- when random apps crash frequently. You may try to reboot the phone first to see whether the problem persists because sometimes the problem is caused by non-responsive system services. If this is the case, a reboot should solve the issue. But if the reboot does not solve the issue, you may consider to wipe cache partition on Galaxy S7 and Galaxy S7 edge.
- when battery life is consistently poor. If you find battery life (usually screen-on time) is consistently poor (less than 3 hours, for example) without obvious abnormalities, you may try to wipe Galaxy S7 cache partition to see whether it helps.
Although it is simple to wipe cache partition on Galaxy S7 and Galaxy S7 edge, you may seek assistance in Samsung service center if you are not comfortable to do it by yourself.
Is it safe to wipe cache partition on Galaxy S7 and Galaxy S7 edge?
As cache partition is separated from your data and files in the storage, it is safe for your data and settings when you wipe cache partition on Galaxy S7 and Galaxy S7 edge.
In other words, your files, settings, apps will NOT be affected when clearing cache partition.
Will wiping cache partition on Galaxy S7 and Galaxy S7 edge free up my internal storage?
The post How to wipe cache partition on Galaxy S7 and Galaxy S7 edge? appeared first on Galaxy S7 Guides.
How to customize Galaxy S7 quick setting buttons after Android Nougat update?
simonAndroid Nougat udpate for Galaxy S7 and S7 edge allows you to further customize Galaxy S7 quick setting buttons, including, adjusting button layout and ordering these quick setting buttons.
If your phone is still running Marshmallow, please check this guide.
What are the changes for Galaxy S7 quick setting buttons in Android Nougat update?
After applying Android Nougat update for Galaxy S7 and S7 edge, you may noticed the quick setting buttons (icons) were changed.
It seems it is part of Samsung’s design overhaul for material design.
In addition to the aesthetic update, there are four major changes:
- The swipe (left or right) gesture in notification panel is no longer working for the top row of quick setting buttons. There are now up to 6 buttons only (instead of 10 in two panels in previous versions).
- You can customize the layout of the quick settings buttons: 3×3, 4×3 or 5×3.
- New buttons were added, including, performance mode, data saver, private mode, phone visibility, blue light filter and smart view.
- Brightness control can be placed above notifications, or below the 3-row quick setting buttons. You decide!
- You can add buttons of third-party apps to quick setting buttons.
Please note, the size of quick setting buttons is a bit smaller. If you want to make it bigger, you can change screen zoom level.
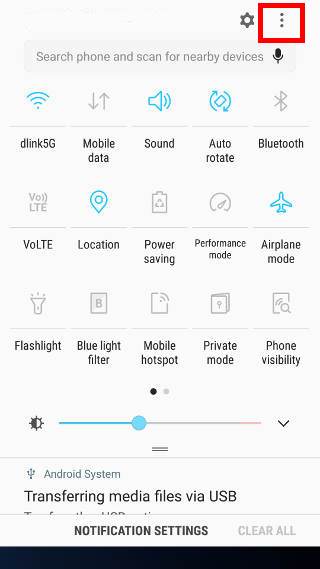
How to customize Galaxy S7 quick setting buttons after Android Nougat update?
In the notification panel, only first 6 quick setting buttons will be shown after Android Nougat update.
As in previous versions of Android, you can swipe down again from notification panel to access Galaxy S7 quick setting buttons with Android Nougat update.
You can also swipe down with two fingers from the status bar to access Galaxy S7 quick setting buttons.
In the quick settings button, you can tap the menu key (3 vertical dots) as shown below.
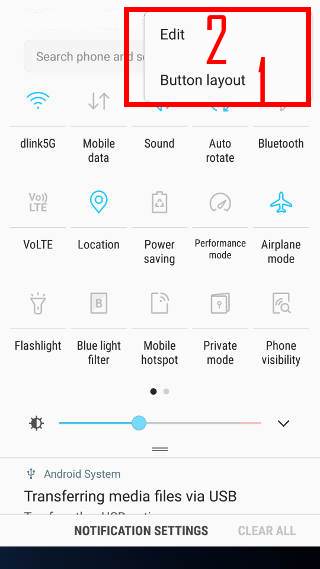
You will then have two options for customizing Galaxy S7 quick setting buttons after Android Nougat update:
- Button layout (marked as 2 in the screenshot below). This is a new option for customizing quick setting buttons in Android Nougat udpate.
- Edit (marked as 1). This option allows you to order the buttons.
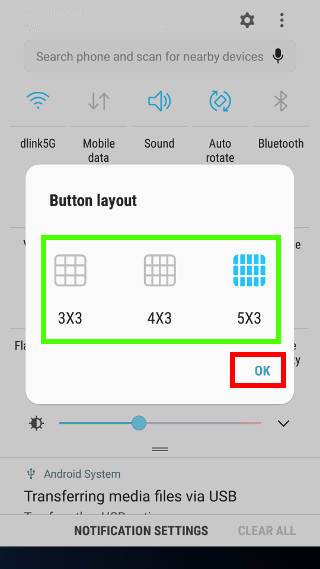
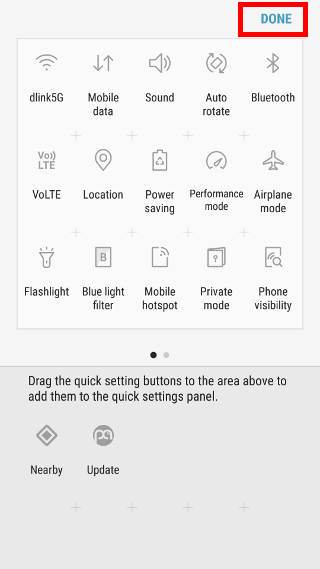
As shown above, you can use one of the three button layout: 3×3, 4×3 or 5×3, to customize Galaxy S7 quick setting buttons after Android Nougat update.
After you choose the desired button layout, you need tap OK button as shown above to apply the change.… Read the rest
The post How to customize Galaxy S7 quick setting buttons after Android Nougat update? appeared first on Galaxy S7 Guides.
Samsung Galaxy S7 How-to guides
simon About Samsung Galaxy S7 How-to guides
 About Samsung Galaxy S7 How-to guides
Samsung Galaxy S7 How-to Guides will help you to explore and better use some important Galaxy S7 features.
All these Galaxy S7 guides include very detailed step-by-step instructions. All Galaxy S7 owners can easily follow these Galaxy S7 how-to guides.
We release new Galaxy S7 how-to guides regularly. So, bookmark this page because this Galaxy S7 guides page will be updated regularly.
All Galaxy S7 how-to guides are tested vigorously before they are released. This makes sure these guides should work on most Galaxy S7 devices (Galaxy S7 and Galaxy S7 edge) in all regions .
You may also check Galaxy S7 online user manual page for using some common features in Galaxy S7 and Galaxy S7 edge.
If you want to download the official Galaxy S7 user guide (in PDF) in your own language, you may check this Galaxy S7 user manual page and Galaxy S7 edge user manual page.
If you cannot find the Galaxy S7 how-to guides you are looking for, please feel free to leave you questions or problems in the comment box below. The community will try to find a solution or an answer for you.
List of Samsung Galaxy S7 How-to guides
-
Meaning of Galaxy S7 notification icons and status icons?
-
Switch to Galaxy S7: how to transfer data from your previous device to Samsung Galaxy S7 with Smart Switch?
It is very easy to switch to Galaxy S7 thanks to Smart Switch. You can even migrate old phone data to Galaxy S7 without installing any apps. This Galaxy S7 how-to guide shows you how to use USB cable to connect your old phone (Android, iPhone or BlackBerry) to Galaxy S7, and migrate all your data and apps to Galaxy S7. This is the easily one to migrate phone data to Galaxy S7. Read on….
-
How to use Galaxy S7 always-on display (AOD)?
Galaxy S7 always on display (AOD) allows you to choose an image or a clock or other information to display instead of turning off the screen for your Galaxy S7 and Galaxy S7 edge. Without waking up the phone, you can check time, notifications and calendar. This Galaxy S7 how-t0 guide shows you how to enable and customize Galaxy S7 always-on display (AOD). Read on.…
-
How to hide apps screen on Galaxy S7 and Galaxy S7 edge and show all apps on Galaxy S7 home screen?
The post Samsung Galaxy S7 How-to guides appeared first on Galaxy S7 Guides.
Top 7 new features in Android Nougat update for Galaxy S7 and Galaxy S7 edge
simon Samsung started to release the Android Nougat update for Galaxy S7 and Galaxy S7 edge. There are some new features and improvements in this Android Nougat update.
This post will explain to you the top 7 new features in Android Nougat update for Galaxy S7 and Galaxy S7 edge. You may check Galaxy S7 and Galaxy S7 edge Android Nougat update guide for detailed guides on how to use the new features in Android Nougat update.
For the updated user guide in your own languages, you may check official user manual for Galaxy S7 with Android Nougat update page.
If you have a non-Samsung phone with Android Nougat, some of the features discussed below may be not available in your device. You may check Android Nougat guides.
Grouped notifications and quick action
In Android Nougat, multiple notifications from the same app are now grouped.
And you can also take a quick action in the notification panel directly. The quick actions supported are offered by individual app developers. In other words, quick actions you can use are limited by individual apps.
Actually, in the recalled Galaxy Note 7 (with Android Marshmallow), Samsung already implemented the bundled notification through the new UI.
Now, in Galaxy S7 and Galaxy S7 edge, grouped notification and quick action is natively supported. This means more apps will support direct action in the notification panel.
Launcher shortcut support
Another new feature in Android Nougat update for Galaxy S7 and Galaxy S7 edge is shortcut (quick action) support in launcher.
In Marshmallow, by default, in Galaxy S7 home screen, when you tap and hold an app icon, you have the option to remove it from the home screen. In addition, you can move it to other home screen panels. These options are universal: for all apps.
In the Android Nougat update for Galaxy S7 and S7 edge, you now have some app specific options. For example, if you tap and hold Google Play store app, in addition to the two universal options, you have an app specific option: my apps. In other words, you can enter My Apps page in Google Play app directly from Galaxy S7 home screen. Google Keep app has even more options.
Such options is similar to widgets. Of course, only app developer can add such options. Android Nougat and the the launcher simply support it.
Launcher shortcut support works in Galaxy S7 apps screen as well.… Read the rest
The post Top 7 new features in Android Nougat update for Galaxy S7 and Galaxy S7 edge appeared first on Galaxy S7 Guides.
How to use Galaxy S7 S View cover (for S7 and S7 edge)?
simon What is Galaxy S7 S View cover?
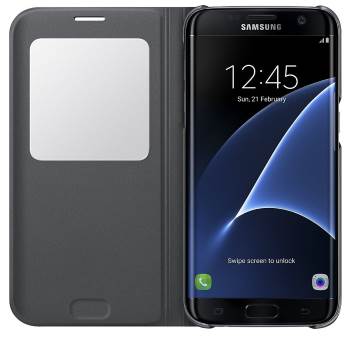
Galaxy S7 S View cover (and Galaxy S7 edge S View cover) , as shown left is a special folio-type flip cover with a special plastic window, S View window. It is one of the official accessories for Galaxy S7 and Galaxy S7 edge.
Samsung first introduced S View cover for Galaxy S4 in 2013. Initially the S view window was a small rectangle. Since Galaxy Note 3, the S View window became larger (close to a square) as shown in this guide.
Different from other brands of flip covers, S view cover offers additional features through the plastic S View window. The features offered in S View window changed with time and phone models.
Prior to Galaxy S6, you have to remove the back cover to use S View cover. Because Galaxy S6 (and S6 edge), Galaxy Note 5 and Galaxy S7 (and S7 edge) have non-removable back panel, Galaxy S7 S View cover have to snap on the phone.
Galaxy S7 S view cover (and Galaxy S7 edge S view cover) offers the following special features:
- Auto sleep and auto wake. When you close the front lid of S view cover, Galaxy S7 or S7 edge will automatically sleep. The screen will wake up once you open the front lid. If you lock screen security is set as swipe or none, opening the front lid will direct you to Galaxy S7 home screen.
- Answering and rejecting calls from S View window. You can answer or reject calls by swiping on the S View window as instructed.
- Take photos or record videos from S View window.
- Check notifications from S View window. This follows your lock screen notification settings.
- Share same app shortcuts in S View window as Galaxy S7 lock screen.
- Control music playing in S View window.
- Check time, weather and status icons from S view window.
- Use quick setting buttons (first 10) in S view window. You can use the first 10 quick setting buttons from S View window to change phone settings and features.
- Set separate wallpaper for S View window.
So, in addition to protecting the phone (and the screen), Galaxy S7 S view cover offers these exclusive features. These features can be very useful for some Galaxy S7 or S7 owners.
Please note, in the market, only Samsung’s Galaxy S7 S view cover offers such features.… Read the rest
The post How to use Galaxy S7 S View cover (for S7 and S7 edge)? appeared first on Galaxy S7 Guides.
How to access Google Settings on Galaxy S7 and Galaxy S7 edge?
simon
Update: Samsung moved the Google settings back to the standard location in Galaxy S7 and Galaxy S7 edge in a May update. You can access Google settings in Galaxy S7 and S7 edge as in other Android devices at Settings–– Google.
What is Google Settings on Galaxy S7 and Galaxy S7 edge?
Google settings on Galaxy S7 and Galaxy S7 edge is a centralized app for you to set almost everything related to your Google account and Google services on the phone. These include:
- Your Google account: Account sign-in, and security, personal info and privacy, and account preferences;
- Google services: Ads, connected apps, data management, Google Fit, Google Photos backup, location, Nearby, Play Games, Search & Now, Security, setup nearby device, and smart lock for passwords.
Some Google settings can also be accessed from individual apps.
For example, Google Photos backup settings can be done in Google Photos app.
Search and Now settings can be set in Google app (Google Now app, or Google Search app).
But a centralized location for most Google settings is convenient for most Android users.
In previous versions (since Android Jelly Bean), Google tried to put more and more settings into this centralized Google Settings.
Prior to Android Marshmallow, you can find the Google Settings app icon (shown above) in the apps screen (app drawer)
Where is Google Settings on Galaxy S7 and Galaxy S7 edge?
But when you get your Samsung Galaxy S7 or S7 edge, you may immediately find you cannot find the Google Settings icon for as shown in the beginning of this page.
It is not in Galaxy S7 Apps screen.
It is not in Galaxy S7 Home screen.
It is not in any app folders.
Then, where is Google Settings on Galaxy S7 and Galaxy S7 edge?
Yes, some nerds may tell you Google Settings has a dedicated entry in the Settings in Android Marshmallow.
But when you check Galaxy S7 Settings, you still cannot find Google Settings on Galaxy S7 and Galaxy S7 edge.
If you try to Search Galaxy S7 settings, it will not return Google Settings either.
Did Samsung remove Google Settings on Galaxy S7 and Galaxy S7 edge?
Of course, not.
Samsung put Google Settings entry under Settings–Applications on Galaxy S7 and Galaxy S7 edge.
You can find Google settings after Samsung apps settings.… Read the rest
The post How to access Google Settings on Galaxy S7 and Galaxy S7 edge? appeared first on Galaxy S7 Guides.
Enjoy your Galaxy S7.